Forum sponsored by:

Nemetts 15cc engine
attenpting to build this.
| Steve Withnell | 30/08/2011 18:40:12 |
 858 forum posts 215 photos | I'm impressed at the rate you are getting on with the build! Took me about 18 months to build the Nemett!
You've also got a nice smooth taper on the front crankcase half - mine has a sartorial corduroy finish, as I didn't have the gibs adjusted quite right! It's very uniform, so I could claim it was deliberate!
Do post the video of it running, it's a great noise -
Steve
|
| wheeltapper | 30/08/2011 19:25:06 |
 424 forum posts 98 photos | Hi You may have a long wait, I hope you're patient. the job that worries me is the head, so many things to go wrong.  and the cams, and the..................well you get the picture. and the cams, and the..................well you get the picture.I had trouble turning tapers on my lathe because no matter what I did as I turned the topslide handwheel (only one handle) the top wobbled as the handle went round and the cutter went in, out, in, out and I got a scalloped effect. now what I do is turn the handwheel by the centre nut with a box spanner,no more wobble. Roy BTW I dont have a video camera but if its as noisy as you say you'll probably hear it anyway.  Edited By wheeltapper on 30/08/2011 19:27:27 |
| JasonB | 30/08/2011 19:32:20 |
 25215 forum posts 3105 photos 1 articles | I was alway tought that you shoul use both hands on the wheel and not the handle, this allows a constant feed and stops that tendancy to lift the slide as the handle comes up.
If its a long taper one of the electric screwdrivers works well on the nut, not a cordless, they are too fast.
J Edited By JasonB on 30/08/2011 19:33:01 |
| Steve Withnell | 30/08/2011 21:06:33 |
858 forum posts 215 photos | I must admit the head was the one component that had me worried. In the end the only thing I screwed up was milling the locating square on the top, everything else was just a load of patience and keep re-reading Nemett's article on the build. One thing to watch is avoiding clamping marks on the head, I'm a bugger for not taking care in that department!
The Cams didn't turn out too difficult, but I did have a DRO on the mill Z-feed by then, it would have been impossible on my Warco mill as the mechanical readout is hopeless for close tolerance stuff. In the article Nemett uses loctite to fix the cams, I was a bit doubtful but they have held tight no problem.
The scalloped effect you described sounds just like the issue I had, but adjusting the top slide gibs fixed it for me.
|
| wheeltapper | 30/08/2011 21:37:44 |
424 forum posts 98 photos | deleted, double post. Edited By wheeltapper on 30/08/2011 21:41:28 |
| wheeltapper | 30/08/2011 21:37:47 |
424 forum posts 98 photos | Steve I just looked at your pics of this engine and noticed you don't have a breather pipe to the cam box. is that only necessary on the petrol version? Roy |
| wheeltapper | 03/09/2011 21:17:33 |
424 forum posts 98 photos | Hi bit more done. piston rings made and fitted and con rod made and fitted with bearing. 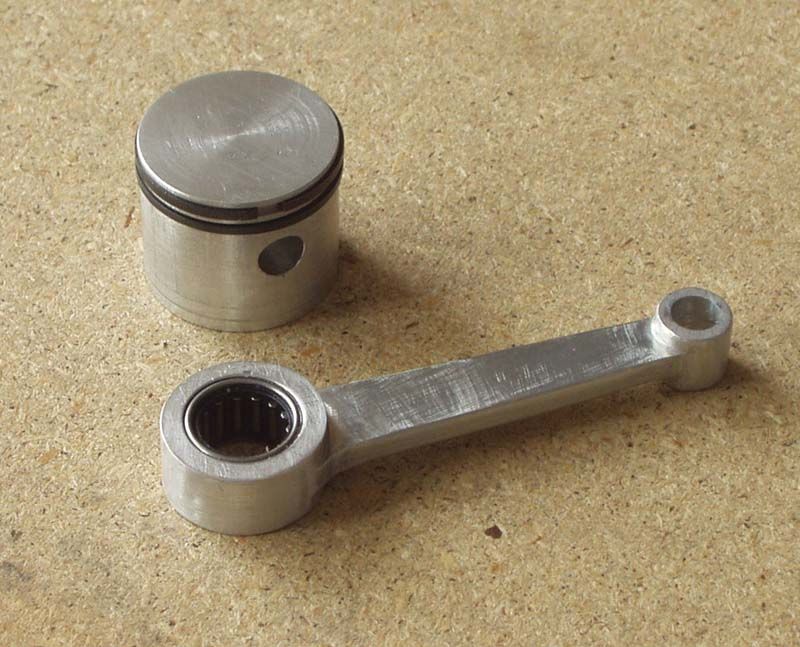 more soon. Roy |
| Steve Withnell | 04/09/2011 14:42:01 |
858 forum posts 215 photos | Hi Roy,
Don't think the glow plug version needs the breather, I didn't accidentally omit it and I'd never made an engine before, so I will have stuck to Nemett's article to the letter as I had no experience to rely upon. I did put a couple of drops of oil in the cam housing before I started it up and after that there was plenty of oily smoke every where!
You are doing a cracking job of this - you can't avoid the head much longer! Just keep measuring twice, checking twice and cutting once and it will come out just fine!
Steve
|
| Steve Withnell | 04/09/2011 14:46:58 |
858 forum posts 215 photos | One thing I do remember from the build which I did forget, was that Nemett recommended the use of a split pin to retain the prop nut as he'd had his prototype backfire and kick the prop off. I simply used a nyloc nut. I didn't experience the engine kicking back on the few occasions I ran the engine, so maybe the timing on mine was slightly off. |
| wheeltapper | 04/09/2011 16:55:24 |
424 forum posts 98 photos | Hi I remember reading about him nearly scalping himself. he recommended a circlip but I was giong to use a split pin. I couldn't figure out how to do up a nyloc nut without holding the shaft somehow. stop press!!! I've started on the head. so far I've done the valve holes and the fixing holes from the underneath, and turned it to finished depth. I splashed out on a rotary table, very handy gadget. Roy |
| Ramon Wilson | 05/09/2011 09:46:20 |
 1655 forum posts 617 photos | Roy, Steve,
Speaking from personal experience a prop continually loosening or indeed spinning off all together is definitely not ideal
 . .Personally I think the circlip idea to prevent total 'loss' is better than the split pin if for no other reason than asthetics though either could catch an unwary finger if run exposed. A split pin will have to be continually straightened for removal too. However niether will actually prevent the prop from loosening as it fires and kicks back which is the root of the problem.
Though I have no experience with them directly I know model four strokes have a far greater propensity to throw a prop than two strokes but it happens with these quite often too.
When flying/competing in C/L aerobatics there is only one minute allowed to start and
get airborne. A loose prop in that situation then is a definite no-no.
I found that introducing a paper 'washer' cut from 240/320 grit wet and dry between the driver and the back of the prop (grit toward the prop) virtually eliminated this problem both on wooden and 'plastic' props. On some aircraft there was the need to space the spinner backplate out from the prop driver to clear the fuselage and these spacers were made from nylon. Again wet and dry washers were used between all surfaces with total success.
It's a simple tip but works well certainly worth trying to see if it will do the same in your situation.
Small, short, drive peg/pegs can also be incorporated into the driver to match a shallow hole/holes in the prop but a paper washer is much easier to produce
 Like wise by drilling a radial hole in the prop driver to accomodate a 'tommy' bar when tightening the prop nut if you decide to use a nylok - though it's hardly likely to cause an effect, by drilling two or three the balance remains and is more asthetic.
Hope this is of use/interest
regards - Ramon
Edited By Ramon Wilson on 05/09/2011 09:49:16 |
| wheeltapper | 17/09/2011 17:09:43 |
424 forum posts 98 photos | Hi a bit more done, the cambox. 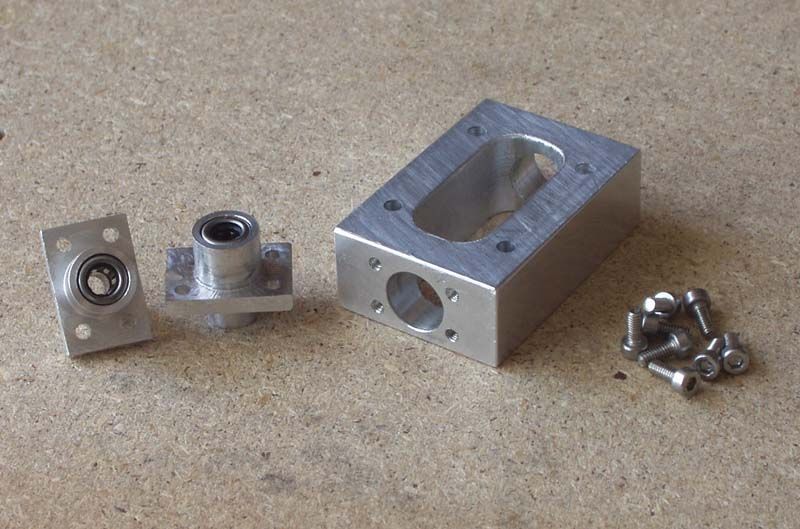 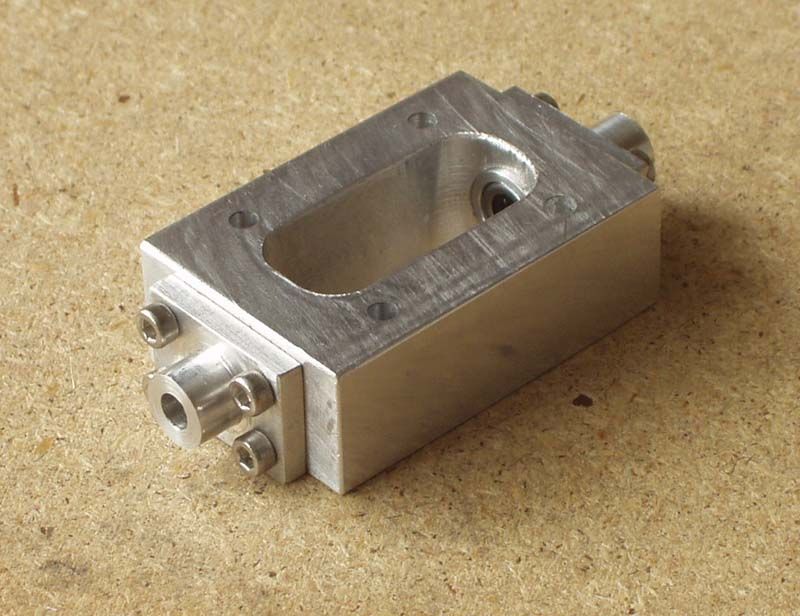 its coming along, bit by bit. Roy |
| Steve Withnell | 17/09/2011 19:40:47 |
858 forum posts 215 photos | Hey Roy - you avoiding the cylinder head? I can see all the parts getting done, except the head!
Steve
|
| wheeltapper | 17/09/2011 21:04:36 |
424 forum posts 98 photos | Hi Steve. Not really, I've drilled the valve and bolt holes and turned it down to the correct height, I'm waiting for some milling cutters to arrive so I can counterbore the holes then I can get on with the rest of it. I'll keep you up to date with pics as I progress. cheers Roy |
| wheeltapper | 27/09/2011 13:12:27 |
424 forum posts 98 photos | HI are you still watching Steve, I'm not avoiding the head any more. top 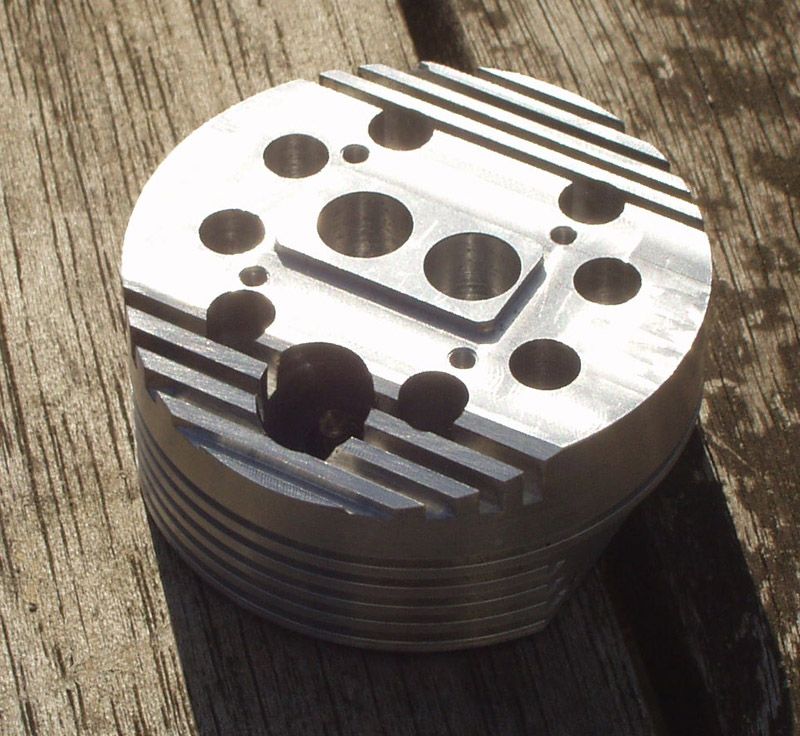 bottom 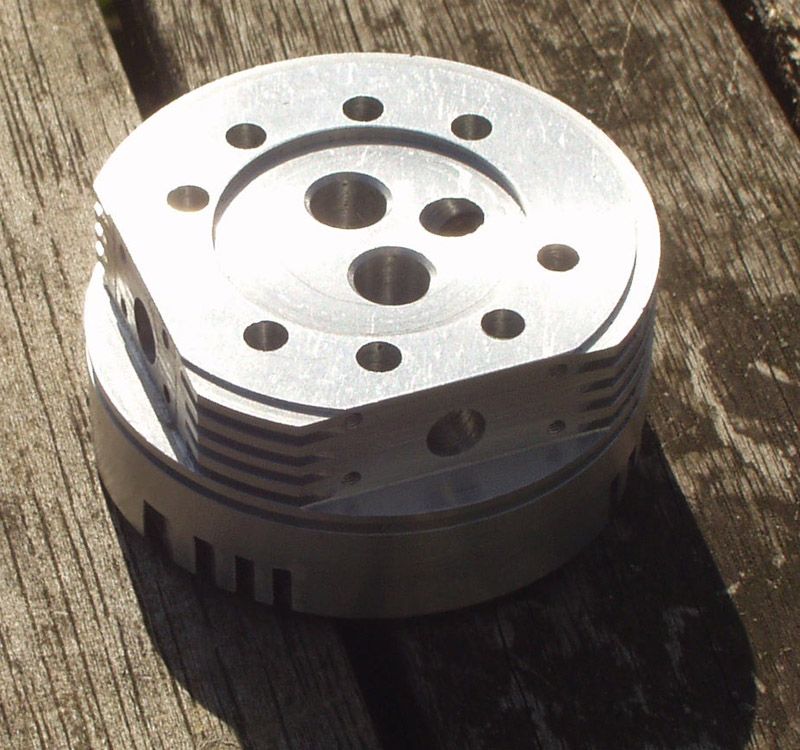 and finally all dressed up 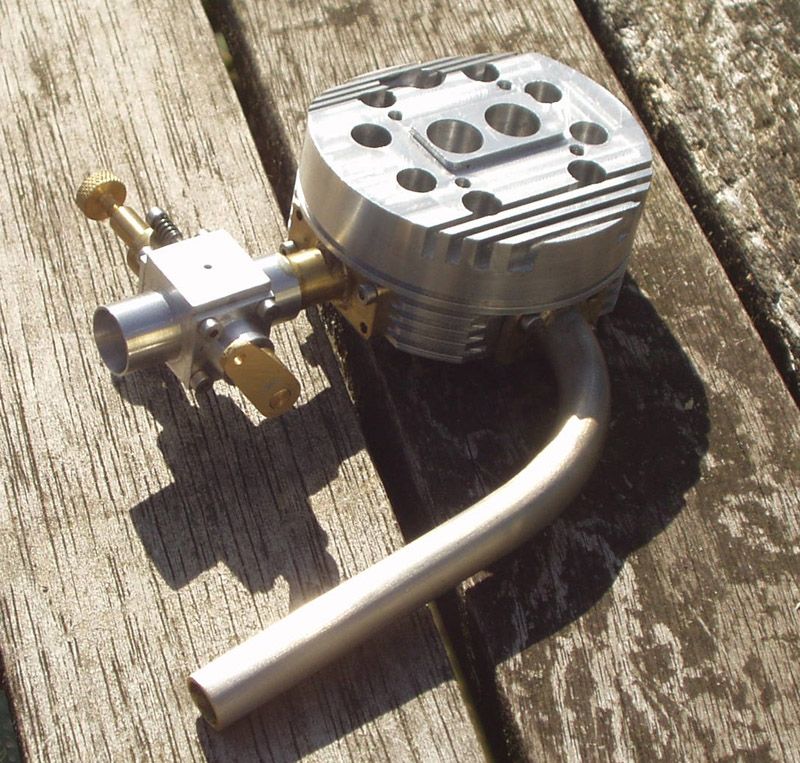 I just need some phosphor bronze for the valve guides. when I recover from doing this I'll have a go at the camshaft, cutting the cams should be fun, I'll need a "do not disturb" sign. Cheers Roy |
| Steve Withnell | 27/09/2011 18:19:25 |
858 forum posts 215 photos | Very nice indeed! no sign of any "oops!" unlike mine!.
I can hear a 4 stroke burble coming on soon...
|
| wheeltapper | 27/09/2011 18:34:53 |
424 forum posts 98 photos | there are a few near oop's's . for a start the inlet hole is 6mm instead of 7.5 because it was too close to a bolt hole, I sweated a lot tapping the last 4 holes for the exhaust. I had a go at the cams earlier, what a soul destroying job that was, my arm is killing me cranking the mill bed backwards and forwards 360 times. stil, its all supposed to be fun.........................................................................isn't it? cheers Roy |
| wheeltapper | 28/09/2011 16:55:08 |
424 forum posts 98 photos | me again a bit more done, cams cut and fitted. 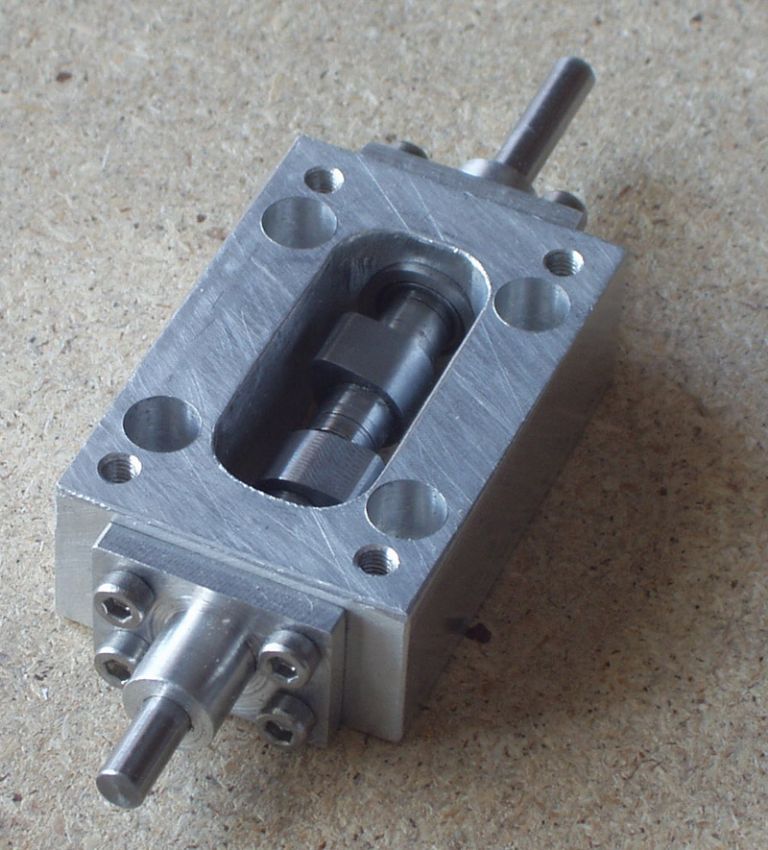 watch this space Roy |
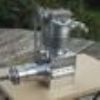
| wheeltapper | 30/09/2011 13:39:54 |
424 forum posts 98 photos | Hi I thought I'd stick it all together temporarily to see what it looked like. behold the beast 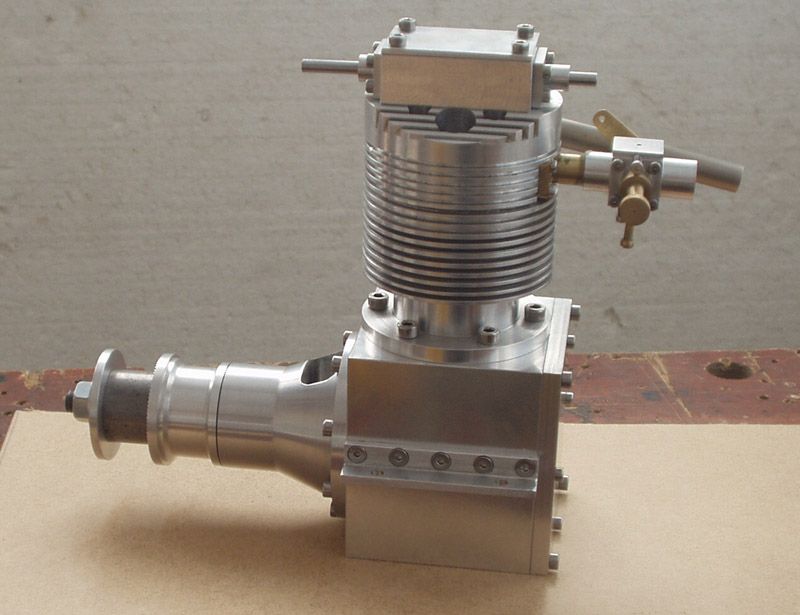 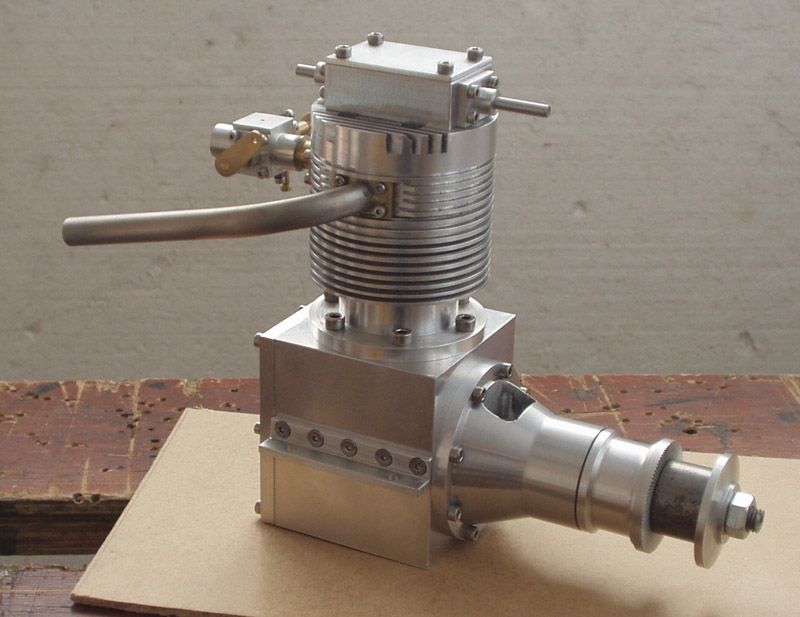 cheers Roy |
| Clive Hartland | 30/09/2011 15:59:43 |
 2929 forum posts 41 photos | Now for a nice bit of anodising Roy, The head in Red and the cylinder in deep Blue and the crankcase Black.
Very good work there Roy and you should be proud of what you have made.
It should run well!
Clive |
Please login to post a reply.
Magazine Locator
Want the latest issue of Model Engineer or Model Engineers' Workshop? Use our magazine locator links to find your nearest stockist!
Sign up to our Newsletter
Sign up to our newsletter and get a free digital issue.
You can unsubscribe at anytime. View our privacy policy at www.mortons.co.uk/privacy
Latest Forum Posts
- hemingway ball turner
04/07/2025 14:40:26 - *Oct 2023: FORUM MIGRATION TIMELINE*
05/10/2023 07:57:11 - Making ER11 collet chuck
05/10/2023 07:56:24 - What did you do today? 2023
05/10/2023 07:25:01 - Orrery
05/10/2023 06:00:41 - Wera hand-tools
05/10/2023 05:47:07 - New member
05/10/2023 04:40:11 - Problems with external pot on at1 vfd
05/10/2023 00:06:32 - Drain plug
04/10/2023 23:36:17 - digi phase converter for 10 machines.....
04/10/2023 23:13:48 - More Latest Posts...
- View All Topics
Support Our Partners


Shopping Partners
Subscription Offer

Latest "For Sale" Ads
- Reeves** - Rebuilt Royal Scot by Martin Evans
by John Broughton
£300.00 - BRITANNIA 5" GAUGE James Perrier
by Jon Seabright 1
£2,500.00 - Drill Grinder - for restoration
by Nigel Graham 2
£0.00 - WARCO WM18 MILLING MACHINE
by Alex Chudley
£1,200.00 - MYFORD SUPER 7 LATHE
by Alex Chudley
£2,000.00 - More "For Sale" Ads...
Latest "Wanted" Ads
- D1-3 backplate
by Michael Horley
Price Not Specified - fixed steady for a Colchester bantam mark1 800
by George Jervis
Price Not Specified - lbsc pansy
by JACK SIDEBOTHAM
Price Not Specified - Pratt Burnerd multifit chuck key.
by Tim Riome
Price Not Specified - BANDSAW BLADE WELDER
by HUGH
Price Not Specified - More "Wanted" Ads...
Get In Touch!
Do you want to contact the Model Engineer and Model Engineers' Workshop team?
You can contact us by phone, mail or email about the magazines including becoming a contributor, submitting reader's letters or making queries about articles. You can also get in touch about this website, advertising or other general issues.
Click THIS LINK for full contact details.
For subscription issues please see THIS LINK.
Digital Back Issues


Donate

 Register
 Log-in
Model Engineer Magazine
- Percival Marshall
- M.E. History
- LittleLEC
- M.E. Clock

ME Workshop
- An Adcock
- & Shipley
- Horizontal
- Mill

Subscribe Now
- Great savings
- Delivered to your door

Pre-order your copy!
- Delivered to your doorstep!
- Free UK delivery!
All Forum Topics > I/C Engines > Nemetts 15cc engine