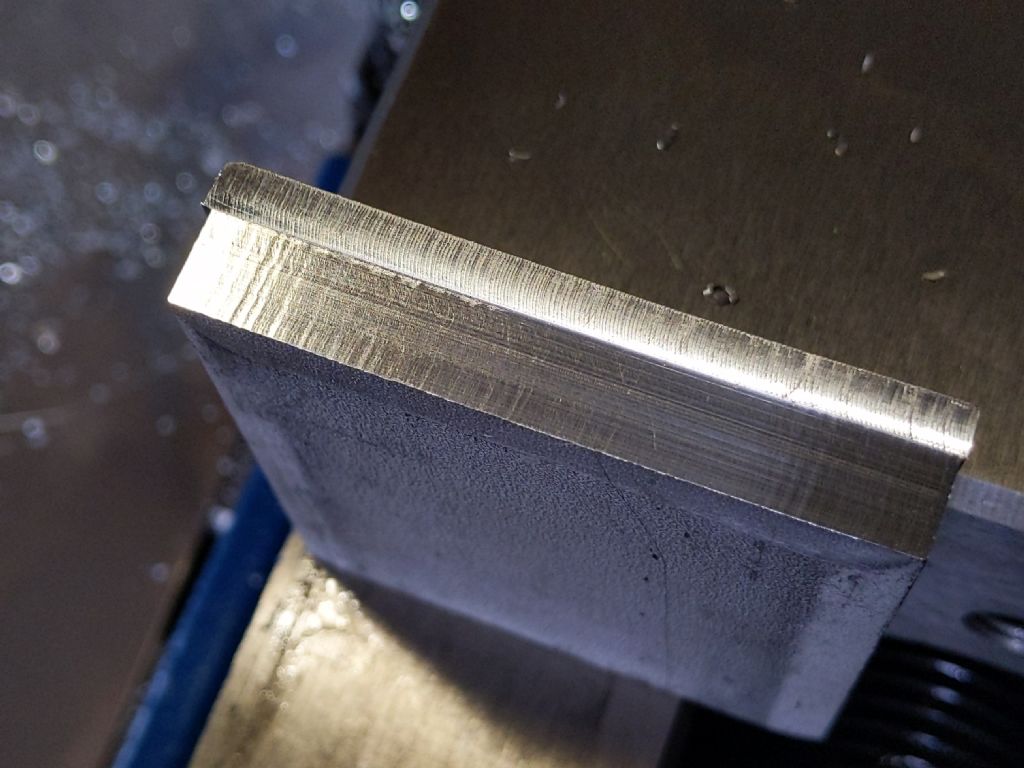
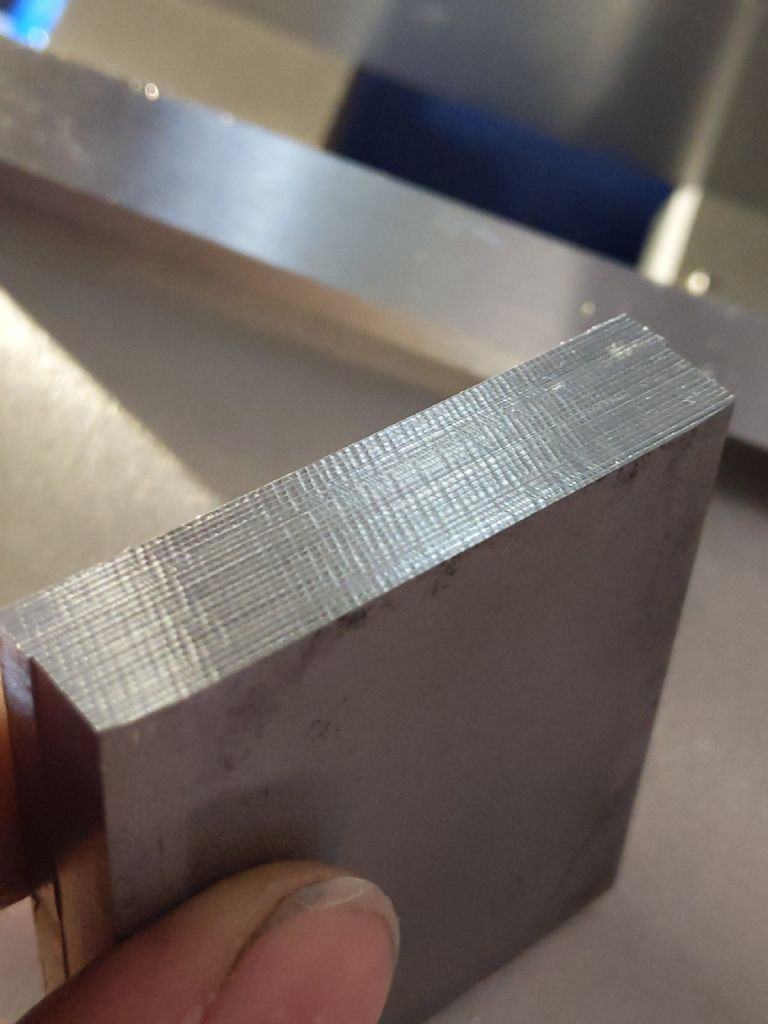
Poor surface surface finish milling steel
| Andrew Johnston | 05/07/2023 10:53:53 |
7061 forum posts 719 photos | Posted by John Doe 2 on 05/07/2023 10:42:59:
Are they designed for that? Yes they are; the name endmill is a misnomer. They are intended for cutting using the side flutes. Andrew |
| s d | 05/07/2023 11:02:52 |
| 30 forum posts 11 photos | So here's the facing vs side milling. I'm happy enough with the face finish, those ridges are fairly even and the surface feels smooth. This is with a 10mm rougher (the side milling was with the 6mm HSS 3F I think). The rougher doing side milling is better than the other tools, it's much more regular, but still has those vertical dents. |
| Martin Connelly | 05/07/2023 11:42:30 |
2549 forum posts 235 photos | Anything that can be done to stiffen the process will help so if all the none moving axes are locked and the stick out of both the spindle in the head and the tool in the collet is reduced to the minimum then the next question is are you tightening the tool in the collet sufficiently to reduce flex. If you are not using a ball bearing ER nut and suitable wrenches to put high torque on the nut and therefore high pressure on the tool shank then the tool position may flex slightly in the collet holder. Martin C |
| John Doe 2 | 05/07/2023 12:32:37 |
441 forum posts 29 photos | Ah, fair enough. Do we know then, if the milling bit is true and regular ? - is it possible to check each flute "diameter" with a DTI? - perhaps one is slightly proud compared to the others. In the same vein; does a DTI show any bend in the driving shaft, as measured against the side of the cutter as it is rotated through 360°.
. Edited By John Doe 2 on 05/07/2023 12:33:28 |
| Dave Halford | 05/07/2023 12:35:41 |
| 2536 forum posts 24 photos | Isn't side milling supposed to be approx. the radius of the cutter in depth so for the 6mm dia cutter three passes would be required for 10mm thick work. |
| s d | 05/07/2023 12:51:04 |
| 30 forum posts 11 photos | Posted by Martin Connelly on 05/07/2023 11:42:30:
Anything that can be done to stiffen the process will help so if all the none moving axes are locked and the stick out of both the spindle in the head and the tool in the collet is reduced to the minimum then the next question is are you tightening the tool in the collet sufficiently to reduce flex. If you are not using a ball bearing ER nut and suitable wrenches to put high torque on the nut and therefore high pressure on the tool shank then the tool position may flex slightly in the collet holder. Martin C Two wrenches as as much as I can tighten it. Could it be the er32 collet holder itself? The machine came with an mt3 keyless chuck.... I could try that instead, or is that a terrible idea 😂. Running out of things to try. Edited By s d on 05/07/2023 12:51:34 |
| s d | 05/07/2023 12:54:24 |
| 30 forum posts 11 photos | Posted by John Doe 2 on 05/07/2023 12:32:37:
Ah, fair enough. Do we know then, if the milling bit is true and regular ? - is it possible to check each flute "diameter" with a DTI? - perhaps one is slightly proud compared to the others. In the same vein; does a DTI show any bend in the driving shaft, as measured against the side of the cutter as it is rotated through 360°.
. Edited By John Doe 2 on 05/07/2023 12:33:28 Runout on the spindle is very good but there is more in the collet holder. Used multiple tools and get similar result difficult to isolate as I only have a keyless chuck alternative. There is flex in the column too. |
| JasonB | 05/07/2023 13:08:50 |
25215 forum posts 3105 photos 1 articles | Posted by Dave Halford on 05/07/2023 12:35:41:
Isn't side milling supposed to be approx. the radius of the cutter in depth so for the 6mm dia cutter three passes would be required for 10mm thick work. Most makers that publish cutting data tend to show 1D to 1.5D on their 4-flute cutters so two passes at the most when also using the usually published 0.1D stepover. It is possible to use more Ap (vertical) depth if the Ae (sideways) stepover is less particularly for the 5 or 6 flute finishing cutters. Don't try the drill chuck The irregular pattern would seem to suggest flexing somewhere rather than a regular pattern that could be attributed to runout. Edited By JasonB on 05/07/2023 13:10:58 Edited By JasonB on 05/07/2023 13:14:19 |
| s d | 05/07/2023 13:55:42 |
| 30 forum posts 11 photos | Posted by JasonB on 05/07/2023 13:08:50:
Posted by Dave Halford on 05/07/2023 12:35:41:
Isn't side milling supposed to be approx. the radius of the cutter in depth so for the 6mm dia cutter three passes would be required for 10mm thick work. Most makers that publish cutting data tend to show 1D to 1.5D on their 4-flute cutters so two passes at the most when also using the usually published 0.1D stepover. It is possible to use more Ap (vertical) depth if the Ae (sideways) stepover is less particularly for the 5 or 6 flute finishing cutters. Don't try the drill chuck The irregular pattern would seem to suggest flexing somewhere rather than a regular pattern that could be attributed to runout. Edited By JasonB on 05/07/2023 13:10:58 The pic with the face milling on the same side has a section that was side milled and is 6.5mm deep. It was done either with the 10mm or 6mm tool. I think it probably does get worse with deeper cuts but it's always there. Just measured the flex again between the table and the tool, its about 0.015" (my indicator is imperial) easily with 1 hand levering against he vice, with two hands its 0.003"/0.076mm in x. About the same or a little more in y. Similar reading from table to spindle and pulling on the top of the column maybe abut 0.004. No lose column bolts, all are very tight and there are no cracks in the paint between the column and base (nice that they painted it after it was assembled, including the allen bolts!). I only get a tiny deflection if I try to man-handle the table in this setup. IDK if this is significant or totally normal but the spindle-to-head flex is barely measurable so don't think its bearings. Or course there's a lot of leverage on the column. Don't know what else to do. |
| Michael Gilligan | 05/07/2023 14:26:00 |
23121 forum posts 1360 photos | Posted by s d on 05/07/2023 13:55:42: […[ Just measured the flex again between the table and the tool, its about 0.015" (my indicator is imperial) easily with 1 hand levering against he vice, with two hands its 0.003"/0.076mm in x. About the same or a little more in y. . 0.015” sounds WAY TOO MUCH … is that a typo ? MichaelG. |
| s d | 05/07/2023 14:26:51 |
| 30 forum posts 11 photos | Posted by Michael Gilligan on 05/07/2023 14:26:00:
Posted by s d on 05/07/2023 13:55:42: […[ Just measured the flex again between the table and the tool, its about 0.015" (my indicator is imperial) easily with 1 hand levering against he vice, with two hands its 0.003"/0.076mm in x. About the same or a little more in y. . 0.015” sounds WAY TOO MUCH … is that a typo ? MichaelG. Yes it is... Should read 0.0015", sorry. Edited By s d on 05/07/2023 14:28:21 |
| Michael Gilligan | 05/07/2023 14:33:21 |
23121 forum posts 1360 photos |
|
Please login to post a reply.
Want the latest issue of Model Engineer or Model Engineers' Workshop? Use our magazine locator links to find your nearest stockist!
Sign up to our newsletter and get a free digital issue.
You can unsubscribe at anytime. View our privacy policy at www.mortons.co.uk/privacy
- *Oct 2023: FORUM MIGRATION TIMELINE*
05/10/2023 07:57:11 - Making ER11 collet chuck
05/10/2023 07:56:24 - What did you do today? 2023
05/10/2023 07:25:01 - Orrery
05/10/2023 06:00:41 - Wera hand-tools
05/10/2023 05:47:07 - New member
05/10/2023 04:40:11 - Problems with external pot on at1 vfd
05/10/2023 00:06:32 - Drain plug
04/10/2023 23:36:17 - digi phase converter for 10 machines.....
04/10/2023 23:13:48 - Winter Storage Of Locomotives
04/10/2023 21:02:11 - More Latest Posts...
- View All Topics
- Reeves** - Rebuilt Royal Scot by Martin Evans
by John Broughton
£300.00 - BRITANNIA 5" GAUGE James Perrier
by Jon Seabright 1
£2,500.00 - Drill Grinder - for restoration
by Nigel Graham 2
£0.00 - WARCO WM18 MILLING MACHINE
by Alex Chudley
£1,200.00 - MYFORD SUPER 7 LATHE
by Alex Chudley
£2,000.00 - More "For Sale" Ads...
- D1-3 backplate
by Michael Horley
Price Not Specified - fixed steady for a Colchester bantam mark1 800
by George Jervis
Price Not Specified - lbsc pansy
by JACK SIDEBOTHAM
Price Not Specified - Pratt Burnerd multifit chuck key.
by Tim Riome
Price Not Specified - BANDSAW BLADE WELDER
by HUGH
Price Not Specified - More "Wanted" Ads...
Do you want to contact the Model Engineer and Model Engineers' Workshop team?
You can contact us by phone, mail or email about the magazines including becoming a contributor, submitting reader's letters or making queries about articles. You can also get in touch about this website, advertising or other general issues.
Click THIS LINK for full contact details.
For subscription issues please see THIS LINK.
Model Engineer Magazine
- Percival Marshall
- M.E. History
- LittleLEC
- M.E. Clock
ME Workshop
- An Adcock
- & Shipley
- Horizontal
- Mill
Subscribe Now
- Great savings
- Delivered to your door
Pre-order your copy!
- Delivered to your doorstep!
- Free UK delivery!


![20230705_131235[1].jpg 20230705_131235[1].jpg](/sites/7/images/member_albums/44290/925813.jpg)


 Register
 Log-in


