Forum sponsored by:

D H Gipsy mk1
Brief build thread
| David K | 02/03/2020 20:51:56 |
| 258 forum posts 259 photos | Cut some alloy blanks for the Cyl heads Turned the combustion chambers on the lathe then Cutting the fins was more problematic than the barrels, I found it better to use no fluid and to cut in the same direction as the saw , 'climb cutting'
|
| David K | 02/03/2020 20:57:15 |
| 258 forum posts 259 photos | Removing more material to form the top shape
Tapping the plug holes, the digital gauge has proved very useful since I purchased it.
Finished Cyl head , I made five so one spare.
|
| JA | 03/03/2020 16:20:55 |
 1605 forum posts 83 photos | David Many thanks for the reply. I occasionally look at models of Gipsy Mk.1 engine at show and think that it may be an interesting model to make. When I start a model I always think that it will be a quick build, it never is. Now on my fourth model I am beginning to understand castings:
I did have a quick look at a sectioned Gipsy Mk.1 engine this morning. Major Halford was one of the great aero-engine designers and the only one that progressed from piston engines to jets. I wish you good progress with the model. JA |
| Clive B | 07/03/2020 08:19:28 |
| 46 forum posts 21 photos | Hi David, I'd be interested to know where you found errors in the drawings. I believe I have found some errors in the camshaft drawing and am redrawing this part in CAD. Also don't buy 10T 32DP gears for parts 151/147 (as I did) without checking the dimensions first. Regards, Clive |
| David K | 07/03/2020 20:07:46 |
| 258 forum posts 259 photos | Hi Clive, I have not got the advantage of using CAD, I will learn one day , so I just tend to trust the drawing and get on with it. The length of the valves gave me a problem , I had to make some more about 2 tenths longer. Already bought the oil pump gears and fitted them , seemed ok and camshaft is made and fitted. I have not written down any errors , nothing major just a couple of figures written down with the decimal point in the wrong place ie. 0.12 instead of 0.012 . |
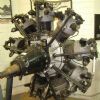
| JasonB | 08/03/2020 13:41:02 |
 25215 forum posts 3105 photos 1 articles | This was just posted over on MEM forum, makes a change to the usual stand and prop though it is shown with a prop at the end. |
| Clive B | 08/03/2020 15:08:46 |
| 46 forum posts 21 photos | Hi David, Thanks for your reply. After a little head scratching I'm now happy with the dimensions given in the original camshaft drawing, so that's good and now it's time to cut some more metal. I mentioned the gears as I couldn't locate a 10T 32DP gear with 0.375" OD as specified. I could only find a 9T gear with this OD and corresponding PCD. Looking forward to the next update on your build. Regards, Clive |
| David K | 08/03/2020 19:42:50 |
| 258 forum posts 259 photos | Hi Clive ,, yes your correct , I have just checked my oil pump and they are 9T Gears. Bought my gears from HPC Gears Edited By David K on 08/03/2020 19:45:24 |
| David K | 08/03/2020 19:46:29 |
| 258 forum posts 259 photos | That's ace Jason, always someone who goes one better. |
| noel shelley | 08/03/2020 22:44:27 |
| 2308 forum posts 33 photos | What a work of art ! Do they run inverted and if so how do you stop the lube oil from gathering in the back of the piston ? Asked this question at RAF Cosford, but no one could tell me. Many thanks Noel |
| Lee Rogers | 08/03/2020 23:56:48 |
 203 forum posts | Posted by noel shelley on 08/03/2020 22:44:27:
What a work of art ! Do they run inverted and if so how do you stop the lube oil from gathering in the back of the piston ? Asked this question at RAF Cosford, but no one could tell me. Many thanks Noel The answer is you live with it. Mags off and a couple of careful pulls through on the prop before you try to start it. An experienced person would know by the feel of it that all was well or not so. Starting on a cold morning was often far from easy, all part of the fun. What you wouldn't want to hand swing was a metal Fairey prop , tough on the hands.
|
| David K | 09/03/2020 18:25:55 |
| 258 forum posts 259 photos | Turned some valve guides
I turned the valves a section at a time to help minimise flex in the material
Once complete a fine skim and polish before parting off
Valves complete with collets and caps , springs were bought items.
|
| David K | 09/03/2020 18:50:59 |
| 258 forum posts 259 photos | Inlet manifold , started with a piece of solid stainless Machined the shape out on the mill
Turned the inlet stubs
Then finished them on the mill
|
| David K | 09/03/2020 18:55:13 |
| 258 forum posts 259 photos | Made a jig to hold the stubs ready for Silver solder
Then soldered in the bottom plate ,
I soak in citric acid and then polish
|
| David K | 17/06/2020 20:07:58 |
| 258 forum posts 259 photos | Started to mill out the end casing
Boring the oil pump
Silver soldered the oil pump gear to the drive shaft
|
| David K | 17/06/2020 20:11:53 |
| 258 forum posts 259 photos | Tapping for the inlet/outlet unions
The end case and parts ready for trial fit
|
| David K | 17/06/2020 20:19:13 |
| 258 forum posts 259 photos | Turned some brass parts to make the oil line unions
Silver soldered the parts
Made a jig to join the unions
Some extra pipe work
|
| David K | 17/06/2020 20:22:31 |
| 258 forum posts 259 photos | Made some union bolts
Milling the hex
A quick polish
Fitted to the engine
|
| David K | 17/06/2020 20:22:34 |
| 258 forum posts 259 photos | Made some union bolts
Milling the hex
A quick polish
Fitted to the engine
|
| Neil Wyatt | 17/06/2020 20:59:01 |
 19226 forum posts 749 photos 86 articles | Impressive work and rapid progress! Neil |
.jpg")
.jpg")
.jpg")
.jpg")
.jpg")
.jpg")
.jpg")
.jpg")
.jpg")
.jpg")
.jpg")
.jpg")
 (medium).jpg")
 (medium).jpg")
 (medium).jpg")
 (medium).jpg")
 (medium).jpg")
 (medium).jpg")
.jpg")
.jpg")
.jpg")
.jpg")
.jpg")
.jpg")
.jpg")
.jpg")
.jpg")
.jpg")
.jpg")
.jpg")
.jpg")
.jpg")
Please login to post a reply.
Magazine Locator
Want the latest issue of Model Engineer or Model Engineers' Workshop? Use our magazine locator links to find your nearest stockist!
Sign up to our Newsletter
Sign up to our newsletter and get a free digital issue.
You can unsubscribe at anytime. View our privacy policy at www.mortons.co.uk/privacy
Latest Forum Posts
- *Oct 2023: FORUM MIGRATION TIMELINE*
05/10/2023 07:57:11 - Making ER11 collet chuck
05/10/2023 07:56:24 - What did you do today? 2023
05/10/2023 07:25:01 - Orrery
05/10/2023 06:00:41 - Wera hand-tools
05/10/2023 05:47:07 - New member
05/10/2023 04:40:11 - Problems with external pot on at1 vfd
05/10/2023 00:06:32 - Drain plug
04/10/2023 23:36:17 - digi phase converter for 10 machines.....
04/10/2023 23:13:48 - Winter Storage Of Locomotives
04/10/2023 21:02:11 - More Latest Posts...
- View All Topics
Support Our Partners


Shopping Partners
Subscription Offer

Latest "For Sale" Ads
- Reeves** - Rebuilt Royal Scot by Martin Evans
by John Broughton
£300.00 - BRITANNIA 5" GAUGE James Perrier
by Jon Seabright 1
£2,500.00 - Drill Grinder - for restoration
by Nigel Graham 2
£0.00 - WARCO WM18 MILLING MACHINE
by Alex Chudley
£1,200.00 - MYFORD SUPER 7 LATHE
by Alex Chudley
£2,000.00 - More "For Sale" Ads...
Latest "Wanted" Ads
- D1-3 backplate
by Michael Horley
Price Not Specified - fixed steady for a Colchester bantam mark1 800
by George Jervis
Price Not Specified - lbsc pansy
by JACK SIDEBOTHAM
Price Not Specified - Pratt Burnerd multifit chuck key.
by Tim Riome
Price Not Specified - BANDSAW BLADE WELDER
by HUGH
Price Not Specified - More "Wanted" Ads...
Get In Touch!
Do you want to contact the Model Engineer and Model Engineers' Workshop team?
You can contact us by phone, mail or email about the magazines including becoming a contributor, submitting reader's letters or making queries about articles. You can also get in touch about this website, advertising or other general issues.
Click THIS LINK for full contact details.
For subscription issues please see THIS LINK.
Digital Back Issues


Donate

 Register
 Log-in
Model Engineer Magazine
- Percival Marshall
- M.E. History
- LittleLEC
- M.E. Clock

ME Workshop
- An Adcock
- & Shipley
- Horizontal
- Mill

Subscribe Now
- Great savings
- Delivered to your door

Pre-order your copy!
- Delivered to your doorstep!
- Free UK delivery!
All Forum Topics > Work In Progress and completed items > D H Gipsy mk1