Wiggler or edge finder?
| Andrew Moyes 1 | 21/07/2019 05:43:38 |
| 158 forum posts 22 photos | I too bought an American 'General' wiggler many years ago and encountered the stiffness described by you and George Thomas in his book. It was easily solved by mounting the body minus the nut in the three-jaw chuck then expanding the collet jaws by forcing them apart with a 60 degree centre in the tailstock. By going gently, I was able to achieve just the right amount of grip on the ball. Since then, I have had very satisfactory service from the wiggler. More recently, I bought a cheap Chinese electronic centre finder, thinking it would be even easier to use and more accurate. I wasted my money. The ball was a couple of thou off centre from the body. I took it apart and re-machined the ball seating. Even then it wasn't satisfactory because any eccentricity in a three-jaw chuck is replicated at the ball giving an intermittent contact. The light starts to come on before true centre and gets brighter until you have gone a similar distance beyond true centre. It's impossible to determine the true centre. Whereas my old General wiggler centres itself regardless of any inaccuracy in the chuck. Has anyone invented a self-centring electronic centre finder? |
| Bodger Brian | 21/07/2019 09:36:52 |
187 forum posts 40 photos | Clive - thanks for the explanation. Unfortunately you lost me after the first sentence, which I hasten to add is due to my comprehension skills rather than than your writing. Never mind, I’ll return to it at some point and see if it’s any clearer. A DRO is something that I’ve often thought about but never could justify the cost of. Brian |
| Clive Foster | 21/07/2019 12:09:15 |
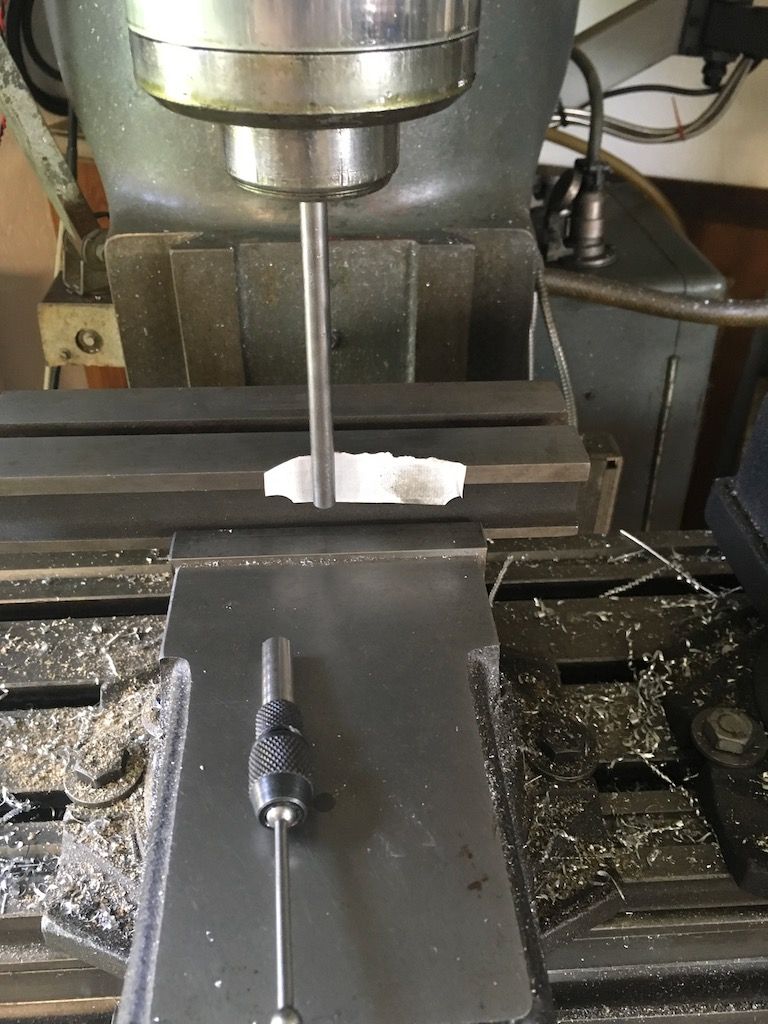
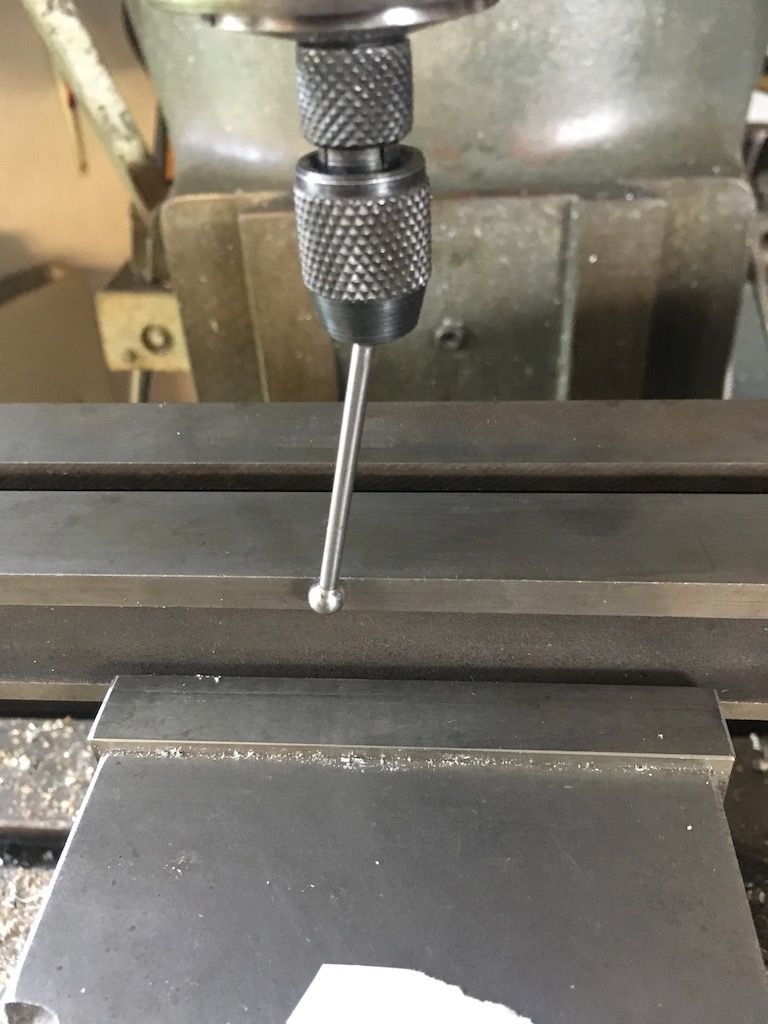
| 3630 forum posts 128 photos | Hi Brian Sorry to be unclear. Take 2 on the calibration, with pictures. Obviously if you put a straight round rod of known diameter in a collet and just touch it against something solidly fixed to the table the spindle centre line will be exactly half the diameter of the rod away from the solid object. Tricky bit is getting the just touch position right as, using the feed screws its very easy to bend any sensible size rod by a few thou without noticing. Picture below shows the method using the Y axis with a piece of cigarette paper instead of the feeler gauge so its easy to see. Basically wind the slide over until the cigarette paper or feeler gauge is just trapped between rod and object needing a smooth pull to remove. My personal calibration is just bit less pull than needed to tear the paper. Using a one thou feeler gauge means you know exactly how much extra to add to half the rod diameter to get spindle offset. Rizla green is said to be a reliable 1 thou thick but paper always seems bit squidgy and a rather un engineering material for calibration use. The narrow ridge on the indicator holder base block seems better than a solid face for reference as a face needs to be truly vertical for accuracy not merely very close. Posed picture with the edge finder running out a little to one side. Having figured out the spindle centre line position using the rod as above its easy to note how far the edge finder has to be off centre before it moves sideways. In a perfect friction free system its obvious half the ball diameter. Friction, stiction et al means it has to go bit further. Hope this helps. Clive |
| Tony Pratt 1 | 21/07/2019 12:18:00 |
| 2319 forum posts 13 photos | Posted by Clive Foster on 21/07/2019 12:09:15:
Hi Brian Sorry to be unclear. Take 2 on the calibration, with pictures. Obviously if you put a straight round rod of known diameter in a collet and just touch it against something solidly fixed to the table the spindle centre line will be exactly half the diameter of the rod away from the solid object. Not strictly true, you should have mentioned that the rod needs to be running true [concentric] to the spindle for this statement to be accurate. Tony |
| Clive Foster | 21/07/2019 12:43:10 |
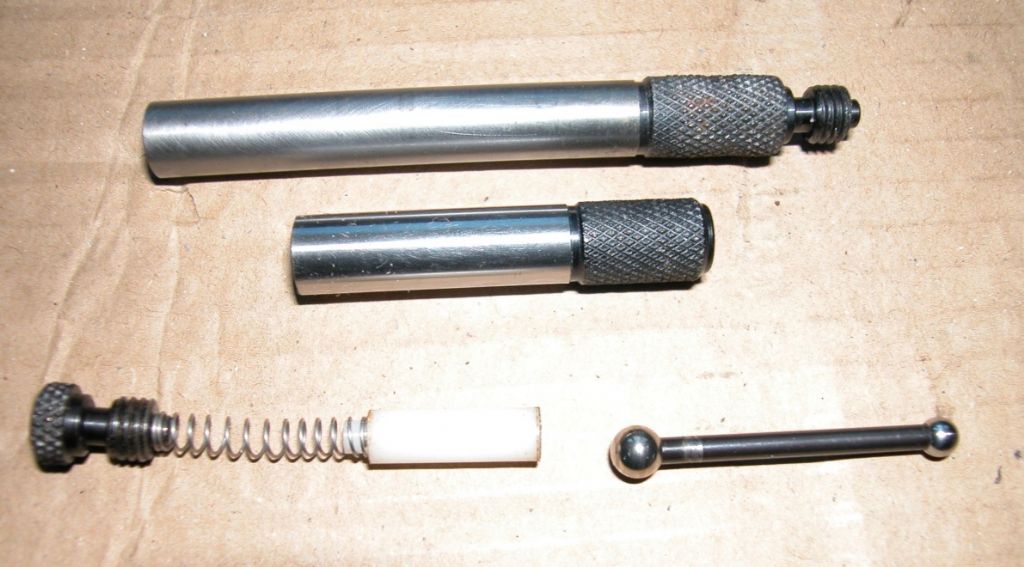
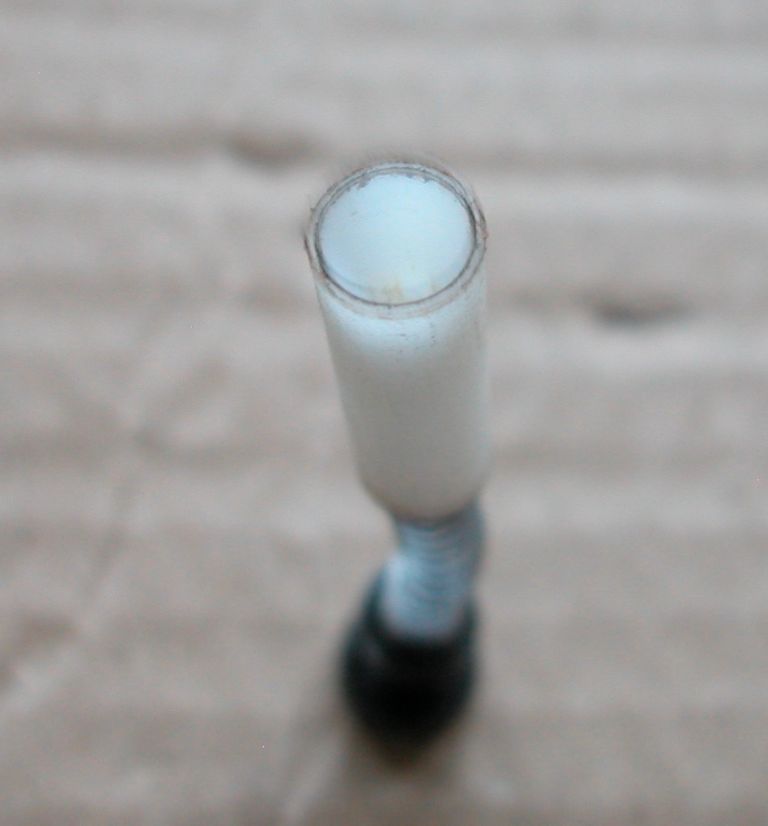
| 3630 forum posts 128 photos | Kiwi Bloke I suspect that your stiff "General" brand edge finder was intended to be used with the light line method rather than the kick off method. Huffam say :- "Since the Huffam Centre Locator stem will not run off the surface of the work until it is forced beyond the centre line of the machine spindle, run off accuracy greater than .0005 in cannot be guaranteed. If greater accuracy is required, this can be obtained by the "light line" method. For convenience, the following example again refers to the horizontal datum face. Lower the machine table, and allow the Centre Locator stem to run out of alignment again, then raise the table slowly, watching the flickering light line which appears between the spindle end and the datum face. As soon as this light disappears and the stem appears to be running on the surface of the work, stop the machine, and set the table dial to zero as for the run-off method. When used in this way the stem will not run along the surface of the work and a accuracy to within 0.0002 in can be obtained. Special lighting is not required, but a magnifying glass increases the accuracy obtainable" Although the light line method does work its a pretty frustrating procedure getting everything just so. Sounds even harder with a stiff collet. Earlier Huffams have a barrel shaped probe for straight edges which can be used in this way but the later ones have balls which aren't really suitable. With later ones its better to use the cylinder probe intended for picking up on round rods and other curved surfaces. The Huffam cylinder probe is 10 mm or 3/8 long, depending on whether its metric or imperial, and same diameter as the ball probe. It doesn't seem unreasonably difficult to make a Huffam style body to take the ball ended probe out of a collet set. Innards of my metric (5 mm ball) Huffam in this picture :- and a blurry close up of the pressure pad :- I imagine there is some engineering subtlety involved in getting best performance but I had a shop made copy through my hands which was well up to 1 thou location performance but not quite as good as the real thing. Made to a respectable standard but nothing beyond any reasonably careful model engineer. The Huffam ball seat is made in one with the body. For a home shop made one it would be easier to make the seat on a separate short barrel. Hold it in the body with loctite. Doesn't need to be very thick but easier to handle and push in dead square if you make it too long, maybe 1/2" or 12 mm and face the whole thing, tube and all, back to something more reasonable when the loctite has gone off. Countersink the outer end to give the probe room to swing. The Geo. H Thomas version specifies a narrow conical seat for the ball cut with a sharp centre drill. Seems a sensible approach here. Pressure pad is nylon, same diameter as the upper ball with a smooth conical seat. Sharp centre drill again I think. Body tube bore is perhaps 20 - 30 thou, little under 1 mm, bigger than the upper ball and nylon pad so it all slides in very freely but doesn't rattle all over the shop. GHT specifies a couple of pounds spring force giving a couple of ounces deflection force. Probably not unreasonable but I'd guess Mr Huffam specified something bit lighter. Spring out of a retracting type, Parker refill compatible, ballpoint pen might well do. I've never used my extensions but they seem good idea. Personally I'd just pony up for the real thing. Which I did. Twice! Mentioning GHT reminds me that his analysis of how the things operate is wrong. Nothing to do with tilt. Just a matter of generating enough force between probe and ball for it to drive sideways along the surface. Once its moved a fraction off axis centrifugal force takes over and it flies. Clive Edited By Clive Foster on 21/07/2019 12:52:12 Edited By Clive Foster on 21/07/2019 12:52:58 |
| Enough! | 21/07/2019 16:50:40 |
| 1719 forum posts 1 photos | Posted by old mart on 20/07/2019 20:43:58:
I bought a Vertex electronic edge finder years ago, it has a 20mm shank, and a 10mm spring loaded ball. The shank size will be too big for smaller machines, but if you can manage that size, it is recommended. They are not intended to be used with the machine running. Identical versions are available cheaply on ebay, see listing 263808616504.
+1. I used to use the type that Jeff recommended but - clumsy clot that I am - I crashed it (them) into the work on a number of occasions and no longer trusted them (they seem to have little compliance). Edited By Bandersnatch on 21/07/2019 16:51:17 |
| Bodger Brian | 21/07/2019 18:09:59 |
187 forum posts 40 photos | Posted by Clive Foster on 21/07/2019 12:09:15:
Hi Brian Sorry to be unclear. Take 2 on the calibration, with pictures. ......... Hope this helps. Thanks Clive, I think I’m getting there but I’m still slightly confused. It appears to me that you’re suggesting that the offset is always 1 thou (+half the ball width). Is that right? If not, I’m still none the wiser on how the offset is found. Am I really being dim? Brian |
| Clive Foster | 21/07/2019 20:32:03 |
| 3630 forum posts 128 photos | No worries Brian we'll get there. Its what I call looking at opposite sides of the fence. One guy just sees the panels the other one see the rails too! The one thou comes from when you are using the rod and feeler gauge to find out where the spindle centre is in relation to the reference surface. Probably be clearer with some numbers. Assume both rod and edge finder ball are 1/4, 0.250, inches in diameter. If the machine is correctly set up and in good order the rod will hang straight down in alignment with the spindle when held in good collet. If the reference is set up as in my first picture, with the spindle stationary, winding the Y-Axis feed screw will bring the rod closer to the reference. When its quite close slip the one thou feeler gauge in the gap and slide it back and forth as you close the gap. When the gap is a teensy bit greater than a thou you will start to feel bit of resistance as you move the feeler. After a touch more movement the feeler will still pull smoothly across but when you try to push it back it will buckle and not really want to move. Difference between buckles but just moves and won't quite move isn't worth worrying about. Either way consider the gap between rod and reference one thou. So the centre of the spindle is 0.126" away from the reference. Half the rod diameter plus one thou. Set your feed dial to read 0.126" and remove the rod. Obviously if you now feed further until the dial reads 0.000 the centre of the spindle will be exactly above the reference edge. So you now have the basic machine set-up ready to see how well the wiggler does. Wind things back to give enough offset to fit the wiggler in the collet, set the probe stem as near vertical as you can and run the machine at a sensibly low speed. Huffam suggest 200 to 500 rpm. If you like you can "milk" it closer to true running but small errors will sort themselves out automatically as it intermittently touches the reference when it gets close. Wind in slowly. When your dial reads 0.125 the probe should be running dead true with the ball just touching the reference surface. The probe of a perfectly frictionless, stiction free, wiggler would swing off sideways but in the real world you need to go a little further until the ball is pressing hard enough against the surface to drive sideways rather than sitting there spinning like car wheels on sheet ice. Carefully feed further forwards until the ball grips and slides sideways. The dial reading now gives you the offset of the spindle centre line from the reference surface. Which is what you need to know. Its not really worth worrying about the actual error between the 0.125" offset a perfect system would show and what yours shows although its best if the error is small. For example if the probe walks sideways at 0.115" on the dial the error due to stiction and so in is 10 thou. A little large suggesting the collet is too tight. Typically 3 to 5 thou error is reasonable with a collet system but if you are really careful you can get less. A Huffam in good condition typically shows under 0.0005" , half a thou, error so calibration is hardly worth it. Fortunately 'cos its a royal pain with something that sensitive. Important thing is that the offset be the same every time. That said if the error is up in the 10 thou region a bit to attention to set up, especially collet tightness, wouldn't go amiss. Obviously use your numbers for rod diameter and ball diameter. Don't have to be the same but its easier that way. Clive
Edited By Clive Foster on 21/07/2019 20:33:52 Edited By Clive Foster on 21/07/2019 20:37:22 |
| Kiwi Bloke | 22/07/2019 09:16:57 |
| 912 forum posts 3 photos | Clive. 'I suspect that your stiff "General" brand edge finder was intended to be used with the light line method rather than the kick off method.' Well, of course, it could be used this way, and perhaps it should be, as it's the most sensitive method. But my point was that the manufacturer's instructions are as I quoted, and they seem bizzarre. I'd be interested to know whether anyone has used General's method. 'Mentioning GHT reminds me that his analysis of how the things operate is wrong. Nothing to do with tilt. Just a matter of generating enough force between probe and ball for it to drive sideways along the surface. Once its moved a fraction off axis centrifugal force takes over and it flies.' I don't remember GHT's explanation. I'm not sure that I understand what you mean by 'enough force between probe and ball for it to drive sideways along the surface.' I may have misinterpreted what you meant, but, to avoid confusion, the probe's ball or cylinder does not drive itself along the surface it is contacting, as a result of friction at this interface. The sideways force is generated by asymmetric forces between the chuck and the ball end of the probe sitting in the chuck, once axial alignment is lost. Experiment confirms that the tip of the probe is driven sideways, from the chuck, but doesn't pull (or push) itself sideways. If centrifugal force deflects the probe, things may have got rather hairy. Better to arrange things so the probe doesn't whirl free, if possible. |
| Neil Lickfold | 23/07/2019 08:13:44 |
| 1025 forum posts 204 photos | I have used a Starret one for years and recently bought a ceramic one with a 10mm ceramic pad instead of the Starret 6mm pad. What I like about the ceramic, is it is un effected by parts that have become magnetic. The wigglers do work but are not as good as the Starret or the ceramic centre finders. |
| lfoggy | 23/07/2019 23:03:35 |
231 forum posts 5 photos | Magnetism in the probe can be a real nuisance with wigglers. Even a minor degree of magnetism can give erratic and inaccurate results on ferrous metals. My workshop seems to have become annoyingly magnetic recently and I am having to de-magnetise frequently.
|
Please login to post a reply.
Want the latest issue of Model Engineer or Model Engineers' Workshop? Use our magazine locator links to find your nearest stockist!
Sign up to our newsletter and get a free digital issue.
You can unsubscribe at anytime. View our privacy policy at www.mortons.co.uk/privacy
- *Oct 2023: FORUM MIGRATION TIMELINE*
05/10/2023 07:57:11 - Making ER11 collet chuck
05/10/2023 07:56:24 - What did you do today? 2023
05/10/2023 07:25:01 - Orrery
05/10/2023 06:00:41 - Wera hand-tools
05/10/2023 05:47:07 - New member
05/10/2023 04:40:11 - Problems with external pot on at1 vfd
05/10/2023 00:06:32 - Drain plug
04/10/2023 23:36:17 - digi phase converter for 10 machines.....
04/10/2023 23:13:48 - Winter Storage Of Locomotives
04/10/2023 21:02:11 - More Latest Posts...
- View All Topics
- Reeves** - Rebuilt Royal Scot by Martin Evans
by John Broughton
£300.00 - BRITANNIA 5" GAUGE James Perrier
by Jon Seabright 1
£2,500.00 - Drill Grinder - for restoration
by Nigel Graham 2
£0.00 - WARCO WM18 MILLING MACHINE
by Alex Chudley
£1,200.00 - MYFORD SUPER 7 LATHE
by Alex Chudley
£2,000.00 - More "For Sale" Ads...
- D1-3 backplate
by Michael Horley
Price Not Specified - fixed steady for a Colchester bantam mark1 800
by George Jervis
Price Not Specified - lbsc pansy
by JACK SIDEBOTHAM
Price Not Specified - Pratt Burnerd multifit chuck key.
by Tim Riome
Price Not Specified - BANDSAW BLADE WELDER
by HUGH
Price Not Specified - More "Wanted" Ads...
Do you want to contact the Model Engineer and Model Engineers' Workshop team?
You can contact us by phone, mail or email about the magazines including becoming a contributor, submitting reader's letters or making queries about articles. You can also get in touch about this website, advertising or other general issues.
Click THIS LINK for full contact details.
For subscription issues please see THIS LINK.
Model Engineer Magazine
- Percival Marshall
- M.E. History
- LittleLEC
- M.E. Clock
ME Workshop
- An Adcock
- & Shipley
- Horizontal
- Mill
Subscribe Now
- Great savings
- Delivered to your door
Pre-order your copy!
- Delivered to your doorstep!
- Free UK delivery!


 Register
 Log-in


