M8 tapping drill
| Mark C | 15/10/2016 23:15:09 |
| 707 forum posts 1 photos | Oh, OK I accept. Just need to see if everyone else will? Mark PS. I was going to measure some scabby studding in the morning and add to the last drawing for Michael as well... Edited By Mark C on 15/10/2016 23:16:44 |
| JasonB | 16/10/2016 07:29:34 |
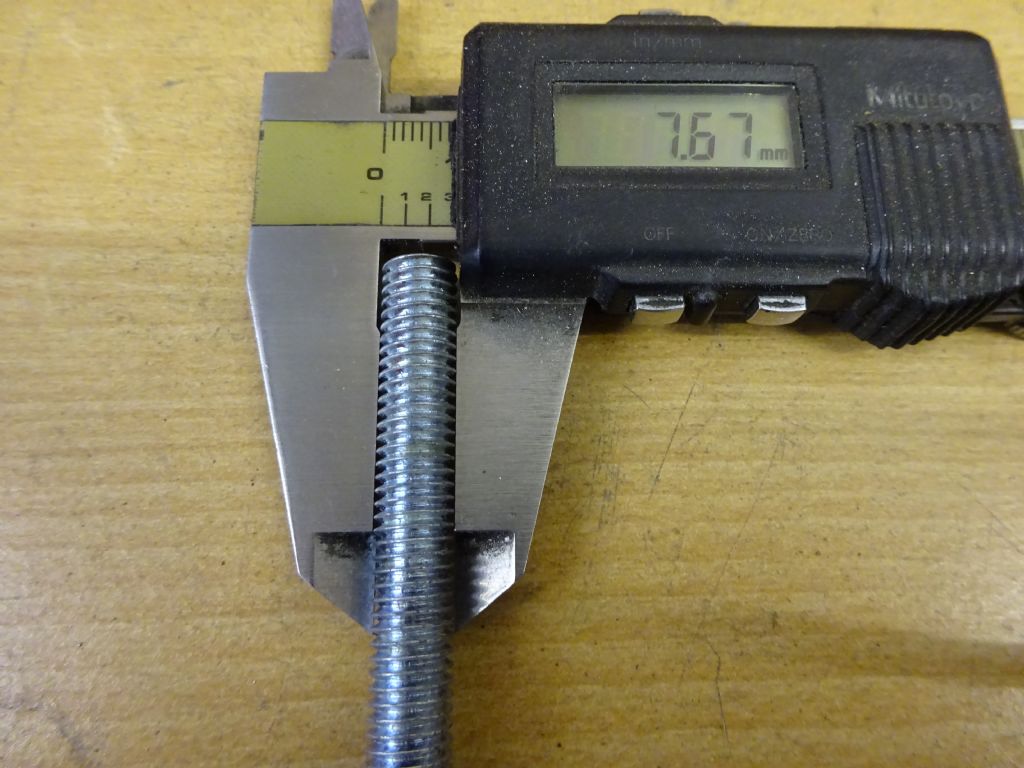
25215 forum posts 3105 photos 1 articles | It would be interesting top compare the FEA of the 7.1mm hole with scabby studding in it. I have a bit that measures 7.67mm have you got a scabbier bit? The studding is also likely to be made from old fridges so that should probably be entered into the equasion too |
| Michael Gilligan | 16/10/2016 07:52:51 |
23121 forum posts 1360 photos | Posted by JasonB on 16/10/2016 07:29:34:
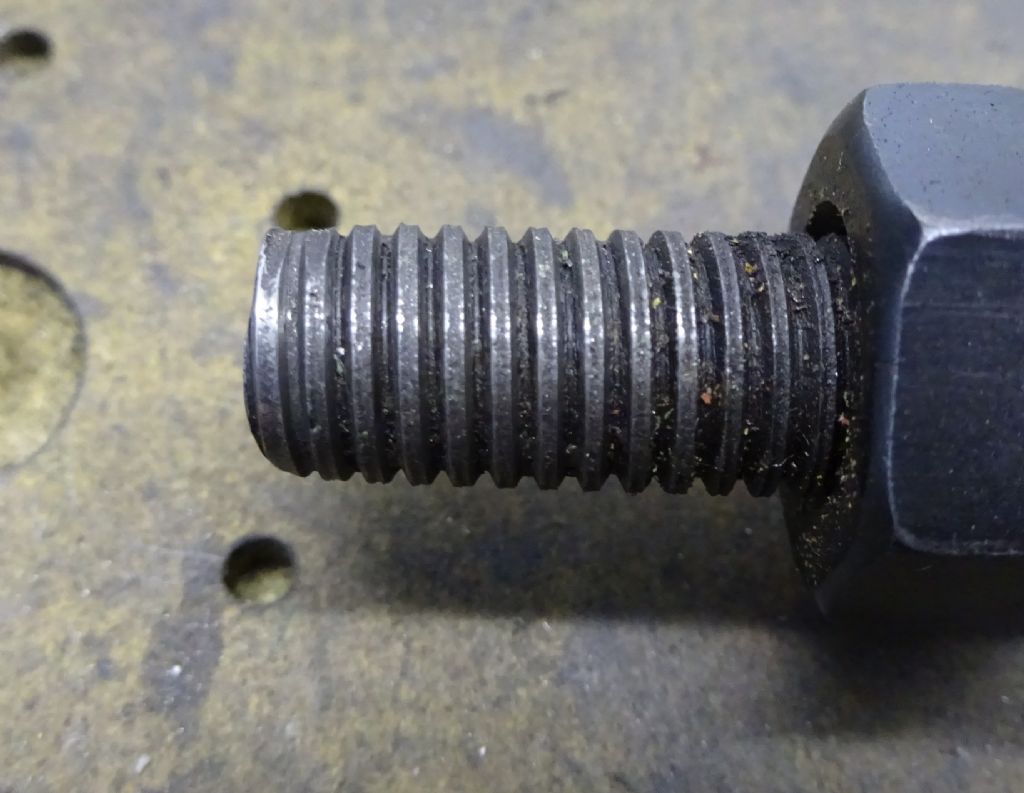
... I have a bit that measures 7.67mm ... . What does the thread-form look like on that, Jason Truncated, or full-but-undersize, or something between ? MichaelG. |
| JasonB | 16/10/2016 07:53:38 |
25215 forum posts 3105 photos 1 articles | I'll take a pic, back in a few mins. |
| JasonB | 16/10/2016 08:12:42 |
25215 forum posts 3105 photos 1 articles | It's an interesting point Michael, a fully formed but undersize male thread will have thinner crests in contact with the female thread than one that has been cut from undersize material so I would expect the fully formed male thread to fail first. Anyway this is the stud I mentioned early on when I first enquired whether people who worked out percentage engagement bothered to measure the male thread. M8 commercial studding, seems to have fully formed crests, rough almost torn surface and should we deduct the thickness of the plating I also mentioned on about page two that I had seen undersize studding on which the crests looked more like an ACME form, I can't take a pic of that as it is now surrounded in 1/2 cubic meter of concrete holding up a clients tennis court post but here is a fine example of a rolled M10 thread with an OD of 9.32mm J
Edited By JasonB on 16/10/2016 08:20:40 |
| Roderick Jenkins | 16/10/2016 08:52:08 |
2376 forum posts 800 photos | Of course, I make my own studs using a split die where I can carefully control the thread diameter. I don't just pop down to B&Q Rod Edit:. According to the ISO standard shown (much!) earlier in the thread (!) , my sums suggest that the od of m8 is 7.73
Edited By Roderick Jenkins on 16/10/2016 09:19:10 Edited By Roderick Jenkins on 16/10/2016 09:19:58 |
| Michael Gilligan | 16/10/2016 09:43:57 |
23121 forum posts 1360 photos | Posted by JasonB on 16/10/2016 08:12:42: M8 commercial studding, seems to have fully formed crests, rough almost torn surface and should we deduct the thickness of the plating
. This ^^^ may be the new 'international standard' It probably fits 5/16" 20 tpi Nuts equally MichaelG. |
| JasonB | 16/10/2016 10:19:05 |
25215 forum posts 3105 photos 1 articles | Rod, depending on tollerance of thread your 7.73 would be just below minimum, max would be 7.92. Have a go with the calculator MarkC linked to here, just select M8 x 1.25 and leave the rest as is then calculate. |
| Raymond Anderson | 16/10/2016 11:10:15 |
785 forum posts 152 photos | Further to Jason's measurements of some "scabby " M8 studding, I went and measured a piece of M8 threaded rod that came off a job I was at, It is just plain threaded rod [ galvanized ] that is used for hanging cable trays ect, it measures 7.76mm then took the measurement of a piece of M8 10.9 threaded rod [ self colour ] that I use for clamping studs on the LUX MM and it measures 7.88mm . So that gives a range from 7.67 up to 7.88. quite a range. Also measured some M16 10.9 threaded rod [ also for clamping studs on the K &T ] and it is 15.87mm and a M16 10.9bolt measures 15. 89mm so not much variation on those 2. edited for changing a £ to a & sign. Edited By Raymond Anderson on 16/10/2016 11:12:22 |
| Mark C | 16/10/2016 18:34:10 |
| 707 forum posts 1 photos | I was having trouble thinking of the best way to get the contact faces to work in the FEA but I think I have a solution. The solver is busy with the problem as I type.... Mark |
| Flying Fifer | 16/10/2016 18:53:27 |
| 180 forum posts | 6 days & 11 pages of posts later, has the OP drilled & tapped the b????y hole yet ? Hope it wasn`t for an urgent job the customer would be a wee bit p//d off by now. Alan |
| Mark C | 16/10/2016 18:58:27 |
| 707 forum posts 1 photos | Alan, yes he has - he even posted the pictures but we have moved on since then! Mark |
| Mark C | 17/10/2016 20:15:40 |
| 707 forum posts 1 photos | Ok Jason, it took a while to configure for the new geometry and make the simulation work but I managed to get it to run and here is the result using mild steel female thread and low tensile (175 MPa yield) stud. Everything else is the same so you are seeing a true comparison as far as the FEA is concerned. Mark |
| JasonB | 17/10/2016 20:24:09 |
25215 forum posts 3105 photos 1 articles | Thanks Mark, compared with the first ones you posted its easy to see the stresses are much much higher on the small percentage of metal that is in contact |
| Mark C | 17/10/2016 20:26:44 |
| 707 forum posts 1 photos | Yes, and I have also got this for Michael... |
| Michael Gilligan | 17/10/2016 20:30:55 |
23121 forum posts 1360 photos | Posted by JasonB on 17/10/2016 20:24:09:
Thanks Mark, compared with the first ones you posted its easy to see the stresses are much much higher on the small percentage of metal that is in contact . ... and, incidentally, it shows one of the reasons why threadlocking compounds can be so successful. MichaelG. |
| Michael Gilligan | 17/10/2016 20:32:53 |
23121 forum posts 1360 photos |
. Excellent job ... Thanks Mark MichaelG. |
| Mark C | 17/10/2016 20:35:47 |
| 707 forum posts 1 photos | As a point of interest (if you are interested in this sort of thing) it was necessary to create the thread geometry on a fixed reference plane set normal to the helix feature and then create feature axis fort both parts. They then had coincident mates created between the axis and to align the pressure faces the feature sketches were used with a fixed point on one sketch made coincident with the flank of the female thread. This allows me to "easily" reconfigure the assembled thread at whatever geometric conditions I chose....... Mark |
Please login to post a reply.
Want the latest issue of Model Engineer or Model Engineers' Workshop? Use our magazine locator links to find your nearest stockist!
Sign up to our newsletter and get a free digital issue.
You can unsubscribe at anytime. View our privacy policy at www.mortons.co.uk/privacy
- *Oct 2023: FORUM MIGRATION TIMELINE*
05/10/2023 07:57:11 - Making ER11 collet chuck
05/10/2023 07:56:24 - What did you do today? 2023
05/10/2023 07:25:01 - Orrery
05/10/2023 06:00:41 - Wera hand-tools
05/10/2023 05:47:07 - New member
05/10/2023 04:40:11 - Problems with external pot on at1 vfd
05/10/2023 00:06:32 - Drain plug
04/10/2023 23:36:17 - digi phase converter for 10 machines.....
04/10/2023 23:13:48 - Winter Storage Of Locomotives
04/10/2023 21:02:11 - More Latest Posts...
- View All Topics
- Reeves** - Rebuilt Royal Scot by Martin Evans
by John Broughton
£300.00 - BRITANNIA 5" GAUGE James Perrier
by Jon Seabright 1
£2,500.00 - Drill Grinder - for restoration
by Nigel Graham 2
£0.00 - WARCO WM18 MILLING MACHINE
by Alex Chudley
£1,200.00 - MYFORD SUPER 7 LATHE
by Alex Chudley
£2,000.00 - More "For Sale" Ads...
- D1-3 backplate
by Michael Horley
Price Not Specified - fixed steady for a Colchester bantam mark1 800
by George Jervis
Price Not Specified - lbsc pansy
by JACK SIDEBOTHAM
Price Not Specified - Pratt Burnerd multifit chuck key.
by Tim Riome
Price Not Specified - BANDSAW BLADE WELDER
by HUGH
Price Not Specified - More "Wanted" Ads...
Do you want to contact the Model Engineer and Model Engineers' Workshop team?
You can contact us by phone, mail or email about the magazines including becoming a contributor, submitting reader's letters or making queries about articles. You can also get in touch about this website, advertising or other general issues.
Click THIS LINK for full contact details.
For subscription issues please see THIS LINK.
Model Engineer Magazine
- Percival Marshall
- M.E. History
- LittleLEC
- M.E. Clock
ME Workshop
- An Adcock
- & Shipley
- Horizontal
- Mill
Subscribe Now
- Great savings
- Delivered to your door
Pre-order your copy!
- Delivered to your doorstep!
- Free UK delivery!


 Register
 Log-in


