Member postings for Graham Meek
Here is a list of all the postings Graham Meek has made in our forums. Click on a thread name to jump to the thread.
| Thread: Clock Stand with a difference |
| 05/10/2021 12:23:46 |
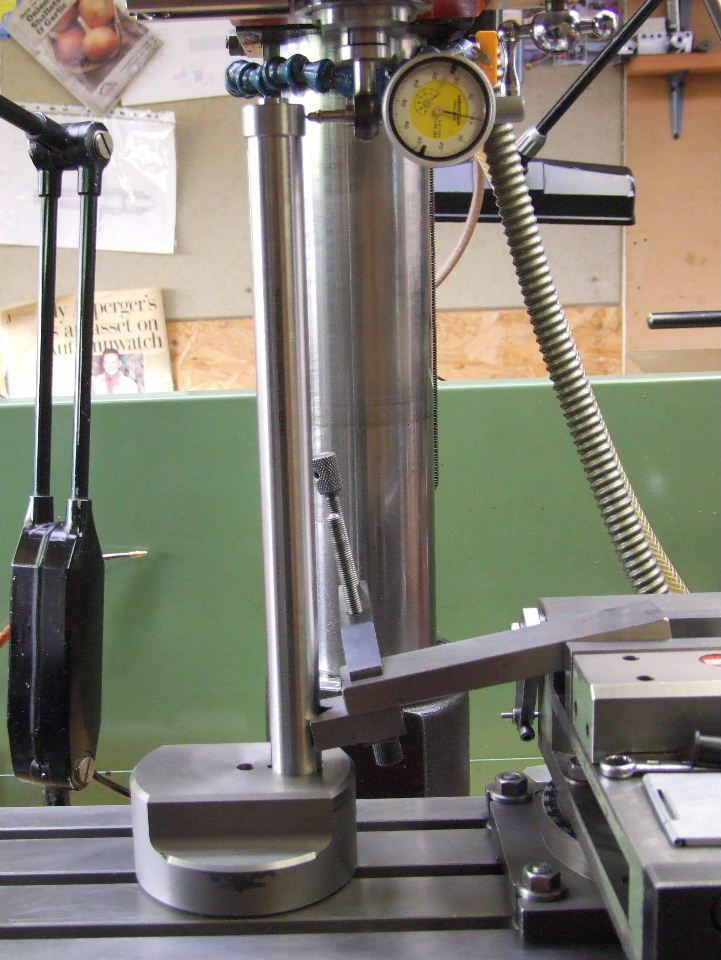
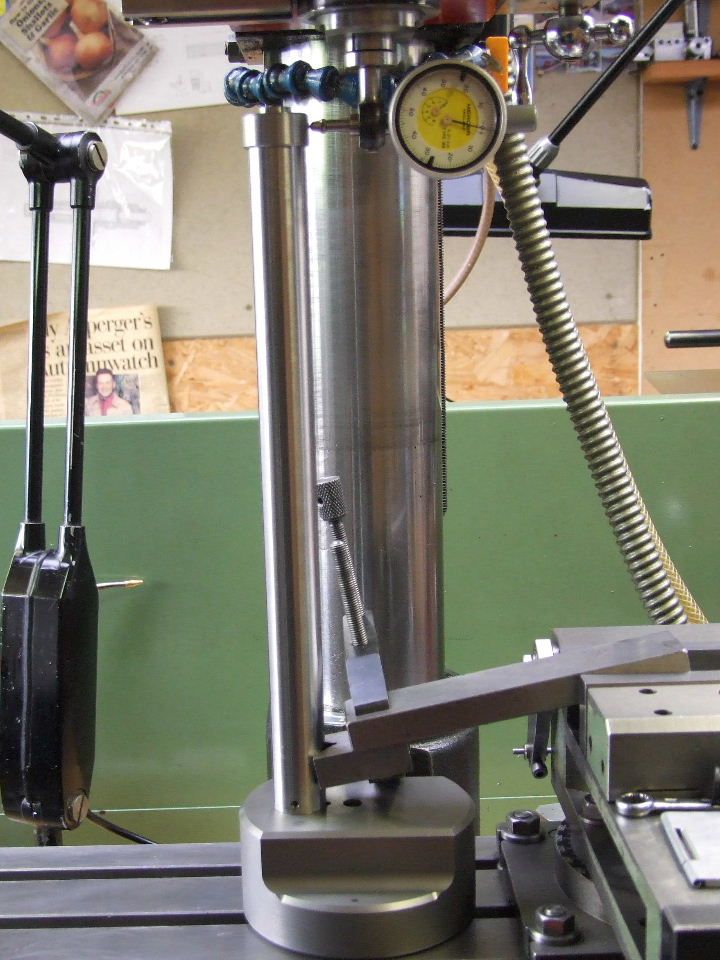
Yesterday was spent checking the Column out. I first turned a "Cup" shaped bush to fit the top of the Column which removes the need to avoid the two key slots in the Column. As this was turned on the O/D and bored at one setting concentricity should be assured. The "Fit" on the Column was very close but I was still able to rotate the bush on the Column. The Vee block attached to the parallel in the vice machine is purposely angled down in order to present two knife edges to the Column. This ensures only point contact and that any out of squareness in the Column is not masked by a full on Vee block face. Once the set-up was ready the assembly was placed against the Vee block and the DTI brought into contact. Traversing the Y-Axis the null point was found which meant the DTI was on the Column centreline, (this procedure is repeated as the Column approaches perpendicular, to remove any further sources of error). At this point the Bush was also rotated on the Column to see if there were any errors in the machining, which there weren't. It always pays to check. The contact face for the Column is a spot face done by mounting the part on the faceplate. The initial out of squareness was 0.1 mm in the Y-Axis in the above photographs and 0.05 mm in the X-Axis. Using my Pull Scraper and removing barely 0.005 mm from the surface of the spot face opposite the maximum errors had the Column, virtually perfect. The maximum error in the X-Axis was 0.005 mm leaning towards the centre of the Base Plate. In the Y-Axis the there was no discernable error. Turning the Column in the Base Plate by 180 degrees gave exactly the same results. Which is what I would expect as I already checked the Columns straightness using two Vee blocks and a Clock on the surface plate. To double check I might just make the tool shown above, but not until the Clock Stand is complete. Regards Gray, |
| 03/10/2021 17:40:12 |
Hi Howard, The problem lies in determining how square the angle plate is, to start off with. I am not saying your method would not work, but. I have two angle plates made by EMCO which checked with my Cylinder Square show no deviation, (eyesight). Yet when I took them to work many years ago and checked them out using a dedicated tool for checking vertical surfaces they were out by 0.013 mm over the height of the height of the angle plate. They might well have moved in the interim. The flat surface of the surface plate is the fundamental datum in engineering, everything else comes off this. Thus any check that does not involve another variable is the best move as far as I can see. Once this Clock Stand is finished I will be able to check them again. Regards Gray,
|
| 03/10/2021 15:23:18 |
Kiwi Bloke, I like your idea as it can be trailed easily using my FB2 milling machine, tomorrow. Regards Gray,
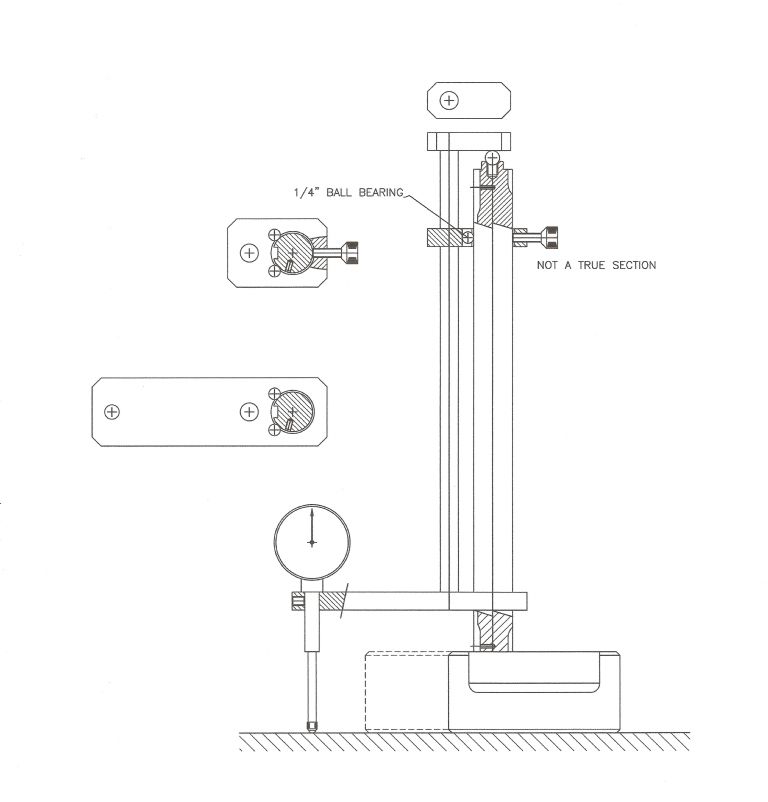
My original idea was to make the Checking Tool below, but thanks to several trains of thought put forward, I can now check this before I set too making the tool. The Ball at the top of the column gives a constant point of contact. Two 1/4" ball bearings in each of the arms contact the column 90 degrees apart. The weight of the DTI will probably tend to pull the top arm out of contact, so the clamping screw may be needed. An additional screw might also be needed in the lower arm due to the reaction from the force the clock exerts on the probe. The Tool is first clamped to the one side of the column and the DTI is set to zero. Releasing the clamping screw(s) the tool is raised and rotated about the column and reset. Any deviation will be shown on the clock. Regards Gray, |
| 02/10/2021 20:09:09 |
I am glad to see I have stimulated some grey cell activity. As regards Phil's answer the underside of the base is relieved such that only the outer edge of the base is in contact with the surface plate, so it would mean moving the cross-slide or clamping a parallel to the base to avoid moving the cross-slide. While I like the simplicity of Martin K's idea and it has some merit, it will not directly give me a measured error. I could use a feeler gauge beneath the base to give an idea how much the dot on the wall moves for a given feeler. A sort of calibrated scale. I do wonder if any error in the construction of the laser holder and the required squareness of the face of the collar to retain a height setting would influence the results during the turn around. This being my only reservation with this idea. Regards Gray, |
| 02/10/2021 12:21:44 |
By way of an introduction and something to get the little grey cells working. I am currently working on what for me is a Clock Stand, with a difference. The primary design was for a stable clock stand. I have for years used a Starrett Machinists Scribing Block. Using very sensitive clocks do test the various elements of this "Maid of all work", and sometimes ones patience. Whilst at the design stage it was envisaged that with a bit of care in the workmanship/manufacture the design would lend itself to being used to check a vertical surface as well. Something which has to date only been catered for by the engineers square or a cylinder square. (The engineers square can get dropped or abused) . As an additional bonus, just as I was closing up the computer for the night it dawned on me if I added a DRO scale it would also double up as a digital height gauge. I must thank Ketan for his help with this feature. Over the coming weeks I will reveal more detail as I make the parts. Currently what is shown above is what has been made this week. Photographs would I know be good but these dull and dismal days do nothing for my workshop photography. Now to exercise the little grey cells. I have worked out a way of checking that the 22 mm diameter column is truly vertical to the base. It involves making another dedicated piece of equipment to do this, something I am trying to avoid. The question is is there an easier way. I really want to quantify the accuracy of the column. Relying on the use of an engineers square or cylinder square is dependant on my poor eyesight. Your suggestions are most welcome. Regards Gray,
|
| Thread: Not enoughh CO2 ? |
| 28/09/2021 10:35:55 |
It was reported yesterday that 2/3rds of forecourts in the UK were without fuel. The shortages I reported on the 22nd were well in advance of the "Panic at the Pumps". This shows me that there is an underlying problem. A problem which should have been thought about Pre 2020, and addressed long before now. The scenes in the streets of the queues of cars, look more like those in the early 70's, all over again, and as usual nothing as been learned. We must be the laughing stock of the World as we bumble from one crisis to another. Regards Gray,
|
| 22/09/2021 18:29:23 |
By what I was told today, petrol is also in short supply in certain parts of the country. Regards Gray, |
| Thread: Emco FB2 Quirks and Additions |
| 19/09/2021 13:22:03 |
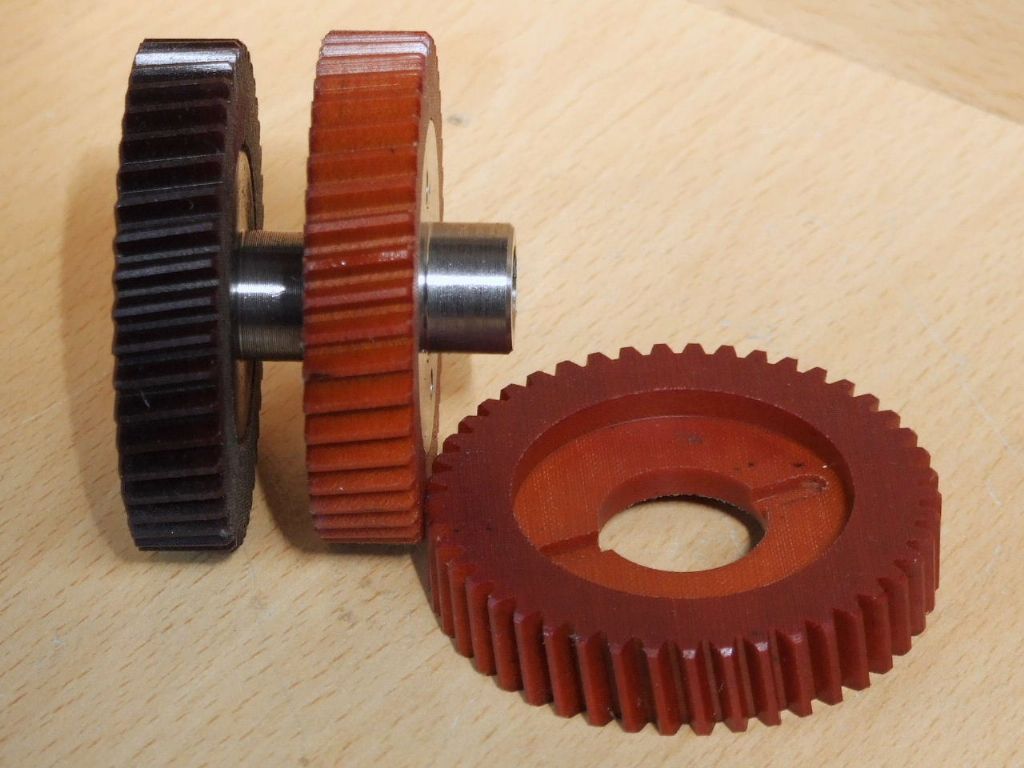
As promised in the article and above, I have now had chance to trial the new FB2 Tufnol gear. Having done quite a bit of heavy milling with my inserted tip 50 mm diameter Face Mill on Mild and Tool Steel. As well as the Emco 40 mm diameter HSS Face Mill. I decided it was time to take a look at how things were doing in the gearbox. This is the condition of the new gear on the Right compared to the original on the Left. Despite the new gear not being a true Helical gear there are no signs of scuffing on the edges of the teeth. Which is where I would expect to see some. Currently I am running the Delrin gear, which to me seems quieter still. I have not had a chance to do any serious milling with this gear as yet, property maintenance has got in the way, but that will soon change after this week, as a new project is started. Regards Gray, |
| Thread: Dodgy eyes and extra workshop lighting |
| 09/09/2021 15:25:14 |
One thing that is well worth a consideration is having a chat with your optician. I had better add I deal with a local family firm. I had lens put into my safety spec's which were tailored to my workshop requirements. Normal everyday glasses are for seeing the No 51 bus coming away off. In the workshop the furthest thing away from me is a maximum of 2 m. Thus my main safety spec's are adjusted for this distance which gave a chance to improve the Varifocal close-up portion. Until I asked the question I was unaware that these lenses are available in two standard ranges. These new glasses made such an improvement that I asked if he could do another pair which were for bench work with a focal range of about 300-350 mm. I can now sit at my workbench and see things a lot clearer. Without the need for magnifiers and illuminated lens, which I had been using before. Regards Gray, Edited By Graham Meek on 09/09/2021 15:26:40 |
| Thread: Threading myth .... busted! |
| 06/09/2021 12:02:13 |
I think the whole matter of the "set-over method" was spoiled when some one published tables for various "in-feeds" on the topslide for each thread. This put people off big time, as many have told me so. Those who have visited my workshop have seen how easy and quickly I can set-up and produce threads which involve no calculations, no setting with vernier protractor and the topslide was even set to 45 degrees in one instance to prove a point. As long as the tool is square to the work every thing will be fine. It was even clouded further, when another set of tables was produced to cater for the 1 degree less than half the thread angle. If the originator of the tables had read GHT's original article on Screw-cutting, the need for such tables would have not been necessary. Lastly it would pay to observe the manufacturers tolerance on the angle of a commercial tap, before worrying about slight variations in tool geometry due to side rake etc. Regards Gray, |
| 05/09/2021 12:00:10 |
A Cautionary warning, One problem I have with advancing the topslide in unison with cross-slide is this could cause a collision if working to a shoulder or a face when using a lathe equipped with a screw-cutting clutch. Using such lathes the screwcutting finishing point is initially set before screwcutting commences, sometimes with thou's spare as regards clearance. Thus for anyone who has made any of my screw-cutting clutches I would urge them to follow the method outlined in the articles. Generally, Henry Ford's Company once said, when asked to build the Rolls-Royce Merlin Engine during the war, that they could not work to the Rolls Royce drawings as the tolerances were too slack. Just because we work in sheds, or sometimes centrally heated workshops, there is no reason in my book why we cannot aspire to make better things. Those who look at their work, and think, I could have done that better are to be commended. This is how we were taught to hone our skills as apprentices, and as far as I am concerned this ethos has paid me huge dividends. Regards Gray, Edited By Graham Meek on 05/09/2021 12:01:13 |
| 02/09/2021 10:11:30 |
Posted by JasonB on 02/09/2021 07:10:36:
Although I'm a straight in feed type it's interesting to see what the insert manufacturers have to say on the subject as it looks like they suggest the equivalent to setting over the tailstock though the CNC takes care of the angle. Hi Jason, I suspect this was a typo error? Regards Gray,
While the plunge in technique has been advocated for as many years as I have been doing engineering. The plain fact of the matter is, it is down to personal choice. Having served my apprenticeship with the Dowty Group, (Propellers and Undercarriage, mainly). We apprentices were taught the set-over topslide method, (also advocated by South Bend). Some of the threads were quite coarse pitch, and the materials involved would be problematical to machine using the plunge in method. Time in my workshop is not a problem so I stick to the tried and tested method I was taught. It is far too easy for me to make a mistake with moving the topslide and cross-slide in unison. Regards Gray,
|
| Thread: EN1A verses black mild steel. |
| 27/08/2021 11:15:02 |
Machining EN1A is like using a hot knife going through butter, in other words dead easy. Machining Black bar I have likened to trying to machine a Brillo Pad, or Wire Wool. Money saved in the initial purchase will be wasted on electricity trying to get a good finish. That goes without the cost on ones patience during the machining process. Is this material grade correct to the specification for this application? Regards Gray, |
| Thread: Unusual Go-No Go Tool? |
| 25/08/2021 13:17:58 |
I did think that the test was for a weak spark, rather than a really powerful one. While working at Rank-Xerox, their copiers had a power supply to deal with attracting ink onto the paper. With special electrodes with numerous spikes on to distribute this to the paper. High speed printers which I have also worked on, (made in Germany and used mainly in the car industry, paper speed was around a metre/s, if my memory serves me correct), used a similar set-up and what was called in house a Corotron assembly. Maybe as Dave suggests, this tool pre-dates the Xerox as regards a printing process. On a separate theme, I did wonder if it had anything to with Marconi or Tesla, and the early spark generated communication. Not necessarily for the spark used, but for setting any air based capacitors in the circuit. Regards Gray, |
| 24/08/2021 16:37:16 |
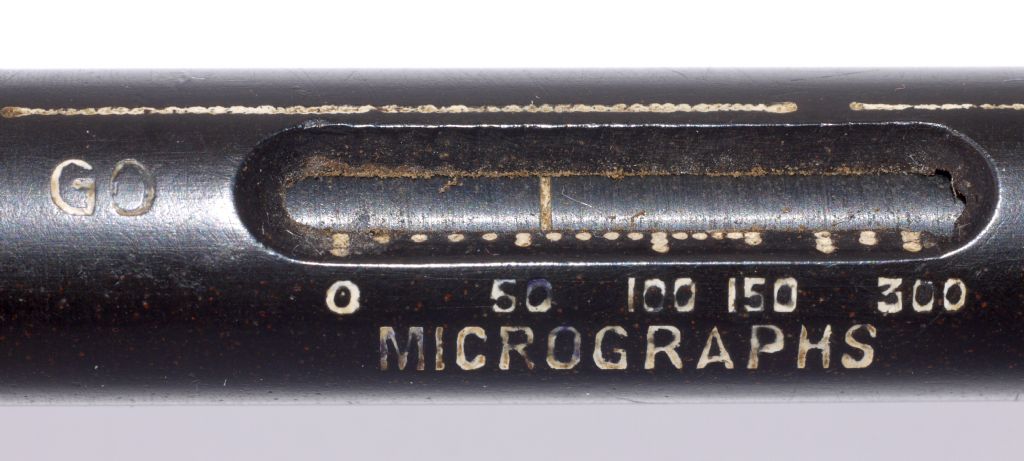
Hi Michael, I noted the gap in that line. It reminded me of the Zero line on a micrometer barrel at first, but then why the gap. As there is no room on the adjuster for a second scale I ruled that out. What does not settle with me and why I asked the question. If this tool was for testing spark strength then the "Go" condition would pass a fairly weak spark. Whereas the "Not Go" would be failing one hell of a spark. So the scale to me does not make sense for that application. It may well be that the sweet spot for setting what ever this tool was setting is in the 0-50 range, there being more graduations, the rest of the scale being arbitrary. We had settings on the Varian Linear accelerators that were in the preferred range, although these settings were well within the upper and lower accepted values, and in many cases not in the middle. Regards Gray,
|
| 24/08/2021 10:35:47 |
Posted by Michael Gilligan on 23/08/2021 22:07:39:
This one's for you, Gray [ click ^^^ for larger image ] . MichaelG. Hi Michael, Having done my fair share of engraving whilst working in the Oncology Workshop, I know how easy it is to make a mistake, at least it was worth a shot. One question, When the instrument is in the "Go" position, or Zero, do the two contacts, contact? Or is there still a gap? (Two questions really I suppose). Regards Gray, Edited By Graham Meek on 24/08/2021 10:40:28 |
| 23/08/2021 17:47:11 |
I have just been looking at Martin's original pictures again. The lettering looks to have been engraved and the "C" does not look quite right to me, Suspecting it might be a badly formed "G". The wax or white paint filling may have come out of the lettering. Doing a search for MIGROGRAPH did to my surprise show some results, but again to do with electron microscopes. I have yet to discover what a MIGROGRAPH is other than a miss typed word, but for there to be 10 pages in the search I cannot believe that there would be many hits for a miss spelling. Regards Gray, |
| 23/08/2021 11:26:36 |
Hi Michael, I have tried "Micrographs" as a company, as 100 and 300 Micrographs being a unit of measurement. I have tried it as a "Pocket type current setting device", as well as voltage. Putting "vintage" or "antique" into the search does nothing either. The searches assume that one is looking for a device to buy or information about Micrographs, ie pictures. A real enigma this one. Regards Gray, |
| Thread: Getting accuracy with my newly added DRO. |
| 22/08/2021 16:26:10 |
In my experience 2 flute, or slot drills are always undersize, but usually in the region of 0.03-0.05 mm. The amount depends on the size of cutter. While 3 and 4 flute milling cutters are usually on, or slightly oversize, but not by much. To measure a cutter correctly the cutting edge needs to be square on with the calliper or micrometer measuring face. Measuring across the ground "backing off" land behind the cutting edge will produce the sort of errors mentioned in the opening post. Hope this helps Regards Gray, Jason seems to have pipped me at the post. Edited By Graham Meek on 22/08/2021 16:28:03 |
| Thread: Unusual Go-No Go Tool? |
| 21/08/2021 11:14:40 |
Hi Michael, Is the the staining on the brass point similar to the powder from an arc strike? The reason I ask is that this unit clearly clips onto something with the square portion, and the hole in the other contact rest on another exposed contact area. Both these parts appear to be insulated from each other. In the view finder there appears to be a small "hair pin" electrode just beneath the clip. My reasoning is the brass point is wound in until the current jumps the gap, viewed through the view finder. The position of the red line shows if the device is set correctly. The problem is I don't know what would warrant such a tool in the electrical field. It might well be something to do with power generation. Or possibly capacitor storage capacity. Regards Gray, |
Want the latest issue of Model Engineer or Model Engineers' Workshop? Use our magazine locator links to find your nearest stockist!
Sign up to our newsletter and get a free digital issue.
You can unsubscribe at anytime. View our privacy policy at www.mortons.co.uk/privacy
- *Oct 2023: FORUM MIGRATION TIMELINE*
05/10/2023 07:57:11 - Making ER11 collet chuck
05/10/2023 07:56:24 - What did you do today? 2023
05/10/2023 07:25:01 - Orrery
05/10/2023 06:00:41 - Wera hand-tools
05/10/2023 05:47:07 - New member
05/10/2023 04:40:11 - Problems with external pot on at1 vfd
05/10/2023 00:06:32 - Drain plug
04/10/2023 23:36:17 - digi phase converter for 10 machines.....
04/10/2023 23:13:48 - Winter Storage Of Locomotives
04/10/2023 21:02:11 - More Latest Posts...
- View All Topics
- Reeves** - Rebuilt Royal Scot by Martin Evans
by John Broughton
£300.00 - BRITANNIA 5" GAUGE James Perrier
by Jon Seabright 1
£2,500.00 - Drill Grinder - for restoration
by Nigel Graham 2
£0.00 - WARCO WM18 MILLING MACHINE
by Alex Chudley
£1,200.00 - MYFORD SUPER 7 LATHE
by Alex Chudley
£2,000.00 - More "For Sale" Ads...
- D1-3 backplate
by Michael Horley
Price Not Specified - fixed steady for a Colchester bantam mark1 800
by George Jervis
Price Not Specified - lbsc pansy
by JACK SIDEBOTHAM
Price Not Specified - Pratt Burnerd multifit chuck key.
by Tim Riome
Price Not Specified - BANDSAW BLADE WELDER
by HUGH
Price Not Specified - More "Wanted" Ads...
Do you want to contact the Model Engineer and Model Engineers' Workshop team?
You can contact us by phone, mail or email about the magazines including becoming a contributor, submitting reader's letters or making queries about articles. You can also get in touch about this website, advertising or other general issues.
Click THIS LINK for full contact details.
For subscription issues please see THIS LINK.
Model Engineer Magazine
- Percival Marshall
- M.E. History
- LittleLEC
- M.E. Clock
ME Workshop
- An Adcock
- & Shipley
- Horizontal
- Mill
Subscribe Now
- Great savings
- Delivered to your door
Pre-order your copy!
- Delivered to your doorstep!
- Free UK delivery!


 Register
 Log-in


