Forum sponsored by:

Tool Post Nut
| Kane | 24/03/2013 14:40:37 |
| 10 forum posts | Hi, I have just bought a quick change tool post for my myford ml7, to replace a cracked 4 way tool post. However the old 4 way tool post had a locking handle instead of a nut, and this will not fit the new quick change tool post. Do I just need a standard nut to hold the QCTP in place? I noticed the myford site sells the nuts with a spherical washer (which I'm guessing isnt required?), but £5 for a nut seems a little excessive.
Cheers guys, Kane
|
| Nigel Bennett | 24/03/2013 14:44:45 |
 500 forum posts 31 photos | The standard nut is 7/16" BSF. I fitted a Dickson toolpost to my lathe, and made up a handle to suit. |
| Kane | 24/03/2013 14:48:32 |
| 10 forum posts | Thank you Nigel! One thing that confused me, the tool post came with a 'nut', it was like a cylindrical spacer with an internal thread, and a hexagon nut at the top. This fits inside the central hole of the toolpost, but the thread was much too small to fit the stud in the top slide. I thought it must just be a generic part that doesn't fit the myford (I emailed the manufacturer, but I don't think they will reply until next week). Any ideas what it might be?
Thanks again for the quick reply. Kane |
| mick | 24/03/2013 17:25:48 |
| 421 forum posts 49 photos | Never bother to find out what the "generic part" was for, I just made up a spacer and continued to use the original handle |
| NJH | 24/03/2013 21:08:36 |
 2314 forum posts 139 photos | Hi Kane - here, as they say, is one I made earlier! Thread the piece of rod to fit the tool post stud and insert a handle with a nice knob. Make up a thick washer to fit between the bottom of the rod and the body of the tool post. Adjust the thickness of this washer by trial and error until the new "nut" is tight when in the position shown. ( Quite a small amount removed will make quite a difference to the position of the handle) The advantage of this method is that it is quick to use and you will never need to search for that spanner amongst the swarf or in your pocket or..... What's more it is aesthetically pleasing - well I think so anyway! Regards Norman
Edited By NJH on 24/03/2013 21:15:15 |
| Kane | 24/03/2013 21:23:28 |
| 10 forum posts | Thanks everyone, I think I have all the info I need!
That bit of kit looks ideal Norman. I'll definitely have a go at making one, but first I'll need to secure the toolpost with a nut before I can make anything. I would never have thought about adjusting the thickness of the washer, but makes a lot of sense. Looks like I have plenty to learn!
Cheers Kane |
| Robbo | 24/03/2013 21:36:15 |
| 1504 forum posts 142 photos | Kane, You may also need a spacer/washer to fit down the 'ole in the toolpost to ensure it is a snug fit on the toolpost stud. It may already be so, these generic types do vary. If you can't get a 7/16" BSF nut without paying a fiver, PM me and I'll send you one. Phil |
| DMB | 24/03/2013 23:48:08 |
| 1585 forum posts 1 photos | Hi Kane, My S-7 came with a black painted triangular cast block with a height adjusting screw under one corner with a knurled disc fixed to middle of screw. The opposite side was a thicker, machined part which pressed the tool down upon the topslide. Centre of triangle had a hole where it fitted over the vertical stud mounted in the topslide. A light spring fitted on the stud under triangular tool clamp which was held down by special nut like you have described. Reason for curved underside of nut was so it fitted neatly in matching recess in top of tool clamp. This enabled varying angles of tool block to accomodate differing thicknesses of lathe tools and still provide secure clamping. Sorry this seems a bit long-winded but I wanted to describe whole attachment in detail. Hope this helps. John |
| Robbo | 25/03/2013 14:57:50 |
| 1504 forum posts 142 photos | John,
That sounds like a description of the standard Myford toolpost clamp, like this Phil |
| Roderick Jenkins | 25/03/2013 16:01:49 |
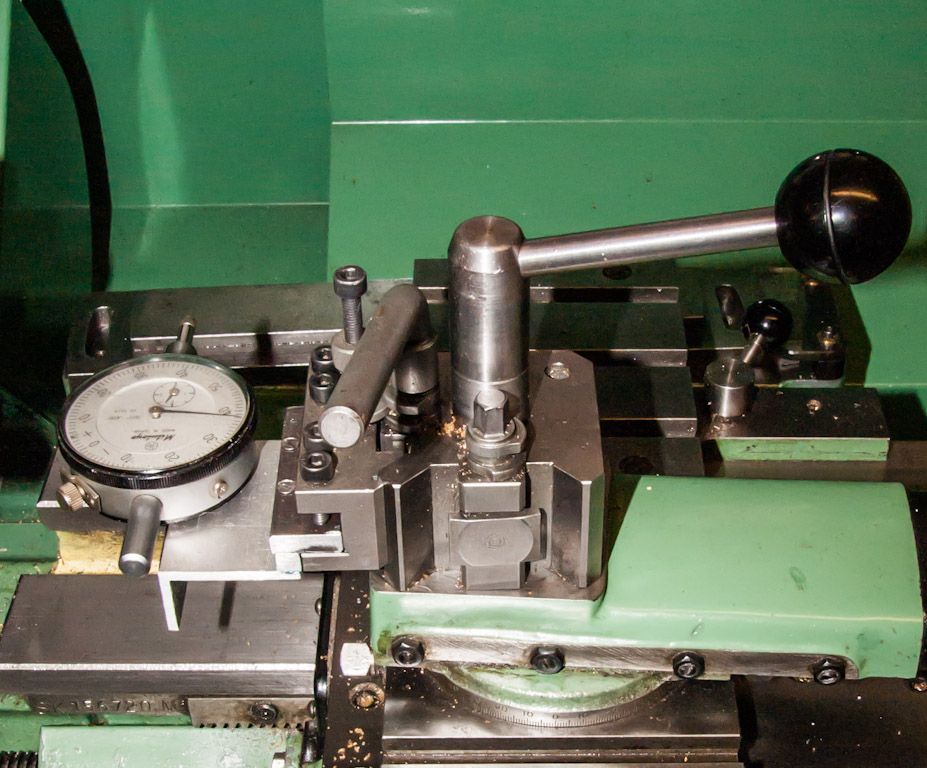
 2376 forum posts 800 photos | Kane, On my S7 I use the 4-way toolpost locking lever with the QCTP. The toolpost is located on the topslide stud with a shouldered washer. Some pics below:
Shouldered washer
Toolpost over stud
Locating washer in place.
The position of the locking handle is determined by the thickness of an additional washer:
With additional spacing washer.
Finally, the locking lever is screwed on until it interferes with the locking pins for the tool holder and then the whole lot is rotated until the locking lever becomes tight - some trial and error is needed to get spacing washer (or washers) of the correct thickness thicknes so that the locking lever is in the right place.
I find it very useful to able to easily adjust the angle of the tool using by rotating the QCTP slightly. HTH Rod |
| DMB | 25/03/2013 17:04:30 |
| 1585 forum posts 1 photos | Robbo. You are quite correct, but my post actually started with "My S-7" etc. John |
| woody1 | 25/03/2013 21:00:40 |
 91 forum posts 21 photos |
I have been educated! Thank you guys, lots here for me to think about. Absolutely fed up of my knob (uh-hum) facing towars the chuck Cheers David. |
| Les Jones 1 | 25/03/2013 22:47:54 |
| 2292 forum posts 159 photos |
Hi Kane, Les. |
| NJH | 26/03/2013 00:18:41 |
2314 forum posts 139 photos | Hi Les Well that's a comprehensive way of deciding just how much to remove! I confess to using the trial and error method but I got there in a couple of cuts! I should just point out that my original post may have been a little confusing in that I talked about a "washer". Now I guess a washer is usually thought of as being quite thin and, once parted off, will be a bit tricky to rechuck. It's much easier to make it thicker and, if you look carefully at my photo, you will see that I made mine about 1/2 inch thick - works just as well, and enables easy rechucking to get just the right thickness. Maybe I should call it a "spacer" rather than a washer! Cheers Norman |
| Les Jones 1 | 26/03/2013 08:52:13 |
| 2292 forum posts 159 photos |
Hi Norman, Les. |
| Kane | 29/03/2013 09:49:38 |
| 10 forum posts | Thank you everyone for your excellent advice. I got hold of a 7/16" BSF nut and got the tool post mounted.
However I now have a problem with not being able to adjust the tool holder low enough to get the 3/8" HSS bit to centre height, as it bottoms out on the top slide.
I guess the best option would be to mill the bottom of the tool holder down, but without a mill this may be tricky? Are the holders usually hardened? Is it possible to just grind the top of the lathe tool down further? It would need about 1-2mm taking off. Would this be ok? I thought about buying some smaller (8mm) HSS blanks, but don't know if these will be too small for the holder. Any advice appreciated. Cheers. Kane
|
| Les Jones 1 | 29/03/2013 10:48:22 |
| 2292 forum posts 159 photos |
Hi Kane, Les. |
| Kane | 29/03/2013 10:57:45 |
| 10 forum posts | Great thanks Les. If it's not a problem grinding the tool down further, I think this will be my first choice. I do have a 4 jaw, but facing could be a problem without a toolholder haha. I was also concerned about how much it would weaken the holder.
Kane |
| Bazyle | 29/03/2013 11:40:00 |
 6956 forum posts 229 photos |
I does seem daft to me to have a handle at all on the fixing nut which just gets in the way. It's not as if you are moving the block every five minutes like you would a 4-way which seems to be where the idea came from.
|
| Robbo | 29/03/2013 12:02:57 |
| 1504 forum posts 142 photos | Kane, Had the same problem when I foolishly bought a replaceable tip holder which was too thick so couldn't drop the tool holder down far enough to get it on centre before it bottomed on the top slide. I milled a few mm off the BOTTOM of the tool so it lowered the tip in relation to the holder, no problem milling, solved the problem. My quick answer to the tool post spanner dilemma was to use a box spanner with a permanent tommy bar fixed in it, and the unused socket on the other end of the box was sawn off! Imperial box spanners are like gold these days, but an 18mm will be a snug fit, especially as the tool post nut is extra long. Phil Edited By Robbo on 29/03/2013 12:08:01 |


Please login to post a reply.
Magazine Locator
Want the latest issue of Model Engineer or Model Engineers' Workshop? Use our magazine locator links to find your nearest stockist!
Sign up to our Newsletter
Sign up to our newsletter and get a free digital issue.
You can unsubscribe at anytime. View our privacy policy at www.mortons.co.uk/privacy
Latest Forum Posts
- hemingway ball turner
04/07/2025 14:40:26 - *Oct 2023: FORUM MIGRATION TIMELINE*
05/10/2023 07:57:11 - Making ER11 collet chuck
05/10/2023 07:56:24 - What did you do today? 2023
05/10/2023 07:25:01 - Orrery
05/10/2023 06:00:41 - Wera hand-tools
05/10/2023 05:47:07 - New member
05/10/2023 04:40:11 - Problems with external pot on at1 vfd
05/10/2023 00:06:32 - Drain plug
04/10/2023 23:36:17 - digi phase converter for 10 machines.....
04/10/2023 23:13:48 - More Latest Posts...
- View All Topics
Support Our Partners


Shopping Partners
Subscription Offer

Latest "For Sale" Ads
- Reeves** - Rebuilt Royal Scot by Martin Evans
by John Broughton
£300.00 - BRITANNIA 5" GAUGE James Perrier
by Jon Seabright 1
£2,500.00 - Drill Grinder - for restoration
by Nigel Graham 2
£0.00 - WARCO WM18 MILLING MACHINE
by Alex Chudley
£1,200.00 - MYFORD SUPER 7 LATHE
by Alex Chudley
£2,000.00 - More "For Sale" Ads...
Latest "Wanted" Ads
- D1-3 backplate
by Michael Horley
Price Not Specified - fixed steady for a Colchester bantam mark1 800
by George Jervis
Price Not Specified - lbsc pansy
by JACK SIDEBOTHAM
Price Not Specified - Pratt Burnerd multifit chuck key.
by Tim Riome
Price Not Specified - BANDSAW BLADE WELDER
by HUGH
Price Not Specified - More "Wanted" Ads...
Get In Touch!
Do you want to contact the Model Engineer and Model Engineers' Workshop team?
You can contact us by phone, mail or email about the magazines including becoming a contributor, submitting reader's letters or making queries about articles. You can also get in touch about this website, advertising or other general issues.
Click THIS LINK for full contact details.
For subscription issues please see THIS LINK.
Digital Back Issues


Donate

 Register
 Log-in
Model Engineer Magazine
- Percival Marshall
- M.E. History
- LittleLEC
- M.E. Clock

ME Workshop
- An Adcock
- & Shipley
- Horizontal
- Mill

Subscribe Now
- Great savings
- Delivered to your door

Pre-order your copy!
- Delivered to your doorstep!
- Free UK delivery!
All Forum Topics > Beginners questions > Tool Post Nut