Forum sponsored by:

Any "Beginners" building 5" gauge Boxhill?
| Trevor Davies 2 | 06/10/2011 11:35:23 |
| 5 forum posts | Whilst I am not exactly new to ME I have not practised for some 35 years. A chance gift of a few copies of Model Engineer and MEW sparked the flame again. One of the copies contained drawings for Martin Evans's Boxhill in 5" gauge. Examining the drawings I thought to mysel "I can do that" so out of storage came the lathe and my shed was converted to an engineering workshop.
Todate I have studied the drawings and have itemised the materials, fastenings and tapping tools requirements, sending orders to the various suppliers. Castings I will order as I proceed, to purchase en masse could be restrictive on the purse considering the other tooling requirements.
The frames have been cut form 5mm steel and drilled. Buffer beams I am not happy about as my machining of the draw hook slot left a lot to be desired, plus misreading the drawings led me to drill the holes for the buffers in the wrong place. I rectified by rivetting a filler piece and redrilling, but the REAL thing had a plate riveted over the slot for the draw hook. The angle irons have been made and drilled for the frames, but before fitting I may just remake the buffers.
So that is state of play, what I would dearly like is to find a newby like me who is building Boxhill so that we can make the same mistakes together, or not preferably. OR if someone would like to take me under their wing and become my mentor, but this person would need to be very patient of my ignorances.
Here's hoping Trevor
|
| Michael Malleson | 07/10/2011 09:07:08 |
| 62 forum posts 2 photos | Go to www.modelengineeringwebsite.co.uk and click on Mentors.
Mike. |
| pcb1962 | 07/10/2011 09:58:59 |
| 65 forum posts | I wish I could find the time to get started on it, hopefully by Christmas. Somebody on this board kindly sent me a set of pdfs of the construction articles last year, let me know if you're missing any. Due to my extreme shortage of workshop time I will be buying the frames, buffer beams etc ready cut from Model Engineers Laser, and I'm thinking of using a tig welded boiler from Steam Technology Ltd. I'm actually planning to build Stepney rather than Boxhill, as the real one lives fairly nearby at the Bluebell railway. I assume you've already found this website: http://modelengineeringwebsite.com/Terrier_build.html Edited By pcb1962 on 07/10/2011 10:08:58 |
| Peter Hothersall | 16/11/2011 22:43:00 |
| 13 forum posts 2 photos | I purchased an almost complete Terrier to finish and then run whilst I built an Adams Radial. Just needs pipework/ injector etc to complete. Beware that the drawings have an omission on the frames that needs to be addressed early on. There is no hole shown to let the tank balance pipes through the frames to the tank under the bunker. Having one that has been built to a high standard by the original builder, if you need photos of any areas of the loco then please contact me by the "message member" option below this post. I just hope I can complete it to the same standard as it is already. Peter H. |
| julian atkins | 14/02/2012 09:18:48 |
 1285 forum posts 353 photos | i am building a 5"g terrier as a copy of STEPNEY in fullsize too! there are a few other posts about BOXHILL on here and the model engineering clearing house website that may be of help. good luck with your own terriers! i am afraid that there are quite a few errors small and large in martin errors' drawings, though lots of people have built locos strictly to the drawings ok. so far ive done the frames buffer beams crankaxle other axles and the wheels and the completed cylinder block, and also made the chassis for an LBSCR 10 ton wagon to go behind for extra coal and water. i can also recommend norman barber's excellent write up of his POPLAR on the modelengineeringwebsite referred to above. i am trying to make my STEPNEY as close as possible to the original as she now is, so am departing quite a bit from the drawings of BOXHILL trevor-i think you have gone for overkill with the 5mm frame thickness instead of 3mm though as long as you remember to keep the outside frame dimension of 4.5" this wont cause any problems as long as you adjust the stretchers and cylinder block width accordingly etc the boiler as designed is only 3.75" wide so will fit ok between the thicker frame material you are using good luck! |
| Dennis Rayner | 14/02/2012 11:30:07 |
 137 forum posts 9 photos | I built Boxhill as a beginner in the early 70s using the ME articles. I was delighted with the way it turned out - a reliable performer. Realising that most locos are limited in their hauling capacity by their weight I chose to fill the side tanks with lead which took the weight up from about 55 lbs to about 105 lbs. This is a much more appropriate weight for the calculated TE. The bunker houses a submerged hand pump and is fed with water from a tank in my driving trolley.
This link http://youtu.be/ZJYi8LUTcNY should take you to a video of the loco in my back garden. I now run the other way round (ie down the 1 in 25). On level track of a sensible radius the loco will pull 6 adults easily.
As others have said there are some errors in the drawings and I am sorry that I cannot remember what they are except one - the cab roof is fundamentally wrong. Martin shows it as flat when seen from the front but it is an arc. The link to Norman Barber's superb loco shows this in the 2 pictures above and below "The Finished Locomotive". I made my roof out of annealed copper using a fly press and wooden formers.
Good luck with the loco - I don't think you will be disappointed |
| julian atkins | 21/02/2012 23:43:50 |
1285 forum posts 353 photos | dennis, thanks for your post! i had found your youtube clip sometime ago and it's great! you have built a cracking loco! as mentioned in a few other posts on this subject here and elsewhere the drawing errors seem to be as follows:- the axlebox and horncheeck drawings are awful. the boiler is nothing like a fullsize TERRIER and neither are the cab controls (which is such a shame as Stroudley was an artist down to the very last detail). so far as the boiler is concerned, it goes for overkill with the grate area and ends up with quite a low free gas ratio through the tubes. it doesnt have the sort of rectangular firehole that the fullsize has nor the large radius on the backhead flange, and it is extended and slopes down over the rear axle. this is quite unnecessary IMHO, and mine has a full depth firebox sitting within the rear horns as per fullsize. the 1/16" inner wrapper i think is suspect as is the lack of proper girder stays. i dont think the palm stays are up to modern standards either. the lower water gauge bush is too low (there should be 2 water gauges anyway as per prototype). my boiler design has a 5/16" foundation ring all round and a 3/32" inner wrapper and a flat topped inner firebox with girder stays. dont forget the boiler is working pressure 90 psi. my own boiler is 4" dia which fits easily between the frames and the front of the rear horns losing only 1" on the grate area of martin evans' boiler design despite the wider foundation ring, and thicker inner wrapper. i have had to use some quite thin boiler insulation material to just about keep to the correct outside diameter. the dome is moved forward to be in line with the driving wheel centre line for the later Marsh boiler. although the side elevation is pretty accurate in martin evans' drawing, the front elevation is NOT! for some inexplicable reason he widened the buffer beams and side tanks and cab. the GA side elevation is correct for the shape of the cab roof but as you have noted on sheet 8 the detail of the cab roof is not and is wrong. depending on how particular you want to be, there are lots of differences from the prototype that add nothing to the miniature ie tank extending into the cab on the r-h side, cab windows too large and in the wrong place, tanks slightly too low etc.. for an original A class TERRIER the smokebox should NOT be circular, and in any event martin evans shows the diameter of the smokebox and smokebox door too small by quite a lot. unfortunately martin evans also completely cocked up the valvegear which has far too large a throw on the eccentrics. this can be accomodated but only with a longer length expansion link to correct this fault. no suspension offset is shown whereas there should be one for good valve events. apparently the balance pipe requires additional holes in the frame not shown, though personally i dont see a problem with making the balance pipe as per prototype. i dont like the well tank idea, so mine will have a wagon to go behind for extra water and coal. i have heard horror stories of the press fit valve spindle glands coming adrift so best to silver solder these in place. the balance weights on the wheels shouldnt be proud of the wheel tread and should be slightly less. the works diameter of the wheels is 4', so martin evans' 4 3/16" is slightly less than fullsize. shame about the lack of room for 4 lifting links to the expansion links and the cut away required on the slidebars as this precludes the use of channel section slidebars as per prototype. my TERRIER has the cylinder block moved forward by 1/4" to give a longer conn rod length nearer to prototype. if i hadnt already machined the cylinders and crankaxle to drawing i would make the outer crank webs 1/4" thick and gain a bit more space for the port passages and a larger exhaust passage. i would also make the cylinders as long as the castings would allow to get a bit more piston width as there is ample room at the front for longer cylinders. the front frame cut out should be the same height as the rear freame cut out and it doesnt take much to fabricate a crosshead pump body to fit the larger cut out. the crosshead pumps are in line with the motion centre line on fullsize, and again it doesnt require much to achieve this in miniature. the reverser arrangement is nothing like Stroudley's, and can easily be made to be the same in miniature. as mentioned above Stroudley was an artist when it came to details, and there is no reason whatsoever why the correct arrangement and design of cab controls should not be incorporated in miniature. one advantage of modelling STEPNEY though is that she hasnt had a westinghouse pump fitted since the 1930's! on mine, the brake cylinder (vacuum on the fullsize STEPNEY) is a steam brake cylinder, and the large reservoir contains a filter and supply from the wagon and acts as a sump to feed the injectors which are rather small but are tried and tested! martin evans' frame stretchers and motion plate are nothing like the prototype, and in fact the prototype had more frame stretchers that can be with advantage be reproduced in miniature. Stroudley's design is so beautiful and perfect that it seems such a pity to depart from it in any way! generally, a very successful design in fullsize can be reproduced successfully in miniature without any departure from the original apart from the internals of the boiler, and the salter safety valves etc.
otherwise a lovely design and it is remarkable how so many successful working locos have been built to the BOXHILL drawings! |
| Peter Hothersall | 22/02/2012 09:33:19 |
| 13 forum posts 2 photos | Hi Julian You forgot to mention that the top of the of the side tanks should be recessed. BUT lads, lets not forget that the start of this thread asked ' Any "Beginners" building 5" guage Boxhill ? ' I am fairly new to the "live steam" scene and I as mentioned above am embarking on an Adam's Radial "Combpyne" by Kevin Moonie. They are more recent drawings, and appear pretty good. I have also done a lot of research on that loco and will include some minor visual cahges. I purchased an almost complete Boxhill to finish and run whilst building the Combpyne. But I, like a lot of enthusiasts out there, do not have the skill to redesign boilers and valve gear. Julian, I seriously applaud your skills, but I do not want us to put off prospective builders who love the style of these diminutive locos. I have always liked them from being a youngster and find the Martin Evans Boxhill a 'fair' representation. Warts and all. Happy building Peter Hothersall |
| julian atkins | 22/02/2012 10:35:08 |
1285 forum posts 353 photos | hi peter, it wasnt my intention to put anyone off building BOXHILL, merely to list some of the design faults for the unwary. i have never liked martin evans' habit of using the running plate as the bottom of the water tanks as this makes assembly and painting difficult, and the saving in brass is minimal and not worth the extra hassle... so i would recommend anyone to make the tanks as self contained units. also be very careful with the castings as there is hardly any machining allowance on them. good luck with completing your own TERRIER and the radial tank!
cheers, julian Edited By julian atkins on 22/02/2012 10:35:39 |
| Peter Hothersall | 22/02/2012 16:02:04 |
| 13 forum posts 2 photos | Hi Julian Your comments about the side tanks got me wondering about the ones on mine. I won't be 100% sure until it is dismantled for painting, but it looks like the original builder had the same idea as yourself and has put a bottom in the tank. Good idea, and I will also consider this theory for the radial tanks. Regards Peter |
| julian atkins | 23/02/2012 13:26:56 |
1285 forum posts 353 photos | if you make the tanks as a self contained unit anyone starting from new can make the running boards out of steel plate anyway which saves on brass!
peter, did you find there is much clearance between the top of the front axle and the bottom of the crosshead on your TERRIER? the axle dia is supposed to be 5/8" all along and i would be interested to know if yours is relieved locally to clear the crossheads. cheers, julian |
| Peter Hothersall | 24/02/2012 10:47:17 |
| 13 forum posts 2 photos | Hi Julian Good question ! On checking my Terrier, there is no clearence on full axle travel. In fact, because the original builder has pinned the Piston rod to the Crosshead the pin is also fouling the axle. I will have to restrict the axle travel as I think it does not need to so great and do something with the pin. Thanks for the heads up on that one. This is a photo of the Cylinders and inside motion
Regards Peter |
| julian atkins | 24/02/2012 13:41:28 |
1285 forum posts 353 photos | Peter, that's a great pic of what appears to be a very well made loco. you could always put the front axle between centres when dismantled for painting and turn the section between the axle boxes down to 1/2" dia. cheers, julian |
| Robert Thompson 3 | 08/04/2012 12:46:46 |
| 25 forum posts | Hi all, a question for you. I am looking at the crank shaft in particular the webs. The build notes call for 1"x5/16" material but all the drawings show 1 3/16" x 5/16" and i cant see a clue as to which is correct. Can anyone help?
Thanks Bob Thompson |
| julian atkins | 08/04/2012 13:06:52 |
1285 forum posts 353 photos | hi bob, they are 13/16" x 1 7/8" each, 5/16" thick. thats 13/16", not 1 3/16"! hope that helps! cheers, julian Edited By julian atkins on 08/04/2012 13:10:54 |
| Robert Thompson 3 | 08/04/2012 13:10:06 |
| 25 forum posts | Thanks Julian excellent service Bob |
| julian atkins | 08/04/2012 13:14:00 |
1285 forum posts 353 photos | hi bob, i have sent you a PM cheers, julian |
| Peter Hothersall | 09/04/2012 09:55:27 |
| 13 forum posts 2 photos | Hi Bob Just in case it helps, I have included another one of the photos I took whilst my Terrier's unside was visible. This shows the crank in greater detail.
If you click on the picture (or the one above) then it will enlarge full size. You can then right click on the enlarged picture to save it on your pc if you felt it useful. I always find a picture worth a thousand words. I have more pictures if you want to send me an email. Regards Peter |
| Robert Thompson 3 | 09/04/2012 10:05:03 |
| 25 forum posts | Thanks Peter thats very helpful indeed. As you say pictures always explain so much better than words. I will drop you a line. Cheers
Bob Thompson |
| Lee Griffiths | 21/01/2017 13:42:47 |
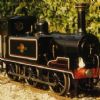
| 19 forum posts 26 photos | Thought I'd add mine to the thread. Bought unseen from an auction last year with no history. Well made originally, but very poorly repainted at some point. Boiler needs work so I'm thinking of just getting a new one made up.
|


Please login to post a reply.
Magazine Locator
Want the latest issue of Model Engineer or Model Engineers' Workshop? Use our magazine locator links to find your nearest stockist!
Sign up to our Newsletter
Sign up to our newsletter and get a free digital issue.
You can unsubscribe at anytime. View our privacy policy at www.mortons.co.uk/privacy
Latest Forum Posts
- hemingway ball turner
04/07/2025 14:40:26 - *Oct 2023: FORUM MIGRATION TIMELINE*
05/10/2023 07:57:11 - Making ER11 collet chuck
05/10/2023 07:56:24 - What did you do today? 2023
05/10/2023 07:25:01 - Orrery
05/10/2023 06:00:41 - Wera hand-tools
05/10/2023 05:47:07 - New member
05/10/2023 04:40:11 - Problems with external pot on at1 vfd
05/10/2023 00:06:32 - Drain plug
04/10/2023 23:36:17 - digi phase converter for 10 machines.....
04/10/2023 23:13:48 - More Latest Posts...
- View All Topics
Support Our Partners


Shopping Partners
Subscription Offer

Latest "For Sale" Ads
- Reeves** - Rebuilt Royal Scot by Martin Evans
by John Broughton
£300.00 - BRITANNIA 5" GAUGE James Perrier
by Jon Seabright 1
£2,500.00 - Drill Grinder - for restoration
by Nigel Graham 2
£0.00 - WARCO WM18 MILLING MACHINE
by Alex Chudley
£1,200.00 - MYFORD SUPER 7 LATHE
by Alex Chudley
£2,000.00 - More "For Sale" Ads...
Latest "Wanted" Ads
- D1-3 backplate
by Michael Horley
Price Not Specified - fixed steady for a Colchester bantam mark1 800
by George Jervis
Price Not Specified - lbsc pansy
by JACK SIDEBOTHAM
Price Not Specified - Pratt Burnerd multifit chuck key.
by Tim Riome
Price Not Specified - BANDSAW BLADE WELDER
by HUGH
Price Not Specified - More "Wanted" Ads...
Get In Touch!
Do you want to contact the Model Engineer and Model Engineers' Workshop team?
You can contact us by phone, mail or email about the magazines including becoming a contributor, submitting reader's letters or making queries about articles. You can also get in touch about this website, advertising or other general issues.
Click THIS LINK for full contact details.
For subscription issues please see THIS LINK.
Digital Back Issues


Donate

 Register
 Log-in
Model Engineer Magazine
- Percival Marshall
- M.E. History
- LittleLEC
- M.E. Clock

ME Workshop
- An Adcock
- & Shipley
- Horizontal
- Mill

Subscribe Now
- Great savings
- Delivered to your door

Pre-order your copy!
- Delivered to your doorstep!
- Free UK delivery!
All Forum Topics > Beginners questions > Any "Beginners" building 5" gauge Boxhill?