Moore & Wright depth gauge - information, please!
Seeking instructions for M&W no 2675 IN (56)
| ega | 02/03/2023 11:46:22 |
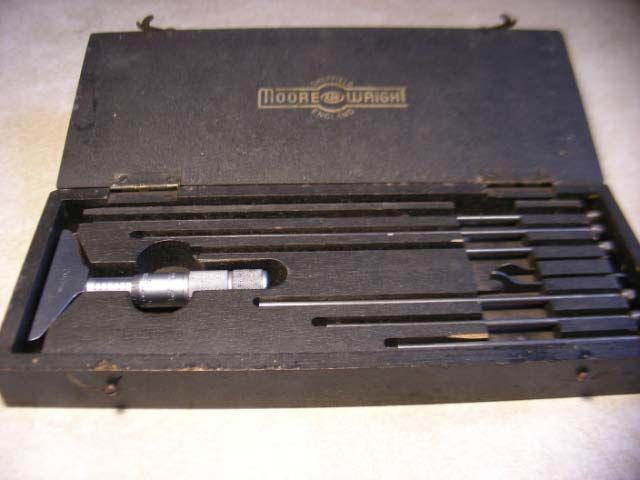
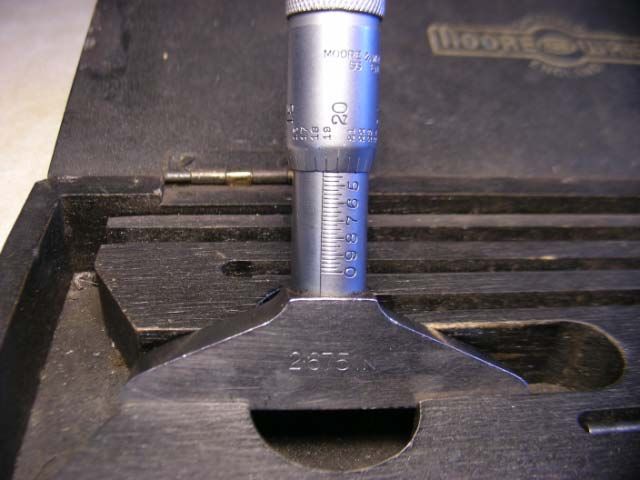
| 2805 forum posts 219 photos | I have just acquired an M&W depth gauge from a forum advertiser: The base is marked "2675 IN" and the there is a "56" under "Moore" on the sleeve: The gauge seems to be complete and in good condition for its age but, unsurprisingly, came without instructions (I have, of course, looked online but without finding anything specific to this model). At first glance, I can't see how the rods are retained and should be grateful for guidance. |
| alan ord 2 | 02/03/2023 12:07:18 |
145 forum posts 41 photos | The top knurled knob is removed and the relevant rod, depending upon depth measured, is inserted and the knob replaced. Check calibration using a slip gauge.
Alan. |
| peak4 | 02/03/2023 12:09:27 |
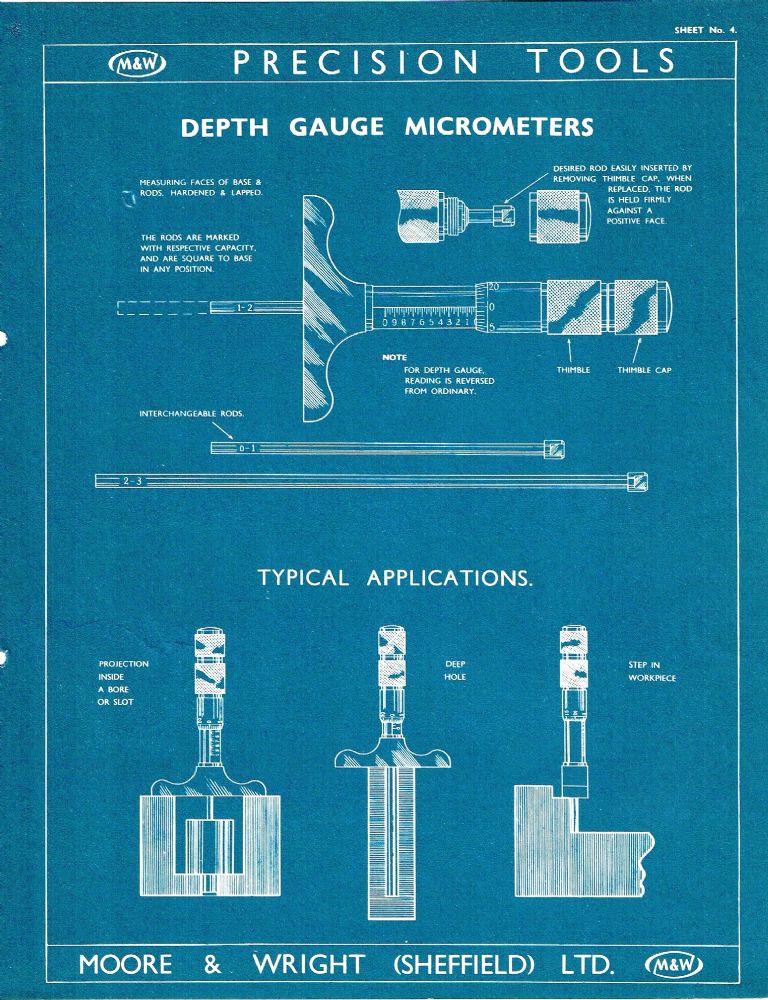
2207 forum posts 210 photos | The line drawing on P46 of this old catalogue shows it quite well |
| ega | 02/03/2023 12:47:53 |
| 2805 forum posts 219 photos | Thank you both. This type of gauge is new to me and I see now that, confusing the end cap with a ratchet, I had made the elementary mistake of inserting the rod from the base end! I think I am still going to have to dismantle, clean and lubricate as the ring nut under the cap is loose and this seems to be disconnecting the sleeve from the thimble so that turning the latter does not alter the reading. Any further pointers would be welcome. Incidentally, I note from the helpful line drawing that M&W redesigned the base which is noticeably more curvy than mine; I speculate that this may have been intended to make the gauge easier to handle in use. PS A further point arises from the note on the drawing: what I thought was the type number may be a dimension, hence the "IN"; confusingly, in my 1970 catalogue, number 56 is a jenny caliper. Edited By ega on 02/03/2023 12:54:21 |
| Nigel McBurney 1 | 02/03/2023 15:07:42 |
1101 forum posts 3 photos | When fitting a depth rod to the micometer head always ensure that the mating faces are very clean,any minute spec of grime will affect the calibration. |
| Nicholas Farr | 02/03/2023 16:05:14 |
3988 forum posts 1799 photos | Hi ega, this scan may be of use to you. I don't know what the 56 is, but my one is the same model as yours and has 54 on it, and is in almost the same type of box, as the central channel where your head sits, extends fully to the right hand side in my box. Click on the scan for a bigger view. Regards Nick. Edited By Nicholas Farr on 02/03/2023 16:29:29 |
| noel shelley | 02/03/2023 17:47:59 |
| 2308 forum posts 33 photos | 2.675" I fancy is the height of the instrument to add to depth rod to give the lenght of a rod. To calibrate will require a set of slip gauges. only the 0 - 1" can be set as is. To set, Calibrate, using the 2 little spanners with the instrument and adjust the collars on the rod. Noel. |
| ega | 02/03/2023 18:31:27 |
| 2805 forum posts 219 photos | Nigel, Nick and Noel: Many thanks for the further information. The decimal point in 2.675 is indeed just visible in my photo. M&W also made a type 53. |
| Colin Heseltine | 02/03/2023 20:06:10 |
| 744 forum posts 375 photos | Also note that when you insert the depth rod required give it a little twist as it meets the mounting surface. If you look closely at the mounting surface it has two grooves which will act to clean the mating faces. Colin |
| old mart | 02/03/2023 20:50:41 |
| 4655 forum posts 304 photos | I had the toolmakers make a special rod for my Mitutoyo 0-6 depth gauge, somewhere in between the 2" and 3" rods. This was used to measure the stroke of a hydraulic cylinder used on Airbus main landing gear and landing gear door uplocks. Otherwise I would have to changed rods each time the stroke was measured even though the stroke was less than 1". I still have it, not much use now. The 2.675" will be the length of the 0-1" rod from the tip to the underside of the top flange. Add 1" to that for each successive rod. Not easy to adjust, fortunately rarely required.
Edited By old mart on 02/03/2023 20:54:51 Edited By old mart on 02/03/2023 20:56:25 |
| ega | 03/03/2023 11:43:40 |
| 2805 forum posts 219 photos | old mart: From today's Guardian crossword: "Europe's largest manufacturer of commercial aircraft (6)" Colin: Did you mean the slots in the ring nut? I took these to be for tightening but I suppose they could also do what you say. |
Please login to post a reply.
Want the latest issue of Model Engineer or Model Engineers' Workshop? Use our magazine locator links to find your nearest stockist!
Sign up to our newsletter and get a free digital issue.
You can unsubscribe at anytime. View our privacy policy at www.mortons.co.uk/privacy
- *Oct 2023: FORUM MIGRATION TIMELINE*
05/10/2023 07:57:11 - Making ER11 collet chuck
05/10/2023 07:56:24 - What did you do today? 2023
05/10/2023 07:25:01 - Orrery
05/10/2023 06:00:41 - Wera hand-tools
05/10/2023 05:47:07 - New member
05/10/2023 04:40:11 - Problems with external pot on at1 vfd
05/10/2023 00:06:32 - Drain plug
04/10/2023 23:36:17 - digi phase converter for 10 machines.....
04/10/2023 23:13:48 - Winter Storage Of Locomotives
04/10/2023 21:02:11 - More Latest Posts...
- View All Topics
- Reeves** - Rebuilt Royal Scot by Martin Evans
by John Broughton
£300.00 - BRITANNIA 5" GAUGE James Perrier
by Jon Seabright 1
£2,500.00 - Drill Grinder - for restoration
by Nigel Graham 2
£0.00 - WARCO WM18 MILLING MACHINE
by Alex Chudley
£1,200.00 - MYFORD SUPER 7 LATHE
by Alex Chudley
£2,000.00 - More "For Sale" Ads...
- D1-3 backplate
by Michael Horley
Price Not Specified - fixed steady for a Colchester bantam mark1 800
by George Jervis
Price Not Specified - lbsc pansy
by JACK SIDEBOTHAM
Price Not Specified - Pratt Burnerd multifit chuck key.
by Tim Riome
Price Not Specified - BANDSAW BLADE WELDER
by HUGH
Price Not Specified - More "Wanted" Ads...
Do you want to contact the Model Engineer and Model Engineers' Workshop team?
You can contact us by phone, mail or email about the magazines including becoming a contributor, submitting reader's letters or making queries about articles. You can also get in touch about this website, advertising or other general issues.
Click THIS LINK for full contact details.
For subscription issues please see THIS LINK.
Model Engineer Magazine
- Percival Marshall
- M.E. History
- LittleLEC
- M.E. Clock
ME Workshop
- An Adcock
- & Shipley
- Horizontal
- Mill
Subscribe Now
- Great savings
- Delivered to your door
Pre-order your copy!
- Delivered to your doorstep!
- Free UK delivery!


 Register
 Log-in


