Pitch Circle
| Roy Birch | 21/06/2021 18:54:38 |
| 75 forum posts 22 photos | Hello
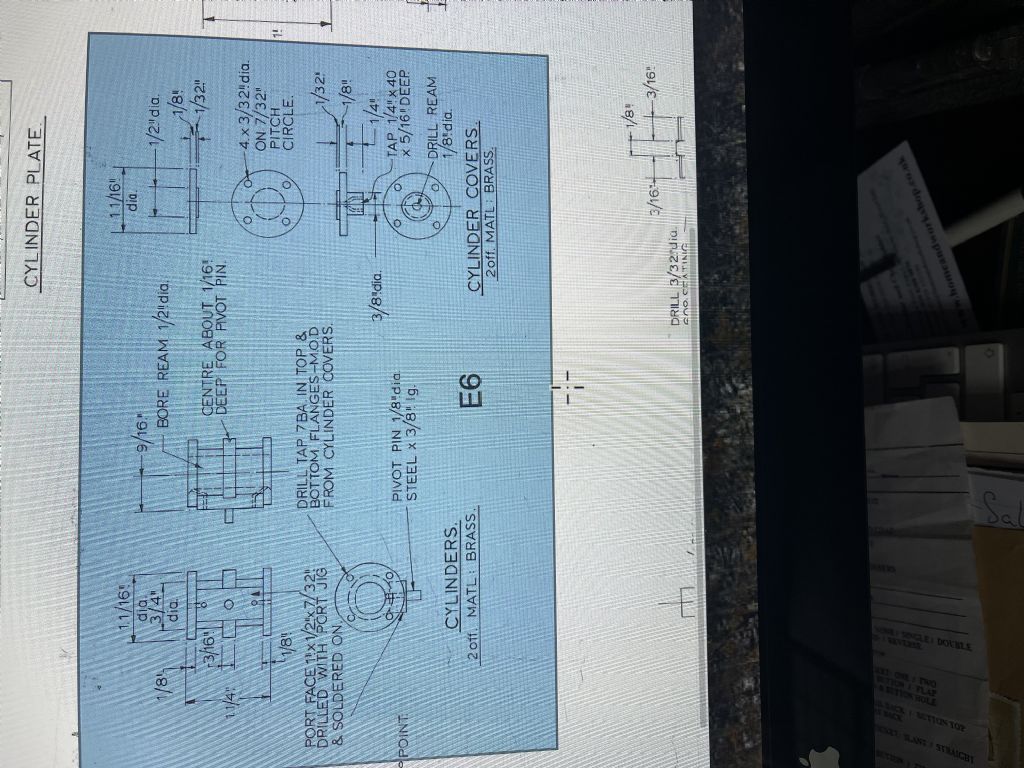
Can anyone tell me what 7/32 pitch circle means on drawings for a cylinder with 4 holes for the cover, the outside diameter is 1. 1/16, the bore is 1/2,
Edited By Roy Birch on 21/06/2021 19:00:08 |
| JasonB | 21/06/2021 19:00:45 |
25215 forum posts 3105 photos 1 articles | It generally means that the 4 holes will have their ctrs placed evenly around a circle of 7/32" diameter but that sounds very small. What engine is it? Following your edit something just over 3/4" PCD would be more likely. Edited By JasonB on 21/06/2021 19:03:12 |
| Roy Birch | 21/06/2021 19:03:15 |
| 75 forum posts 22 photos | its a small engine for a model boat called Miranda, I tried to post a picture of what it is but the site wont let me |
| Jager | 21/06/2021 19:04:51 |
| 44 forum posts 5 photos | Hi Roy, When calling for holes on a pcd it is necessary to describe the hole and specify the pcd. e.g. 4- holes 6mm dia on 24mm pcd. I suspect something is missing from your drawing. David. |
| Jager | 21/06/2021 19:05:40 |
| 44 forum posts 5 photos | Hi Roy, When calling for holes on a pcd it is necessary to describe the hole and specify the pcd. e.g. 4- holes 6mm dia on 24mm pcd. I suspect something is missing from your drawing. David. |
| duncan webster | 21/06/2021 19:06:10 |
| 5307 forum posts 83 photos | It means it is a misprint I think. Pitch circle is the diameter on which the 4 holes are positioned. In this instance it must be more than 1/2 and less than 1 1/16. Scale it off and let us know what it comes out as. I wouldn't be surprised at 27/32, making the holes 7/64 from the outside edge and 11/64 from the bore |
| Roy Birch | 21/06/2021 19:09:13 |
| 75 forum posts 22 photos | The drawing has the following information, 4. x 3/32"dia on 7/32 Pitch Circle, I guess that 3/32 is the hole size |
| JasonB | 21/06/2021 19:10:43 |
25215 forum posts 3105 photos 1 articles | How to post pictures here Yes 3/32" hole size and I'm with Howard 27/32" sounds likely. |
| duncan webster | 21/06/2021 19:13:00 |
| 5307 forum posts 83 photos | Who's Howard?
|
| Roy Birch | 21/06/2021 19:20:01 |
| 75 forum posts 22 photos |
Edited By JasonB on 21/06/2021 19:51:59 |
| Roy Birch | 21/06/2021 19:22:03 |
| 75 forum posts 22 photos | This what I am trying to get to, very simple when you know how but I just never realised how challenging Model Engineering is when you dont really know what you are doing |
| Dave Halford | 21/06/2021 19:46:05 |
| 2536 forum posts 24 photos | Roy, The side view drawing shows the holes between 1 1/16" and 3/4" so 7/32 must be an error or they end up in the bore. ME drawings seem to be full of errors and omissions in general. It's wise not to make stuff at random without comparing the fit. |
| Roy Birch | 21/06/2021 19:53:29 |
| 75 forum posts 22 photos | Hello Dave So am I right that when 7/32 is expressed as a pitch circle it means that 7/32 should be the distance from the centre of the bore or circle to the centre of the bolt hole? and 1 thing that has caught me out with model engineering is the errors on the drawings, when you first started out how did you get around these errors, did you just make the mistake? |
| JasonB | 21/06/2021 20:00:28 |
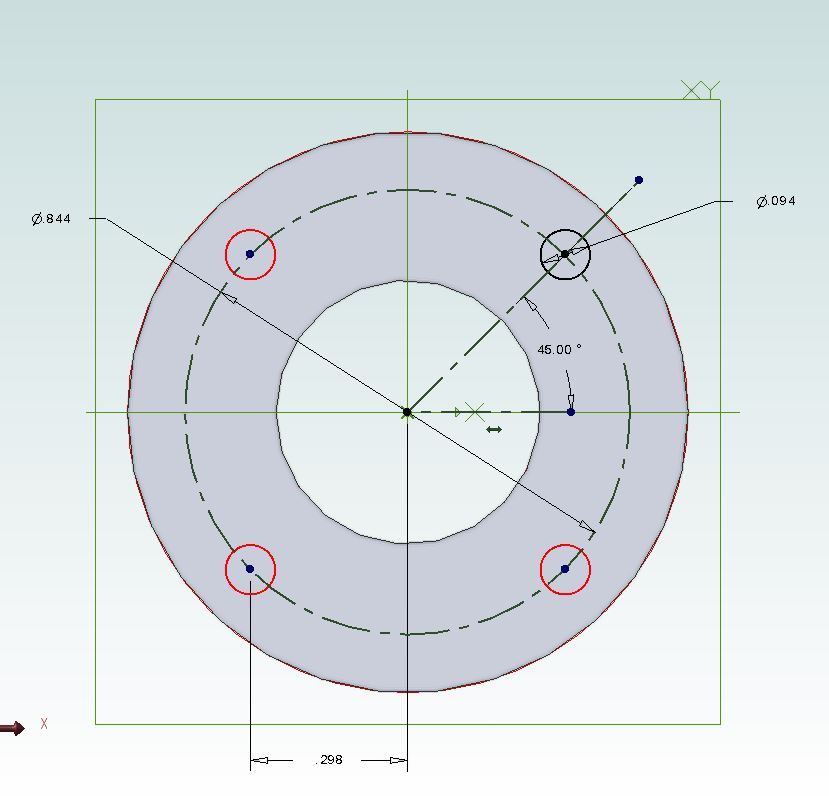
25215 forum posts 3105 photos 1 articles | As Duncan says 27/32 (0.844" ) plots Ok and looks like the drawing.
The PCD or Pitch Circle is the diameter of the green dotted circle that should have been 27/32" not 7/32" and that is what the ctr of each of the 3/32" holes sits on. Edited By JasonB on 21/06/2021 20:01:54 |
| Roy Birch | 21/06/2021 20:11:46 |
| 75 forum posts 22 photos | Thanks Jason, so when you guys make loco's and other things from drawings do you follow the drawing or do you fit and measure the loco as you go, I have made the crankshaft for this model and it also does not fit even though it is exactly to the dimensions on the drawing, the distance between the two sets of crank webs are 1/16 out which I would have noticed if I had measured the distance from the con rods where they are installed, the reason I ask is because I am planning on building Virginia 440 in 3 1/2 gauge soon and then an A4 but that may be a long way off if this is anything to go by. |
| Zan | 22/06/2021 10:00:11 |
| 356 forum posts 25 photos | As most drawings are produced by amateurs working in home workshops, and detailing what they have actually made the drawings are only as good as the skill of the designer in fully detailing ( or remembering ) any changes which had to be made as the build progressed. All drawings thus should be checked as far as possible for correct dimensions as it can lead to complications. I am making a loco donkey pump at the moment, using magazine drawings. The height if the pump block was given in its main drawing at 1/16” less than shown in the later drawing of the water passageways . This I missed this, so it gave me headaches to sort out, solved by making the top plate 1/16 thicker to make the block big enough for the stroke of the pump , but I still had another couple of mods to make to sort things out. The drawings for this loco build are tremendously accurate with tiny clearances and I trust them! It is essential as even with careful checking, a component assembly may have been made a long time before adjacent components are fitted, and mistakes in the drawings may not be spotted even with diligent care But as seen problems still arise. I suspect the problem this time was with the draftsmanship of the magazine employee rather than the designer. if you make and measure where do you start? Something is needed to measure! It’s all part of the process as experience and knowledge of interpretation of drawings and the reality of construction grow. But it also needs common sense, you can’t drill holes in fresh air! Your case was a simple printing error . One of the advantage of producing 3D cad drawings is that the dimensioning is automatic to what has been created and such printing errors in both your and my case would not take place! But again, that depends on the designer actually doing that my designer does not use cad, and I am constantly amazed at his skill. |
| Zan | 22/06/2021 10:02:27 |
| 356 forum posts 25 photos | Ps it seems that with your crank problems, you will need a serious lot of checking at all stages of this build, as you have now identified two areas of error. |
| Andrew Johnston | 22/06/2021 10:05:31 |
7061 forum posts 719 photos | Posted by Roy Birch on 21/06/2021 20:11:46:
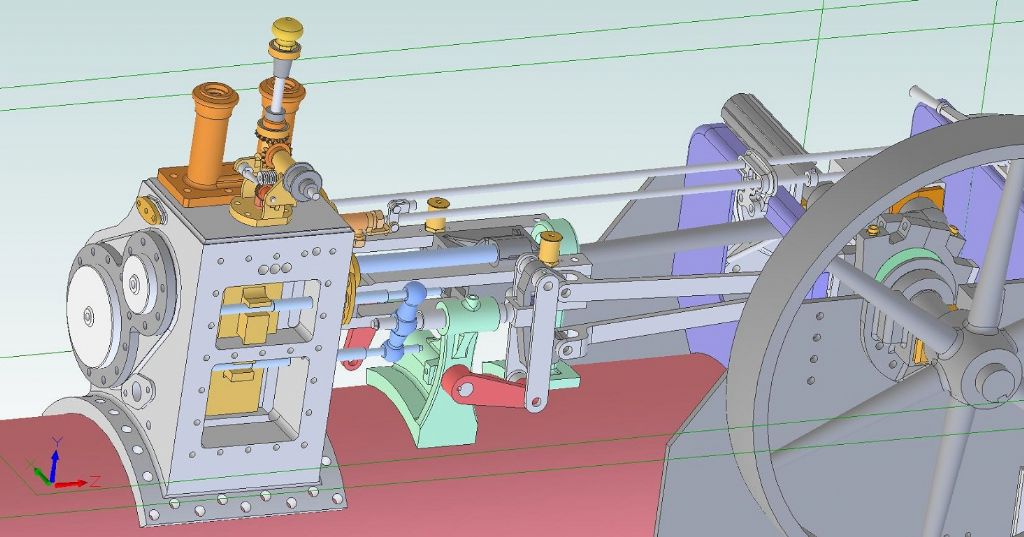
.....when you guys make loco's and other things from drawings do you follow the drawing or do you fit and measure the loco as you go...... It depends upon the quality of the drawings. The drawings for my traction engines are riddled with errors and omissions. So I am re-designing in 3D CAD from whence I can create 2D engineering drawings. I also create assemblies in CAD so I can check fit and function before generating drawings, like this assembly of the valve gear: Apart from the errors and lack of information on the drawings other reasons for CAD modelling are to account for metric, rather than imperial, material and to add features that are on the full size engines but not on the drawings. I'm idle and I expect to make parts once, and also expect them to fit each other even when made months apart. I aim to do my faffing and fitting on the CAD system, not in the workshop. Andrew |
| JasonB | 22/06/2021 10:34:53 |
25215 forum posts 3105 photos 1 articles | With the net it's possible to do a bit of searching to see if a set of drawings have errors which would be a good start. Certain designers are known to make more errors than others so find out if they can be trusted or if more checks are needed. Also make sure you are working to an upto date set of drawings as some do get revised or addendum sheets added that can get lost or even add additional errors! Both can be the case when buying second hand drawings to save a few quid which may work out more costly in the end. Now I mostly design my own but the last engine I made from castings I redrew it in CAD making corrections as I drew it so there were no surprizes when machining or assembling. This also helps you to understand the drawings and think about how you are going to make the parts and you can alter them if need be to allow for how you will make them rather than the original designer who may have had different machines and tooling or castings that are no longer available. |
| Howard Lewis | 22/06/2021 13:05:57 |
| 7227 forum posts 21 photos | Since you have already identified two errors in the drawings, it would be time well spent in comparing the dimensions of parts meant to fit together to ensure that they are compatible, and correct. You don't want to find that the piston is drawn as 13/16 diameter for the 3/4 bore! "Measure twice, cut once" is a good maxim to remember, especially when you are gaining experience. Howard |
Please login to post a reply.
Want the latest issue of Model Engineer or Model Engineers' Workshop? Use our magazine locator links to find your nearest stockist!
Sign up to our newsletter and get a free digital issue.
You can unsubscribe at anytime. View our privacy policy at www.mortons.co.uk/privacy
- *Oct 2023: FORUM MIGRATION TIMELINE*
05/10/2023 07:57:11 - Making ER11 collet chuck
05/10/2023 07:56:24 - What did you do today? 2023
05/10/2023 07:25:01 - Orrery
05/10/2023 06:00:41 - Wera hand-tools
05/10/2023 05:47:07 - New member
05/10/2023 04:40:11 - Problems with external pot on at1 vfd
05/10/2023 00:06:32 - Drain plug
04/10/2023 23:36:17 - digi phase converter for 10 machines.....
04/10/2023 23:13:48 - Winter Storage Of Locomotives
04/10/2023 21:02:11 - More Latest Posts...
- View All Topics
- Reeves** - Rebuilt Royal Scot by Martin Evans
by John Broughton
£300.00 - BRITANNIA 5" GAUGE James Perrier
by Jon Seabright 1
£2,500.00 - Drill Grinder - for restoration
by Nigel Graham 2
£0.00 - WARCO WM18 MILLING MACHINE
by Alex Chudley
£1,200.00 - MYFORD SUPER 7 LATHE
by Alex Chudley
£2,000.00 - More "For Sale" Ads...
- D1-3 backplate
by Michael Horley
Price Not Specified - fixed steady for a Colchester bantam mark1 800
by George Jervis
Price Not Specified - lbsc pansy
by JACK SIDEBOTHAM
Price Not Specified - Pratt Burnerd multifit chuck key.
by Tim Riome
Price Not Specified - BANDSAW BLADE WELDER
by HUGH
Price Not Specified - More "Wanted" Ads...
Do you want to contact the Model Engineer and Model Engineers' Workshop team?
You can contact us by phone, mail or email about the magazines including becoming a contributor, submitting reader's letters or making queries about articles. You can also get in touch about this website, advertising or other general issues.
Click THIS LINK for full contact details.
For subscription issues please see THIS LINK.
Model Engineer Magazine
- Percival Marshall
- M.E. History
- LittleLEC
- M.E. Clock
ME Workshop
- An Adcock
- & Shipley
- Horizontal
- Mill
Subscribe Now
- Great savings
- Delivered to your door
Pre-order your copy!
- Delivered to your doorstep!
- Free UK delivery!


 Register
 Log-in


