Clarkson Radius Grinding Fixture
| Ian Armstrong | 24/12/2020 14:29:26 |
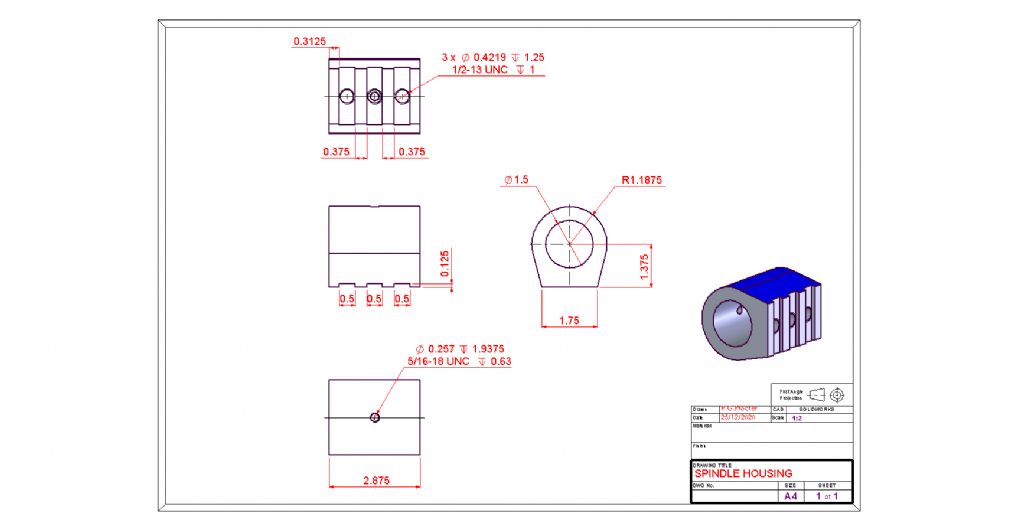
| 17 forum posts 1 photos | Merry Christmas all I find myself 800 miles way from loved ones at Christmas, with a lump of cast iron and workshop time. Can anyone help with dimensions for a Clarkson tool and cutter Radius Grinding Fixture? I have a boxed mark 1 unit which like most others, is missing the circa 3” long component which holds adaptors. Superficially simple to make, I’d appreciate some dimensions as the project has waited a year or more to be kicked off and Tier 4 looks like the perfect time…. Many Thanks Ian |
| Oily Rag | 24/12/2020 14:35:08 |
550 forum posts 190 photos | Ian Give me a couple of hours and I'll dig mine out and send you any dimensions you need. Sorry that I am busy at the moment! something to do with the time of year.
|
| Ian Armstrong | 24/12/2020 17:19:19 |
| 17 forum posts 1 photos | Hi Oily Rag
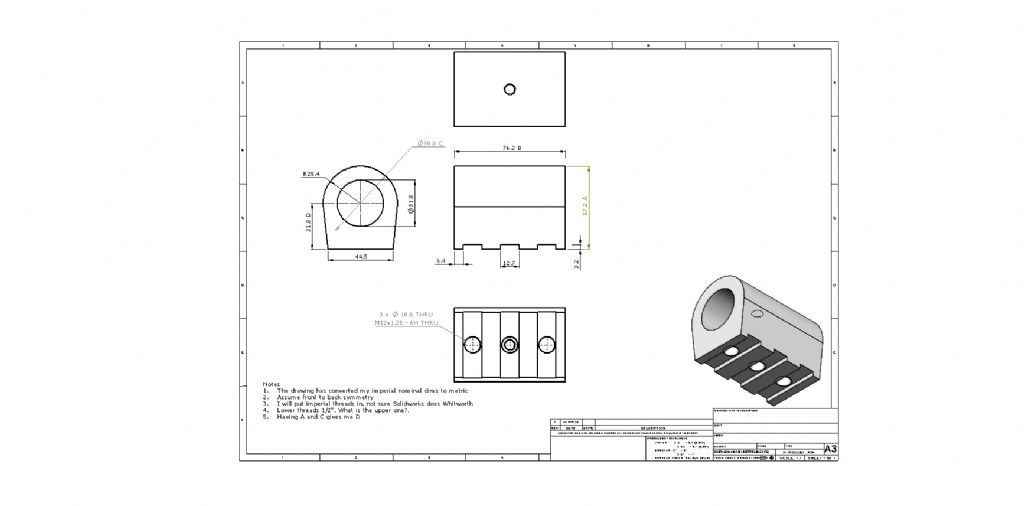
My first stab at dimensions. I'm making from scratch and only have the 'Bedroom workshop' photos to work from.
Ian
|
| peak4 | 24/12/2020 17:19:29 |
2207 forum posts 210 photos | If you're not already aware, The Bedroom Workshop is quite a good resource for information. |
| Ian Armstrong | 24/12/2020 17:26:07 |
| 17 forum posts 1 photos | Hi Bill My plan is the simple Mk1 holder to start with, that makes it useable. I might put the effort in for Mk2 parts afterwards. Presumably there are enough people missing the holder, that it can be passed on. Merry Christmas Ian
|
| Oily Rag | 24/12/2020 18:03:14 |
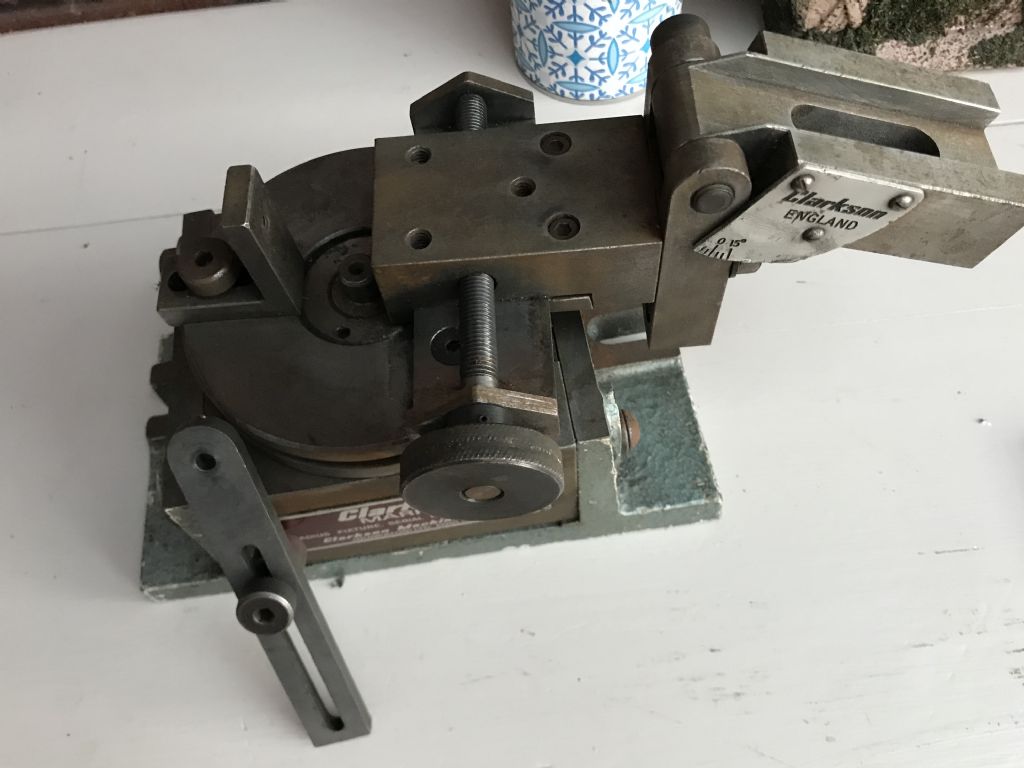
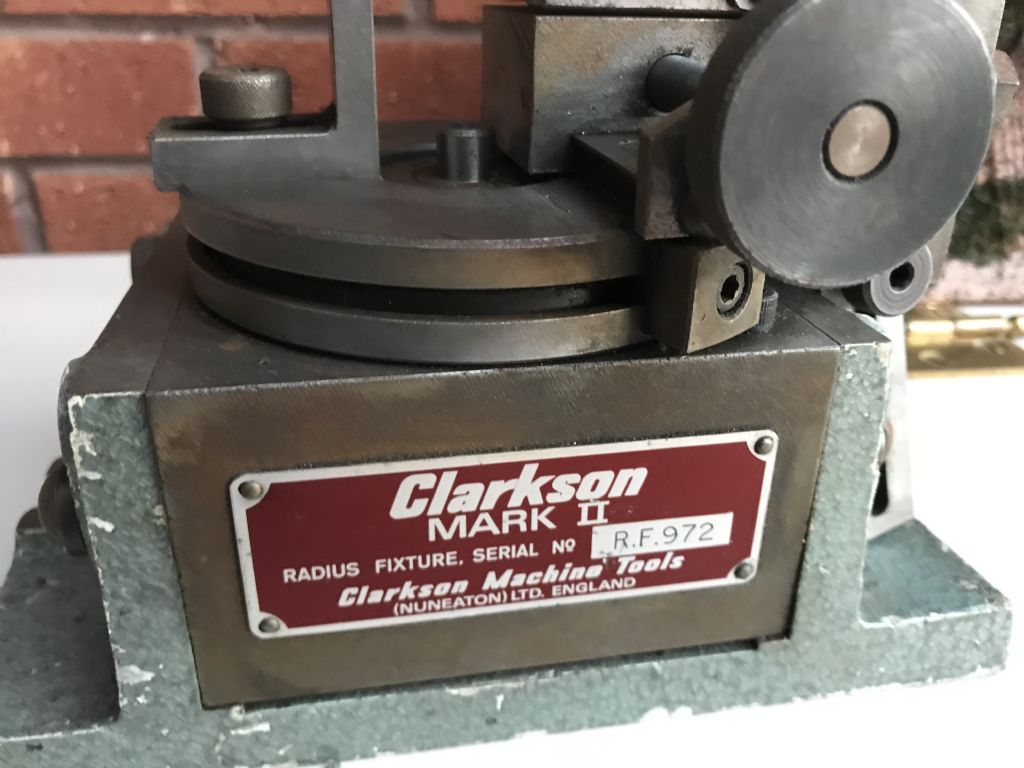
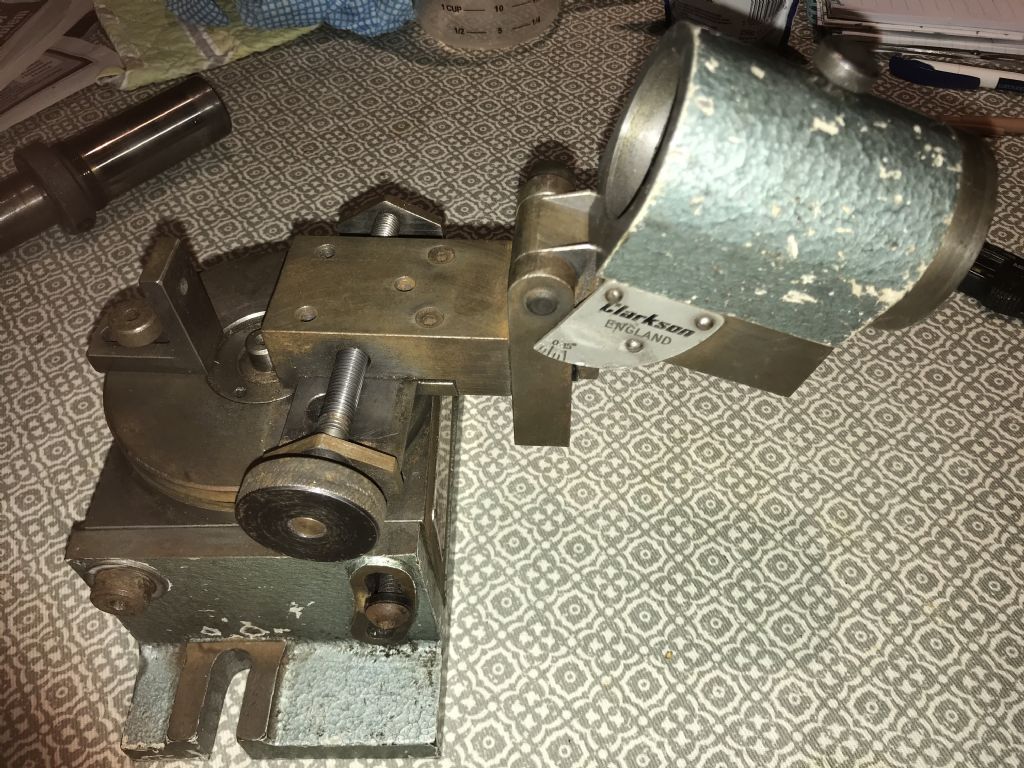
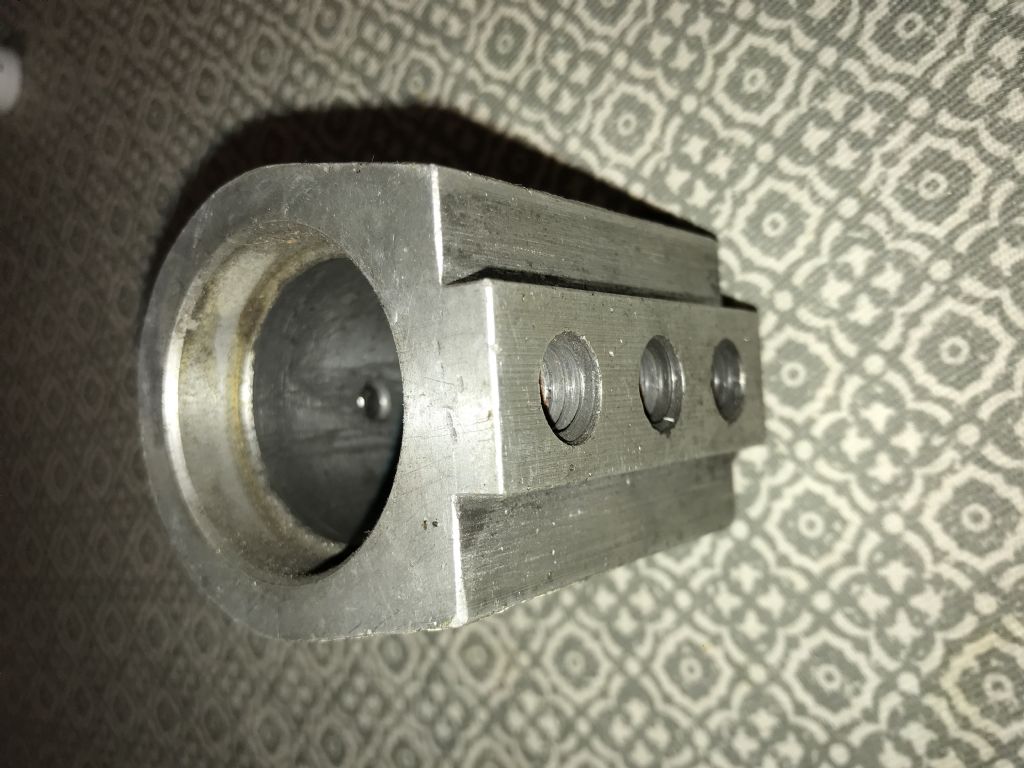
550 forum posts 190 photos | Hi Ian, I've dug my Clarkson RCA out and what I'd forgotten is that it is a MkII - having said that I am not sure it is a standard MkII as it came directly out of St Mary's Rd Factory and may be a prototype or special. Perhaps someone can confirm if it is a MkII! On this the toolholder assembly (I've still got to dig that out!) is similar to your drawing but the tenon is coaxial with the bore not at right angles as shown in your sketch. It locates into the female tenon slot as shown in the first photo. It has a very long toolholder 'tube' to allow for long tooling to be raidiused. I also have a lathe style square toolholder which allows lathe tooling to be radiused accurately. I'll dig the bits out and post later! Martin |
| peak4 | 24/12/2020 19:01:20 |
2207 forum posts 210 photos | Martin, that looks to be broadly the same as mine; those bits are all I have at the moment.
Bill |
| Oily Rag | 24/12/2020 22:10:00 |
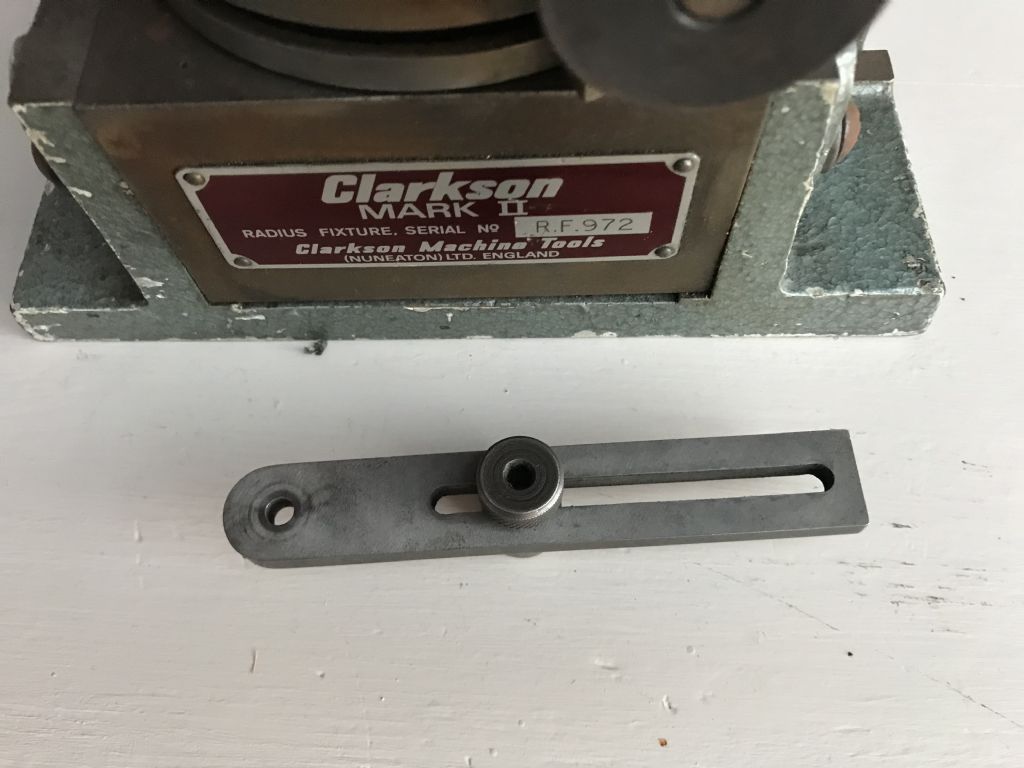
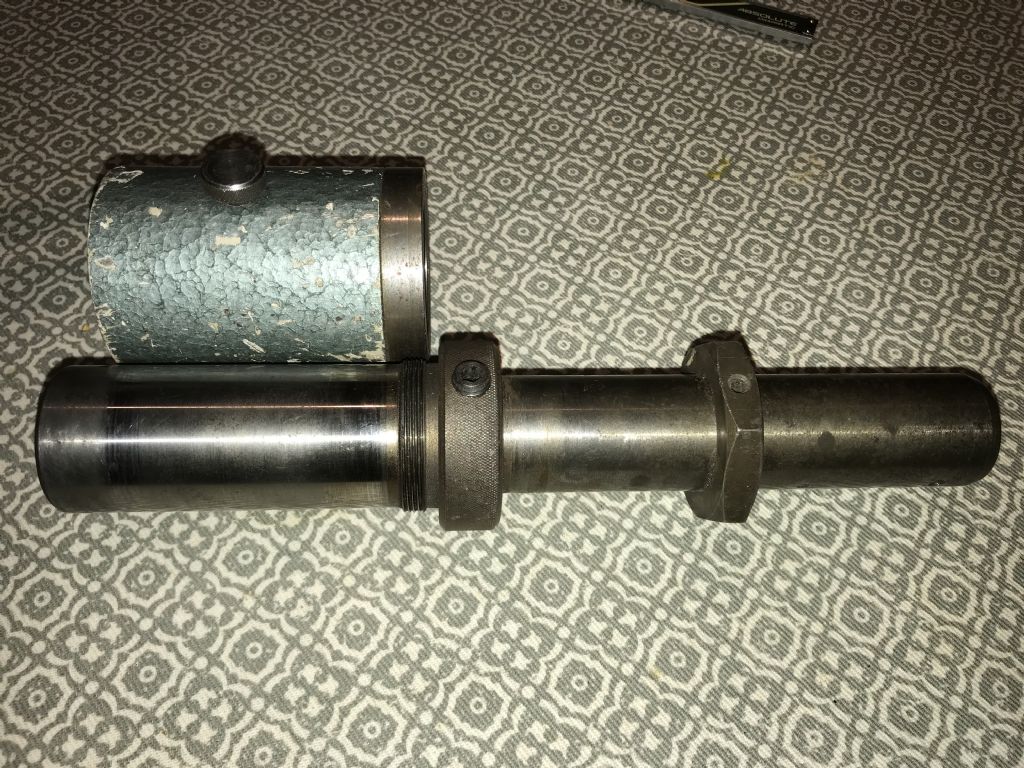
550 forum posts 190 photos | Ian, peak4, Ere'tiz:- and separately with its sleeve:- Look in my album "Clarkson T&C' for further photos. The lathe tool tip grinder eludes me at the moment but I shall search it out! Measurements for the tenoned block (it is interesting that it is made in aluminium ), is as follows:- Overall length = 2.887" (Not including the internally screwed collar/thin wall sleeve - that is 2.248" o/d, collar shoulder depth 7/16th, bore i/d 1.5005", sleeve o/d 1.6845" C/line of bore to tenon location face = 1.125", tenon face major width = 1.92", tenon locating width = 0.8745", depth of tenon = 0.245". 3 holes in male tenon are tapped 7/16" Whit (BSW) there spacing along the tenon length are 0.567" from one end x 0.9" x 0.9" ctrs. Sleeve clamp screw is 5/16" BSW centrally displaced along axis centreline. The thread in the retained inner sleeve appears to be 1 5/8th x 20tpi whit form (but I will confirm later) The long sleeve is interesting in that it is in two parts (which at the moment I cannot separate!) More details of the sleeve will follow. There is one other item which I need to photograph and that is a straight shanked (1.000" dia) centre point which is the setter for the radius offset. it fits into one of the sleeve ends (one long sleeve end is 1.250" dia the other is 1.000" dia) Hope this helps you get started on making swarf, if you need any other dimensions then feel free to mark up any of the photos and repost. Merry Christmas to one and all, pray we have a safer New Year and defeat this wretched pestilence. Kitchen table used for photo backdrop by courtesy of Mrs. Rag (after stuffing the turkey!) Edited By Oily Rag on 24/12/2020 22:12:39 |
| Clive Foster | 24/12/2020 22:14:43 |
| 3630 forum posts 128 photos | Ian I have a Mk 1 radius attachment with the correct adapter holder. Your drawing looks about right. I can easily check the dimensions if you send me an electronic copy of your drawing to work from. Picture above doesn't blow up well enough to see properly. With luck you can save in a CAD format that I can open and edit directly. PM me for my E-Mail. I need to find dimensions for the bracket it sits on. Mine has very non standard workshop made version clearly intended to do something special. Clive |
| Oily Rag | 24/12/2020 22:29:20 |
550 forum posts 190 photos | Clive, Can you post a photo of your attachment as I would be interested in the differences. As I said previously mine came out of the Clarkson St Marys Road factory when it shut down and the guy I got it from told me it was a development department unit and had some unusual parts. I also had a flute and tap grinder attachment which looked like no other I've ever seen. The other interesting part I have is a Pratt Burnerd 3 jaw 'watch makers' chuck on a tee slotted mounting for uncentred slot drill sharpening. |
| Clive Foster | 24/12/2020 23:09:52 |
| 3630 forum posts 128 photos | Oily Rag I'll have a look after Christmas to see if I have enough standard parts to make a sensible picture. Mine has non standard "shop made" extras and I'm pretty sure the bracket to carry the adapter holder is missing. I'm not really sure what the special bits were made for as with flat carriers rather than the proper stepped one it would seem that the end of the cutter would be far too low to grind correctly. The adapter holder is currenly mounted on a flat palte about 4 inces square with a long slot, presumably for a bolt or stud, running parallel to the adapter and a 2 inch long upward pointing post in one corner. The other shop made accessory is also on a flat base but this uses one of the standard cutter holder adapters, as per the univesal bracket, converted into a sort of deviding head with a spindle through the middle and a 5 inch (ish) plate having several rows of index holes. The hole counts are quite high. The plate looks suspiciously like one of the ones hidden under a cover on some British makes of larger rotary tables. Back in the day I used a 12" table with a 6 hole plate hidden in a bulge behind the dials. Clive |
| noel shelley | 25/12/2020 22:12:05 |
| 2308 forum posts 33 photos | Hello all, the two picctures are both Mk2. The Mk1 has a fixed arm and raised tenon with a single hole, the tool holder for this has 3 slots and threaded holes. The slots run across the axis of the large hole. The Mk2 has an arm that can be angled, with a slot running down the middle and a single bolt. The tool holder has a tenon down the middle and single threaded hole. They nearly all seem to loose their tool holders. They would be easy to cast in alli if a good drawing was available. How many ? Noel |
| Phil P | 25/12/2020 23:02:14 |
| 851 forum posts 206 photos | This is the one fitted to my mk1 version. Phil |
| Ian Armstrong | 26/12/2020 10:02:32 |
| 17 forum posts 1 photos | Thanks Phil/all That should keep me busy on Boxing day. Martin's Mk 2 has a front counterbore. I assume Mk1 has a plain 1.5" through bore? Ian |
| Ian Armstrong | 26/12/2020 11:01:09 |
| 17 forum posts 1 photos | Noel My thoughts on part replication, for what they are worth. The fastest way for me to get a workable solution for my own use is to machine from solid, using dimensions kindly provided by forum members. I happen to have some 4” dia cast iron bar. The hardest bit of the job is probably ensuring an orderly transition from the outer radius to the side walls, using a rotary table. Al. alloy is probably good enough for a bearing, for home use on a Radius Cutter, if I had suitable stock to machine it from. If I was going to the effort of casting and wasn’t limited by material, I’d have it made in cast iron, which is a nice bearing material. With the dimensions I have, an updated CAD solid model could be made that had a shrinkage allowance added, I’d then 3D print and use that as the basis of a sacrificial pattern, investment casting style. You still end up machining the bores, base tenons, and threads. If I were going for the big effort solution (which I might yet do as a follow up) I’d be focusing on ‘MK 2’ style arms. Mk 2 is presumably a better option than Mk 1 by dint of evolution. I assume the turntable is common to both designs so a Mk 1 base could be upgraded to Mk 2 status by anyone with the will. Ian
|
| Phil P | 26/12/2020 11:38:07 |
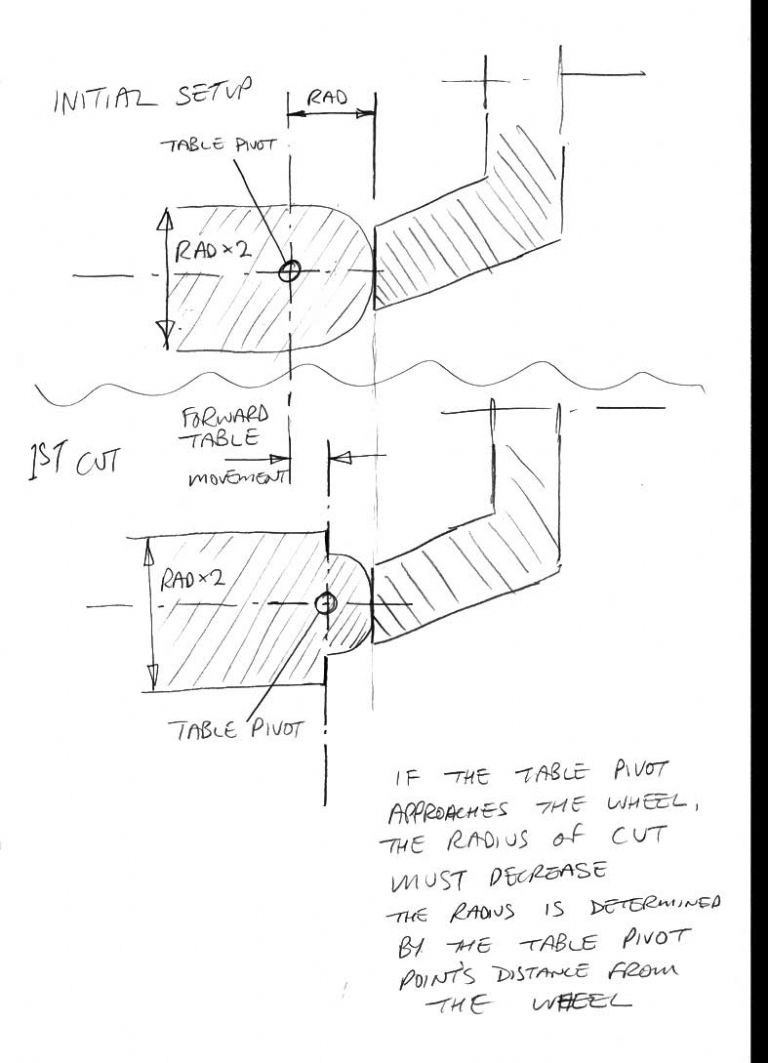
| 851 forum posts 206 photos | I had an "interesting" debate with an expert on one of the forums a few years ago about the radius grinding fixture. The debate was on how one should apply the cut after each new pass on the grinding wheel the expert said that you apply the cut by advancing the table of the cutter grinder as you would in most other cases. Mt argument was that if you do that the finished radius with get progressively smaller as you are moving the pivot point closer to the wheel. This is the explanatory sketch I did at the time. What is needed is a way of advancing the cutter holder forwards on the grinding fixture, the mk2 head has the tenon in line with the angled holder so that could be achieved, but I plan on making mine with a fine adjustment screw built into the design. That might be something you want to think about. If you need an instruction manual for the radius attachment mk1 or mk2 let me know by PM. Phil |
| DC31k | 26/12/2020 13:14:40 |
| 1186 forum posts 11 photos | Posted by Phil P on 26/12/2020 11:38:07:
This is the explanatory sketch I did at the time. What the sketch is depicting is true, but is it not mislabelled? Where it says 'initial setup', that should say 'final cut' or 'sparkout pass'. So you start with the wheel further from the pivot point than your final dimension and gradually advance until it hits a stop at the correct place. If you go beyond that point, as you say, you will end up with an undesirable result. Conceptually, it is similar to using a vertical axis ball turner on a lathe. You turn the stock to the diameter of the ball, advance the cross slide until the pivot is under the workpiece centreline, then advance the cutter until it touches the OD of the stock. Note the cross slide reading or set a stop at that point. Then you can back off the cross slide and work inwards to your stop, sure that you will end up with the correct diameter ball. |
| noel shelley | 26/12/2020 13:30:35 |
| 2308 forum posts 33 photos | Dear Ian, I would agree with you that cast iron is the better option Though from all the pictures I've seen the original was in alli - strange ! The bore IS 1.25" NOT 1.5". The turntable on Mk1 & Mk2 is the same and to convert to Mk2 cut off the extension, then make up new extension allowing for variation of the horizontal axis and a Mk2 tool holder. I have become a bit of a Clarkson man. Noel |
| Phil P | 26/12/2020 13:57:34 |
| 851 forum posts 206 photos | Posted by DC31k on 26/12/2020 13:14:40:
Posted by Phil P on 26/12/2020 11:38:07:
This is the explanatory sketch I did at the time. What the sketch is depicting is true, but is it not mislabelled? Where it says 'initial setup', that should say 'final cut' or 'sparkout pass'. So you start with the wheel further from the pivot point than your final dimension and gradually advance until it hits a stop at the correct place. If you go beyond that point, as you say, you will end up with an undesirable result. Conceptually, it is similar to using a vertical axis ball turner on a lathe. You turn the stock to the diameter of the ball, advance the cross slide until the pivot is under the workpiece centreline, then advance the cutter until it touches the OD of the stock. Note the cross slide reading or set a stop at that point. Then you can back off the cross slide and work inwards to your stop, sure that you will end up with the correct diameter ball.
------------------------------------------------------------------------------------------------------------------------------------------------- Yes I get what you mean, I must admit I did that sketch before i was in possession of any Clarkson instructions a good few years ago. I think the method requires that the cutter to be re-sharpened is ground back sufficiently first so that when the setting button is used with the slip gauges, that will be the new datum to grind the radius back to as described. I have never actually got round to modifying my own attachment yet, it is still sat on the shelf unused.
Phil
Edited By Phil P on 26/12/2020 13:58:15 Edited By Phil P on 26/12/2020 13:58:47 Edited By Phil P on 26/12/2020 13:59:28 |
| SteveI | 26/12/2020 18:52:05 |
| 248 forum posts 22 photos | Hi,
My MK2 attachment came with a few items that are not in the pictures shown so far. So I've put a few pictures into an album. If you want any measurements of the items pictured do let me know.
Oily Rag - I'd be interested to see pictures of the lathe tool radiusing holder you have. Is it anything clever?
Thanks, Steve |
Please login to post a reply.
Want the latest issue of Model Engineer or Model Engineers' Workshop? Use our magazine locator links to find your nearest stockist!
Sign up to our newsletter and get a free digital issue.
You can unsubscribe at anytime. View our privacy policy at www.mortons.co.uk/privacy
- *Oct 2023: FORUM MIGRATION TIMELINE*
05/10/2023 07:57:11 - Making ER11 collet chuck
05/10/2023 07:56:24 - What did you do today? 2023
05/10/2023 07:25:01 - Orrery
05/10/2023 06:00:41 - Wera hand-tools
05/10/2023 05:47:07 - New member
05/10/2023 04:40:11 - Problems with external pot on at1 vfd
05/10/2023 00:06:32 - Drain plug
04/10/2023 23:36:17 - digi phase converter for 10 machines.....
04/10/2023 23:13:48 - Winter Storage Of Locomotives
04/10/2023 21:02:11 - More Latest Posts...
- View All Topics
- Reeves** - Rebuilt Royal Scot by Martin Evans
by John Broughton
£300.00 - BRITANNIA 5" GAUGE James Perrier
by Jon Seabright 1
£2,500.00 - Drill Grinder - for restoration
by Nigel Graham 2
£0.00 - WARCO WM18 MILLING MACHINE
by Alex Chudley
£1,200.00 - MYFORD SUPER 7 LATHE
by Alex Chudley
£2,000.00 - More "For Sale" Ads...
- D1-3 backplate
by Michael Horley
Price Not Specified - fixed steady for a Colchester bantam mark1 800
by George Jervis
Price Not Specified - lbsc pansy
by JACK SIDEBOTHAM
Price Not Specified - Pratt Burnerd multifit chuck key.
by Tim Riome
Price Not Specified - BANDSAW BLADE WELDER
by HUGH
Price Not Specified - More "Wanted" Ads...
Do you want to contact the Model Engineer and Model Engineers' Workshop team?
You can contact us by phone, mail or email about the magazines including becoming a contributor, submitting reader's letters or making queries about articles. You can also get in touch about this website, advertising or other general issues.
Click THIS LINK for full contact details.
For subscription issues please see THIS LINK.
Model Engineer Magazine
- Percival Marshall
- M.E. History
- LittleLEC
- M.E. Clock
ME Workshop
- An Adcock
- & Shipley
- Horizontal
- Mill
Subscribe Now
- Great savings
- Delivered to your door
Pre-order your copy!
- Delivered to your doorstep!
- Free UK delivery!



 Register
 Log-in


