Forum sponsored by:

Trunch Trojan
Assembly
| Arthur Goodwin | 10/04/2020 22:37:40 |
| 71 forum posts 45 photos | Hi I am just setting out on my first project the Trunch Trojan by Bob Middleton If there are any members who have completed this or part way through PI would love to hear from youm For instance he says 2 of for the slide valve when only 1 will fit. Sticking with the slide valve, the way it is drawn it would have to go upside down which would be silly. I, m not knocking Bob, far from it he's done a great job designing it but it's frustrating having to 2nd guess his drawings. Any help would be much appreciated. Newbie
|
| Neil Wyatt | 11/04/2020 12:56:19 |
 19226 forum posts 749 photos 86 articles | Hi Arthur, Welcome to the forum, afraid I haven't come across that design. <edit> Looks like he cut a double engine in half, and only drew the extra information for teh single version, so some of the drawings refer to the double version. Neil Edited By Neil Wyatt on 11/04/2020 12:59:31 |
| JasonB | 11/04/2020 13:24:45 |
 25215 forum posts 3105 photos 1 articles | Neil is right the valve drawing has just been copied & pasted from the double but hopefully this engine will only half the errors If you look at the metric version that Julius did that just shows one valve and the position. |
| Arthur Goodwin | 11/04/2020 19:41:16 |
| 71 forum posts 45 photos | Thanks that explains a lot. Arthur
|
| Arthur Goodwin | 12/04/2020 18:00:20 |
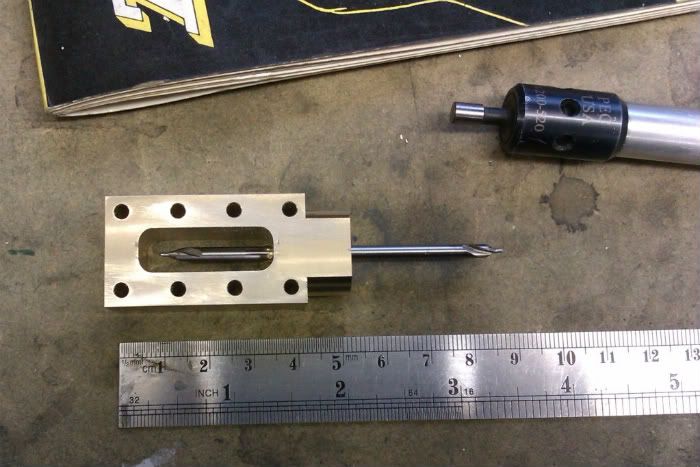
| 71 forum posts 45 photos | Hi all Further to the slide valve on the T. T engine I have today made this valve and along with the other components now have a better idea of how it works. One thing puzzles me though, with ref to J. A. M. De waal, s excellent cad drawing the slide valve sits on top of the valve rod (2-09.4) and presses up against the underside of 1-06.3. When the valve slides it will expose one slot and cover up the other. This I understand as it will stroke the piston up and down. What I fail to see is what function does the pocket on the top side of the slide valve do? Any ideas? |
| JasonB | 12/04/2020 18:19:09 |
25215 forum posts 3105 photos 1 articles | The pocket acts to connect the central exhaust passage to the "inlet" that is now on the emptying side of the piston so allowing the used steam to be exhausted. Edited By JasonB on 12/04/2020 18:21:33 |
| Arthur Goodwin | 12/04/2020 22:27:22 |
| 71 forum posts 45 photos | Very clever. Would never have worked that out. Thanks for that |
| Arthur Goodwin | 14/04/2020 20:13:32 |
| 71 forum posts 45 photos | Hi all Have today successfully completed element E of the T. T 1.06 IN The cad drawing. Tomorrow will be my biggest test since starting this project. I need to deep drill a 3/32 hole 2.25 inches deep, passing through the pocket to the far side and carrying on for a further9/16. I need to maintain accuracy along the center line and also to be parallel with the face. This is so when the valve rod and slide valve are fitted that the top of the slide valve is a snug fit on thr underside of element D (106-3) which contains the steam portsm Any advice would be greatly appreciated. Thanks |
| Arthur Goodwin | 14/04/2020 20:16:23 |
| 71 forum posts 45 photos | Forgot to say will be doing this on my mini mill with the drill in a chuck as I have no collet small enough Cheers Arthur |
| JasonB | 14/04/2020 20:26:39 |
25215 forum posts 3105 photos 1 articles | If I were doing it I would drill and ream the 1/8" hole first then use a long series ctr drill to start the 3/32" hole on the far side of the valve chest. If you don't have one you can make a simple punch from a length of 1/8" silver steel. It's not usual for the valve to be a tight fit against the port face, a bit of float will allow the valve to lift if condensate builds up at the ends of the cylinder and is pushed out, if not you may get a hydraulic lock.
|
| Arthur Goodwin | 15/04/2020 17:54:34 |
| 71 forum posts 45 photos | Thats a gteat idea thanks for that. Have got some silver steel on order. Will let you know the result. Thanks once again Arthur |
| Arthur Goodwin | 17/04/2020 19:21:28 |
| 71 forum posts 45 photos | Hi all Just to let you know I completed my deep hole drilling successfully thanks to Jason, s sage advice. I am now into element "a" the cylinder head component. Neither Bob M, s version or the cad version show the piston rod gland threaded on the 3/8 dia (1-08.4) and only Bob M shows its mating hole threaded. I lean towards J. D. W's version as he as elongated the 3/8 dia and included the seal material, relying on the 2 studs to hold the gland down and compress the seal. Am I correct in this assumption. Regards Arthur
|
| JasonB | 17/04/2020 19:33:12 |
25215 forum posts 3105 photos 1 articles | I would say Bill's note to tap the 3/8" hole is wrong, two studs with nuts and locknuts allow you to adjust the compression of the seal and lock its position. Some engines do have a threaded gland but they would typically have a knurl or hex so the gland can just be screwed down onto the sealing material not the oval shape with stud holes. |
| Arthur Goodwin | 19/04/2020 16:51:32 |
| 71 forum posts 45 photos | Thanks for that. Your help is greatly appreciated. Arthur |
| Arthur Goodwin | 13/05/2020 19:12:57 |
| 71 forum posts 45 photos | Hi All Been making good use of the lockdown to crack on with my engine (every Cloud.......) Now at the stage where I am ready to do a test build of the cylnder and its constituent parts. It is made up of 6 seperate components all 2.25 diameter (or thereabouts) What I would like to know is, what is the preferred gasket material for a steam cylinder and what thickness should I be looking to use. I have scanned other forums and the variety spans from using a dollar bill to brown paper and oil I will be including some pictures on my next post of the parts and completeed cylinder,
Regards |
| Neil Wyatt | 13/05/2020 19:20:41 |
19226 forum posts 749 photos 86 articles | Something thin like brown paper is good to avoid changing the dimensions too much. Instant gasket is fine if you are not expecting to disassemble too often. Proper gasket paper can be thick enough to cause pistons to lock if tolerances are close. Neil |
| JasonB | 13/05/2020 19:36:22 |
25215 forum posts 3105 photos 1 articles | I use a liquid (instant)gasket on all my engines which effectively has no thickness when assembled so you don't need to make any allowance for it, get it from the likes of Halfords. |
| Arthur Goodwin | 13/05/2020 23:33:46 |
| 71 forum posts 45 photos | Hi Neil Thanks for your answer. When you say proper gasket paper, what thickness ate we talking about. Arthur
|
| Arthur Goodwin | 19/05/2020 21:34:51 |
| 71 forum posts 45 photos |
Hi all Not got round to assembling the cylinder as Ineeded to prrpare the base for it. This is were I hit a problem. The base measures 7.5 X 3.5 inches, when I mounted it to my face plate and centrslised for the counter bore, the throw was 6.5 inches and fouled the bed. My lathe is a 5 inch denford. The only way forward was to saw off 1.5 inch. Now looking at this with hindsight (a grrat thing) what i should have done was make the steam chest cover the same diameter as the S C and use the same bolt circle to fasten them both dowm see pics. Any reason why Bob would not |
| Arthur Goodwin | 19/05/2020 21:36:47 |
| 71 forum posts 45 photos |
|


Please login to post a reply.
Magazine Locator
Want the latest issue of Model Engineer or Model Engineers' Workshop? Use our magazine locator links to find your nearest stockist!
Sign up to our Newsletter
Sign up to our newsletter and get a free digital issue.
You can unsubscribe at anytime. View our privacy policy at www.mortons.co.uk/privacy
Latest Forum Posts
- hemingway ball turner
04/07/2025 14:40:26 - *Oct 2023: FORUM MIGRATION TIMELINE*
05/10/2023 07:57:11 - Making ER11 collet chuck
05/10/2023 07:56:24 - What did you do today? 2023
05/10/2023 07:25:01 - Orrery
05/10/2023 06:00:41 - Wera hand-tools
05/10/2023 05:47:07 - New member
05/10/2023 04:40:11 - Problems with external pot on at1 vfd
05/10/2023 00:06:32 - Drain plug
04/10/2023 23:36:17 - digi phase converter for 10 machines.....
04/10/2023 23:13:48 - More Latest Posts...
- View All Topics
Support Our Partners


Shopping Partners
Subscription Offer

Latest "For Sale" Ads
- Reeves** - Rebuilt Royal Scot by Martin Evans
by John Broughton
£300.00 - BRITANNIA 5" GAUGE James Perrier
by Jon Seabright 1
£2,500.00 - Drill Grinder - for restoration
by Nigel Graham 2
£0.00 - WARCO WM18 MILLING MACHINE
by Alex Chudley
£1,200.00 - MYFORD SUPER 7 LATHE
by Alex Chudley
£2,000.00 - More "For Sale" Ads...
Latest "Wanted" Ads
- D1-3 backplate
by Michael Horley
Price Not Specified - fixed steady for a Colchester bantam mark1 800
by George Jervis
Price Not Specified - lbsc pansy
by JACK SIDEBOTHAM
Price Not Specified - Pratt Burnerd multifit chuck key.
by Tim Riome
Price Not Specified - BANDSAW BLADE WELDER
by HUGH
Price Not Specified - More "Wanted" Ads...
Get In Touch!
Do you want to contact the Model Engineer and Model Engineers' Workshop team?
You can contact us by phone, mail or email about the magazines including becoming a contributor, submitting reader's letters or making queries about articles. You can also get in touch about this website, advertising or other general issues.
Click THIS LINK for full contact details.
For subscription issues please see THIS LINK.
Digital Back Issues


Donate

 Register
 Log-in
Model Engineer Magazine
- Percival Marshall
- M.E. History
- LittleLEC
- M.E. Clock

ME Workshop
- An Adcock
- & Shipley
- Horizontal
- Mill

Subscribe Now
- Great savings
- Delivered to your door

Pre-order your copy!
- Delivered to your doorstep!
- Free UK delivery!
All Forum Topics > Introduce Yourself - New members start here! > Trunch Trojan