Forum sponsored by:

from a 3.5 inch Gezina to 5 inch tramway Plettenberg locomotive
a conversion from a narrow gauge to tramway locomotive
| Werner Schleidt | 20/03/2019 19:56:36 |
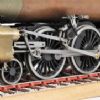
 158 forum posts 180 photos | Hello all, this is a discription of my work , a conversion from a 3.5 inch Gezina to a 5 inch Tramway locomotive. All starts with the question to steam friend " do you still have the boiler ?" The answer was yes . This was the start oft the project.
The parts look nice, but more then 25 years old. In the beginning I thought if its possible to keep the green house, but it was very fast clear that makes no sense. The front
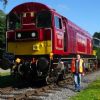
After the decision to look to a tramway locomotive I made very fast the decision to build the locomotive Plettenberg. She is in preservation at the museum railway Bruchhausen-Vilsen in Germany.
This was a good decision,because I have The Chiemseebahn and a freelance Wiliam Wilkison tramway locomotive build and constructed. Werner |
| OldMetaller | 21/03/2019 05:15:08 |
 208 forum posts 25 photos | Hello Werner, I will follow this thread with interest as I love tram locomotives! Good luck with the build! John. |
| Mark Gould 1 | 21/03/2019 08:55:31 |
| 231 forum posts 131 photos | Looks great Werner, I look forward to seeing more! |
| Werner Schleidt | 21/03/2019 19:34:38 |
158 forum posts 180 photos | Many thanks for your replies. I will update my work . The next step was looking if the boiler is OK . For that I had to make several plugs with M8*1 thread. I had to learn that teflon tape which tighten with M8*0.75 without problems with M8*1 there were the problem that the tape was shift off the thread and the tighting was only by chance. I had to do it several times,perhaps the fit of the thread was to good. All of the valves I found in the added box ,but they were internally not ready made. It was not a problem to fix it ,but only work to do. At the picture all valves are in place and the boiler is OK a good step forward.
The next step was to make the new 5 inch gauge frame. So I disassemble all parts with the exeption of the wheels. The profil and the diameter was not useable. In the time between I ordered my material and I had to keep in mind ,it was late in November 2018, that over the year when i have time that all important materials are there. for the frame and the housing. I build the frame in a simple way similar to the principle of my Maxitrak Ruby. That means the rear axle is fix in the frame and the front axle is tiltable. That worked on my locomotives relativ good even on not good prepared tracks.
I tried to reuse as much as possible .It was not easy to align all properly. The plans from the Gezina was not very helpful,because the cylinder tighting sketch at the frame was not there. And the guy who build that 25 years ago had not the same hole layout on both cylinder. The wheels had a greater diameter and so I had to arrange all new. But with some patience bot sides got together working. In mid of december the first turns of the wheels were achieved under air pressure.
It was noticeable that the cylinder needs a lot of air and the compression was low. I tried to see what happens with a lot of oil. The system behaviour was better ,but I can see that there was leeaking oil out of the cylinder a leak was recognized. The cylinder were build up with a combination of materials and were silversoldered together. I had to disassemble it and softsolder it steam tight. By stripping all off and out I saw that the pistonring with teflon tape has no connection to the cylinder bore. I machined a new groove to fit a teflon ring with an Oring for static pressure. With this setup the cylinder had a lot of compression. That was really good .This action I have done on both sides and then I put all together . What a difference in the behaviour after that repair. will be updated Werner |
| Werner Schleidt | 26/03/2019 19:19:41 |
158 forum posts 180 photos | Here is the next update. The boiler was aligned at the frame to see where the pipes and attachments have to go. This was an iterative process, because my plan is only the photo in the rear .
The the footplate on the frame were build.Screwed with many M2 Screws countersink type.
The boiler attachments were arranged and Iwant to use as much as possible from the old frame.
The housing was constructed with brass material .I ordered at the dealer as much as possible cuted in the correct dimensions I measured from the photo. Step by step it came to the look of the original locomotive. The brass for the roof I had to order later ,because the correct dimension were only visible and measureable in this stage. In the time between till the ordered parts arrived,, I completed the frame with valves steampump ,bypass valve,,watertank between the frame and so on.
Here is the water tank between the frame visible and the pipework for water and oiling the axles. For all attachments I tried to install it in a way that service is good possible.
That is not easy to achieve ,because in further steps there are some attachments were screws are blocked.
The homemade oilpump with ratchet mechanism. The toothwheel have to have more teeths. In this configuration it is a litle bit dificult to adjust it.
On the right side is an automatic blower valve. This valve open and close pressure dependant the blower .For small boiler is this a good attachment, because is much easier to fire. And it is good if you have a coffee break then you could come back and the fire is still alive. Werner |
| Jon Lawes | 26/03/2019 19:54:03 |
 1078 forum posts | I don't think I'd be going off for a coffee break with a lit fire! |
| Werner Schleidt | 26/03/2019 20:22:15 |
158 forum posts 180 photos | It is shure to keep an eye on it ,but you can take a short break and you are not forced to look to the pressure cauge, the safety valve and so on permanent. I have tested it with an other small loco . With the steamp pump on in slow movement and enough coal in the fire box, the system can work for till an half hour with nearly nothing to do. Otherwise you blow the water out by the safety valve ,the fire is dead or there is no water in the gauge. |
| Werner Schleidt | 28/03/2019 20:36:24 |
158 forum posts 180 photos | This is the boiler on the driver side.The reversal handle was not ready at that time.
I tried to use the same setup of valves and handles as I have on my other locomotives.
All necessary attachments are there some refinements have to made later before painting. For my opinion it looks pretty much the same like the Plettenberg at the photo.
The spark arrestor was very difficult to make. The small pipe and the bell are whithout function.
Now with the nameplates on the side. The have been made in etching technic. With good wheather the next step is testing under steam. Then I will see whath happens. With air pressure I made tests on the table and they were sucessful. Werner |
| Jon Lawes | 28/03/2019 20:39:07 |
1078 forum posts | Looks fantastic Werner, sehr schön. |
| OldMetaller | 29/03/2019 07:10:13 |
208 forum posts 25 photos | Wow! Amazing work Werner, that looks wonderful! John. |
| Werner Schleidt | 07/04/2019 08:48:19 |
158 forum posts 180 photos | Hello all , here is an update of my work. The Plettenberg was now two times under steam with good experience. But, as you all know, steam is in everytime good to get new expereience. By the first heat up the pressure gauge was defekt. I let the fire go down and I had luck that I had a replacement.. With the replacement all work was straight forward. And the first ride was succesfull. I ordered after that a new pressure gauge and I added an additional check valve to the Injektor pipe to the boiler. With this setup the injector worked very good from 3 to 7 bar from low to high water in the water gauge. The loco run very good I was satisfied ,but there is room for optimization. The safety valves I will change to pop action , because they open good but the closeing is sometime late. The hand valves have to be optimized ,because they are not satisfiing steam thight. Overall i am very fine with the behaviour of the Plettenberg. To give you an impression I made a video from the build in the workshop and the run in my garden.
Werner
Edited By Werner Schleidt on 07/04/2019 08:50:45 |
| OldMetaller | 07/04/2019 11:19:30 |
208 forum posts 25 photos | Excellent work Werner! You have a nice railway. What is the first piece of music on your video, please? Best wishes, John. |
| Paul Kemp | 07/04/2019 12:09:21 |
| 798 forum posts 27 photos | Werner, very nice, looks to steam very well. I like that steam pump runs very smooth at low speed. I take it from the flange squeal you are running on steel rail in your garden? Paul. |
| Werner Schleidt | 07/04/2019 12:33:17 |
158 forum posts 180 photos | Hello Paul, the flange squeal is from the steel rails on steel slippers. It occurs In the range of the gras. In our well water for the garden we have some iron therefore this part is brown and the rails are steel with zinc coating. With a few drops of olive oil on a brush ,greasing the flange where it sqeaks , this is gone. This time I forgot this to do. I was hot testing the Plettenberg. At my track there is an inclination of 2 to 3 % and in combination with that narrow curves ( radius 5m) it is with steam not easy to drive. My experience is ,if i can drive at home, I am able to drive on any club track. It is an ideal test track. Werner
|
| Paul Kemp | 07/04/2019 13:33:18 |
| 798 forum posts 27 photos | Werner, Looks a very nice little track and with the tight curves very prototypical. The flange squeal adds to the atmosphere! On heritage railways over here they are sometimes using graphite blocks which are sprung loaded into the root of the flange from a holder to provide 'lubrication' and extend the life of the wheel profiles by reducing wear. Might be something to experiment with on your home track to save the olive oil. Paul. |
| Ron Laden | 07/04/2019 14:14:52 |
 2320 forum posts 452 photos | Very nice indeed Werner, I agree with Paul the flange squeal adds to the atmosphere. I am very envious of your garden railway and its also complete with a turntable, very nice. Ron
|
| Werner Schleidt | 07/04/2019 17:14:34 |
158 forum posts 180 photos | Hello Ron,Paul , thanks for your ideas regarding the noise sqeuals. This track was originally planned as a small test track and then my at that time 10 years old son and I had some ideas. And so we developed the layout. The turntable is necessary to come to the fire up and service stand in the corner. We have to cut three trees and smaller ones. Then we thought we have to have a station house. So the wooden house was build. It was a little bit an overkill,but whitout railway driving it is good to use for other purposes. I use this track more as a test track and not very often. My problem is, I have more ideas then time. Werner
|
| Werner Schleidt | 16/04/2019 18:22:14 |
158 forum posts 180 photos | Hello all, after a testride in the garden about 1 Km ,perhaps with less oil on the crosshead, I had an accidenttal blocking of the left crosshead. There was no movement possible. It was like welded. Could someone give me an advice how much play I have to have that oil can grease? I made a shim of 0.1 mm and add this for more side lash. Is there a rule of thumb? Years a go where I am not able to work such precise I had less problems,but rattling. Werner
|
| Werner Schleidt | 06/05/2019 17:55:03 |
158 forum posts 180 photos | At our club track we had on the first of may a nice club driving day without public. The Plettenberg was able to pull a load with two adult persons. This is very satisfying. After the run I had some issues,because I lost the rod to the oil pump. But all is repared and better then before. Wise man called this experience, good joke but it is the truth. Werner
Edited By Werner Schleidt on 06/05/2019 17:56:10 |
| Kerrin Galvin | 07/05/2019 08:55:06 |
| 44 forum posts 9 photos | Hi Werner, It looks like you & the others had a fun day! The Tram looks to be running very well, you should be very pleased. Minor challenges are character building!
Cheers Kerrin |


Please login to post a reply.
Magazine Locator
Want the latest issue of Model Engineer or Model Engineers' Workshop? Use our magazine locator links to find your nearest stockist!
Sign up to our Newsletter
Sign up to our newsletter and get a free digital issue.
You can unsubscribe at anytime. View our privacy policy at www.mortons.co.uk/privacy
Latest Forum Posts
- *Oct 2023: FORUM MIGRATION TIMELINE*
05/10/2023 07:57:11 - Making ER11 collet chuck
05/10/2023 07:56:24 - What did you do today? 2023
05/10/2023 07:25:01 - Orrery
05/10/2023 06:00:41 - Wera hand-tools
05/10/2023 05:47:07 - New member
05/10/2023 04:40:11 - Problems with external pot on at1 vfd
05/10/2023 00:06:32 - Drain plug
04/10/2023 23:36:17 - digi phase converter for 10 machines.....
04/10/2023 23:13:48 - Winter Storage Of Locomotives
04/10/2023 21:02:11 - More Latest Posts...
- View All Topics
Support Our Partners


Shopping Partners
Subscription Offer

Latest "For Sale" Ads
- Reeves** - Rebuilt Royal Scot by Martin Evans
by John Broughton
£300.00 - BRITANNIA 5" GAUGE James Perrier
by Jon Seabright 1
£2,500.00 - Drill Grinder - for restoration
by Nigel Graham 2
£0.00 - WARCO WM18 MILLING MACHINE
by Alex Chudley
£1,200.00 - MYFORD SUPER 7 LATHE
by Alex Chudley
£2,000.00 - More "For Sale" Ads...
Latest "Wanted" Ads
- D1-3 backplate
by Michael Horley
Price Not Specified - fixed steady for a Colchester bantam mark1 800
by George Jervis
Price Not Specified - lbsc pansy
by JACK SIDEBOTHAM
Price Not Specified - Pratt Burnerd multifit chuck key.
by Tim Riome
Price Not Specified - BANDSAW BLADE WELDER
by HUGH
Price Not Specified - More "Wanted" Ads...
Get In Touch!
Do you want to contact the Model Engineer and Model Engineers' Workshop team?
You can contact us by phone, mail or email about the magazines including becoming a contributor, submitting reader's letters or making queries about articles. You can also get in touch about this website, advertising or other general issues.
Click THIS LINK for full contact details.
For subscription issues please see THIS LINK.
Digital Back Issues


Donate

 Register
 Log-in
Model Engineer Magazine
- Percival Marshall
- M.E. History
- LittleLEC
- M.E. Clock

ME Workshop
- An Adcock
- & Shipley
- Horizontal
- Mill

Subscribe Now
- Great savings
- Delivered to your door

Pre-order your copy!
- Delivered to your doorstep!
- Free UK delivery!
All Forum Topics > Work In Progress and completed items > from a 3.5 inch Gezina to 5 inch tramway Plettenberg locomotive