Forum sponsored by:

Sizing an M2 thread during screwcutting
| Graham Meek | 24/02/2019 12:32:46 |
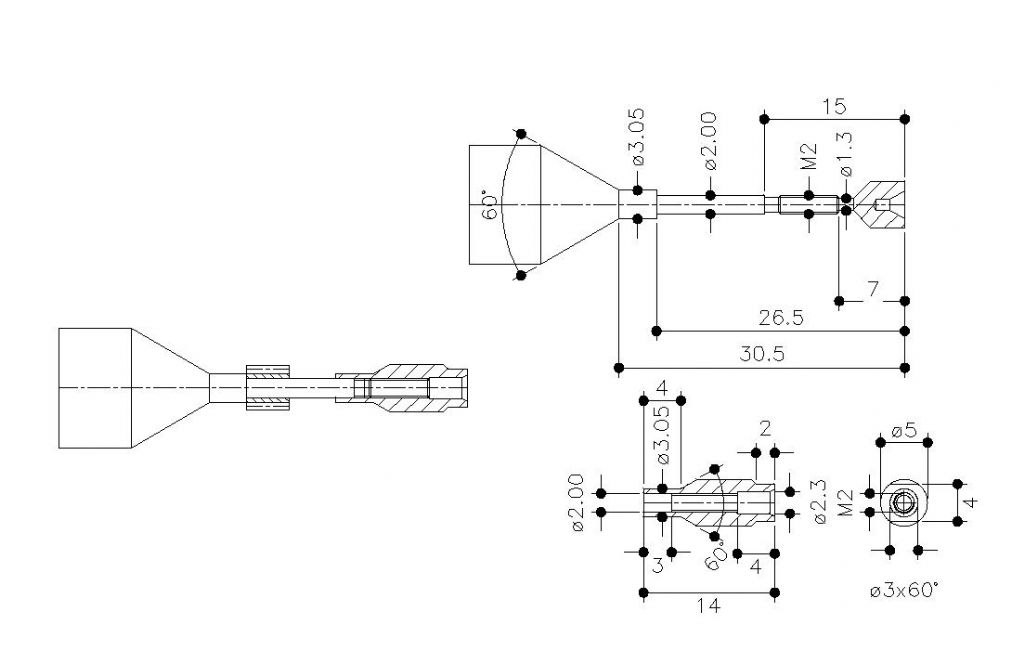
| 714 forum posts 414 photos | I thought I would post a little poser to exercise the little grey cells. I recently made the above arbor to permit me to cut quite a few small 64 DP gears. The M2 thread needed to be screwcut to ensure absolute concentricity with the location diameter. It will be seen from the assembly drawing that the "Nut" portion of the arbor locates on the 2.00 mm diameter as well. Any run-out in the thread will cause the Nut to bend such a slender shaft. The Nut is also coned at the rear to take a centre for much needed support. This would mean the whole arbor would be running out. The problem, or poser is how to size the thread such that the Nut is a good fit. A sloppy thread will not be of any use as regards maintaining concentricity. The 3 Wires dimension required wires of 0.23 mm diameter. None were to hand and besides balancing 3 wires of this size on the thread did not appeal to me, even with grease. It is however one solution. It will be appreciated the centre support which would later be cut off, was needed during the screwcutting operation. The solution was simple in its execution and it is the main reason for this post, ie to pass on the method. As it could be used on larger threads., but before that I offer this conundrum to the forum to make suggestions. Regards Gray,
|
| duncan webster | 24/02/2019 16:46:25 |
| 5307 forum posts 83 photos | I'll jump in with my size 12s. Sweat 2 pieces of brass together to make a square, say 6mm AF. Set up in 4 jaw so joint is on centre, drill and tap M2 and turn the OD to a known size, concentric with the thread. Part off a piece just shorter than the required thread and heat to get apart. Clean off the solder and you have some loose jaws for your micrometer. Be careful not to lose them as they will be quite small. Then you can screwcut the male using the loose bits to measure. |
| JasonB | 24/02/2019 17:04:40 |
 25215 forum posts 3105 photos 1 articles | That's too easy, I would have thought Gray screw cut the female thread to suite the male one using that as the plug gauge once the end had been cut off A very small female ctr may have been another option and would allow test fitting of the male thread. Edited By JasonB on 24/02/2019 17:07:01 |
| blowlamp | 24/02/2019 18:08:52 |
 1885 forum posts 111 photos | Turn a rod to a certain O/D (say 5mm). Drill & tap to M2. Slit this across its diameter & 'part' the two halves off the rod. Thoroughly deburr the threaded section. I think it should then be possible to then use both halves of this nut - when fitted over the area being threaded - to measure its diameter, until an acceptable fit is achieved, i.e 4.99mm.
Martin. Edited By blowlamp on 24/02/2019 18:09:56 |
| duncan webster | 24/02/2019 18:42:05 |
| 5307 forum posts 83 photos | Posted by blowlamp on 24/02/2019 18:08:52:
Turn a rod to a certain O/D (say 5mm). Drill & tap to M2. Slit this across its diameter & 'part' the two halves off the rod. Thoroughly deburr the threaded section. I think it should then be possible to then use both halves of this nut - when fitted over the area being threaded - to measure its diameter, until an acceptable fit is achieved, i.e 4.99mm.
Martin. Edited By blowlamp on 24/02/2019 18:09:56 BLATANT PLAGIARISM! |
| blowlamp | 24/02/2019 19:35:53 |
1885 forum posts 111 photos | Posted by duncan webster on 24/02/2019 18:42:05:
Posted by blowlamp on 24/02/2019 18:08:52:
Turn a rod to a certain O/D (say 5mm). Drill & tap to M2. Slit this across its diameter & 'part' the two halves off the rod. Thoroughly deburr the threaded section. I think it should then be possible to then use both halves of this nut - when fitted over the area being threaded - to measure its diameter, until an acceptable fit is achieved, i.e 4.99mm.
Martin. Edited By blowlamp on 24/02/2019 18:09:56 BLATANT PLAGIARISM!
Lol. I read your post straight after I submitted mine. I was just making allowance for people with no solder.
Martin.
|
| Graham Meek | 25/02/2019 10:21:17 |
| 714 forum posts 414 photos | I was beginning to think no-one was going to rise to the challenge. The two half nuts are a very good solution, but my solution was for a change much simpler. I found some copper wire 0.24 mm diameter, from a multi-stranded cable. Winding the wire into the thread and taking a measurement could not have been easier. The wire was discarded after each use to minimise loss of diameter from stretching and the possibility of small flats from the micrometer anvils. I was well satisfied with the fit of the two parts once the end was cut off. Checking the mandrel between centres with the components in situ showed no detectable run-out. This method and it's ease of use is one I shall keep in mind for larger threads, provided I can find a suitable diameter wire. Regards Gray, |
| Brian Wood | 25/02/2019 13:39:57 |
| 2742 forum posts 39 photos | Gray, That's an inspired idea and so simple; there will surely be many other ways to exploit it. Congratulations Brian |
| Jeff Dayman | 25/02/2019 16:57:54 |
| 2356 forum posts 47 photos | If doing over-wires thread measurement with copper wire, one caution - check that the wire is actually round. I have seen lots of copper wire bought for coil winding and sensor making that is seriously deformed off-round. Some oval, some triangular, some almost square. I became aware of these deformations when trying to troubleshoot wire feed issues in high speed coil and sensor winding. If the wire is round it is a clever and simple method and will work well, same as measuring over wires with ground steel wires on larger threads. |
| Neil Lickfold | 25/02/2019 18:29:17 |
| 1025 forum posts 204 photos | The copper works well as does the split nut method. On very small stuff like the M2 thread I have found that a thread mic with the anvils, not the points to be the best. The biggest problem I find with small threads is the variation in the taps themselves and the thread that is in the nut. As for fine wire, music shops sell the wire in 1 thou diameter increments. I buy sets of wires in a selection. Its what I make my circlips from for the model engines .When I used to make up wire for thread measuring , I left it very long, and looped it around and had tow on top and two on the bottom. As it was hinged it sort of stayed together. Another guy I worked with made his like a coil spring. It was just 2 loops. These he put tooth picks for handles on and would unwind the spring to fit over the thread form. This was for M3 and M4 LH threads for inserts. Both worked well, but the thread mic is quite fast. Down side to a thread mic is the purchase cost of the anvil sets. What I do like about the thread mic, is that you can make different anvils to suite differing applications , IE ball anvils etc. Trying to get concentric threads I had always found difficult. So one way was to modify some taps, and on the lead in area, make it very close to the drilled size hole. This make it into a piloted tap, and that has solved a lot of issues for me. I use it to get the start of the thread form concentric, and then follow through with the regular tap. Neil L Edited By Neil Lickfold on 25/02/2019 18:32:51 |
| JohnF | 26/02/2019 10:57:52 |
 1243 forum posts 202 photos | An excellent and simple solution Gray ! Neil -- I agree with the thread Mic and your comments, I have one purchased from Shars tools in the USA several years ago and its invaluable for some of the work I do. Much less expensive than you can purchase here. My original problem came when I had to cut accurate metric threads on my imperial lathes, they have to be produced to a correct standard and wires are difficult/time consuming to use [unless you have the Horstman clip on type sets] so purchased an thread imperial mic. with 60deg anvils then made a table for conversion of metric thread measurements to imperial and it works well. Anyone interested in the Shars mics here is a link **LINK** After some negotiations with them regarding freight, and they were very helpful sending the unit by insured post rather than a courier saving ££££'s John |
| Nick Hulme | 27/02/2019 08:33:57 |
| 750 forum posts 37 photos | I'd go with a set of M2 chasers for one of my die heads. |
Please login to post a reply.
Magazine Locator
Want the latest issue of Model Engineer or Model Engineers' Workshop? Use our magazine locator links to find your nearest stockist!
Sign up to our Newsletter
Sign up to our newsletter and get a free digital issue.
You can unsubscribe at anytime. View our privacy policy at www.mortons.co.uk/privacy
Latest Forum Posts
- *Oct 2023: FORUM MIGRATION TIMELINE*
05/10/2023 07:57:11 - Making ER11 collet chuck
05/10/2023 07:56:24 - What did you do today? 2023
05/10/2023 07:25:01 - Orrery
05/10/2023 06:00:41 - Wera hand-tools
05/10/2023 05:47:07 - New member
05/10/2023 04:40:11 - Problems with external pot on at1 vfd
05/10/2023 00:06:32 - Drain plug
04/10/2023 23:36:17 - digi phase converter for 10 machines.....
04/10/2023 23:13:48 - Winter Storage Of Locomotives
04/10/2023 21:02:11 - More Latest Posts...
- View All Topics
Support Our Partners


Shopping Partners
Subscription Offer

Latest "For Sale" Ads
- Reeves** - Rebuilt Royal Scot by Martin Evans
by John Broughton
£300.00 - BRITANNIA 5" GAUGE James Perrier
by Jon Seabright 1
£2,500.00 - Drill Grinder - for restoration
by Nigel Graham 2
£0.00 - WARCO WM18 MILLING MACHINE
by Alex Chudley
£1,200.00 - MYFORD SUPER 7 LATHE
by Alex Chudley
£2,000.00 - More "For Sale" Ads...
Latest "Wanted" Ads
- D1-3 backplate
by Michael Horley
Price Not Specified - fixed steady for a Colchester bantam mark1 800
by George Jervis
Price Not Specified - lbsc pansy
by JACK SIDEBOTHAM
Price Not Specified - Pratt Burnerd multifit chuck key.
by Tim Riome
Price Not Specified - BANDSAW BLADE WELDER
by HUGH
Price Not Specified - More "Wanted" Ads...
Get In Touch!
Do you want to contact the Model Engineer and Model Engineers' Workshop team?
You can contact us by phone, mail or email about the magazines including becoming a contributor, submitting reader's letters or making queries about articles. You can also get in touch about this website, advertising or other general issues.
Click THIS LINK for full contact details.
For subscription issues please see THIS LINK.
Digital Back Issues


Donate

 Register
 Log-in
Model Engineer Magazine
- Percival Marshall
- M.E. History
- LittleLEC
- M.E. Clock

ME Workshop
- An Adcock
- & Shipley
- Horizontal
- Mill

Subscribe Now
- Great savings
- Delivered to your door

Pre-order your copy!
- Delivered to your doorstep!
- Free UK delivery!
All Forum Topics > Workshop Techniques > Sizing an M2 thread during screwcutting