Forum sponsored by:

Removing and re-chucking a part whilst thread cutting on Myford Super 7
| C J | 02/09/2018 12:17:50 |
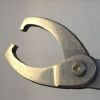 113 forum posts 86 photos | I recently made the pictured screwed cap on my Super 7 and had some difficulty in getting the thread diameter right. I have a DRO fitted to my lathe so I can add on more cut by known increments and to avoid un-chucking the part I initially backed off the saddle enough (with the feed still engaged) to remove the chuck containing the cap in order to try it in it's destined hole but the thread was binding and having the part in the chuck made the handling unwieldy, and after two goes at doing this I thought there must be a better way. At the third attempt I just removed the part from the chuck, as the thread was still binding in it's destined hole, and then put the part back in the chuck, hand cranked the saddle towards the chuck until the cutting tool was positioned approximately half way along the thread, but away from and not engaged in the thread, and then adjusted the fit of the cutting tool into the thread using a combination of the slide (positioned in line with the spindle) and the cross slide, and when it fitted withdrew the cutting tool reversed the lathe and then restarted cutting the thread I encountered no problem using this technique other than having to ensure that the part runs true on re-chucking and finally achieved a working fit for the thread after two more cycles of removing and re-chucking the cap!
Edited By C J on 02/09/2018 12:31:55 Edited By C J on 02/09/2018 12:32:35 Edited By C J on 02/09/2018 12:33:42 Edited By C J on 02/09/2018 12:36:22 |
| C J | 02/09/2018 14:58:49 |
113 forum posts 86 photos | Correcton “..... and adjusted the fit of the cutting tool into the thread using a combination of the top slide... “ |
| thaiguzzi | 02/09/2018 15:01:17 |
 704 forum posts 131 photos | Nice. M/C inspection cap? |
| C J | 02/09/2018 15:06:03 |
113 forum posts 86 photos | Well spotted, yes a motorcycle inspection cap, in the pursuit of lightness in magnesium!
|
| C J | 02/09/2018 15:06:04 |
113 forum posts 86 photos | Addenda Fitting the cutting tool into the thread in approximately the middle of a length of cut thread is far easier than trying to find the position in which the thread starts and once fitted and then the cutting tool withdrawn the fit is of course saved for the length of the thread after you reverse the lathe, take the backlash up, and then start cutting again.
Edited By C J on 02/09/2018 15:06:54 Edited By C J on 02/09/2018 15:21:29 Edited By C J on 02/09/2018 15:24:34 Edited By C J on 02/09/2018 15:26:21 Edited By C J on 02/09/2018 15:30:01 |
| Brian Wood | 02/09/2018 18:41:49 |
| 2742 forum posts 39 photos | Hello CJ, I have done this sort of picking up on a part cut thread by combined movements as you describe many times and it is easier than one might think too. Regards Brian |
| Neil Wyatt | 02/09/2018 20:35:40 |
 19226 forum posts 749 photos 86 articles | I always run the tool under power for a bit to take up any backlash before using the topslide to line it up. Neil |
| not done it yet | 02/09/2018 22:08:40 |
| 7517 forum posts 20 photos | Clearly not ‘best practice’, but when ‘needs must’ many of us have done it! Even Doubleboost has succumbed on occasions - not removed from the chuck, but having to make a new cutter half way through an internal threading job on one of his u-toob videos. Personally, on a job like that I think I would make a plain thread to get the fit and then make the item. Not too bad with a coarse thread, as yours, but I would not relish rechucking with a very fine thread. |
| Marcus Bowman | 02/09/2018 22:53:59 |
| 196 forum posts 2 photos | That's quite a short thread, but it looks as though you have 3 fully formed turns, so I would use thread wires to measure the pitch diameter, because that's the crucial dimension for fit. You do need a minimum of 3 threads to be able to position the wires. With care, that method should avoid the need for re-chucking. You should, in any case, be able to get a good indication of the required depth of cut by consulting tables. That might not get you exactly there, but you should get a good indication of depth, so that you can judge when to use the thread wires to work out the final cut(s). Thread wires are a bit fiddly to position, but worth the effort for a thread like this. I guess the thread is too large for you to have a tap so that you can make a female thread to act as a gauge. With that short a right-hand thread, I would turn it from the flange outwards, to minimise the need for a groove at the inner end of the thread. If you use the tool right way up, mounted at the rear of the thread; reverse the rotation, and feed the tool towards the tailstock, life becomes much less stressful. Grind the tool so that the point is close to the chuck end of the tool when it is in its mounted position, and you should be able to start it right up against the flange. Let it cut a vee groove for clearance, before engaging the half-nuts. I like the nice crisp slot. Marcus |
| not done it yet | 03/09/2018 07:34:56 |
| 7517 forum posts 20 photos | Of course, the re-chucking (the really naughty bit) could be avoided by cutting the threads between centres so that alignment is not a problem, leaving only adjusting the thread starting point as the much less of a problem, even for finer threads. |
| Nick Hulme | 16/09/2018 15:23:16 |
| 750 forum posts 37 photos | Posted by Marcus Bowman on 02/09/2018 22:53:59:
I guess the thread is too large for you to have a tap so that you can make a female thread to act as a gauge. Or try it in the only part it's ever going to be screwed into? |
| chris stephens | 16/09/2018 15:45:05 |
| 1049 forum posts 1 photos | For fine adjustment of threads you might find a hand held thread chaser of some benefit. No need for realigning part with a leadscrew or even running super true in the chuck.As another benefit you can also get correct thread form on rounded Whitworth threads. Do Tracy Tools still do their chaser sets? chriStephens
Do |
| Neil Lickfold | 17/09/2018 07:22:18 |
| 1025 forum posts 204 photos | Another way is to use a collet chuck, that has a radial index, and is placed in the same z position.The collet with the work piece can be removed, tried on the part, returned and carry on with the thread cut.On a 25mm shank holder, if you get it to a radial position with in 0.1mm, the pitch position error is negligible. Neil L. |
| Clive Foster | 17/09/2018 09:22:37 |
| 3630 forum posts 128 photos | Standard way to deal with this sort of dilemma is to leave the half nuts engaged and work with the topside set the parallel to the bed. Exact replacement position becomes a non issue as the topside provides the necessary fine adjustment to give proper alignment between thread and tool. As Neil says its important to use the threading feed to run up to the approximate position to take out backlash. For final adjustment I prefer to cut on the front edge of the tool as its easier to set up a very fine skim. Can be a pain in the backside keeping track of cuts. Best way is to start by touching the tool off the workpiece. Set the cross-slide dials to zero. Crank the saddle clear of the workpiece and run the cross-slide in by the book thread depth (plus an allowance for tool tip shape if yours is too pointy). Set the cross-slide dial back to zero. Cut thread as per normal using only cross-slide feeds. When the dial gets to zero thread should be the calculated book depth. Remove, test fit and adjust as needed. I normally use the zero2zero threading method where the lathe self generates the required in-feed with the topside set at close to half the thread angle so this is a simple modification to my standard process. Got me a left hand 26 TIP thread wheel bearing retaining ring in the "Please fix this for me" box that will need this approach. On machine trial fits are a bit impractical with a 19" diameter motorcycle wheel. With a simple job like that its easiest to make a test piece then revert to the zero2zero method for proper job as the final cross slide dial reading give the extra in-feed needed beyond the original setting so the proper depth can be used. Clive. |


Please login to post a reply.
Magazine Locator
Want the latest issue of Model Engineer or Model Engineers' Workshop? Use our magazine locator links to find your nearest stockist!
Sign up to our Newsletter
Sign up to our newsletter and get a free digital issue.
You can unsubscribe at anytime. View our privacy policy at www.mortons.co.uk/privacy
Latest Forum Posts
- *Oct 2023: FORUM MIGRATION TIMELINE*
05/10/2023 07:57:11 - Making ER11 collet chuck
05/10/2023 07:56:24 - What did you do today? 2023
05/10/2023 07:25:01 - Orrery
05/10/2023 06:00:41 - Wera hand-tools
05/10/2023 05:47:07 - New member
05/10/2023 04:40:11 - Problems with external pot on at1 vfd
05/10/2023 00:06:32 - Drain plug
04/10/2023 23:36:17 - digi phase converter for 10 machines.....
04/10/2023 23:13:48 - Winter Storage Of Locomotives
04/10/2023 21:02:11 - More Latest Posts...
- View All Topics
Support Our Partners


Shopping Partners
Subscription Offer

Latest "For Sale" Ads
- Reeves** - Rebuilt Royal Scot by Martin Evans
by John Broughton
£300.00 - BRITANNIA 5" GAUGE James Perrier
by Jon Seabright 1
£2,500.00 - Drill Grinder - for restoration
by Nigel Graham 2
£0.00 - WARCO WM18 MILLING MACHINE
by Alex Chudley
£1,200.00 - MYFORD SUPER 7 LATHE
by Alex Chudley
£2,000.00 - More "For Sale" Ads...
Latest "Wanted" Ads
- D1-3 backplate
by Michael Horley
Price Not Specified - fixed steady for a Colchester bantam mark1 800
by George Jervis
Price Not Specified - lbsc pansy
by JACK SIDEBOTHAM
Price Not Specified - Pratt Burnerd multifit chuck key.
by Tim Riome
Price Not Specified - BANDSAW BLADE WELDER
by HUGH
Price Not Specified - More "Wanted" Ads...
Get In Touch!
Do you want to contact the Model Engineer and Model Engineers' Workshop team?
You can contact us by phone, mail or email about the magazines including becoming a contributor, submitting reader's letters or making queries about articles. You can also get in touch about this website, advertising or other general issues.
Click THIS LINK for full contact details.
For subscription issues please see THIS LINK.
Digital Back Issues


Donate

 Register
 Log-in
Model Engineer Magazine
- Percival Marshall
- M.E. History
- LittleLEC
- M.E. Clock

ME Workshop
- An Adcock
- & Shipley
- Horizontal
- Mill

Subscribe Now
- Great savings
- Delivered to your door

Pre-order your copy!
- Delivered to your doorstep!
- Free UK delivery!
All Forum Topics > Workshop Techniques > Removing and re-chucking a part whilst thread cutting on Myford Super 7