Forum sponsored by:

Hoglet Build
| Nick_G | 30/03/2016 20:11:38 |
 1808 forum posts 744 photos | . Just to let you know I have not been slacking. ........................ (totally) I have been carving out larger bits and stacking them unfinished on the build so far so that I can get a feel of how it is going to lay out. This is so I can mill holes, drill and tap the aluminium plate base. I am needing to do this as I am deviating prom the plan quite a bit. - It's gaining size and weight.
I will post pics etc. of the machining of the various sections as I step to the finishing stage of each one. Nick |
| Nick_G | 02/04/2016 23:53:53 |
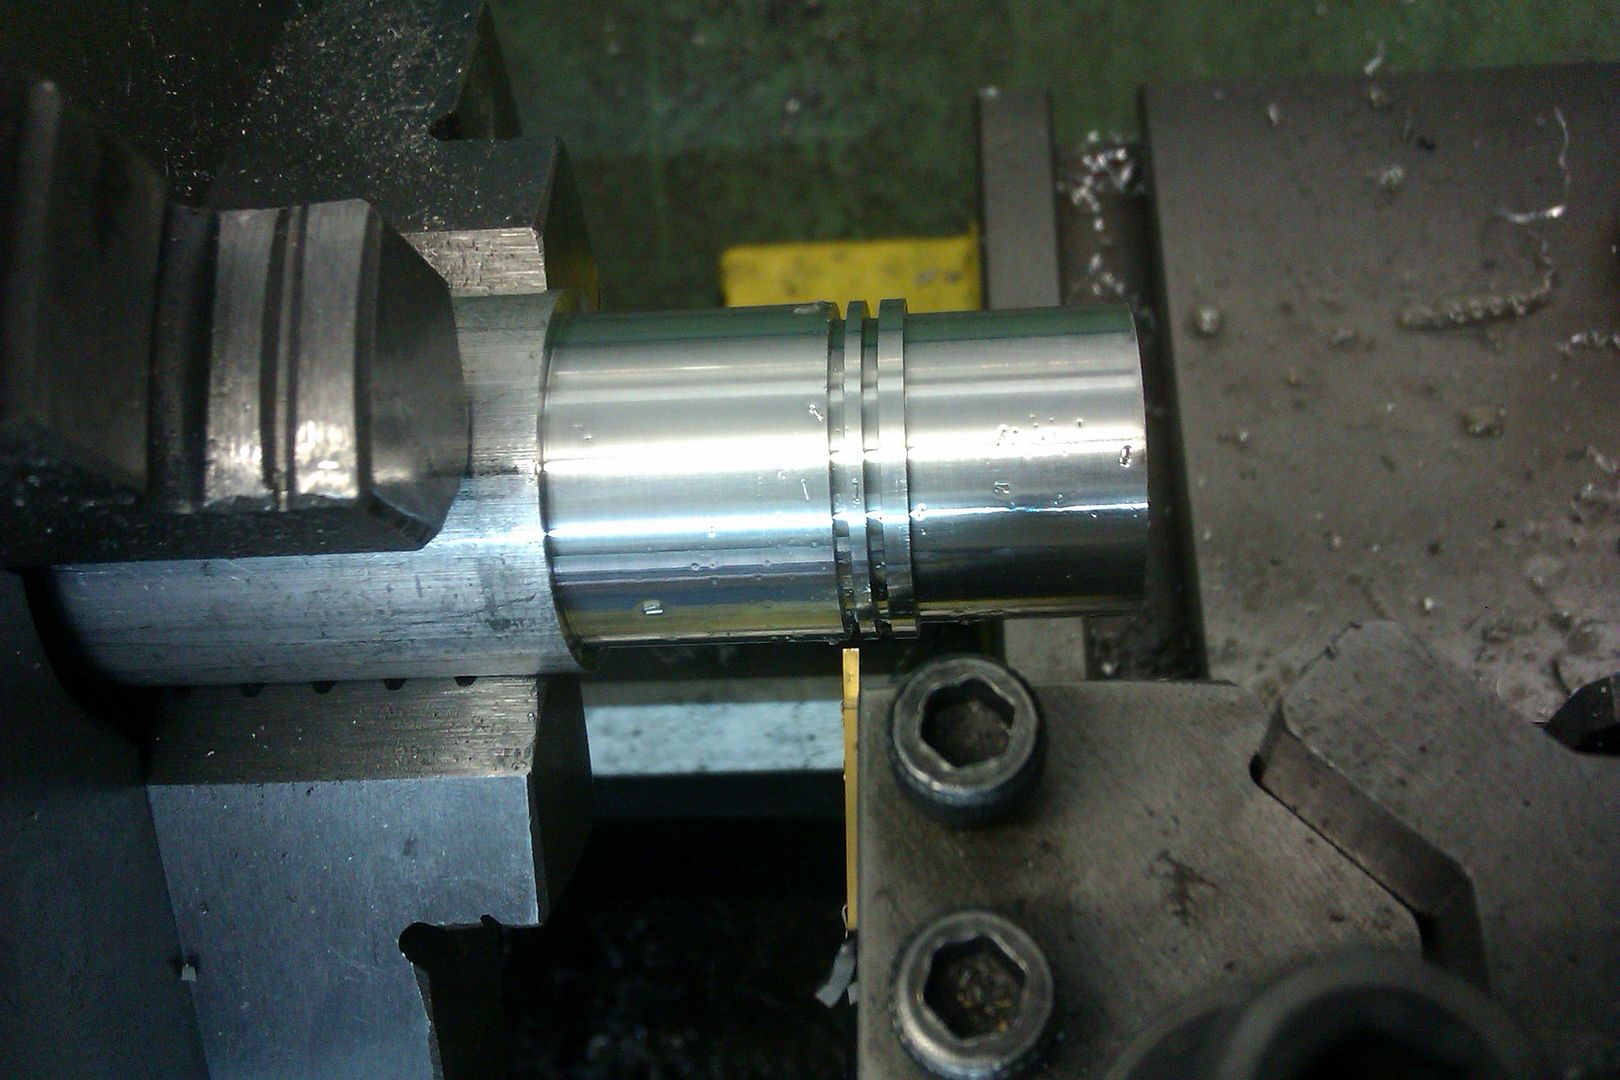
1808 forum posts 744 photos | . On with the flywheel. Billet was turned to make the centre hub to 4" dia.
After a cuppa and a few ciggs I plucked up the courage to butcher the 4 1/2" outside 3 1/2" inside bronze stock. I glue tacked some sacrificial washers to one side so that I did not run the boring bar into the chuck flange jaws.
I need not have fretted. It machined really nicely.
And tested the centre boss.
But don't it make you want to cry. All that bronze swarf.
I think it was the American machinist Kieth Fenner that said in one of his videos. "There is something about bronze to men. Bronze to men is the same as diamonds are to women." - Must admit it is nice stuff.
I did a PCD on the mill DRO of 12 holes that fixed the 2 parts together.
I need to go to my mates workshop so that I can broach a recess into the hub to enable a keyway to the crankshaft. Once this is done I will make a keyed mandrill to place into the lathe to turn the outer side of the flywheel. .............. Yes Jason, your recommended tips have arrived.! Nick
|
| Nick_G | 03/04/2016 00:07:35 |
1808 forum posts 744 photos | . Been saying for I while I need to make the base as it was getting larger and heavier. An accident was bound to happen. Again the DRO came to my rescue. ............. I really would be up THAT creek without a paddle without them.
Some mounting holes for the engine. Plus some extra ones for a Baldrick style 'cunning plan'.
Some legs were made for it which will eventually fix to a bottom plate. I am thinking this maybe steel to give some mass in a low centre of gravity.
And an idea of how it's going to layout.
Nick |
| Nick_G | 03/04/2016 00:39:29 |
1808 forum posts 744 photos | . And a couple of vids of the flywheel activity if anyone is interested. |
| thaiguzzi | 03/04/2016 04:52:16 |
 704 forum posts 131 photos | Only came across this today. Just read all 5 pages. Nice project and great work from the pair of you. Not wanting to derail the thread, any comments on the Hemingway v twin? |
| Nick_G | 03/04/2016 10:25:12 |
1808 forum posts 744 photos | Posted by thaiguzzi on 03/04/2016 04:52:16:
Only came across this today. Just read all 5 pages. Nice project and great work from the pair of you. Not wanting to derail the thread, any comments on the Hemingway v twin? . Thanks, but this is not a duo build. I can however understand why it may seem as such. - The other engine in this thread has already been made by Jason some time ago. The photos he has posted are ones he has kindly taken by stripping his to pieces to assist my build. I have no idea about the Hemingway V twin. Others here may have though and I would personally not consider the thread derailed if it was discussed here. Nick |
| Nick_G | 04/04/2016 13:47:54 |
1808 forum posts 744 photos | . Getting serious now.! This arrived in todays post :-
It was suggested for me to use one of these by Jason. He is very good at spending my money that fella is.!!!!
Nick |
| Nick_G | 07/04/2016 19:46:45 |
1808 forum posts 744 photos | . Bit more progress. Went to my mates workshop to cut a keyway in the flywheel hub. I was going to show the broaching in photographs but he did it so quick I missed it in the time it took to go for a pee. With that done i cut a recess into the crankshaft so that I could fix it securely with a key for final turning. I suppose a purist would have used a 4 jaw dialed in but the collet chuck runs within 1/2 a thou.
Which proceeded with 'Jasons tips'
Made one of the main bearing blocks. (there will be 4 in total) With a pocket to accept the bearing. This is one of the areas where I am deviating from the original design.
Which looks like this.
And will eventually position like this. It will be fixed both to the crankcase side wall and to the base. I am also wondering about rounding the outer edges. - But the rest is quite angular. ......... 'Dunno' ??
And the crank will sit thus ish.
Painted the center hub and gave a couple of coats of lacquer. Also taped up the bronze outer to protect it while I am messing about with the rest. ..................... Bet I still scratch it though.!
Nick |
| Nick_G | 13/04/2016 08:49:11 |
1808 forum posts 744 photos | . The crank web blanks were tacked together with loctite and milled to shape as a pair.
These were then dressed and I had a semi assemble to see how it would start to look.
Made a start on the final shape of the bearing housing pedestals.
The parts of the crankshaft were joined with 638 and pinned. The center of the main shaft was then milled out.
Nick
Edited By Nick_G on 13/04/2016 08:53:39 |
| Nick_G | 16/04/2016 13:33:44 |
1808 forum posts 744 photos | . Finished off the bottom end.
And a short video clip of it doing it's round and round thing. (radio was a bit loud in the workshop - sorry)
|
| Nick_G | 27/04/2016 23:10:41 |
1808 forum posts 744 photos | . Hi guy's, I am on with the con rods presently. This seems to be taking an age, but they are nearly done. So I will have to have the pistons to make sure all is as it should be. On my previous 2 builds both of them had very simple pistons. Threaded disks really with a groove for the rings. But these are a tad more involved. I know how to make the shape. But what I don't know is the best machining order so that I don't crush and distort the aluminium rascals as I move between lathe and clamping in the mill. Drawing :-
Ideas please chaps. Nick
|
| Bob Murray | 28/04/2016 04:44:26 |
| 24 forum posts | Turn the piston from 1 1/8" or 1 1/4" stock with a 1" long chucking stub on the head end. Clamp the stub in the milling vise with a V-block, and mill the interior. Pivot the stub and V-block over and square up to drill and ream the wrist pin hole. Return to the lathe and part off. Just my 2p.
Edited By Bob Murray on 28/04/2016 04:51:49 |
| JasonB | 28/04/2016 07:14:27 |
 25215 forum posts 3105 photos 1 articles | As there are two of them rather than a chucking spigot just make them on each end of a 3" long piece of bar, final job will be parting off. Hold by central section of the bar Or as Bob says have a smaller spigot on the head end that will fit a collet block or go into the chuck on a rotary table so milling and gudgeon pin hole can be done at 90deg Or just shove it in a 1" collet and you won't crush things Edited By JasonB on 28/04/2016 07:16:09 |
| Nick_G | 28/04/2016 08:24:07 |
1808 forum posts 744 photos | . Of course. A chucking spigot.! .............. Where were my brains at.? Thanks, Nick |
| Steven Vine | 28/04/2016 10:06:32 |
| 340 forum posts 30 photos | Posted by Nick_G on 28/04/2016 08:24:07:
. Of course. A chucking spigot.!
Nice avoidance of an expletive there Nick! I must say, as well as the whole job, that red paintwork is looking very nice. I like it. Steve
|
| JasonB | 28/04/2016 13:12:57 |
25215 forum posts 3105 photos 1 articles | Here you go Nick now I have a bit more time 1. Turn spigot, OD of piston and ring grooves then part off
Hold by spigot face end to length, drill out most of the waste and open up the skirt area with a boring bar
Hold by spigot in ER block or rotary table to mill out the recess
Then without rotating thre table set it vertically or just lay the block on its side to drill & ream for the pin, this keeps pin hole at 90deg to recess sides
Finally remove spigot and face the top of teh piston your multisize collets won't harm the piston
Edited By JasonB on 28/04/2016 13:13:21 |
| Nick_G | 30/09/2016 12:55:25 |
1808 forum posts 744 photos | . Hi folks, It's been a good while since I have posted on this build. I first I made the rings out of cast iron for the next stage and while it was set up I cut a few spares. (I need 4)
These were then split gently in a vice and a twist. Then inserted a spreader into them. I then popped them into an old cast iron pan (so did not matter if it cracked) and put it upon the 'wok burner' at full blast for a few mins.
Then the blow torch was brought into the kitchen and the rings were brought up to a cherry red and held there for about 10 mins. Once this was done the lid was put onto the pan and the hob burner was left on and gradually reduced over about another 10 mins. The whole lot was then left to cool naturally.
I then had rings with some spring in them.
One of them was twisted, so it's a good job I made some spares. Pistons were then made as per Jasons guide lines.
Nick |
| Neil Wyatt | 30/09/2016 13:44:37 |
 19226 forum posts 749 photos 86 articles | ... and to inspire those just starting out, two and a half years ago Nick was claiming to be a newbie Neil |
| JasonB | 30/09/2016 14:32:50 |
25215 forum posts 3105 photos 1 articles | Good to see you back at it Nick, nice pistons. Is that one of the Eccentric inverted parting tools you are using? |
| Nick_G | 30/09/2016 14:37:16 |
1808 forum posts 744 photos | Posted by Neil Wyatt on 30/09/2016 13:44:37:
... and to inspire those just starting out, two and a half years ago Nick was claiming to be a newbie Neil . Thanks Neil. But TBH I still regard myself as that newbie. There is an awful, awful lot I don't know and much I never will. I tend to learn on a progressive need to know basis. This is only possible because of sites like this one and it's members that give information and advice so freely from their combined vast pool of knowledge. In all honesty if it was not for them I would be confined to making plumb bobs and wobbler engines. Nick |


Please login to post a reply.
Magazine Locator
Want the latest issue of Model Engineer or Model Engineers' Workshop? Use our magazine locator links to find your nearest stockist!
Sign up to our Newsletter
Sign up to our newsletter and get a free digital issue.
You can unsubscribe at anytime. View our privacy policy at www.mortons.co.uk/privacy
Latest Forum Posts
- hemingway ball turner
04/07/2025 14:40:26 - *Oct 2023: FORUM MIGRATION TIMELINE*
05/10/2023 07:57:11 - Making ER11 collet chuck
05/10/2023 07:56:24 - What did you do today? 2023
05/10/2023 07:25:01 - Orrery
05/10/2023 06:00:41 - Wera hand-tools
05/10/2023 05:47:07 - New member
05/10/2023 04:40:11 - Problems with external pot on at1 vfd
05/10/2023 00:06:32 - Drain plug
04/10/2023 23:36:17 - digi phase converter for 10 machines.....
04/10/2023 23:13:48 - More Latest Posts...
- View All Topics
Support Our Partners


Shopping Partners
Subscription Offer

Latest "For Sale" Ads
- Reeves** - Rebuilt Royal Scot by Martin Evans
by John Broughton
£300.00 - BRITANNIA 5" GAUGE James Perrier
by Jon Seabright 1
£2,500.00 - Drill Grinder - for restoration
by Nigel Graham 2
£0.00 - WARCO WM18 MILLING MACHINE
by Alex Chudley
£1,200.00 - MYFORD SUPER 7 LATHE
by Alex Chudley
£2,000.00 - More "For Sale" Ads...
Latest "Wanted" Ads
- D1-3 backplate
by Michael Horley
Price Not Specified - fixed steady for a Colchester bantam mark1 800
by George Jervis
Price Not Specified - lbsc pansy
by JACK SIDEBOTHAM
Price Not Specified - Pratt Burnerd multifit chuck key.
by Tim Riome
Price Not Specified - BANDSAW BLADE WELDER
by HUGH
Price Not Specified - More "Wanted" Ads...
Get In Touch!
Do you want to contact the Model Engineer and Model Engineers' Workshop team?
You can contact us by phone, mail or email about the magazines including becoming a contributor, submitting reader's letters or making queries about articles. You can also get in touch about this website, advertising or other general issues.
Click THIS LINK for full contact details.
For subscription issues please see THIS LINK.
Digital Back Issues


Donate

 Register
 Log-in
Model Engineer Magazine
- Percival Marshall
- M.E. History
- LittleLEC
- M.E. Clock

ME Workshop
- An Adcock
- & Shipley
- Horizontal
- Mill

Subscribe Now
- Great savings
- Delivered to your door

Pre-order your copy!
- Delivered to your doorstep!
- Free UK delivery!
All Forum Topics > Work In Progress and completed items > Hoglet Build