Forum sponsored by:

Brian's 1" Minnie Traction Engine
| Brian Abbott | 02/03/2015 21:37:35 |
 523 forum posts 95 photos |
|
| JasonB | 03/03/2015 07:19:01 |
 25215 forum posts 3105 photos 1 articles | Looking good, now for the fun job of riviting in the spokes! |
| Harry Wilkes | 03/03/2015 09:06:55 |
 1613 forum posts 72 photos | Posted by JasonB on 03/03/2015 07:19:01:
Looking good, now for the fun job of riviting in the spokes! |
| Brian Abbott | 03/03/2015 23:27:55 |
523 forum posts 95 photos | I am guessing that riveting the spokes is not going to be the simplest of jobs ! might it be worth while using copper rivets ? |
| JasonB | 04/03/2015 07:26:08 |
25215 forum posts 3105 photos 1 articles | Definately need to use copper as anything harder will need a lot more force to close and you will distort the aluminium Tee around the rivit. If you make the little dolly to hold the rivit like it shows in the book that will get you into the back of the rivit, depending on where you buy your rivit snaps you may need to thin the end down. If you have not formed snap head rivits before then drill some holes in a bit of scrap and have a practice before you do the wheels. I think that i swhy most people start with teh front end as the single Tee makes it easier to do those rims. |
| Brian Abbott | 05/03/2015 19:33:24 |
523 forum posts 95 photos | Thanks the the advise, will order some copper rivets I think. |
| CotswoldsPhil | 06/03/2015 16:38:06 |
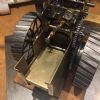
 196 forum posts 112 photos | Hi Brian, This is the dolly made many years ago when riveting Minnie's rear wheels. I also used a hollow punch to settle things down before trying to close the rivet.
Getting the length of the rivet is important for a correctly formed head, a little experimentation as Jason suggests will pay dividends. I made a little shear tool to crop the rivets to length once the correct length had been determined. (there are quite a few to cut!) I tried side cutters but then the rivets tend to fall over to one side.The length will vary depending on how good a fit the rivet is in the hole, first it will expand to fill the hole and then start to form a head. The dolly can also be used on the smoke-box ring, when you get there, by repositioning the snap, that's what the slot is for at the other end. Regards
Phil |
| Brian Abbott | 09/03/2015 21:51:32 |
523 forum posts 95 photos | Thanks Phil, going to have a break from the rims for a bit ( wimp )... Going to make a start on the boiler..so..here we go again.. Seem to be having real problems with rust/staining. only last night I wrapped all the pieces up in rag after spraying with wd40 checked tonight and some rust staining again. Workshop does not have any rust problems normally, machines and tools are all fine. So tonight have dipped in oil and wrapped in paper towel...anyone got any ideas? Edited By Brian Abbott on 09/03/2015 21:59:08 |
| Brian Abbott | 19/03/2015 10:52:44 |
523 forum posts 95 photos | Hello all, quick update on my rust issue.. Whenever i store parts i soak them in WD40, could it be the solder from when i did the hubs is still leaching acid, this then gets washed around the wheel by all the WD40 giving me a rust problem ? Anyway, based on this i cleaned the wheels again, the lightly wiped them over with an oily rag, and for the past week or so no rust.. just an idea. |
| CotswoldsPhil | 19/03/2015 11:17:21 |
196 forum posts 112 photos | Hi Brian, So that you know you are not alone... After soldering, my wheels leached flux from the Bakers Solder Paste at the root of the spokes for a long time. I think this is why I have avoided painting for so long. If I was doing it again, I would use slow set epoxy resin, I think I mentioned this in an earlier post. I'm sure someone here will be able to advise what method to use to remove the flux. This is what mine looks like after some 30 years...
Regards Phil Edited By CotswoldsPhil on 19/03/2015 11:27:03 |
| Brian Abbott | 19/03/2015 21:22:50 |
523 forum posts 95 photos | Look pretty good after 30 years, thought about giving them a light sand blast, (have an old blast cabinet at work) then a coat of etch primer to seal but would the rust pass through the paint, I don't know. All a little sole destroying when you spend so much time on something just to see the rust start. |
| Brian Abbott | 04/05/2015 19:38:52 |
523 forum posts 95 photos | Minnie boiler advice please. Hello all, after some more help, Working through making all the bits for the boiler, is calls for the water gauge to be tapped 7/32x40 in both the soldered bush and the manifold, am I correct in saying I that I have to turn up 2 spacers to connect the gauge to the boiler? And if so what size should these be tapped for the gauge as 7/32 do not seem common, thanks for any help |
| JasonB | 04/05/2015 20:00:03 |
25215 forum posts 3105 photos 1 articles | I made my gauge and the top & bottom fittings are 7/32x40. Can't see why you could not use an off the shelf 1/4x40 gauge and make up a couple of extensions 1/4 one end and 7/32 male the other from a bit of hex stock |
| Brian Abbott | 05/05/2015 10:42:40 |
523 forum posts 95 photos | Thanks Jason. Do you know of any websites / you tube videos showing how these parts work when in steam ? |
| Brian Abbott | 22/05/2015 13:17:05 |
523 forum posts 95 photos | Hello all. Still building the boiler...have decided to use PB102 for the threaded bushes, is this the best material or should i favour brass ? Thanks Brian |
| JasonB | 22/05/2015 16:16:52 |
25215 forum posts 3105 photos 1 articles | Definately bronze for the bolier bushes. Missed you request for video, will have a look.
J |
| Brian Abbott | 08/06/2015 14:52:09 |
523 forum posts 95 photos | Thanks Jason, sorry for not responding. |
| maurice bennie | 08/06/2015 17:18:31 |
| 164 forum posts 1 photos | Hi Brian , If I have used acid on anything I give it a good soak in soda carbonate or bicarbonate, hot is best ,leave to soak ,rinse well in hot water and dry quickly by warming .Then oil or paint. Hope this helps Maurice. |
| JasonB | 08/06/2015 17:48:51 |
25215 forum posts 3105 photos 1 articles | Brian, yes you can get a build up of scum inside the glass and this can be cleared by opening the bottom valve on the glass. About 2 mins into this one
J Edited By JasonB on 08/06/2015 17:54:07 |
| Brian Abbott | 16/06/2015 18:46:53 |
523 forum posts 95 photos | Thanks both, Jason that is a help, Thank you. Feel a little stupid asking this as I feel I should know but here goes. Why do I need to use Pb 102 for bushes and such on the boiler, why can i not just use copper ? is it because the Pb is a stronger material and holds the threads better ? I do no that Pb102 has a very high copper content so makes it ideal to solder to the copper but that's it. thanks for any advice. |


Please login to post a reply.
Magazine Locator
Want the latest issue of Model Engineer or Model Engineers' Workshop? Use our magazine locator links to find your nearest stockist!
Sign up to our Newsletter
Sign up to our newsletter and get a free digital issue.
You can unsubscribe at anytime. View our privacy policy at www.mortons.co.uk/privacy
Latest Forum Posts
- hemingway ball turner
04/07/2025 14:40:26 - *Oct 2023: FORUM MIGRATION TIMELINE*
05/10/2023 07:57:11 - Making ER11 collet chuck
05/10/2023 07:56:24 - What did you do today? 2023
05/10/2023 07:25:01 - Orrery
05/10/2023 06:00:41 - Wera hand-tools
05/10/2023 05:47:07 - New member
05/10/2023 04:40:11 - Problems with external pot on at1 vfd
05/10/2023 00:06:32 - Drain plug
04/10/2023 23:36:17 - digi phase converter for 10 machines.....
04/10/2023 23:13:48 - More Latest Posts...
- View All Topics
Support Our Partners


Shopping Partners
Subscription Offer

Latest "For Sale" Ads
- Reeves** - Rebuilt Royal Scot by Martin Evans
by John Broughton
£300.00 - BRITANNIA 5" GAUGE James Perrier
by Jon Seabright 1
£2,500.00 - Drill Grinder - for restoration
by Nigel Graham 2
£0.00 - WARCO WM18 MILLING MACHINE
by Alex Chudley
£1,200.00 - MYFORD SUPER 7 LATHE
by Alex Chudley
£2,000.00 - More "For Sale" Ads...
Latest "Wanted" Ads
- D1-3 backplate
by Michael Horley
Price Not Specified - fixed steady for a Colchester bantam mark1 800
by George Jervis
Price Not Specified - lbsc pansy
by JACK SIDEBOTHAM
Price Not Specified - Pratt Burnerd multifit chuck key.
by Tim Riome
Price Not Specified - BANDSAW BLADE WELDER
by HUGH
Price Not Specified - More "Wanted" Ads...
Get In Touch!
Do you want to contact the Model Engineer and Model Engineers' Workshop team?
You can contact us by phone, mail or email about the magazines including becoming a contributor, submitting reader's letters or making queries about articles. You can also get in touch about this website, advertising or other general issues.
Click THIS LINK for full contact details.
For subscription issues please see THIS LINK.
Digital Back Issues


Donate

 Register
 Log-in
Model Engineer Magazine
- Percival Marshall
- M.E. History
- LittleLEC
- M.E. Clock

ME Workshop
- An Adcock
- & Shipley
- Horizontal
- Mill

Subscribe Now
- Great savings
- Delivered to your door

Pre-order your copy!
- Delivered to your doorstep!
- Free UK delivery!
All Forum Topics > Traction engines > Brian's 1" Minnie Traction Engine