lost drive to power feed
Beaver mk1 VRBP milling machine
| Mark Rand | 21/12/2020 19:12:01 |
| 1505 forum posts 56 photos | After you've got it all fixed, put some permanent stops in the T-slot on the front of the table. There may well be two tapped holes in the T-slot to locate them. That way, the feed will always get cut off before damage can occur. |
| Mark Guy | 21/12/2020 19:51:31 |
| 40 forum posts 29 photos | Mark Good man cheers will I get away with just taking the plate off as the handle on the left as be broke off the lead screw and been bojed up. There was a T nut and bolt right side but not on the left. I never gave it much thought until this happened then I realised what it was for. |
| Mark Rand | 21/12/2020 20:03:28 |
| 1505 forum posts 56 photos | I keep writing without checking or thinking. Sorry! There should be two T-nuts in the slot at the front, one on the left and one on the right. The two holes that should be in the bottom of the slot just stop the T-nuts being moved past the point where the drive could destroy itself.
With the standard feed on the Mk1 being limited to 4 1/2" per minute, it's useful to be able to set the stops and wander away to do something else. I think that the optional faster feed just used a 2 pole motor instead of the 4 pole one. |
| Mark Guy | 21/12/2020 20:49:43 |
| 40 forum posts 29 photos | Mark well that’s pretty much how it happened I’d just faced of a 2”x18x9” plate and shut the head down and going back to my bench for another plate and caught my overhaul pocket on the feed lever not thinking the motor was still on and well the rest is history |
| Mark Guy | 22/12/2020 19:48:15 |
| 40 forum posts 29 photos |
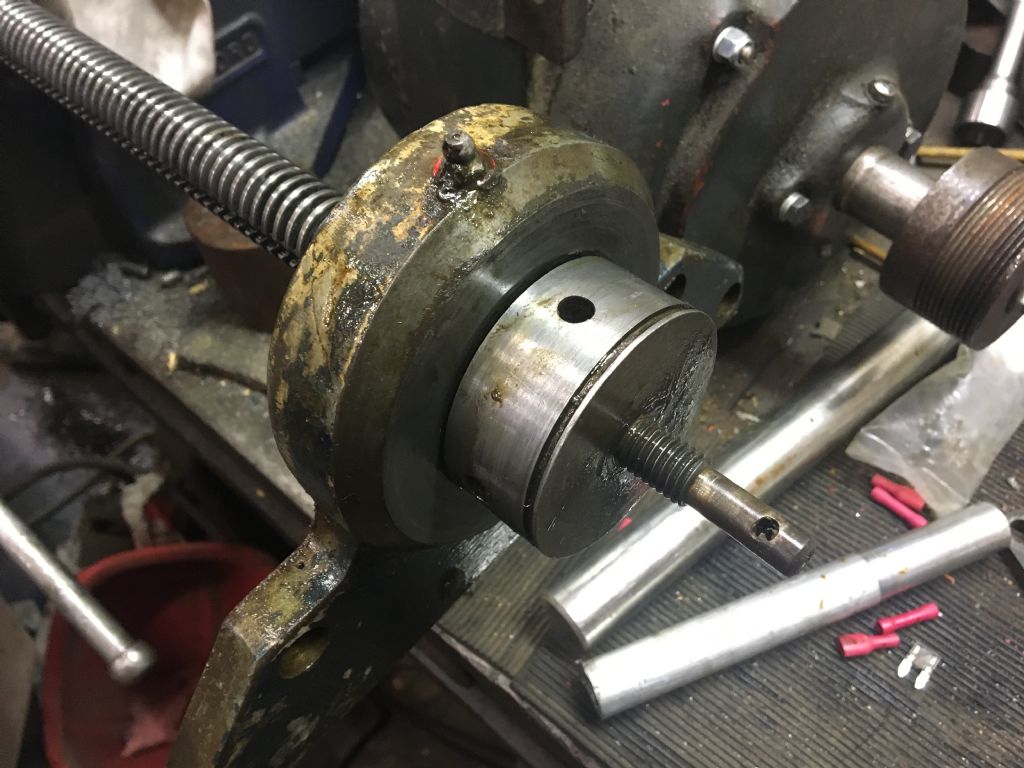
I’ve managed to get it apart after taking the lead screw out completely like you said it was a burr on outer right side of the lead screw. Had to get the pullers on it mind to shift it. Thanks for the advise. |
| DC31k | 22/12/2020 21:03:06 |
| 1186 forum posts 11 photos | Posted by Mark Guy on 22/12/2020 19:48:15:
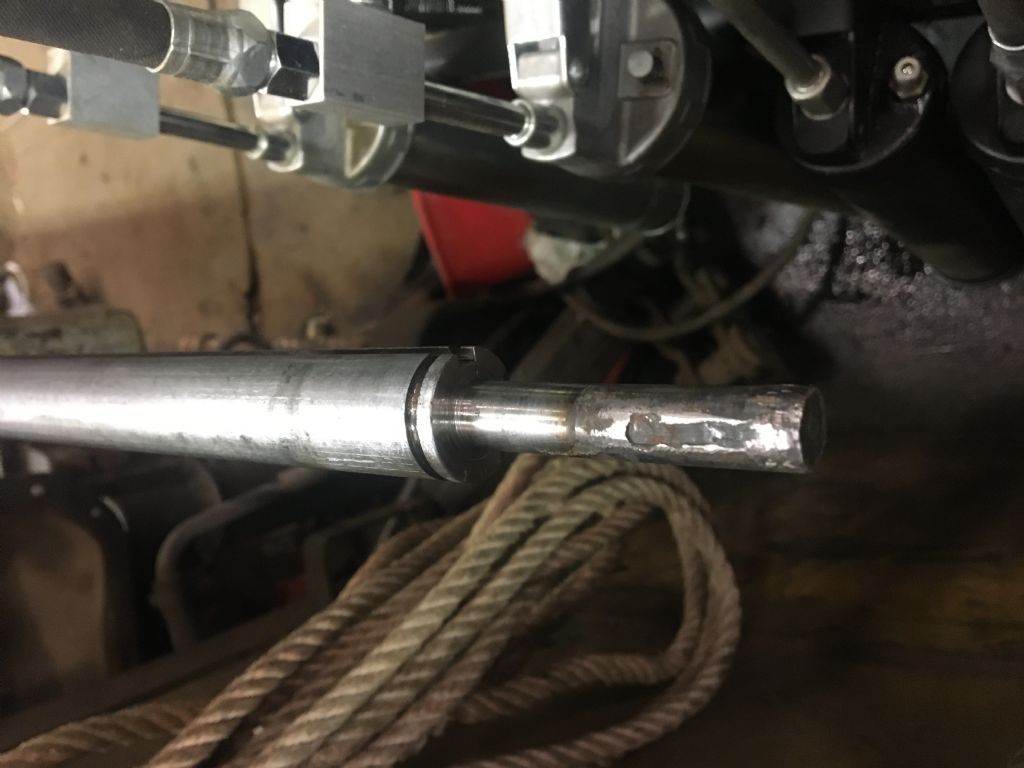
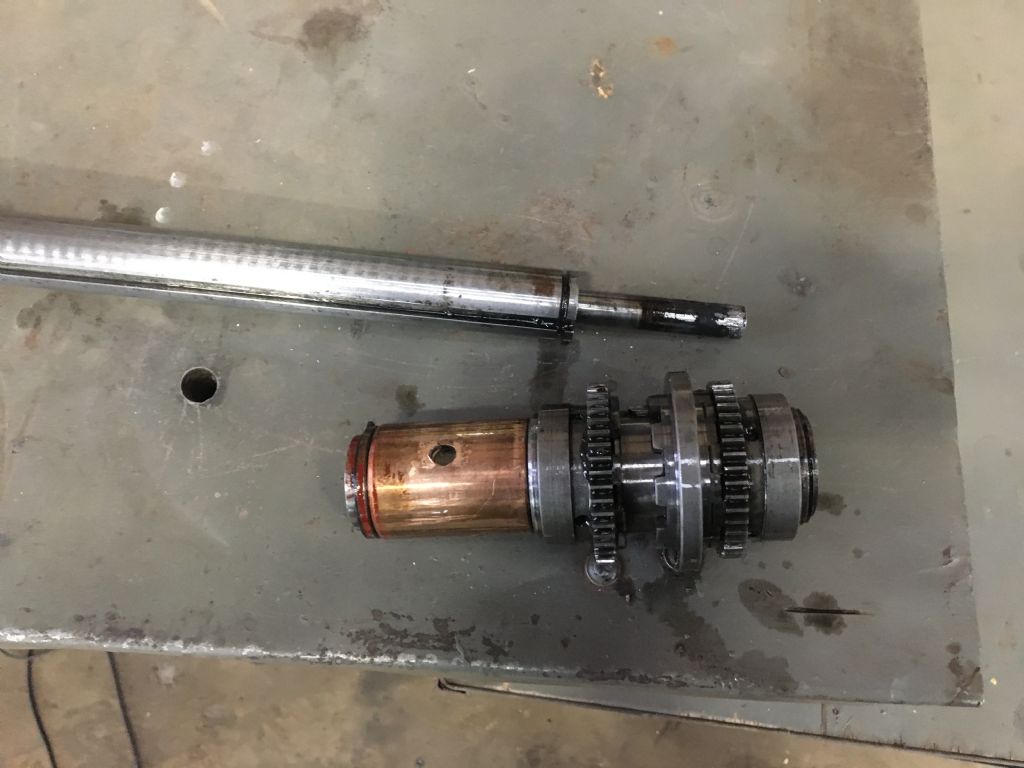
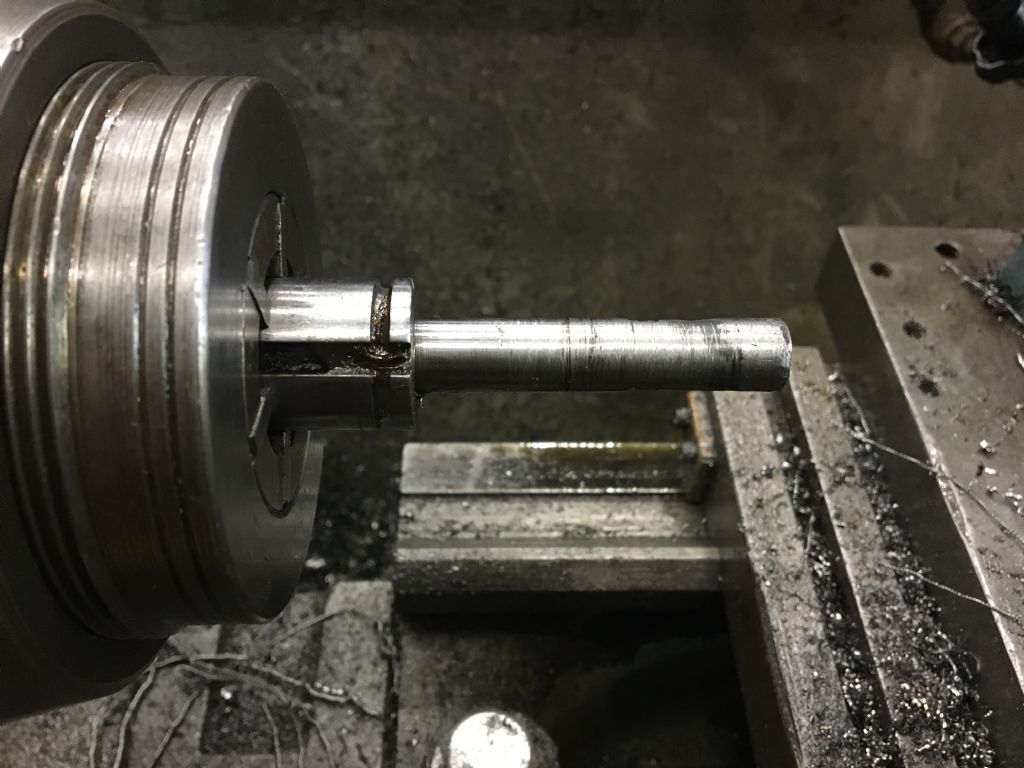
I’m thinking of a straight 1/2 en16t bar threaded 1/2 unf cut off the damaged ends on the lead screw then bore and tap the lead screw to suit then either lock tight or drill and grub screw in place. I would just cut off the smaller diameter piece flush with where the step in diameter is, drill and ream the leadscrew and use Loctite 648. What torque is that part taking? Or are you in the habit of using a Stilsons with a four foot cheater bar on the handwheel? Threading both parts runs the risk of them not ending up concentric, unless you make the shorter bit oversize and finish turn it after locking it into place. You should probably stone or file the keyway in the entire leadscrew while it is out to remove any burrs. Also have a good look at the drive key that runs in the keyway, and remake it if necessary. It is not the best design, having a keyway along a threaded shaft - the threads act as a cheese grater on the key. Before you commit yourself to gluing something in, have a think of how you will secure the handwheel and dials to the leadscrew. If you have the necessary taper pin reamer, all well and good, but matching the existing holes in the dial and screw is not simple, especially with five feet of screw waggling about on the end of the piece on which you are working. It might be easier to do the fitting with the small diameter piece free of the main leadscrew. Then you can test assemble everything, make one simple length adjustment and glue it together. Have a look at the part in the foreground of the lower photo, let us call it the dog assembly. Excessive end float in this can make engaging the power feed like changing gear in an Austin Maxi. A brass washer to shim it all back snug again transforms it to a Honda Accord. |
| Mark Rand | 22/12/2020 21:35:47 |
| 1505 forum posts 56 photos | Strangely enough, my one's got 1/2" silver steel ends, threaded 1/2"BSF, held in with Loctite 603 for similar reasons It may be worth putting the feedscrew on a couple of V blocks to check that it is straight. If anyone's tries to lift the mill with slings under the table it might not be. Mine was 1/8 out of true! Straightened to 3 thou TIR with a bit of work. At this point, it's also worth inspecting the feedscrew nut for wear. unscrewing the outside end of the adjustable nut and having a look down the hole will give you a good idea of how much meat is left on the threads. If they look as clapped out as mine were, you might need to make a new set. Not a particularly complicated job if you have a lathe that can be geared to cut 5 tpi and can grind and ACME bit to sit in a boring bar. If the threads look usable, then just adjust the backlash when you've got it all back together. The one thing that Balding Engineering got very right was to use cast iron nuts on the feedscrews. The nuts wear in preference to the screws unlike certain well known US mills, where the bronze nuts ruin the feedscrews...
A lot of improvements were made on the later Mk2 versions and they've had 60 years for people to abuse them, but when they're all sorted out they're bloody good machines (not biased at all!). |
| Mark Guy | 22/12/2020 23:18:09 |
| 40 forum posts 29 photos | DC I know what you mean about going in to the death on the screw as there is no room for error as I said I was just thinking of it and I’m open to options. I also thought of just doing the last 3/4’ that is missing on the right side seeing as that part only holds the handle. Where as the left size as been welded up previously and is not concentric at all. The dog assy sits on the main part of the lead screw which I will not be modifying and the modification I’m considering would have no detrimental effect on its operation.
|
| Mark Guy | 22/12/2020 23:31:04 |
| 40 forum posts 29 photos | Mark yes that’s tomorrow’s job check the screw and look at the back lash adjustment assy and then a bit of wet n dry on the bed runners ( for want of a better word) as you can guess I m new to the milling game although i do a bit lathes. Ive only owned this mill for a few months and I’m still getting up to speed. |
| DC31k | 23/12/2020 08:21:11 |
| 1186 forum posts 11 photos | If you end up putting the leadscrew into the lathe to modify the end of it, think very carefully about the very long, unsupported bit that will be poking out the back of the headstock. Support it well (in a manner closely equivalent to having it in a fixed steady). I think it is better to make the repair inside the large diameter part of the screw as there is more surface area (greater perimeter and longer depth) for the threadlocker to work. If you did want to thread it, you could drill and tap it 3/8" UNC say 2" deep and then bore and ream the first 1" to 1/2" diameter. That way, the loctited threads give security and the reamed bore gives concentricity. There is also no stress riser at the point where the diameters change. With the left side, is that the side where the leadscrew is threaded for the thrust bearing? Turn it down maybe 1/16" then build it back up with weld, then skim back to truth. There's a description on here of how John Stevenson did the same with motor shafts. Now for a real challenge: would it be possible to do all this work on the mill itself, without using a lathe? I think that on a Beaver, it would. |
| Mark Guy | 23/12/2020 13:45:26 |
| 40 forum posts 29 photos |
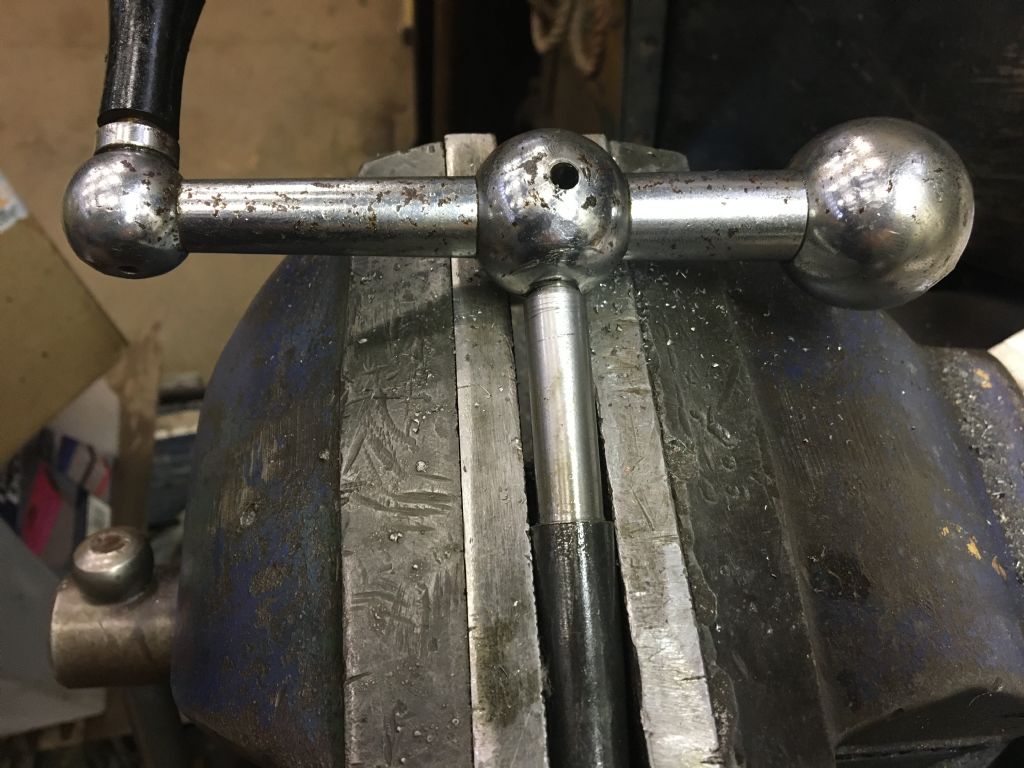
This end of the lead screw is .010 out around 5/16 from the screw( just as it leaves the bush) I’ve made the wheel end c/w taper hole and pin and was just thinking what your thoughts would be about turning it down say .030 unti concentric and boring the wheel end .002 under size over 2” and sweating it on. |
| Mark Guy | 23/12/2020 13:55:32 |
| 40 forum posts 29 photos | DC I’ve secured it in the lathe with a cone I’ve knocked up on the back side and nipped it up with lead screw nut and the back of the screw is supported with a packed stand and rubber lined v cup to prevent bounce. I’d be struggling with the mill as it all still in bits. Thanks for the advice |
| Pete Rimmer | 01/01/2021 12:15:21 |
| 1486 forum posts 105 photos | New gears made. Send me your postal details Mark
|
Please login to post a reply.
Want the latest issue of Model Engineer or Model Engineers' Workshop? Use our magazine locator links to find your nearest stockist!
Sign up to our newsletter and get a free digital issue.
You can unsubscribe at anytime. View our privacy policy at www.mortons.co.uk/privacy
- *Oct 2023: FORUM MIGRATION TIMELINE*
05/10/2023 07:57:11 - Making ER11 collet chuck
05/10/2023 07:56:24 - What did you do today? 2023
05/10/2023 07:25:01 - Orrery
05/10/2023 06:00:41 - Wera hand-tools
05/10/2023 05:47:07 - New member
05/10/2023 04:40:11 - Problems with external pot on at1 vfd
05/10/2023 00:06:32 - Drain plug
04/10/2023 23:36:17 - digi phase converter for 10 machines.....
04/10/2023 23:13:48 - Winter Storage Of Locomotives
04/10/2023 21:02:11 - More Latest Posts...
- View All Topics
- Reeves** - Rebuilt Royal Scot by Martin Evans
by John Broughton
£300.00 - BRITANNIA 5" GAUGE James Perrier
by Jon Seabright 1
£2,500.00 - Drill Grinder - for restoration
by Nigel Graham 2
£0.00 - WARCO WM18 MILLING MACHINE
by Alex Chudley
£1,200.00 - MYFORD SUPER 7 LATHE
by Alex Chudley
£2,000.00 - More "For Sale" Ads...
- D1-3 backplate
by Michael Horley
Price Not Specified - fixed steady for a Colchester bantam mark1 800
by George Jervis
Price Not Specified - lbsc pansy
by JACK SIDEBOTHAM
Price Not Specified - Pratt Burnerd multifit chuck key.
by Tim Riome
Price Not Specified - BANDSAW BLADE WELDER
by HUGH
Price Not Specified - More "Wanted" Ads...
Do you want to contact the Model Engineer and Model Engineers' Workshop team?
You can contact us by phone, mail or email about the magazines including becoming a contributor, submitting reader's letters or making queries about articles. You can also get in touch about this website, advertising or other general issues.
Click THIS LINK for full contact details.
For subscription issues please see THIS LINK.
Model Engineer Magazine
- Percival Marshall
- M.E. History
- LittleLEC
- M.E. Clock
ME Workshop
- An Adcock
- & Shipley
- Horizontal
- Mill
Subscribe Now
- Great savings
- Delivered to your door
Pre-order your copy!
- Delivered to your doorstep!
- Free UK delivery!



 Register
 Log-in


