Forum sponsored by:

ML7 toolpost - Turns Under Load
| Rod Renshaw | 14/11/2020 12:46:12 |
| 438 forum posts 2 photos | Jason's analysis of the possible reasons for the marks on the topslide encourage me to suggest that once the surface has been improved, it may be prudent to protect it from any further damage, there are only so many times one can mill a little off the surface before one is down to the canvas! So, if using the Clog type clamp, use soft, or at least smooth, packing, under any tools and under the foot of the clamp. I don't see any problem using the quick change tool block, though as ever with clamping, it pays to clean off any swarf before tightening. Rod |
| Dr_GMJN | 14/11/2020 12:55:11 |
 1602 forum posts | All, The blue on the pin is from where I caught it with my finger, it's quite far up in the bore. I've removed the pins now anyway. The feel of the block on the pin isn't tight, nor is it too sloppy, and as I said the pin is perpendicular. I don't think the fit there is an issue. I'll try the block on the surface plate and report back. |
| Hopper | 14/11/2020 12:59:36 |
 7881 forum posts 397 photos | See the bit I just added to previous post about checking that shiny ring around the base of the clamping stud. Looks like metal to metal contact there displacing the blue so could be sitting up on that. |
| Ramon Wilson | 14/11/2020 12:59:58 |
 1655 forum posts 617 photos | Doc, it appears to me you have a good finished result there within the limits of your mill - I would trust the milled surface at this stage. I think you will find the block is hardened so unless you can find someone to surface grind it your only option would be to lap it to something of known flatness - not your new surface! If you have something flat that you can lay a fresh sheet of wet and dry paper about 280 grit on, using plenty of paraffin and oil as a lubricant you may be able to get rid of those high spots to a degree of flatness acceptable. Duncan has a point if your tool holder is a close fit on the tool post - if it's not square it would produce an uneven result. Before you do anything else try parting something off to see if it has improved the gripping power so far. My toolholder is the same as Duncan's and has the recess in the bottom too - it was a very slack fit over the Myford post but like his did/does have a centering washer. I assumed that yours would be similar - I fitted a boss as said to centralise the tool post which also improved matters but |
| Howard Lewis | 14/11/2020 13:32:56 |
| 7227 forum posts 21 photos | Perhaps a silly thought, but is it possible that the clamp handle is hitting the end of the stud? An extra washer under the handle might clarify that, and allow full clamping load to be applied to the block. If so, another job would be to make up a spacer to replace all the washers. Howard. |
| Dr_GMJN | 14/11/2020 13:47:22 |
1602 forum posts | Posted by JasonB on 14/11/2020 10:23:25:
If we look back to some of his first posts the Doc was getting ridging when machining a flat surface quite possibly due to nod of the mill, someone else suggested a flycutter to give a better finish. Doc then started to use this in his 10V thread as it gave the "best* finish" and as it was being used with an insert tool coped well with the chill in some of the castings that would have blunted an HSS mill quite quickly. Now if there is nod in the machine that may still allow the flycutter to cut a flat surface if only used in one direction be it with a slight tilt a milling cutter particularly flat ended will still leave the steps. As the areas where something like a valve travels are only something like 3/8 x 5/8 even if the cut were concave it would be so small as to not be worth worrying about, the use of gaskets on the mating faces has taken care of any other possible concavity. I'll flycut valve faces on smaller engines but have used the multiple pass method on larger ones using an HSS cutter, just a case of what suits the job ad what the individual machine is capable of. * Best probably being visual
I agree with Hopper that it does look like the toolpost is not sitting flat but could that also be due to the stud leaning at an angle due to many years or pulling on a spanner to tighten the nut? I would say do the blue test again when the stud is removed. As for the marks on the surface again probably years of use with this type of clamp and off bits of packing, you can certainly see a ring of indents with deep ones at 9 & 12 o'clock where the screw opposite the tool has made the deepest indents
Yes, using the fly cutter gave a much better visual finish, and I could very quickly finish it with metal polish to what I thought was an acceptable standard (in terms of both looks and function) on the surface plate. The faces of the square cover and the faces and sides of the valve chest were fly-cut, and they stuck together on their own after some very light polishing. Same with the cylinder valve face and the cover: I did tram the mill such that the fly cutter took very consistent cuts over the entire arc, even at small depth of cuts like 1-2 thou. It also just removed some material - almost dust - as the back of the arc passed over the surface. So I was at the time happy that everything was OK. I've always had issues with side milling - from day one. And this has never improved despite taking all precautions against chatter. The only remaining thing I've got left to try is to re-shim the column base using a much greater area of shims. I got it pretty much perfect, but had to use shims only on the corners, butting-up to the bolts (ie giving a triangular conatact area on each corner). I think this might be having an effect on vibration of the column. I've also go to down-rate the gas strut on the head to prevent it from 'floating' and I think being pulled into the work when drilling and vertical milling, but these are all things that have been covered before here in some detail, and I'm at the stage where I'm just going to do what I think is right as see what happens. Thanks all. |
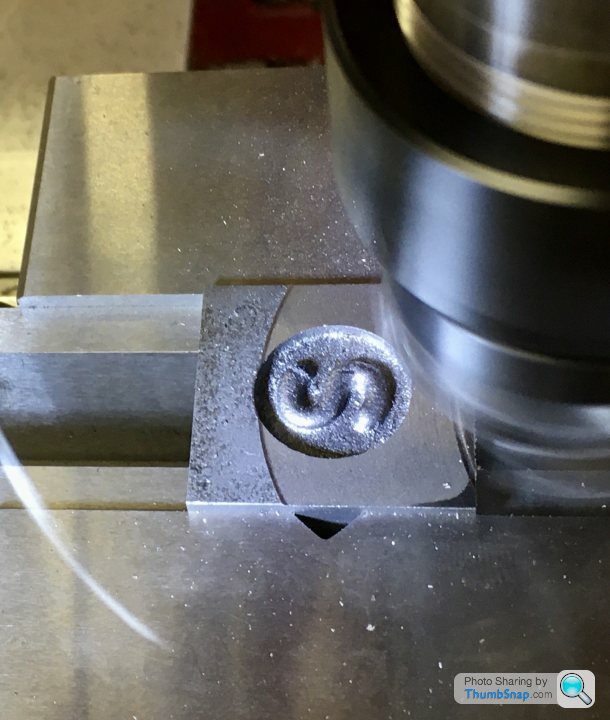
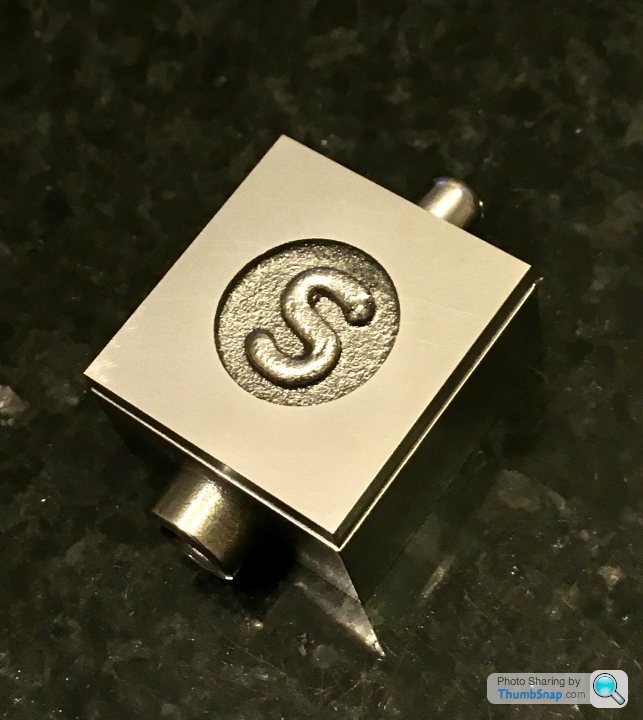
| Dr_GMJN | 14/11/2020 14:34:37 |
1602 forum posts | This is with the underside of the block blued: |
| Dave Halford | 14/11/2020 14:41:08 |
| 2536 forum posts 24 photos | Posted by duncan webster on 14/11/2020 12:43:54:
The hole through the block on my genuine Dickson toolpost is 5/8" fitting over a 7/16" pin. It is bored even bigger at the bottom, then there is a short top hat bush at the top to centralise it. Is your block a good fit on the pin? If so is the hole square to the base? I'll post some photos after I've walked the dog and raked up the vast quantity of leaves in the back garden Duncan may have spotted it. My clone also has the top hat bush and I wonder if the block will clamp properly with the bush removed. Your photo with the spring shows the bush missing and a decent contact patch. |
| Howard Lewis | 14/11/2020 15:02:53 |
| 7227 forum posts 21 photos | It may be that the inconsistent results, and the tendency to turn under load are both because of insufficient clamping force. I would dispense with the spring (I thought that it was a pile of washers! ) and replace it by a solid spacer, long enough that the stud does not bottom out in the handle, so that the full clamping force can be applied to the block. A spring may be suitable for ensuring that the block engages with a locating dowel, but will not apply enough force to hold the block on its own. F = uR where the force is comprised of the coefficient of friction (u ) and the load applied (R ). Obviously F is too little , you cannot change u much, so R has to be increased. Get the block solidly held on the Top Slide, and it will not move, and the surface finish will improve. Rigidity is essential. Howard Edited By Howard Lewis on 14/11/2020 15:04:21 |
| Dr_GMJN | 14/11/2020 15:05:46 |
1602 forum posts | Posted by Dave Halford on 14/11/2020 14:41:08:
Posted by duncan webster on 14/11/2020 12:43:54:
The hole through the block on my genuine Dickson toolpost is 5/8" fitting over a 7/16" pin. It is bored even bigger at the bottom, then there is a short top hat bush at the top to centralise it. Is your block a good fit on the pin? If so is the hole square to the base? I'll post some photos after I've walked the dog and raked up the vast quantity of leaves in the back garden Duncan may have spotted it. My clone also has the top hat bush and I wonder if the block will clamp properly with the bush removed. Your photo with the spring shows the bush missing and a decent contact patch. Sorry Dave you've lost me. Photo with the spring shows the bush missing, but a good contact patch? Mine doesn't have a bush, and if it gives a good contact patch without, where's the issue with not having one? As I said, the block on the post is a reasonable fit. I wouldn't immediately think it would make any difference at all to the contact patch; it's got more slight play in it than anything like I can dectect in out-of-perpendicular of the post - it looks fine.
|
| Howard Lewis | 14/11/2020 15:17:30 |
| 7227 forum posts 21 photos | Get rid of the spring, or you will never fix the problem. That spring cannot generate sufficient clamping force to lock the block, Even with the spring fully compressed, unless the ends have been ground flat, the force is likely to be off centre, so the result may be different each time. My fourway toolpost can be set in any orientation, and clamped with the handle, (No spring ) and stays in place, even with heavy cuts. I can see no reason why yours should be any different, if solidly clamped.. Just to satisfy my curiosity, turn up a spacer, to replace the spring, and tell us what happens! Howard |
| roy entwistle | 14/11/2020 15:21:14 |
| 1716 forum posts | Can I suggest that you place a piece of paper between the mating faces and try that before machining anything. If the bottom face of the tool block were slightly concave that would help as well |
| Nigel McBurney 1 | 14/11/2020 15:24:23 |
 1101 forum posts 3 photos | Just a thought,is the thread in the nut square to the locking face of the nut? I once a had a 1960s two stroke engined English built scrambler,it was s/h when I raced it for the first time the centre nut of the clutch kept coming loose,despite someh ard work in the paddock, later found the thread in the nut was not square to the faces,Brand new nut immediatley solved the problem. Various toolposts on my Super 7 have moved but only when taking things to and above the accepted limit, Knurling with single knurls will move a tool post even on my Colchester,though of course a big long ring spanner helps solve the problem,Also intermittent cuts act like an impact driver and will rotate a small toolpost, |
| Dr_GMJN | 14/11/2020 15:38:26 |
1602 forum posts | Posted by roy entwistle on 14/11/2020 15:21:14:
Can I suggest that you place a piece of paper between the mating faces and try that before machining anything.
Way too late Roy! |
| Dr_GMJN | 14/11/2020 15:40:55 |
1602 forum posts | Posted by Howard Lewis on 14/11/2020 15:17:30:
Get rid of the spring, or you will never fix the problem. That spring cannot generate sufficient clamping force to lock the block, Even with the spring fully compressed, unless the ends have been ground flat, the force is likely to be off centre, so the result may be different each time. My fourway toolpost can be set in any orientation, and clamped with the handle, (No spring ) and stays in place, even with heavy cuts. I can see no reason why yours should be any different, if solidly clamped.. Just to satisfy my curiosity, turn up a spacer, to replace the spring, and tell us what happens! Howard
Howard, the spring was there purely to allow me to apply a consistent downward load and still be able to turn the holder slightly (for marking the blue). Rather than applying simultaneous pressure by hand and turning the block, I thought I'd try and remove one variable by letting the spring apply the downward load. I don't use it for clamping the block in use!
|
| Dr_GMJN | 14/11/2020 15:45:20 |
1602 forum posts | Posted by Nigel McBurney 1 on 14/11/2020 15:24:23:
Just a thought,is the thread in the nut square to the locking face of the nut? I once a had a 1960s two stroke engined English built scrambler,it was s/h when I raced it for the first time the centre nut of the clutch kept coming loose,despite someh ard work in the paddock, later found the thread in the nut was not square to the faces,Brand new nut immediatley solved the problem. Various toolposts on my Super 7 have moved but only when taking things to and above the accepted limit, Knurling with single knurls will move a tool post even on my Colchester,though of course a big long ring spanner helps solve the problem,Also intermittent cuts act like an impact driver and will rotate a small toolpost, Thanks Nigel. I just checked that and its all good. |
| Michael Gilligan | 14/11/2020 16:08:42 |
 23121 forum posts 1360 photos | Posted by Michael Gilligan on 14/11/2020 09:40:48: […] ... I had always assumed that Myford faced that top surface in a lathe ... That would certainly be my approach !
. Clearly of no interest to anyone MichaelG. |
| Dr_GMJN | 14/11/2020 16:09:32 |
1602 forum posts | So I've flatted the sharp edges the best I can (I think it is indeed hardened), and chamfered the holes in teh casting. |
| Howard Lewis | 14/11/2020 16:36:10 |
| 7227 forum posts 21 photos | The stupid thing was that someone inserted the spring before you got the lathe. A spring that is so spindly could never produce a load sufficient to stop the block rotating on the damaged surface that you had. Your last picture shows a much greater contact area. If you clamp the block with a fair degree of force, you may well find that a ) the block no longer turns under load, and b ) the surface finish improves. You now have a block which makes contact over a much larger area, showing that clamping force is what is needed. If the hole in the block is much bigger than the 7/16 BSF Myford stud, make up a top hat bush to centralise the block around the stud. (IF you don't have one ) The thickness of the "rim" should be such that with your spacer in place, and clamped hard, the handle does not overhang the workpiece., i.e. is on the operator side of the Top Slide. (Just another of my hobby horses ) With the block tightly clamped, (You won't strip a 7/16 BSF thread with the forces that you can apply with just a hand ) Hopefully, two of your problems will be history. Please confirm, when you have time. The spring can go into the "Come in handy one day" box to await a new career! Howard |
| duncan webster | 14/11/2020 16:41:40 |
| 5307 forum posts 83 photos | photos as promised.
|


.jpg")
.jpg")
Please login to post a reply.
Magazine Locator
Want the latest issue of Model Engineer or Model Engineers' Workshop? Use our magazine locator links to find your nearest stockist!
Sign up to our Newsletter
Sign up to our newsletter and get a free digital issue.
You can unsubscribe at anytime. View our privacy policy at www.mortons.co.uk/privacy
Latest Forum Posts
- *Oct 2023: FORUM MIGRATION TIMELINE*
05/10/2023 07:57:11 - Making ER11 collet chuck
05/10/2023 07:56:24 - What did you do today? 2023
05/10/2023 07:25:01 - Orrery
05/10/2023 06:00:41 - Wera hand-tools
05/10/2023 05:47:07 - New member
05/10/2023 04:40:11 - Problems with external pot on at1 vfd
05/10/2023 00:06:32 - Drain plug
04/10/2023 23:36:17 - digi phase converter for 10 machines.....
04/10/2023 23:13:48 - Winter Storage Of Locomotives
04/10/2023 21:02:11 - More Latest Posts...
- View All Topics
Support Our Partners


Shopping Partners
Subscription Offer

Latest "For Sale" Ads
- Reeves** - Rebuilt Royal Scot by Martin Evans
by John Broughton
£300.00 - BRITANNIA 5" GAUGE James Perrier
by Jon Seabright 1
£2,500.00 - Drill Grinder - for restoration
by Nigel Graham 2
£0.00 - WARCO WM18 MILLING MACHINE
by Alex Chudley
£1,200.00 - MYFORD SUPER 7 LATHE
by Alex Chudley
£2,000.00 - More "For Sale" Ads...
Latest "Wanted" Ads
- D1-3 backplate
by Michael Horley
Price Not Specified - fixed steady for a Colchester bantam mark1 800
by George Jervis
Price Not Specified - lbsc pansy
by JACK SIDEBOTHAM
Price Not Specified - Pratt Burnerd multifit chuck key.
by Tim Riome
Price Not Specified - BANDSAW BLADE WELDER
by HUGH
Price Not Specified - More "Wanted" Ads...
Get In Touch!
Do you want to contact the Model Engineer and Model Engineers' Workshop team?
You can contact us by phone, mail or email about the magazines including becoming a contributor, submitting reader's letters or making queries about articles. You can also get in touch about this website, advertising or other general issues.
Click THIS LINK for full contact details.
For subscription issues please see THIS LINK.
Digital Back Issues


Donate

 Register
 Log-in
Model Engineer Magazine
- Percival Marshall
- M.E. History
- LittleLEC
- M.E. Clock

ME Workshop
- An Adcock
- & Shipley
- Horizontal
- Mill

Subscribe Now
- Great savings
- Delivered to your door

Pre-order your copy!
- Delivered to your doorstep!
- Free UK delivery!
All Forum Topics > Workshop Tools and Tooling > ML7 toolpost - Turns Under Load