Advice on Cluttered Dimensions in Drawings
| Nick Wheeler | 23/03/2022 00:05:15 |
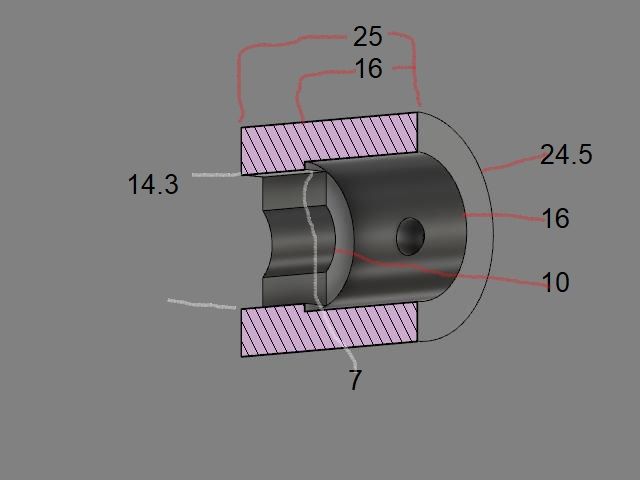
| 1227 forum posts 101 photos | I'd quite happily head to the workshop with something like this
if it didn't take exporting a CAD image into another program and annotating manually. Doing that simple part was tedious, it isn't practical for a complicated one. If I draw on paper, it looks like a child's attempt to copy Picasso's version of the Mona Lisa. Or a water damaged print of the Eiffel Tower. |
| JasonB | 23/03/2022 08:14:08 |
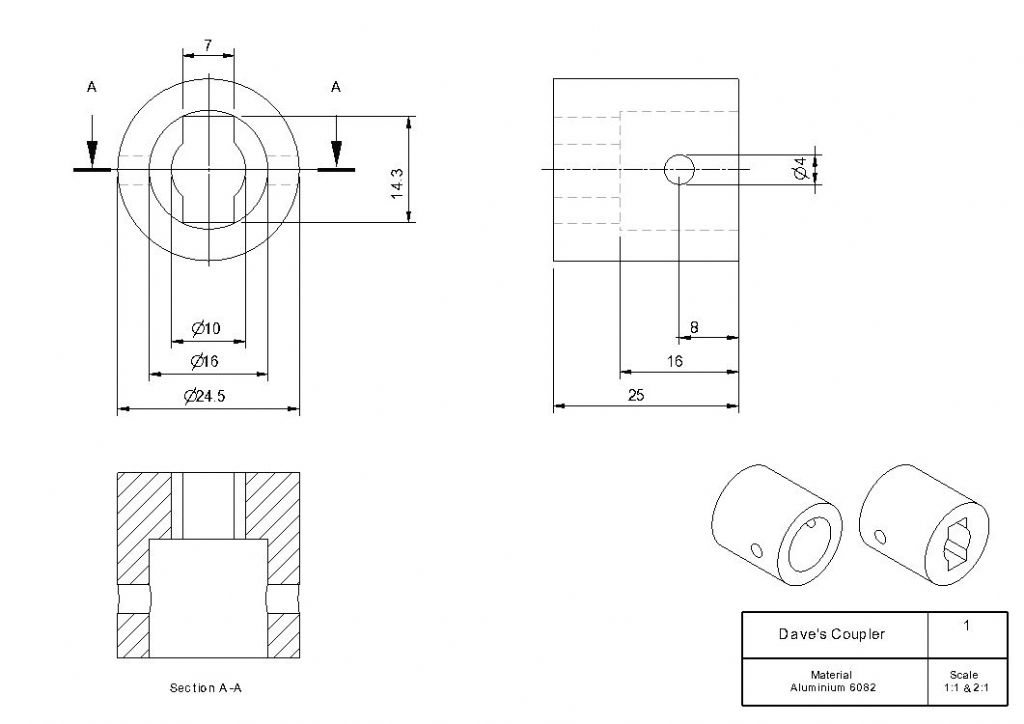
25215 forum posts 3105 photos 1 articles | Dave, looking at your drawing there are a few points I still think it looks a bit cluttered, if the isometric views were separated from the actual 2D working drawings you could lay it out better, maybe make the iso ones smaller. The 4.00dia as close to the 8.00mm dimension and also the opposite end of the 16dia arrow The 4mm hole does not have a dimension from the end of the workpiece. This has lost a bit of clarity being snipped but clearer if clicked on. I think just the two elevations can hold all the dimensions needed buy have added a section for good measure. Isometric have been made smaller and away from the 2D. Dimension lines on the two elevations have been lined up with each other which looks neater. All on an A4 sheet Edited By JasonB on 23/03/2022 08:22:15 |
| Circlip | 23/03/2022 10:03:25 |
| 1723 forum posts | Sorry if your sensitivities have been offended Jon but when 'Theoretical' P/C rears its ugly head, as a PRACTICAL ingineer of over fifty years (now long retired) in the manufacture (yes, got me hands mucky and cut as an apprentice), design and specification of components and items for the mechanical, electrical and electronic industries, I think I can validate my reply. With all due respect, last time I read BS (aptly acronymed) 308 was when a copy was stuffed under my nose after being 'promoted' into the D/O. Last time I used it practically was as a packing shim under a wobbly table. For those who glibly quote DROs and rotary tables, haven't seen many companies with 32ft long versions for one or two off requirements. But we are making toys and trying to apply 'Theoretical industrial standards' interrupts getting the show on the road. If your drawings are to be used for mass production, they are to a different standard than Joe Soap making a one off, NOT to say that the interactive dimensions shouldn't work but when some start bleating "What about tolerances", we're making one off toys for our own amusement, not 10,000. Going back to the O/Ps original problem, two solutions, move the component to the left a bit on the drawing or use a bigger bit of paper. Even with the 'Constraints' of slavishly following BS308, with a pencil and rule you still have the ability to 'do your own thing' but with Acad and ALL its clones, unless you can find all the hidden tweaks, you're limited to drawing lines but the program(me) determines annotation styles. Regards Ian. And for the blue pencil brigade, You might not like what I say, but that doesn't mean I'm wrong. Edited By Circlip on 23/03/2022 10:20:24 |
| Nick Wheeler | 23/03/2022 10:29:39 |
| 1227 forum posts 101 photos | Ian's post above sums it up for me, as I'm only ever going to be making stuff for me. So it simply isn't worth the time to learn how to make any drawings match a standard other than the one that makes sense to me. So while Jason's latest revision is clear, I would still change it to suit the way I would make the part: the diameters would be moved to the top right, along with the lengths, as they're all done as part of the same setup. I would move all of the dimensions for the 4mm cross-hole to the the section, because it's another setup. And the top left would only have the dimension for the slot - width, height and hole diameter. All of that would immediately make sense to me when I come to make the part 18months after designing it... After all, the drawing is only a step on the way to having the actual part working. As for tolerances, I would suggest that the only bits that matter are the slot and the cross-hole; everything else is either there to place the holes, or for clearance around the coupled parts so appropriate methods apply - like starting the 16mm bore with a 5/8" drill then finishing and flattening the bottom with a 16mm endmill, or cleaning up the outside diameter of 1" bar with some emery tape. |
| JasonB | 23/03/2022 12:03:56 |
25215 forum posts 3105 photos 1 articles | Yes we can all do it as suits our needs as per my rouch sketches. Regarding The post above I personally try to avoid dimensioning hidden detail and if you look at some of my drawings in the mag I may well have called out "16dia x 16deep" .Or dimentioned the section and not had the side elevation. Also if grouping for setup then I would have the 10mm hole with the other concentric diameters and have drilled right through 10mm then opened up the 16mm. all while in the lathe. Regarding mass production, do they still use 2D drawings or just send a file electronically ? and even if you do send off a DWG or DXF it only needs the one dimension as a check so you don't get apart 10ft long that should have been 10mm. I've even sent people a single .STP file of an assembled engine and they have made one from just that, all the info is there for them to make it the best way that suits them. |
| Circlip | 23/03/2022 12:18:00 |
| 1723 forum posts | Regarding mass production, do they still use 2D drawings or just send a file electronically ? Don't know, and now care even less. The ability to send drawings add lib at the speed of light by one national customer that had different dimensions at different times WITHOUT changing the drawing issue have long gone. Regards Ian. |
| Jon Lawes | 23/03/2022 21:44:53 |
1078 forum posts | Posted by Circlip on 23/03/2022 10:03:25:
Sorry if your sensitivities have been offended Jon but when 'Theoretical' P/C rears its ugly head, as a PRACTICAL ingineer of over fifty years (now long retired) in the manufacture (yes, got me hands mucky and cut as an apprentice), design and specification of components and items for the mechanical, electrical and electronic industries, I think I can validate my reply.
My point is still valid. The content of your reply might be but it rather gets lost in the noise. |
| SillyOldDuffer | 24/03/2022 12:25:35 |
| 10668 forum posts 2415 photos | Special Mention in Despatches for Nicholas. His version gets the prize for maximum information in the smallest spacer without clutter:
Unfortunately, it's a little unexpected, and as Nicholas says: 'Doing that simple part was tedious, it isn't practical for a complicated one.' One oddity, when I first looked at it I saw an Einstein's Head inversion! Despite the brief optical illusion I like it. I believe FreeCAD/TechDraw could create most of the drawing automatically, so it may be more practical than Nick believes. I'll try it later. First prize goes to Jason.
It's cleaner than my attempt and I'm sure TechDraw can do the same. Watch this space. Been reading what my 1947 Newnes Engineer's Reference Book has to say about Drawing Office Practice. It's based on B.S.S 308(1943) and how it differs from B.S.S 308(1927). Nothing is ever simple - two BS308s. Much good advice in Newnes, but BS308 can be verbose too, as in 'Hole letter G drill (0.261" dia)'. And hard to see how clutter is avoided if BS302 surface finish, tolerance and other production information is added. Fortunately not needed on most home workshop drawings. Newnes casts an interesting light on who actually produced the old Technical Drawings I admire so much. Good chance it wasn't a Draughtsman! Newnes advises draughtsmen to concentrate on design, leaving most of the actual finish drawing to Tracers. Tracers specialised in producing the clean fully populated drawings needed for production from the Draughtman's drawings and notes. The tracer decided how the drawing looked and how it was completed: line thicknesses, dimension placements, titles, version numbers, reference numbers, colour, hatching, sections, and tables etc. He drew the nice arrow heads and other posh features. Another specialist, the Checker, reviewed drawings independently before they were submitting them to the Chief Draughtsman/Drawing Office Manager for final approval. Big Drawing Offices were a team effort, with many opportunities to spot mistakes before anything got to a machinist. As I have to combine all these roles, and am untrained in all of them, I don't feel so bad about my mistakes now! Dave
|
Please login to post a reply.
Want the latest issue of Model Engineer or Model Engineers' Workshop? Use our magazine locator links to find your nearest stockist!
Sign up to our newsletter and get a free digital issue.
You can unsubscribe at anytime. View our privacy policy at www.mortons.co.uk/privacy
- hemingway ball turner
04/07/2025 14:40:26 - *Oct 2023: FORUM MIGRATION TIMELINE*
05/10/2023 07:57:11 - Making ER11 collet chuck
05/10/2023 07:56:24 - What did you do today? 2023
05/10/2023 07:25:01 - Orrery
05/10/2023 06:00:41 - Wera hand-tools
05/10/2023 05:47:07 - New member
05/10/2023 04:40:11 - Problems with external pot on at1 vfd
05/10/2023 00:06:32 - Drain plug
04/10/2023 23:36:17 - digi phase converter for 10 machines.....
04/10/2023 23:13:48 - More Latest Posts...
- View All Topics
- Reeves** - Rebuilt Royal Scot by Martin Evans
by John Broughton
£300.00 - BRITANNIA 5" GAUGE James Perrier
by Jon Seabright 1
£2,500.00 - Drill Grinder - for restoration
by Nigel Graham 2
£0.00 - WARCO WM18 MILLING MACHINE
by Alex Chudley
£1,200.00 - MYFORD SUPER 7 LATHE
by Alex Chudley
£2,000.00 - More "For Sale" Ads...
- D1-3 backplate
by Michael Horley
Price Not Specified - fixed steady for a Colchester bantam mark1 800
by George Jervis
Price Not Specified - lbsc pansy
by JACK SIDEBOTHAM
Price Not Specified - Pratt Burnerd multifit chuck key.
by Tim Riome
Price Not Specified - BANDSAW BLADE WELDER
by HUGH
Price Not Specified - More "Wanted" Ads...
Do you want to contact the Model Engineer and Model Engineers' Workshop team?
You can contact us by phone, mail or email about the magazines including becoming a contributor, submitting reader's letters or making queries about articles. You can also get in touch about this website, advertising or other general issues.
Click THIS LINK for full contact details.
For subscription issues please see THIS LINK.
Model Engineer Magazine
- Percival Marshall
- M.E. History
- LittleLEC
- M.E. Clock
ME Workshop
- An Adcock
- & Shipley
- Horizontal
- Mill
Subscribe Now
- Great savings
- Delivered to your door
Pre-order your copy!
- Delivered to your doorstep!
- Free UK delivery!


 Register
 Log-in


