Forum sponsored by:

Merryweather Fire King
| Bob Wild | 23/05/2021 23:06:02 |
| 99 forum posts 77 photos | Hi Werner. Thanks for your reply - it’s always interesting to hear of other people’s experiences. As I mentioned it took me ages to get everything lined up. I did make all the clearance holes wherever I could to be much larger than they should have been and I tightened them up progressively to get the smoothest fit. So, I am going to have another go at prefabricating the crankshaft and will hope for the best. Anyway, I will have a little time to ponder as my dear wife wants me to take her in our caravan for a few weeks on one of our rare visits to the south of England!!!! Bob Edited By Bob Wild on 23/05/2021 23:07:19 |
| Bob Wild | 26/05/2021 20:23:41 |
| 99 forum posts 77 photos |
|
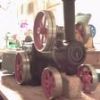
| Bob Wild | 27/06/2021 22:49:27 |
| 99 forum posts 77 photos |
Edited By Bob Wild on 27/06/2021 22:55:01 Edited By Bob Wild on 27/06/2021 23:01:27 |
| Werner Schleidt | 28/06/2021 06:08:50 |
 158 forum posts 180 photos | Hello Bob, congratulations to your running engine. Your engine need a run in time that is normal. And it depends on how good the valve is tight at the valve ports. And you need plenty of oil. The oil you give to the air pressure have not the same effect as later the mixture of steam and oil emulsion with water. This is my experience I made. |
| noel shelley | 28/06/2021 09:54:28 |
| 2308 forum posts 33 photos | Well done ! Looks good and it runs ! running in should free it up, but a difference in exhaust note could be almost anything connected with the valve events, it may be as simple as setting or it could be the accuracy of the valve ports or the slide valves. Good luck. Noel |
| Bob Wild | 29/06/2021 22:30:29 |
| 99 forum posts 77 photos | Thanks Werner - I’ve added more oil to the valve chamber. Bob
|
| Bob Wild | 23/07/2021 22:43:41 |
| 99 forum posts 77 photos |
|
| Bob Wild | 21/08/2021 23:23:29 |
| 99 forum posts 77 photos | I said that I was a novice ! Made a lovely hardwood former to shape the lower tapered part of the boiler. Sawed off the excess overlap after bending and silver soldered the join after a fashion. Drilled two sets of 36 rivet holes at a 6 degree angle by tilting the head. Being a novice I completely forgot that the burrs from the drilled holes would dig into the wood. No amount of (gentle) tapping or prising would persuade the ring to separate from the former !!!
So as a last resort I decided to (hack) machine away as much wood from the former as I could to expose one set of rivet holes
The former is actually made from two pieces of 25 mm beach screwed together. So I figured that if I drilled four clearance holes in one piece and bashed four screws it was worth giving it a try to separate the two pieces to improve my chance of getting the ring off the other piece of wood.
And bingo, it worked. And finally the ring came off the former in one piece. Got to fettle it up and figure a way of riveting it to its mounting plate. That will be in a while since SWMBO wants to go off in our caravan for a while.
|
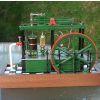
| Bob Wild | 29/10/2021 11:29:18 |
| 99 forum posts 77 photos | Still plodding on slowly thanks to the demands of Mrs W and her other hairbrain projects. But anyway, I have finished the boiler and mounted it in the chassis. Bit of a problem because I used the boiler tube which was 110 mm diameter rather than the 4 in as specified, being the nearest I could find. The upshot was that the rear cross brace and axle fouled. So I had to move them both which was a nuisance. Anyway I got it all to fit and am quite pleased with the results. Here are a few shots of the installation. Next up are the water tanks which will be interesting.
Sorry about the orientation. Blame Steve Jobs. Bob
|
| Roger Best | 01/11/2021 18:20:10 |
 406 forum posts 56 photos | It looks the real deal Bob. |
| Bob Wild | 17/11/2021 18:59:02 |
| 99 forum posts 77 photos | Thanks Roger. So we are progressing with the water tanks. Quite fun metal bashing. Here is one after soldering and the other after a bit of filling with JB weld and then cleaning up:
Next up is the rear platform, and then some painting. |
| Martin W | 18/11/2021 00:13:21 |
| 940 forum posts 30 photos | That all looks brilliant, I envy people that can produce results like that. Keep posting your progress and like Werner's I really enjoy seeing projects like this coming to fruition. Martin W |
| Bob Wild | 18/11/2021 20:21:59 |
| 99 forum posts 77 photos | Hi Martin. Thanks for your generous comments. But, I certainly am still very much a novice. There are many members of this forum, like Werner, who have far more skill and experience than me. I do have a lot of patience, and will always reject a part if I’m not happy with it. One day I might publish a photo of my scrap bin to make the point. Like you I like to follow the build progress of other modellers both for interest and to learn the techniques of the experts. I’m a bit disappointed however that such threads are such a small proportion of threads here. I wonder why that is. I don’t know if it is because the software is a bit old and clunky - for example a “like” feature would let you know that people are actually reading your threads. Also it is a nightmare uploading photos; why not a “cut and paste” feature rather than messing around with albums? But I must come down from my hobby horse and let the thread continue back on track! Bob |
| Bob Wild | 22/01/2022 12:12:33 |
| 99 forum posts 77 photos | A Nightmare Painting Job When I finally got to paint the water tank assembly I discovered to my horror that there was absolutely no colour match with the front parts. This was despite the fact that I used the same tin of paint.
I contacted the supplier who suggested it was something to do with the primer I had used. He very kindly sent me some isolating primer and some more paint (at a very nice discount). But this was not much better. He then suggested I brushed on more coats. This ended up with an awful finish, so I spent ages with paint stripper to get back to bare metal. In desperation I went to my local paint shop and a very helpful guy found me some spray paint that was almost the same colour as Fire Engine Red. So finally I got a good finish, and assembled all the fittings. I added a few more, such as the spotlights and filler mountings. These were not on the Julius drawings but I copied them from Cherry Hill's model, just to add a bit of detail and also because I like machining little bits of brass!
Next up the wheels, which look a challenge. Not to mention 60 tapered spokes! I nearly forgot. I was thinking about pinstriping on the tanks. Never done that before, so any suggestions would be most welcome. Bob
Edited By Bob Wild on 22/01/2022 12:19:53 Edited By Bob Wild on 22/01/2022 12:26:36 |
| noel shelley | 22/01/2022 13:28:47 |
| 2308 forum posts 33 photos | A beautiful model, of which you should be proud. As to pinstriping, a bit pricy but beugler make a neat tool for the job. Noel. |
| Werner Schleidt | 23/01/2022 08:41:27 |
158 forum posts 180 photos | Hi Bob, congratulations for your modelwork. If you want to have an unknown adventure paint your parts. This was the same experience I had with painting. Important is the correct hummidity and temperature. I painted a roof o my loco in summer with a good result . Then in October in the sun with the same paint can, i made the roof of the second loco. The outcome was terrible not black it was more grey. I made it two times with the same result. Then I go in my workshop and do the same and it was perfect. The difference was the hummidity. Outside about 80 % and inside 50 %. This had a great influence. After i noticed this, I build up a paintbox form a big cardboard box with a small fan and a pipe to bring the paint gases out of the basement window. This was made with many improvisation with hot glue and so on. The result was very good. With my fireking i had acrylic based colour from the hobby store . This was premium marked two in one. The greatest trash i ever had. At the start it looked good and it was a nice paint cover and after some short time the colour begins to move and it was one blot of colour in the midddle. The only solution i found then, bring it out with a foam roll and roll as it is nearly dry. Then it stays were it have to belong. And i made the experience in the hobby store, the suppliers change the base material every three years and when you have the experience it was good the next time it behave different. And premium is only the price you pay for it. It is very impportant to read the small printed discription of the incridents. My friend bought his paint at the professional paint store and this is as i know good and it is only cleanabel with thinner and not with water. The only problem there is, the can format of one liter. You see you are not alone with your experience. I am eager to see your fire king ready ,keep the good work. Werner
|
| Bob Wild | 23/01/2022 23:03:10 |
| 99 forum posts 77 photos | Werner, I’m glad I’m not the only one with paint problems. I’ve heard about temperature problems and took the precaution of bringing the paint and model from my (cold) workshop into the house to warm them up. But I hadn’t thought about humidity. That is something I will have to think about. Noel, thanks for your encouraging comments. When I did Technical Drawing at school many years ago, I spent a lot of time using a drawing pen and Indian Ink. And I still have the drawing equipment! I was going to have a go like that but using gold acrylic paint. Done a few tests with reasonable success. The main problem was avoiding a big blob of paint at the start of the line. I might avoid this with a bit of practice. I will keep you posted. Bob |
| Bob Unitt 1 | 24/01/2022 11:48:03 |
 323 forum posts 35 photos | I had paint problems on my Lady Stephanie too, not a very smooth finish at all (applied by brush). Having discussed it with a friend who's an experienced model-railway scratch-builder we came to the conclusion that I should have done it in the house, not the workshop - too cold and humid out there; and that I should have thinned it a lot more and put more coats on. Phoenix paints seem to require more thinning than Humbrol or Revell - not a problem now I know, but it was the first time I'd used paint of that particular brand. I've also bought myself an airbrush for the next model, so another skill to learn... I'll leave it as it stands for now, but eventually I'd like to strip and repaint some of the larger flat pieces - what's the best non-mechanical way of stripping enamel paints off brass ? Edited By Bob Unitt 1 on 24/01/2022 11:49:19 |
| Bob Wild | 24/01/2022 14:11:41 |
| 99 forum posts 77 photos | Hi Bob, I used Nitromors applied several time for stripping the bulk of the paint. I did finish off with 1000 grit wet and dry to remove the stubborn bits. I think you are right about where to do the painting as Werner said earlier. My workshop (garage) is outside and cold. I'd like to do the painting inside, but I'm not sure SWMBO would approve. Bob |
| Bob Unitt 1 | 24/01/2022 17:12:07 |
323 forum posts 35 photos | Hi (also) Bob Thanks, I have some Nitromors here somewhere, so I'll give it a try. Does it need re-etch-priming, or can I paint direct onto the stripped surface ? I have the same painting-location problem as you, but my SWMBO does disappear across the country to her mother's for the day, every so often...
Bob
|


Please login to post a reply.
Magazine Locator
Want the latest issue of Model Engineer or Model Engineers' Workshop? Use our magazine locator links to find your nearest stockist!
Sign up to our Newsletter
Sign up to our newsletter and get a free digital issue.
You can unsubscribe at anytime. View our privacy policy at www.mortons.co.uk/privacy
Latest Forum Posts
- *Oct 2023: FORUM MIGRATION TIMELINE*
05/10/2023 07:57:11 - Making ER11 collet chuck
05/10/2023 07:56:24 - What did you do today? 2023
05/10/2023 07:25:01 - Orrery
05/10/2023 06:00:41 - Wera hand-tools
05/10/2023 05:47:07 - New member
05/10/2023 04:40:11 - Problems with external pot on at1 vfd
05/10/2023 00:06:32 - Drain plug
04/10/2023 23:36:17 - digi phase converter for 10 machines.....
04/10/2023 23:13:48 - Winter Storage Of Locomotives
04/10/2023 21:02:11 - More Latest Posts...
- View All Topics
Support Our Partners


Shopping Partners
Subscription Offer

Latest "For Sale" Ads
- Reeves** - Rebuilt Royal Scot by Martin Evans
by John Broughton
£300.00 - BRITANNIA 5" GAUGE James Perrier
by Jon Seabright 1
£2,500.00 - Drill Grinder - for restoration
by Nigel Graham 2
£0.00 - WARCO WM18 MILLING MACHINE
by Alex Chudley
£1,200.00 - MYFORD SUPER 7 LATHE
by Alex Chudley
£2,000.00 - More "For Sale" Ads...
Latest "Wanted" Ads
- D1-3 backplate
by Michael Horley
Price Not Specified - fixed steady for a Colchester bantam mark1 800
by George Jervis
Price Not Specified - lbsc pansy
by JACK SIDEBOTHAM
Price Not Specified - Pratt Burnerd multifit chuck key.
by Tim Riome
Price Not Specified - BANDSAW BLADE WELDER
by HUGH
Price Not Specified - More "Wanted" Ads...
Get In Touch!
Do you want to contact the Model Engineer and Model Engineers' Workshop team?
You can contact us by phone, mail or email about the magazines including becoming a contributor, submitting reader's letters or making queries about articles. You can also get in touch about this website, advertising or other general issues.
Click THIS LINK for full contact details.
For subscription issues please see THIS LINK.
Digital Back Issues


Donate

 Register
 Log-in
Model Engineer Magazine
- Percival Marshall
- M.E. History
- LittleLEC
- M.E. Clock

ME Workshop
- An Adcock
- & Shipley
- Horizontal
- Mill

Subscribe Now
- Great savings
- Delivered to your door

Pre-order your copy!
- Delivered to your doorstep!
- Free UK delivery!
All Forum Topics > Work In Progress and completed items > Merryweather Fire King