Forum sponsored by:

RDG Myford Quick Change Tool Post
Anyone have one and care to comment on quality?
| Michael Wilde | 19/04/2010 23:05:12 |
 25 forum posts 16 photos | Hi David, I saw you on Thursday and was meaning to stop and chat but everytime I was passing you were engrossed in conversation! It was a great day, I dragged my dad along with me and he seemed to enjoy it too. I couldn't believe the amount of pre-owned equipment that sold in the 5 or so hours I was there! Unfortunately I've done the dirty and bought an RGD tool post today, all I could afford after the lathe purchase. Best get my Chester DB10Vs sold! Advertised on this site. I intend on using this RGD toolpost for a bit, saving up and buying a myford version (maybe next open day) and then making a rear tool post to fit the RGD to. Would this work ok with the rotation of the work trying to lift the tool holder up? Mike |
| Terryd | 19/04/2010 23:49:27 |
 1946 forum posts 179 photos | I personally don't bother with the Dickson type toolpost. I am quite happy to use known shims and find it takes very little longer to set up my tools using these. Sometimes I find shimming quicker and more reliable. No screws to slip or re adjust. Once I have set up a tool i keep the shims together with it as a dedicated set and usually just stone my HSS tools to keep them ultra sharp. I've never had a problem with a getting a good finish on the correct quality steel for the job. I also find the finish from well ground HSS to be at least comparable with Carbide, without the grinding problems or expense of replaceable tips. Carbide tools are great for high rate stock removal and high temperature production operation, but we are hobby engineers mostly with a little time to enjoy the nuances of the hobby. Phew I'm glad I got That off my chest. Grumpy Old Men - Tschk!! - they have nothing on me!!!!  Terry |
| Michael Wilde | 20/04/2010 00:08:27 |
25 forum posts 16 photos | I too am a great believer of HSS over carbide in the home workshop. It's cheaper and easier to sharpen (no special 'green grit' wheels etc). I've just made a mini boring bar from a broken 5mm hss drill following Harold Halls' advice.
Incidentally, the drill was marked 'HSSE'. What does the 'E' stand for?
I've got a set of brazed carbide tools that have had very little use, maybe just the 45 degree for chamfering most commonly. I've a sandvick tipped tool for the odd occasion when some serious ploughing is needed or the material's tough.
I like the quick change tool holder for the ease of tool height setting. I've made a lathe centre height post to David Clarks' design in MEW and use this for setting tools to height.
|
| Michael Wilde | 22/04/2010 00:16:42 |
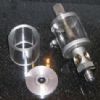
25 forum posts 16 photos | Well I got my RGD version today, I took it to work for something to do while my machine was doing it's roughing cycle (7 hrs!). I say something to do because every component needed de-burring, I also stripped the main block, cleaned it up, removed a bit of gritty stuff and (off?) grease from the plunger that's actuated by the 'cams'. Everything was then de-burred, greased up the internals and built back up. The box was a bit smashed up as received, but it came with adequate packing for this to NOT occur! (shredded paper inside the wooden toolpost box and the box wrapped thoroughly in cardboard). Obviously been shipped from the east and been aloud to bang around. Some of the holders and the block were bruised here and there but nothing a diamond Lapp couldn't sort out. The components wern't seriously smashed up, nothing to warrant sending the toolpost back anyway. Just a little annoying. You get what you pay for I suppose. As far as functionality goes, it's early days yet but all the holders seem to locate ok, nice and solid. I've managed to steal an hour in the garage this evening, fitted the toolpost and machined some acrylic for some new oilers (see my photos). All seems ok so far. I think if I buy more holders it'll be the Myford items, especially the "Piddington?" holders. Then eventually I'll buy a Myford main block and heypresto! A Myford quick change tool post set up. |
| Richard Smithers 1 | 29/07/2013 12:13:28 |
| 9 forum posts | I have an RDG quick change tool holder - it arrived with the ML7R Tri lever lathe I bought. The tool holder is "alright" but I seem to have difficulty in setting the tool holder to height. Anyway I have learned to live with it for the time being. I have just taken delivery of 3-jaw and 4-jaw chucks, both internally screwed for the Myford spindle. The 3-jaw will mount on the mandrel only with diffiiculty and will not screw up to the shoulder. RDG say all their chucks are checked before dispatch and it must be the lathe spindle. But the two chucks that came with the lathe mount perfectly. The 3-jaw bears a label "Myford - made in Poland"; my only criticism being that the jaws and body are not numbered. Has anyone else had problems with an RDG chuck? And can anyone make any suggestions as to how I might induce these chucks to screw easily onto the mandrel? Many thanks for any help. Richard. |
| Bazyle | 29/07/2013 13:11:10 |
 6956 forum posts 229 photos | Use engineers blue to see where it is binding. It can be just fractions of a thou that make a difference and it is better to be too tight than sloppy. I had a pre-machined Boxford backplate from RDG that would not go on properly but went on backwards ok. Screwed it onto a separate screwed mandrel, the sort used for holding a chuck on a rotary table- thereafter it went on the lathe fine and snug. It was just the tips of the thread in that case that needed compacting. |
| Bazyle | 29/07/2013 13:14:13 |
6956 forum posts 229 photos | ps You can mark hard things like jaws with dots using a 12v battery to make sparks off a needle. |
| john fletcher 1 | 29/07/2013 16:51:39 |
| 893 forum posts | Several of us made our own QC tool holders at the "College" evening class.We each obtain a length of steel, milled away the centre part will eventually become the part which will be clamped again the tool post. Next milled away either side with a "TEE" slot cutter copying a Myford bought one. Then cut the length up into individual pieces, then the tool slot was cut.Next all the blocks were drill and tapped in 4 places 2BA and 4 X 2BA allen screws were screwed in I had a broken cast iron VEE block, it was slightly modified to become a triangle jig. This was then clamped to the milling machine table, such that each tool holders could be clamped to it at a 45 degree angle, using the previously milled slots, one at a time, using the four allen screws. Now the 4 angle faces could be milled.We each made about 8 in two hours, once we got set up. We used mild steel and up to date all have been Ok with no problem and that was four years ago. Incidently we organise our own evening class, we hire the College workshops.Ted |
| Richard Smithers 1 | 29/07/2013 18:23:38 |
| 9 forum posts | My thanks everyone who sent me advice. This afternoon I removed the jaws and discovered that the scroll and jaw slots were loaded with what appears to be muck/grinding 'stuff'. So I have given it a good clean and with difficulty got the chuck on. But it really isn't a patch on my Burnerd! Anyway, we are under way and my Sweet Pea now has some odds and ends that I have been promising her. Richard |
Please login to post a reply.
Magazine Locator
Want the latest issue of Model Engineer or Model Engineers' Workshop? Use our magazine locator links to find your nearest stockist!
Sign up to our Newsletter
Sign up to our newsletter and get a free digital issue.
You can unsubscribe at anytime. View our privacy policy at www.mortons.co.uk/privacy
Latest Forum Posts
- *Oct 2023: FORUM MIGRATION TIMELINE*
05/10/2023 07:57:11 - Making ER11 collet chuck
05/10/2023 07:56:24 - What did you do today? 2023
05/10/2023 07:25:01 - Orrery
05/10/2023 06:00:41 - Wera hand-tools
05/10/2023 05:47:07 - New member
05/10/2023 04:40:11 - Problems with external pot on at1 vfd
05/10/2023 00:06:32 - Drain plug
04/10/2023 23:36:17 - digi phase converter for 10 machines.....
04/10/2023 23:13:48 - Winter Storage Of Locomotives
04/10/2023 21:02:11 - More Latest Posts...
- View All Topics
Support Our Partners


Shopping Partners
Subscription Offer

Latest "For Sale" Ads
- Reeves** - Rebuilt Royal Scot by Martin Evans
by John Broughton
£300.00 - BRITANNIA 5" GAUGE James Perrier
by Jon Seabright 1
£2,500.00 - Drill Grinder - for restoration
by Nigel Graham 2
£0.00 - WARCO WM18 MILLING MACHINE
by Alex Chudley
£1,200.00 - MYFORD SUPER 7 LATHE
by Alex Chudley
£2,000.00 - More "For Sale" Ads...
Latest "Wanted" Ads
- D1-3 backplate
by Michael Horley
Price Not Specified - fixed steady for a Colchester bantam mark1 800
by George Jervis
Price Not Specified - lbsc pansy
by JACK SIDEBOTHAM
Price Not Specified - Pratt Burnerd multifit chuck key.
by Tim Riome
Price Not Specified - BANDSAW BLADE WELDER
by HUGH
Price Not Specified - More "Wanted" Ads...
Get In Touch!
Do you want to contact the Model Engineer and Model Engineers' Workshop team?
You can contact us by phone, mail or email about the magazines including becoming a contributor, submitting reader's letters or making queries about articles. You can also get in touch about this website, advertising or other general issues.
Click THIS LINK for full contact details.
For subscription issues please see THIS LINK.
Digital Back Issues


Donate

 Register
 Log-in
Model Engineer Magazine
- Percival Marshall
- M.E. History
- LittleLEC
- M.E. Clock

ME Workshop
- An Adcock
- & Shipley
- Horizontal
- Mill

Subscribe Now
- Great savings
- Delivered to your door

Pre-order your copy!
- Delivered to your doorstep!
- Free UK delivery!
All Forum Topics > Workshop Tools and Tooling > RDG Myford Quick Change Tool Post