Forum sponsored by:

Surface grinder reassembly
| Steve355 | 03/08/2022 22:01:54 |
| 321 forum posts 235 photos | The tight spots are simply spots at edges or corners where there is a high spot surrounded by low spots, so not even real tight spots yet! Because the ways are long and thin, it’s difficult to do a nice pattern. Much easier to scrape along the ways. It that way leaves behind high spots. if it’s 2 tenths then that’s 5 passes for 1 thou. I reckon I’m doing about half that, measuring is really difficult. I have managed to attach the DTI firmly to a height gauge at last, but it easily gets out of kilter If the probe gets knocked. I could have a go with a plunger type dial indicator, but it’s less accurate. my surface plate is too small, but there’s not much I can do about that, All good learning experience! |
| Steve355 | 03/08/2022 22:04:14 |
| 321 forum posts 235 photos | Posted by peak4 on 03/08/2022 21:58:03:
Posted by Tony Ray on 03/08/2022 21:35:43:
Yes it’s hard work. You can make the scraper. I bought a Sandvik insert & made the rest. The inserts is very hard wearing but you will need a way of lapping it. There is a knack to it once you have it it does get a bit easier. Someone mentioned C19 carbide I’d be interested to know where they bought the blank. Twas me that mentioned C19 as an early adopter, but that's an abbreviation for Covid, not a grade of carbide. Hi Bill I did see that, and I’m considering getting one of that guy’s scrapers. But I’m off to the US on Monday, I wonder if in can find something cheap and good over there. |
| Pete Rimmer | 03/08/2022 22:20:59 |
| 1486 forum posts 105 photos | You can evaluate most small surface grinder tables just with a micrometer. So long as the mic can span from top to way you can make it as flat as the top to within a couple of tenths at least. It'll be fatter at the ends and more worn in the middle and the bottom ways will match that bow. You'll be able to see that by the wear ridges left behind. Get a micrometer and go along the ways every couple of inches. Measure the table thickness and mark it on the way with a sharpie. Remove the wear ridges and high spots with a file if you have to. If your ends are 5 thou higher than the middle don't fanny around trying to scrape them - get a good large flat file and file a few thou off. It's a lot faster thn scraping and so long as you carefully keep track so you don't overshoot you can get within scraping distance very quickly. My eagle table had the two long ways raised higher than any other features so I just laid the file across both and it kept them planar. It's not so difficult as you might imagine.
The numbers below are tenths of a thou.
If you're near Kent I could give you some pointers or even lend a straight edge. Edited By Pete Rimmer on 03/08/2022 22:21:59 |
| Steve355 | 04/08/2022 00:16:32 |
| 321 forum posts 235 photos | Posted by Pete Rimmer on 03/08/2022 22:20:59:
You can evaluate most small surface grinder tables just with a micrometer. So long as the mic can span from top to way you can make it as flat as the top to within a couple of tenths at least. It'll be fatter at the ends and more worn in the middle and the bottom ways will match that bow. You'll be able to see that by the wear ridges left behind. Get a micrometer and go along the ways every couple of inches. Measure the table thickness and mark it on the way with a sharpie. Remove the wear ridges and high spots with a file if you have to. If your ends are 5 thou higher than the middle don't fanny around trying to scrape them - get a good large flat file and file a few thou off. It's a lot faster thn scraping and so long as you carefully keep track so you don't overshoot you can get within scraping distance very quickly. My eagle table had the two long ways raised higher than any other features so I just laid the file across both and it kept them planar. It's not so difficult as you might imagine.
The numbers below are tenths of a thou.
If you're near Kent I could give you some pointers or even lend a straight edge. Edited By Pete Rimmer on 03/08/2022 22:21:59 Pete, that’s really interesting, thanks for the tips. Using a file to get down to a flatness that is practical for scraping will surely save a lot of time and effort, I have a 2” micrometer, but it’s not a vernier one, but nevertheless is probably ok? what’s the next step? Do you blue up the straight edge and use that to “print” the surface for scraping? not too close to Kent, I’m in Herts Steve |
| Tony Ray | 04/08/2022 23:57:11 |
| 238 forum posts 47 photos | “See my post of 31/07/22 @ 12:22:25 for a link to an eBay sell of a suitable grade of insert.
Thanks Bill |
| Tony Ray | 05/08/2022 00:02:29 |
| 238 forum posts 47 photos | “what’s the next step? Do you blue up the straight edge and use that to “print” the surface for scraping?” Yes, plenty of content on the Tube re this. Well worth a trip to Kent to borrow a straight edge imho. |
| Steve355 | 05/08/2022 08:54:42 |
| 321 forum posts 235 photos | I’ve measured the thickness of the table and it seems to mostly now be between 1.899 and 1.901. It was difficult to measure the extremities - had to use a depth micrometer, I don’t think the most outboard measurements are particularly reliable. So 1.899 to 1.901 - I would guess that’s a reasonable tolerance to start the bluing/scraping process? I had a go at bluing using the surface table, but 1) I don’t have a roller, one is on order but hasn’t turned up yet. And 2) it gets wobbly and unreliable at the extremities, it’s an 18” surface plate and a 32” grinder table. So I can see the benefits of the straight edge. The thing I am not understanding about the straight edge is how to keep the ways parallel to the table, and free of twist. I’d take up Pete’s kind offer, but if I could find one suitable I’d probably buy it. With all the machine refurbing I’ve done so far I have stripped, cleaned, replaced bearings etc but as for the basic workings of the machine I’ve had no ability to do anything for accuracy other than adjust/shim etc. I have several machines I can go back over if I have an accurate surface grinder and scraping skills/equipment and get them to a much better condition.
|
| Steve355 | 05/08/2022 10:10:20 |
| 321 forum posts 235 photos | Brilliant. So I wasn’t getting the same results from my surface plate/DTI measurement as with the micrometer. Turns out that the top of the table, somehow, isn’t flat. I’ve checked the surface plate and it seems ok. The micrometer reads 1.999” at A and B. The DTI differs by 0.005. I think it was Bill earlier who said he started by scraping the top of the table, and then use that as a reference surface. I did check the top of the table with feeler gauges, and it seemed to be fine down to one thou. But clearly it isn’t. Or something isn’t.
Edited By Steve355 on 05/08/2022 10:11:41 |
| Pete Rimmer | 05/08/2022 10:27:00 |
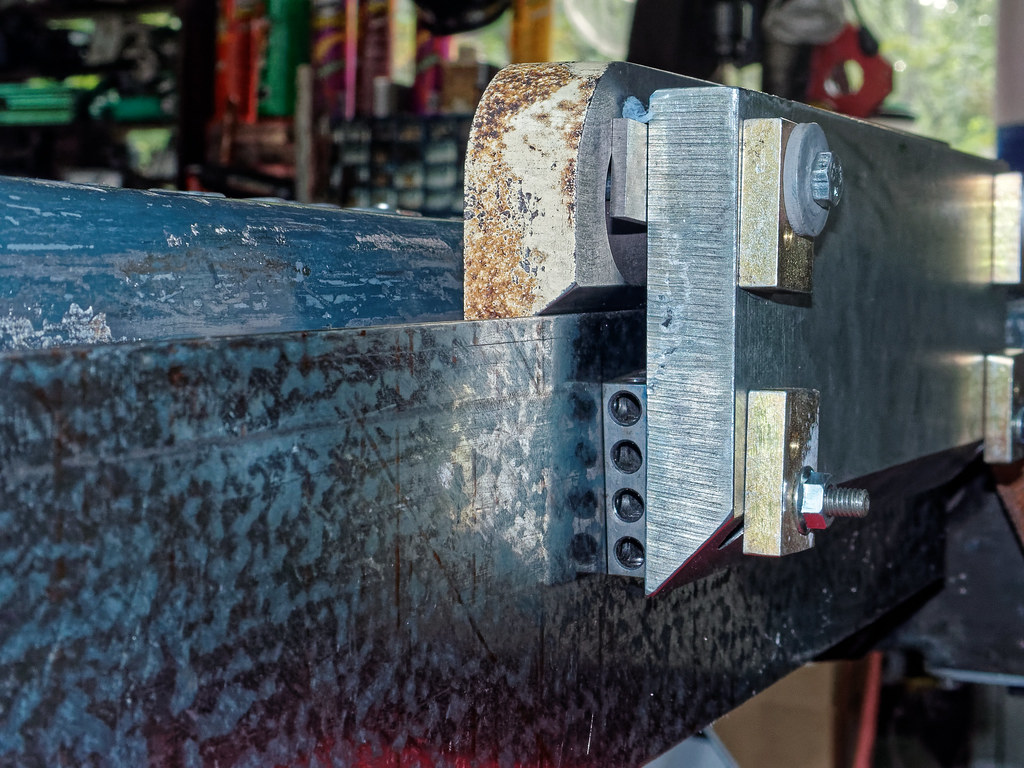
| 1486 forum posts 105 photos | If you look at my pic at full size in the album you'll see that the centre section is quite flat so by measuring from the top flat which is only half the length of the table you'll get a pretty good result. The ends see very little bearing so there's a section at about 25% and 75% where the surface takes quite a change. In my pic from 1 to 6 (tenths) is half a thou difference then 6 to 12 is 6 tenths difference but over 2.5 times the length. the centre is straighter than the ends. Also account for the fact that the micrometer measurements are not affected by gravity but DTI measurements are. The table is thin so will droop depending on which way up it's held. If it's flat upturned on the plate which it seems to be, it will be negligible. Edited By Pete Rimmer on 05/08/2022 10:27:52 |
| peak4 | 05/08/2022 11:38:59 |
 2207 forum posts 210 photos | Steve, yes it was me who mentioned scraping the top of the table flat(ish) as a start to the process. Edited By peak4 on 05/08/2022 11:45:12 |
| Pete Rimmer | 05/08/2022 12:39:29 |
| 1486 forum posts 105 photos | I have several of Lamb's cast straight edges. He will supply them bare or machined ready to scrape. The casting quality is very good and it's good iron for scraping. Not nearly as hard as the one in the pic further up which was a devil to scrape without chatter. These are ideal for the home user, if you can find a reference to scrape them from. |
| Steve355 | 05/08/2022 12:45:25 |
| 321 forum posts 235 photos | Posted by Pete Rimmer on 05/08/2022 12:39:29:
I have several of Lamb's cast straight edges. He will supply them bare or machined ready to scrape. The casting quality is very good and it's good iron for scraping. Not nearly as hard as the one in the pic further up which was a devil to scrape without chatter. These are ideal for the home user, if you can find a reference to scrape them from. >>if you can find a reference to scrape them from. That be the problem! Even my surface plate is only fairly flat. I think I need something that is reliably definitely flat so I can use it to make other things flat. |
| mgnbuk | 05/08/2022 14:43:35 |
| 1394 forum posts 103 photos | I don’t have a roller, And don't need one ? Not worked with a machine tool fitter yet who used anything other than a "dolly" to apply blue - a "dolly" usually being made from a shop cloth (like a heavy-duty cotton dishcloth about 8" square with bound edges, supplied & collected for cleaning by the same company who provided the continuous towels for the washroom). A clean cloth was folded in half, then rolled up tightly into a cylinder with the folded edge at one end. This was then bound tightly with insulating tape, leaving the end with the folded edge uncovered. This face was used to apply and distribute the blue. The "dolly" was kept in a plastic bag to keep the working face clean and prevent everything in the vicinity getting blue on it (a little goes a long, long way ! ). Once impregnated, it didn't seem to require replenishing very often. Usually used with the round tins of blue, with the "dolly" lightly dipped into the tin. This may just have been a typically economical Yorkshire approach to the situation, though - all my former colleagues were ex-Asquith, Butler, Broadbents, Crawford Swift, Swift Summerskill, Warner & Swasey etc. from the Halifax area. Nigel B.
|
| Steve355 | 05/08/2022 15:37:14 |
| 321 forum posts 235 photos | Posted by mgnbuk on 05/08/2022 14:43:35:
I don’t have a roller, And don't need one ? Not worked with a machine tool fitter yet who used anything other than a "dolly" to apply blue - a "dolly" usually being made from a shop cloth (like a heavy-duty cotton dishcloth about 8" square with bound edges, supplied & collected for cleaning by the same company who provided the continuous towels for the washroom). A clean cloth was folded in half, then rolled up tightly into a cylinder with the folded edge at one end. This was then bound tightly with insulating tape, leaving the end with the folded edge uncovered. This face was used to apply and distribute the blue. The "dolly" was kept in a plastic bag to keep the working face clean and prevent everything in the vicinity getting blue on it (a little goes a long, long way ! ). Once impregnated, it didn't seem to require replenishing very often. Usually used with the round tins of blue, with the "dolly" lightly dipped into the tin. This may just have been a typically economical Yorkshire approach to the situation, though - all my former colleagues were ex-Asquith, Butler, Broadbents, Crawford Swift, Swift Summerskill, Warner & Swasey etc. from the Halifax area. Nigel B.
Sounds good. A bit like a French polishing mop. I tried it with a rag and it didn’t work too well. I will make a dolly then and see how it goes. thanks for the tip
|
| Tony Ray | 06/08/2022 08:41:25 |
| 238 forum posts 47 photos | If you have not come across Lookcreation on the Tube Matts channel is well worth exploring, before the Land Rover and house renovation he has meant scraping videos. He also used what he calls a dauber to apply blue.iff I recall correctly is a rolled up piece of cotton fabriic and rhe blue is applied to the end. My machine rebuilding started like yours, cleaning off gunk, repainting, adjusting, fixing or converting electrics , bearing replacements and latterly making feed screws nuts gibs etc. It was the the natural step to start scraping. IMHO you would really benefit from having a surface plate larger than your SG table. It needs to be of a proven flatness so that it is your reference surface. From that you can verify any straight edge (SE) that you buy or make. It is far easier to make a SE flat from a surface plate than the reverse. Mr Lamb sells a good product at a fair price but you can get a new granite surface plate with a cert for similar money. You could sell it on after this project but I’d wager you wouldn’t. Understand that I have not scraped in any of my restorations yet,; I have been developing my scraping skills, acquiring the surface plate, making straight edges from an antique scrapped lathe bed, working on a home brew power scraper and completing a taper attachment ( which I have scraped ) for my M250 based on the design published in MEW. I expect the Eagle will be my first victim. |
| Steve355 | 06/08/2022 09:18:04 |
| 321 forum posts 235 photos | Hi Tony Yes, I’ve seen that channel and it’s very informative. Watching that yesterday inspired me to order a 0.0001 plunger dial indicator and proper scraper. I watched another vid by suburban tool inc about measuring surface plates, and checked mine out this morning, and it’s out by at least 0.001 in places, possibly more. It was a £40 eBay knock off so I’m not surprised, probably fine for what I’ve been using it for - various bits of measuring and scribing, but not suitable for blueing. I will probably end up getting a new surface plate as you suggest, but it’d have to be pretty big, and I don’t know where I would store it or how I’d handle it on my own. A lump of granite 32” long or so must weigh a ton, or something approaching that. And I have a touch of arthritis. Or could I get an 18x12 one for my 36 inch ways? I do wonder whether I could re-scrape my existing plate. And how big a flat surface I’d need to get it flat. But what I do need is at least one thing in my workshop that is definitely, reliably flat. I had another look at Bill’s Flickr pics last night. Bill - if you are reading, what did you use, particularly for the large surface on the Z axis of your grinder? I saw a weird straight edge being used for the dovetails, and a forest of DTIs, but I couldn’t work out how you tested for flatness when the column was strapped to that gurney in your kitchen (respect for that! I wouldn’t dare)
Steve
|
| not done it yet | 06/08/2022 10:31:32 |
| 7517 forum posts 20 photos | A lump of granite 32” long or so must weigh a ton, A bit of an exaggeration? The density of granite is only about 2700kg/cubic metre. The stand would likely need to weigh more than the lump of granite. |
| peak4 | 06/08/2022 12:38:45 |
2207 forum posts 210 photos | Steve, re the flatness of the column; bear in mind I've never done any of this lark before, so am hardly the best person to advise. |
| peak4 | 06/08/2022 13:00:57 |
2207 forum posts 210 photos | The strange straight edge(s) being used for the dovetails on the column were made to scrape the dovetails under the table, and on the top of the knee. Bill p.s. each of the photos in the Flickr album has an explanatory note, if you view the individual photo page. Edited By peak4 on 06/08/2022 13:06:07 |
| peak4 | 06/08/2022 13:19:32 |
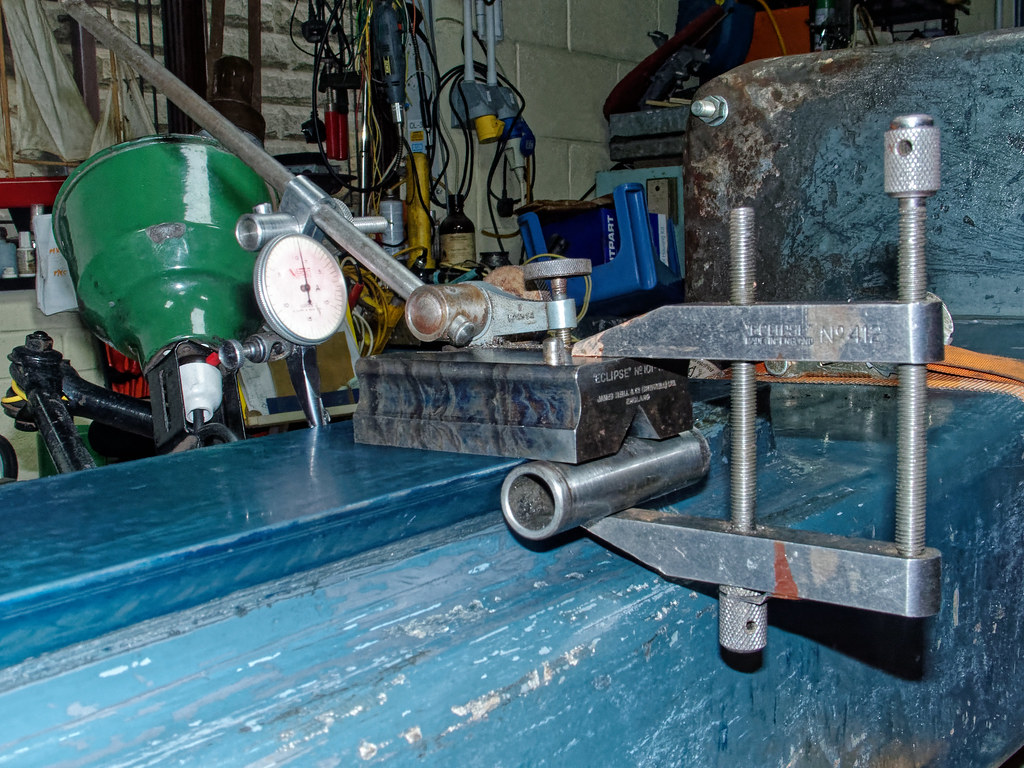
2207 forum posts 210 photos | This was a similar arrangement, but using a flat plate, a ground drill extension and a plunger clock with a flat end. |


Please login to post a reply.
Magazine Locator
Want the latest issue of Model Engineer or Model Engineers' Workshop? Use our magazine locator links to find your nearest stockist!
Sign up to our Newsletter
Sign up to our newsletter and get a free digital issue.
You can unsubscribe at anytime. View our privacy policy at www.mortons.co.uk/privacy
Latest Forum Posts
- hemingway ball turner
04/07/2025 14:40:26 - *Oct 2023: FORUM MIGRATION TIMELINE*
05/10/2023 07:57:11 - Making ER11 collet chuck
05/10/2023 07:56:24 - What did you do today? 2023
05/10/2023 07:25:01 - Orrery
05/10/2023 06:00:41 - Wera hand-tools
05/10/2023 05:47:07 - New member
05/10/2023 04:40:11 - Problems with external pot on at1 vfd
05/10/2023 00:06:32 - Drain plug
04/10/2023 23:36:17 - digi phase converter for 10 machines.....
04/10/2023 23:13:48 - More Latest Posts...
- View All Topics
Support Our Partners


Shopping Partners
Subscription Offer

Latest "For Sale" Ads
- Reeves** - Rebuilt Royal Scot by Martin Evans
by John Broughton
£300.00 - BRITANNIA 5" GAUGE James Perrier
by Jon Seabright 1
£2,500.00 - Drill Grinder - for restoration
by Nigel Graham 2
£0.00 - WARCO WM18 MILLING MACHINE
by Alex Chudley
£1,200.00 - MYFORD SUPER 7 LATHE
by Alex Chudley
£2,000.00 - More "For Sale" Ads...
Latest "Wanted" Ads
- D1-3 backplate
by Michael Horley
Price Not Specified - fixed steady for a Colchester bantam mark1 800
by George Jervis
Price Not Specified - lbsc pansy
by JACK SIDEBOTHAM
Price Not Specified - Pratt Burnerd multifit chuck key.
by Tim Riome
Price Not Specified - BANDSAW BLADE WELDER
by HUGH
Price Not Specified - More "Wanted" Ads...
Get In Touch!
Do you want to contact the Model Engineer and Model Engineers' Workshop team?
You can contact us by phone, mail or email about the magazines including becoming a contributor, submitting reader's letters or making queries about articles. You can also get in touch about this website, advertising or other general issues.
Click THIS LINK for full contact details.
For subscription issues please see THIS LINK.
Digital Back Issues


Donate

 Register
 Log-in
Model Engineer Magazine
- Percival Marshall
- M.E. History
- LittleLEC
- M.E. Clock

ME Workshop
- An Adcock
- & Shipley
- Horizontal
- Mill

Subscribe Now
- Great savings
- Delivered to your door

Pre-order your copy!
- Delivered to your doorstep!
- Free UK delivery!
All Forum Topics > General Questions > Surface grinder reassembly