Forum sponsored by:

PG Optical dividing head
Are the optics saveable?
| Clive Hartland | 15/07/2021 07:13:04 |
 2929 forum posts 41 photos | I think by looking at the pics. the glass ring is held by those blocks? In any case, centring needs to be done by rotating the ring mount and viewing through the microscope and nudging the circle at reciprocal degree readings till there is no error. Use a copper nail to move gently with soft tapping on the copper nail. Secure the circle with dobs of Shellack or thick cellulose, several dobs around the circle, not using too much or it will run. Best of luck on that. |
| Roger Hart | 15/07/2021 09:16:42 |
| 157 forum posts 31 photos | I agree with Michael. I think you should have a very good chance of rescuing the optics. Old lenses were glued with Canada balsam or similar, this discolours over time and does not like damp. First get the lens out of its brass cell making careful notes of distance and orientation. Special spanners may need to be made, look out for little locking screws etc. Once out mark lens pair with a V in pencil so you are certain which way it goes back and which surface matches with which. If lens does not fall apart soak in methylated spirit for 24 hours (assumes lens is glass!) when it should slide apart. Clean up with meths. With luck lens components will not be too etched by mould etc. I have never re-glued lens components - too nervous. I have put back together using 3 very small slips of cooking foil to stop the lens components touching. The cell hides them from view. Other people may know how to re glue and what with. The books Amateur Telescope Making do contain the detail using Canada balsam - looks pretty fiddly and sticky. Probably a modern UV setting clear glue would work but the permanence of that stuff makes me nervous. |
| SillyOldDuffer | 15/07/2021 11:52:33 |
| 10668 forum posts 2415 photos | I've never tried anything like this either, but my Microscope hobby suggests Canada Balsam substitute rather than the original Balsam. Not difficult to use on cover slips but I suggest buying a box of microscope slides and practising on them! From memory, the solvent is Toluene, which Brunel also sell. Dave |
| Clive Hartland | 15/07/2021 12:41:18 |
2929 forum posts 41 photos | Canada balsam, forget it. nowadays a clear liquid is used that is set by exposure to UV light. It is available but I cannot remember the supplier, Google may help. No heat required, like canada balsam. Cleanliness is paramount and I use Ether to clean glass. Only handle the edges of the lens. Good idea to mark positions of lenses in a stack. Because they are centered for the least optical deviation. |
| Michael Gilligan | 15/07/2021 17:39:17 |
 23121 forum posts 1360 photos | Posted by SillyOldDuffer on 15/07/2021 11:52:33:
I've never tried anything like this either, but my Microscope hobby suggests Canada Balsam substitute rather than the original Balsam. […]
After a time [a few months, or perhaps years] it tends to crystallise …with optically disastrous effect. Note: This may be attributable to the use of some particular solvents, but I haven’t tested. MichaelG. . Edit: __ This may be of interest: Edited By Michael Gilligan on 15/07/2021 17:59:47 |
| William S | 15/07/2021 19:46:29 |
 80 forum posts 335 photos |
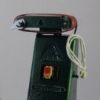
This is the problimatic lens: As can be seen Its not clear like the other 2 lenses(below) the thing I cant work out is how they come out of the brass body, the front looks to be machined to that shape and the back doesn't look to unscrew, what's peoples opinions?
I hope these pictures explain. The previous thoughts are much appreciated, that link to the graticules optics Michael is very handy, they are actually local to me so I may be seeking there expertise on the damaged Minutes scale. William Edited By William S on 15/07/2021 20:00:57 |
| Robert Atkinson 2 | 15/07/2021 20:32:41 |
 1891 forum posts 37 photos | The fitting behind the lens normally unscrews in microscope objectives like that. It may not be obvious. Robert G8RPI |
| Michael Gilligan | 15/07/2021 20:53:43 |
23121 forum posts 1360 photos | Thanks for posting the photos, William The good news is that it looks like the lens probably has a standard RMS objective mounting thread, so substitution shouldn't be a major problem … although 1/2” x14 is not a common power. The group in the Brass cone may well have been located [at the small end] by ‘rubbing’ [a.k.a.burnishing] … like a jeweller mounts a cabochon stone: in which case dis-assembly and re-assembly might be tricky. Edit: as Robert mentions, the ‘cup’ at the large end could be threaded [inspect carefully] Baker was an excellent British microscope maker, ultimately subsumed into the Vickers brand. … I will have a look around. MichaelG. Edited By Michael Gilligan on 15/07/2021 20:57:31 |
| Michael Gilligan | 15/07/2021 21:22:32 |
23121 forum posts 1360 photos | No luck with the 1/2” x14 yet … but this microscope uses what appear to be contemporaneous objectives: http://www.microscopy-uk.org.uk/mag/indexmag.html?http://www.microscopy-uk.org.uk/mag/artapr04/pjbaker.html MichaelG. |
| Clive Hartland | 15/07/2021 22:01:43 |
2929 forum posts 41 photos | I agree the lenses may well have been burnished in place, hard to get out but not impossible. |
| Roger Hart | 16/07/2021 07:04:10 |
| 157 forum posts 31 photos | Mmm, wasn't expecting a microscope objective. This article may encourage you. http://www.microscopy-uk.org.uk/mag/indexmag.html?http://www.microscopy-uk.org.uk/mag/artapr05/dwobjective.html A human put it together, I am not convinced the lens are swaged in, it is a fairly low power objective and the front lens looks set back in the cell. So should come apart. Otherwise a close enough substitute will only alter the focus a little bit.
|
| Michael Gilligan | 16/07/2021 07:33:16 |
23121 forum posts 1360 photos | Posted by William S on 15/07/2021 19:46:29:
[…] This is the problimatic lens: . Roger, I am perfectly happy to be wrong … but these two photos appear [to me] to show a burnished edge separate to the conical brass cell. Unfortunately, I have yet to find any detail about Baker’s mid 20th Century assembly techniques. Eagerly awaiting more revelations from William MichaelG. |
| Roger Hart | 16/07/2021 14:23:06 |
| 157 forum posts 31 photos | I fear you may be right MichaelG. Certainly looks as if front lens is either swaged in or up against a thin collar. I have had a look at my own small selection and they look as if they come apart from the back - not swaged. But I am not about to test this.... A lot hangs on whether the inside thread and cone is a single piece or two - does the internal threading extend down to or beyond the internal cone. How was it made - one piece or two? William said it does not look to unscrew so will a soak in solvent and a bit of pressure from the front reveal anything other than a cracked lens...? Otherwise I would be looking for a substitute until the rest of the kit is back in order.
|
| Robert Atkinson 2 | 16/07/2021 16:06:45 |
1891 forum posts 37 photos | One has to ask why you would swage the doublet in when you already have an internal thread? It does save one turned and threaded part but adds an operation with some risk of damaging the doublet. A semi-destructive method to tell if the inner part is threaded or solid is to cut into the side with a thin slitting saw (or abrasive disc on a dremel type too)l. Stop and inspect frequently to see if there is any sign of a thread. The slit will be covered on re-assembly so won't affeact performance or appearance. If it is threaded and tight, extending the cut to the edge may make it easier to unscrew. Robert G8RPI. Edited By Robert Atkinson 2 on 16/07/2021 16:08:21 |
| William S | 16/07/2021 19:59:47 |
80 forum posts 335 photos |
The thread is undercut, the picture above shows it just about. The part that would usually unscrew has a perfect flat face where I would expect to see the start of the thread. It does seem a bit odd to put a thread in but not put it all the way down to hold the lens in.
What would be the process to “unburnish” the lens? William |
| Roger Hart | 18/07/2021 06:56:06 |
| 157 forum posts 31 photos | Difficult. Just push it out. A look at some YouTubes - replacing a watch jewel - may help. Essentially the idea is precisely controlled and evenly distributed force - a thou at a time. If I were to try this I think a hard plastic cup with spigot held in lathe chuck and a shaped brass pusher with paper washer in the tailstock. Warm the cell up to expand the brass and soften any cement and apply some force and rotate the cell whilst under force to distribute the push evenly. I would aim to put most of the force on the outer part of the lens. That looks the tricky bit. Other people may have better ideas. The watchmakers have some fancy expanding tube tools to re-open the burnished cell once you get the lens out. Experience is directly proportional to the amount of expensive equipment ruined.
|
| William S | 20/07/2021 20:57:16 |
80 forum posts 335 photos | Well a stroke of luck following Rogers advice:
Well good for the lens not so good for my finger, I decided after pressing the doublet out I would press my finger in to the threaded end of the body, a nice gouge and a flap of skin is what happened!
I turned up this plastic holder to support the brass body (it is tapered inside!) the brass body was a good fit.
This was the set up in the lathe, using the lever operated tailstock to gently press the doublet out, It might of just been glued in as it was rather sudden when it broke free. Also I can't see any evidence on the brass body inside of it ever being burnished in, although I cant be certain, its probably so small!
This is the little brass pusher I lined it with electrical tape, after turning the front face convex so just the very outside was pushing on the glass lens.
I am partway though cleaning these 2 up with meths, they are both glass and coming up rather well, I am now looking in to reassembly, how best is it to proceed in your opinions? Thanks again for all the information that has been given thus far and I look forward to hearing more. William
|
| Michael Gilligan | 20/07/2021 23:54:31 |
23121 forum posts 1360 photos | Great result, William … sorry you had to suffer for your Art Traditional bond would surely be Canada Balsam [which has the great advantage of being easy to remove if things go wrong] but a modern alternative, which I think Clive mentioned, would be LOCA [as used for mobile ‘phone screens] MichaelG. . Big question … are the two elements exactly the same diameter ? Hopefully they are, because otherwise you will need to centralise them in the lathe No, I’ve never done it, and the idea scares me somewhat ! Edited By Michael Gilligan on 20/07/2021 23:58:30 |
| Roger Hart | 21/07/2021 06:59:19 |
| 157 forum posts 31 photos | Top man, respect. Sorry about the finger... From what I remember from the ATM books, a small amount of warm balsam was applied, the lens put together with no bubbles etc and then put into a brass ring to keep them centred. A small weight applied and left to cool/set. Usually the lens are same size, just a bit of tube - not too tight - is needed. The tricky bit with a UV setting adhesive is making sure the assembly does not get stuck permanently in the line-up cell, that any smears can be removed and that UV light can get to it so it goes off. A few experiments and a deep ponder.... Thousands of these must be made every day, so it can't be that difficult if only we knew how it was done. A quick trawl of the web found suitable glues but the stuff on removing/cleanup was a bit iffy - maybe others know more. |
| Clive Hartland | 21/07/2021 07:14:03 |
2929 forum posts 41 photos | Any excess adheisve of both types I always trimmed off with a sharp razor edge. A hard setting adhesive is not good as it will set up stresses in the optics and can cause cracking or distortion.. |


Please login to post a reply.
Magazine Locator
Want the latest issue of Model Engineer or Model Engineers' Workshop? Use our magazine locator links to find your nearest stockist!
Sign up to our Newsletter
Sign up to our newsletter and get a free digital issue.
You can unsubscribe at anytime. View our privacy policy at www.mortons.co.uk/privacy
Latest Forum Posts
- hemingway ball turner
04/07/2025 14:40:26 - *Oct 2023: FORUM MIGRATION TIMELINE*
05/10/2023 07:57:11 - Making ER11 collet chuck
05/10/2023 07:56:24 - What did you do today? 2023
05/10/2023 07:25:01 - Orrery
05/10/2023 06:00:41 - Wera hand-tools
05/10/2023 05:47:07 - New member
05/10/2023 04:40:11 - Problems with external pot on at1 vfd
05/10/2023 00:06:32 - Drain plug
04/10/2023 23:36:17 - digi phase converter for 10 machines.....
04/10/2023 23:13:48 - More Latest Posts...
- View All Topics
Support Our Partners


Shopping Partners
Subscription Offer

Latest "For Sale" Ads
- Reeves** - Rebuilt Royal Scot by Martin Evans
by John Broughton
£300.00 - BRITANNIA 5" GAUGE James Perrier
by Jon Seabright 1
£2,500.00 - Drill Grinder - for restoration
by Nigel Graham 2
£0.00 - WARCO WM18 MILLING MACHINE
by Alex Chudley
£1,200.00 - MYFORD SUPER 7 LATHE
by Alex Chudley
£2,000.00 - More "For Sale" Ads...
Latest "Wanted" Ads
- D1-3 backplate
by Michael Horley
Price Not Specified - fixed steady for a Colchester bantam mark1 800
by George Jervis
Price Not Specified - lbsc pansy
by JACK SIDEBOTHAM
Price Not Specified - Pratt Burnerd multifit chuck key.
by Tim Riome
Price Not Specified - BANDSAW BLADE WELDER
by HUGH
Price Not Specified - More "Wanted" Ads...
Get In Touch!
Do you want to contact the Model Engineer and Model Engineers' Workshop team?
You can contact us by phone, mail or email about the magazines including becoming a contributor, submitting reader's letters or making queries about articles. You can also get in touch about this website, advertising or other general issues.
Click THIS LINK for full contact details.
For subscription issues please see THIS LINK.
Digital Back Issues


Donate

 Register
 Log-in
Model Engineer Magazine
- Percival Marshall
- M.E. History
- LittleLEC
- M.E. Clock

ME Workshop
- An Adcock
- & Shipley
- Horizontal
- Mill

Subscribe Now
- Great savings
- Delivered to your door

Pre-order your copy!
- Delivered to your doorstep!
- Free UK delivery!
All Forum Topics > Manual machine tools > PG Optical dividing head