Forum sponsored by:

Stuart Twin Victoria: Advice & General Questions
| Dr_GMJN | 21/10/2020 16:07:50 |
 1602 forum posts | Some inspiration there, thanks all. With the Princess Royal, how are the cylinder mounts integrated into the casting - I like those. Are they different castings? I also agree with Jason about the double flywheel - I'd prefer a single row of thicker spokes. Are there any alternatives from the Stuart range, or elsewhere? If it was a bit thinner it might also be easier to fit a governor drive bevel gear next to it. How could the governor be damped to smooth out speed impulses at low speeds? I like watching the 10V at really low speeds but it is a bit lumpy, same with the Twin Victoria I suppose. I was thinking of something like extending the governor axle down into the baseboard, and mounting a hidden, horizontal flywheel under there. It would probably have to be mounted on a sprag clutch so that only the peaks in speed are used to drive it, otherwise you'd be trying to back-drive the mass of the main flywheel in the low speed bits of the cycle. Maybe I'm over-thinking this...I really need to read up on governors. |
| JasonB | 21/10/2020 16:26:54 |
 25215 forum posts 3105 photos 1 articles | Posted by Dr_GMJN on 21/10/2020 16:07:50:
With the Princess Royal, how are the cylinder mounts integrated into the casting - I like those. Are they different castings? Should all become clear when you check your e-mail. These days I would go with JBWeld rather than the Araldite if nothing else to boost Ramon;s shares The geared drive and having two cylinder will make for smoother running anyway so you may not need any damping. My Benson one is gear driven and the smoothest of the governor equiped engines I have made |
| roy entwistle | 21/10/2020 16:43:48 |
| 1716 forum posts | Mill engines usually had the flywheel boarded in as did colliery winding engines, so if you did this the spokes, and the fact that you are using two wheels wouldn't show. |
| JasonB | 21/10/2020 16:47:39 |
25215 forum posts 3105 photos 1 articles | Or save a few quid and cut the flywheel from a billet of CI, just machine a recess each side and stick the boarding to that. |
| Andy_G | 21/10/2020 17:08:23 |
 260 forum posts | Posted by Dr_GMJN on 20/10/2020 21:22:09:
Does anyone have reference images of real-life twin cylinder mill engines as inspiration for perhaps adding a few other details? Thanks very much all. I can't remember if it's twin cylinder or not, but the Stuart Victoria always puts me in mind of the mill engine at the Manchester Science & Industry Museum. Some nice pictures of details on the museum site, but no general view of the engine: https://collection.sciencemuseumgroup.org.uk/objects/co8404994/firgrove-mill-steam-engine-steam-engine |
| Dr_GMJN | 21/10/2020 18:23:20 |
1602 forum posts | Personal preference, but for me the flywheel is one of the focal points of a stationary engine, and looks wrong boarded over. Like I say - just personal preference. |
| Ramon Wilson | 21/10/2020 18:25:15 |
 1655 forum posts 617 photos | Jason, that's highly personal information absolutely not supposed to be revealed - LOL. Dr G if you have any doubts on JB Weld I think it's fair to say, having used both over many years in varying situations, that it is a far superior product than Araldite in this type of application. It has a very high tensile strength and will not break down under higher temperatures. During a build described over on MEM I did some pressure testing of it - not exactly under scientific conditions but enough to prove it's value as a high strength material. I then built a one piece cylinder block for a Double Ten with it - no issues on 60 psi 'dried' but not superheated steam. I can post the link if you require. As Roy says, many, though not all, mill engines had their flywheels boarded in to reduce windage. Andy - is this the one you are thinking of at the Manchester museum? This McNaught Corliss twin tandem is a truly lovely engine but I think you'd have to go along way to make a Victoria look like it. That said of course there's 'nowt like tryin'
Flywheels can be built up of course so that is another option but personally I don't think I could live with knowing it's solid under the boarding - but then that's just me For now - Ramon Edit Ah Dr G - just missed your latest post - you won't be too keen on my latest build then. I take your point having done it though an open wheel is much more 'in character' Edited By Ramon Wilson on 21/10/2020 18:28:30 |
| Dr_GMJN | 21/10/2020 19:54:51 |
1602 forum posts | Thanks Ramon. I’m guessing JB weld is the same as the Evo-Stick stuff - a grey epoxy sandwich of two pastes that you cut to length and knead together? I used that to repair the outside of the 10V cylinder after the milling cutter grabbed. I also used it to make a fixture for drilling an Rx helicopter main shaft a very long time ago. I’ve no issue at all with using it. I did use Milliput to make the pads around the cladding screws on the 10V to stop it bowing under tightening. I just found Milliput smoother, and easier to apply than the rather grainy Grey stuff. I’m about to start reading the Princess Royal/Goliath articles now. I think - by my own fault - I may be extending this build by months or years before I’ve even bought a casting! I’ll have to find a balance with this one. Cheers. |
| JasonB | 21/10/2020 20:06:54 |
25215 forum posts 3105 photos 1 articles | JB Weld is far more liquid some where between car body filler and an epoxy adhesive such as Araldite. Dries very hard so can be drilled, tapped etc and is also able to withstand quite high heat. Milliput has it's uses such as adding non structural internal fillets and as you say easily smoothed with a damp paint brush. Edited By JasonB on 21/10/2020 20:07:35 |
| roy entwistle | 21/10/2020 20:20:47 |
| 1716 forum posts | In Bolton Steam Museum there is an excellent model of the engine at Bancroft Mill, Barnoldswick fully detailed |
| Dr_GMJN | 21/10/2020 20:24:57 |
1602 forum posts | OK, JB weld it is. One thing that immediately raises a question is securing the machined pads to the cylinder castings by two bolts in each, drilled and tapped into the curved cylinder undersides. This would cause me a lot of stress. Why not simply drill one central hole, thus avoiding any depth estimation disasters? Once jigged Using the frame mounts, and assembled with a countersunk screw and Araldite or JB weld, all degrees of freedom are constrained. Doubly so when bolted to the frames, and the fastening method is invisible. Any issues with that method - just seems much simpler, neater and less onerous.
|
| JasonB | 21/10/2020 20:33:13 |
25215 forum posts 3105 photos 1 articles | The two screws actually give a deeper hole so more thread engagement. It would not really hurt if the holes went into the bor eprovided screw did not and some JBW would fill the hole and machine up well as the cylinder was bored Though given how good JBWeld is I'm sure Ramon would say don't bother screwing. |
| Dr_GMJN | 21/10/2020 20:48:02 |
1602 forum posts | Posted by JasonB on 21/10/2020 20:33:13:
The two screws actually give a deeper hole so more thread engagement. It would not really hurt if the holes went into the bor eprovided screw did not and some JBW would fill the hole and machine up well as the cylinder was bored Though given how good JBWeld is I'm sure Ramon would say don't bother screwing. Yes, this was on the assumption that JB Weld as is as good as advertised, ie it effectively becomes an extension of the casting. The screw would really just be a secondary fixing, and act as a clamp while the epoxy set. |
| Ramon Wilson | 21/10/2020 22:33:17 |
1655 forum posts 617 photos | Posted by Dr_GMJN on 21/10/2020 19:54:51:
Thanks Ramon. I’m guessing JB weld is the same as the Evo-Stick stuff - a grey epoxy sandwich of two pastes that you cut to length and knead together? I used that to repair the outside of the 10V cylinder after the milling cutter grabbed. I also used it to make a fixture for drilling an Rx helicopter main shaft a very long time ago. I’ve no issue at all with using it. I did use Milliput to make the pads around the cladding screws on the 10V to stop it bowing under tightening. I just found Milliput smoother, and easier to apply than the rather grainy Grey stuff. I’m about to start reading the Princess Royal/Goliath articles now. I think - by my own fault - I may be extending this build by months or years before I’ve even bought a casting! I’ll have to find a balance with this one. Cheers.
I can't say for certain if JBW is the same as any other brand but I think it would be fair to say that you cannot better its characteristics with any other regularly available product when using it for this purpose. As I'm sure you will appreciate, I have used other products - Devcon, Miliput, Green Stuff etc etc over the years. I first realised the effectiveness of JBW making silencers for glow motors - the exhaust of which gets far hotter than any steam engine. It more than proved itself in that application such that fasteners were eventualy eliminated. All have their uses however - I will presently be using Miliput for lagging pipework on the latest build for instance but for construction of any 'casting' for similar use as being discussed I don't think you need look elsewhere. It does have one drawback in that it can be a bit runny when first mixed and if used for fillets immediately it can 'slump'. This can easily be got round by two means - bond the parts together when first mixed then leave the unused mixture for about an hour in a warm environment to begin to cure before using it for fillets. The other method is to mix a small amount of colloidal sillicate in with it to thicken it up. Readily available from any glass fibre supplier it is used to make epoxy resin thixotropic. I used this method on the Double Ten cylinder head. Incidentally I first realised how effective this would be as a structural adhesive when I picked up a piece of steel that I had previously used to mix some JBW up on. It was the ideal thickness for what I wanted and thought that I would soon chisel it off - no way - it had to be milled off. Fasteners really only need to be there to hold parts together - they do not have to be of a size to ensure strength (unless you really feel you need to) The Double Ten cylinder head for example has just 4 8BA screws in it. I am coming to the end of my current build and am considering another steam engine. If it goes ahead it will definitely be built using these methods using block cast iron as a basis. (The Twin Shaft is on permanent hold Jason - a covid casualty I guess!) That's it for today - tomorrow is another day as they say Regards - Ramon Edited By Ramon Wilson on 21/10/2020 22:33:57 |
| Dr_GMJN | 22/10/2020 08:52:04 |
1602 forum posts | Ok thanks Ramon. Ill ask questions as I read through the articles. I really like the Princess Royal engine. 1) Is the flywheel keyed purely to reflect full-size practice? 2) In terms of tooling for external key ways - what would I need? Wouldn’t mind having a go. I gather it’s a case of using the saddle hand wheel to move the tool? 3) TC recommends mounting the cylinder on the cross slide and machining with a tool in the chuck. The drawings look like the cylinder shape would fit in the 4-jaw chuck (admittedly I’ve not checked sizes). Would my larger boring bar I used in the 10V not be suitable - mounted conventionally at the toolpost? 4) TC Suggests that turning the piston with the shaft chucked is a massive no-no and shoddy etc etc. That’s what I did on the 10V on advice from the book, and various online sources. I realise why he says that, but I can’t see it’s such a big deal in terms of bad practice, especially when he earlier says don’t worry if you break through into the middle of the cylinder during the foot mods, since the pits will get filled with oil and debris... 5) Re. The governor valves - I suppose having one per cylinder is true to the real thing, but couldn’t things be simplified - and possibly result in smoother running - by having one valve before the bifurcation in the inlet pipe? I’d think if the individual valves weren’t exactly matched in terms of proportion of flow per degree of opening, one cylinder could fight the other when running? Thanks!
|
| JasonB | 22/10/2020 09:19:38 |
25215 forum posts 3105 photos 1 articles | 1. Yes full size would have had some for of key or keys, the problems with a grub screw is that if the fit of flywheel to shaft is not perfect they will cant the flywheel out of true and nobody likes a wobbly flywheel. 2. Using the saddle to plane the keyway in the flywheel works if you don't have a broach 3. At that size you can do the cylinder either way, on the cross slide with a between ctrs boring bar tends to reduce the chance of a tapered bore and easier to ensure the cylinder bore is true to the surface the feet are sitting on. 4. TC gives a long list of "howevers" and says skim the piston while on the rod if you can't meet them. 5. A single valve before splitting with a Tee would also work and as you say simplify things as well as reducing friction which is the enemy of model governors.
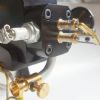
This one is a bit of a gem, it has the type of valve chest oiler I suggested as well as lots of other fine details Edited By JasonB on 22/10/2020 09:23:09 |
| Ramon Wilson | 22/10/2020 10:37:17 |
1655 forum posts 617 photos | Whilst I would agree that holding a piston rod in a basic three jaw for truing the piston is not a basis for success as far as concentricity is concerned I have always finish turned the od and skimmed the packing groove mounted as such but held in a collet. By using PTFE impregmated packing as previously suggested and a piston a couple of thou down on bore diameter the likelyhood of binding is minimal at best. I always mount the piston rod gland in the cover before boring both for the piston rod to ensure concentricity too. Also would say that mounting the cylinder on the saddle and using a boring bar between centres is much the better way from an accuracy point of view. Personally I favour a light skim over the valve face (but not to finished size) to use as a datum face. Once the bore is done it would be mounted on an expanding mandrel (easily made) and the ends brought true. If the mandrel is made such that it can be bolted end on to an angle plate then the valve face can be brought true to the bore both dimensionally and parallel. Certainly concur with Jason on the use of grubscrews on the flywheel - the larger the wheel the more pronounced the effect too. Cutting a keyway using the saddle is not difficult the only tedious part is getting the cutter ground to exact size and dead on centre height as well as square to the bore. I fitted two valves - one in each manifold directly linked to the governor - on mine but can't see any reason why air/steam should not be governed before going to each cylinder - is there any full size evidence of this Jason? Ramon
|
| Nigel McBurney 1 | 22/10/2020 11:48:10 |
 1101 forum posts 3 photos | It depends how close one wants to follow full size practice,the keyway in a flywheel should be tapered and fitted with a taper key,so its a case of either mounting the flywheel at the required small angle on a faceplate or planing from the locked saddle using the top side set at a small angle,on small engines a tapered key will fit in a parallel key way in the flywheel ,the taper key jamming on the front edge of the parallel keyway.When used on a parallel keyway the taper on the key needs only to be a few thou not the usual 1 in 96 taper.Another way on would be to make the keyway in the flywheel parallel ,which is easier and cut the key way in the crankshaft at a slight angle ,a lot easier.Some years ago I was asked to cure a flywheel problem on a full size one hp International open crank i/c engine the owner had bought it as restored,but the flywheel kept moving down the crank shaft and the gib head of the key was up against the flywheel boss,thekey came out easily and I saw that it was a home made new one as genuine taper keys are never made by end milling,the circular marks were easily seen, then when I put a mike on the key,the key was tapered by a thou in the wrong direction, there are some idiots around. a new correctly tapered key got it running again. |
| Andrew Johnston | 22/10/2020 11:51:04 |
 7061 forum posts 719 photos | The mathematics behind centrifugal governors is well established and was first studied by Maxwell in 1868, presumably as a bit of light relief after sorting out electromagnetic theory. Essentially the governor is controlled by a second order differential equation, the solution of which are two co-incident real poles, or more likely a pair of complex conjugate poles. An understanding of poles on the complex s-plane helps to understand the behaviour of simple governors. See this thread for a ramble through the operation of governors and my thoughts on trying to make a working scale governor: Andrew |
| JasonB | 22/10/2020 12:28:45 |
25215 forum posts 3105 photos 1 articles | Ramon as for full size practice with a single governor one of the main problem is finding engines being run as double high particularly in the larger sizes as the Doc wants to represent as most would have been cross compounds but I think we can take it as doable if Tangyes are anything to go by. If going down the route of fabrication the cylinders then no reason not to opt for compound if only from the outside and some inventive passages to get the air/steam into the right places if keeping the model as double high mechanically.
|


Please login to post a reply.
Magazine Locator
Want the latest issue of Model Engineer or Model Engineers' Workshop? Use our magazine locator links to find your nearest stockist!
Sign up to our Newsletter
Sign up to our newsletter and get a free digital issue.
You can unsubscribe at anytime. View our privacy policy at www.mortons.co.uk/privacy
Latest Forum Posts
- hemingway ball turner
04/07/2025 14:40:26 - *Oct 2023: FORUM MIGRATION TIMELINE*
05/10/2023 07:57:11 - Making ER11 collet chuck
05/10/2023 07:56:24 - What did you do today? 2023
05/10/2023 07:25:01 - Orrery
05/10/2023 06:00:41 - Wera hand-tools
05/10/2023 05:47:07 - New member
05/10/2023 04:40:11 - Problems with external pot on at1 vfd
05/10/2023 00:06:32 - Drain plug
04/10/2023 23:36:17 - digi phase converter for 10 machines.....
04/10/2023 23:13:48 - More Latest Posts...
- View All Topics
Support Our Partners


Shopping Partners
Subscription Offer

Latest "For Sale" Ads
- Reeves** - Rebuilt Royal Scot by Martin Evans
by John Broughton
£300.00 - BRITANNIA 5" GAUGE James Perrier
by Jon Seabright 1
£2,500.00 - Drill Grinder - for restoration
by Nigel Graham 2
£0.00 - WARCO WM18 MILLING MACHINE
by Alex Chudley
£1,200.00 - MYFORD SUPER 7 LATHE
by Alex Chudley
£2,000.00 - More "For Sale" Ads...
Latest "Wanted" Ads
- D1-3 backplate
by Michael Horley
Price Not Specified - fixed steady for a Colchester bantam mark1 800
by George Jervis
Price Not Specified - lbsc pansy
by JACK SIDEBOTHAM
Price Not Specified - Pratt Burnerd multifit chuck key.
by Tim Riome
Price Not Specified - BANDSAW BLADE WELDER
by HUGH
Price Not Specified - More "Wanted" Ads...
Get In Touch!
Do you want to contact the Model Engineer and Model Engineers' Workshop team?
You can contact us by phone, mail or email about the magazines including becoming a contributor, submitting reader's letters or making queries about articles. You can also get in touch about this website, advertising or other general issues.
Click THIS LINK for full contact details.
For subscription issues please see THIS LINK.
Digital Back Issues


Donate

 Register
 Log-in
Model Engineer Magazine
- Percival Marshall
- M.E. History
- LittleLEC
- M.E. Clock

ME Workshop
- An Adcock
- & Shipley
- Horizontal
- Mill

Subscribe Now
- Great savings
- Delivered to your door

Pre-order your copy!
- Delivered to your doorstep!
- Free UK delivery!
All Forum Topics > General Questions > Stuart Twin Victoria: Advice & General Questions