Forum sponsored by:

PGK's 1" Minnie
working through the book
| pgk pgk | 31/03/2016 07:59:32 |
| 2661 forum posts 294 photos | Agreed. Shrinking the metal will be a new challenge, specially when it's the circular cap. |
| pgk pgk | 01/04/2016 11:31:57 |
| 2661 forum posts 294 photos | Not much to report on yesterdays session. Most of it was sitting and stressing about the job (I stress over all my hobbies It was also a session of working out what supplies need ordering for the next stage.. which has been done this morning (and makes one appreciate why folk 'cheat' and buy a boiler). In the end all i managed was to cut and deburr the wrapper sheet. S afr cutting on the mill is working out OK.. it takes longer to setup but then less finishing work. If one as doing a lot of these cuts then making a fence for the mill for a straight edge would be cool. Or checking if the slots are true enough to use as they are. I'll wedge a piece of plate in there and run a dti along later. |
| pgk pgk | 05/04/2016 22:45:33 |
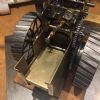
| 2661 forum posts 294 photos | Only very slow progress to report. I did cut and bend the wrapper.. again using the mill to slice the sheet and then bending over a handy bit of ally rod the right diameter. I also cut the reinforcing plates. Yesterday and today saw several deliveries.. now the owner of torches and solder and gas cylinder, imperial drills, rivets and other supplies. Meanwhile i had decided to make a new former for the next plates instead of repurposing the first former.. as much 'cos i can see a second boiller attempt on the horizon...and since i had the imperial drills i was able to make more accurate radius gauges. My previous coments about bone fragment holders caused me to look on ebay fr clamps. I remembered the backhaus towel clips are a similer (if weaker) tool and quite cheap. Also rochester pean artery forceps have much longer jaws than halstead or mosquito pattern... so more spring and the possibility of bowing the jaws if necessary. Ebay prices are really quite cheap on these and the quality isn't as bad as you might expect. I;ve included a pic of one of each clamping the throatplate ears. I'll try and flange these two plates then probably practice riveting and soldering scrap..
|
| pgk pgk | 07/04/2016 21:57:34 |
| 2661 forum posts 294 photos | The second firebox plate came out better than the first (practice) so I made a third. I've also got the motion pad and cylinder pads made and marked ready for bending.. next will be cutting the two bits of plate to sweat together for the pump pad... and starting to practice soldering. I've got all the supplies for the hearth but I'd prefer to build that nearer the shed than the nearest safe barn...and welsh weather in april..well won't stay dry long...so we'll get things ready for soldering and then look for a weather window.
Next time i make one of these I need to make a copper and a lead hammer first..wooden or rubber mallets didn't work for this flanging.
|
| julian atkins | 07/04/2016 22:06:00 |
 1285 forum posts 353 photos | HI pgk pgk, I use a 'Thor' hammer using the copper end and a fair 'whack'. I do all my boiler work indoors, and silver soldering with the patio doors the end of my workshop open. I am also in Wales albeit the South Wales Valleys. Cheers, Julian
|
| pgk pgk | 08/04/2016 05:03:09 |
| 2661 forum posts 294 photos | I looked up thor hammers.. look good. I've got double doors and 4 windows..so plenty of ventilation. But back pain means i have to work at standing or sitting heights ( as in weeding veggies means crawling).. so any indoor hearth is going to be closer to ceiling and ceiling strip light fittings?? What i have in mind is two trestles with a board across, line with light thermalite blocks (and windbreak) then line that with vermiculite blocks. Can be dismantled and stored quite quickly. I'm guessing copper rivets need annealing first? |
| JasonB | 08/04/2016 07:38:13 |
 25215 forum posts 3105 photos 1 articles | I've not found the need to anneal rivits, they are soft enough as they come. |
| julian atkins | 08/04/2016 09:38:58 |
1285 forum posts 353 photos | Hi pgk pgk, I agree with Jason absolutely no need to anneal copper rivets. Dont close them up too much as you ought to have silver solder penetrate around them, plus both heads covered with silver solder. They are a pain to silver solder whilst doing the relevant joint so try and use as few rivets as possible. It is not unknown for me to remove the ceiling light fitting in my workshop when doing the last set up and silver soldering for the backhead and last bit of the foundation ring etc. Cheers, Julian |
| pgk pgk | 08/04/2016 09:48:28 |
| 2661 forum posts 294 photos | Thanks for that, guys. My supply order included some silver foil to stack snippets between rivet layers to avod them being too tight. I note that Mason's instructions for throatplate and wrapper state one rivet midline top warpper and tube and one each in wrapper/tube/throatplate ears. However i don't see how that can keep the throatplate perpendicular to the boiler tube..effectively a hinge..and ought to need an additional rivet somewhere between throatplate and wrapper to prevent movement? I guess i'll find out on preliminary bolting up.... |
| Raymond Griffin | 09/04/2016 16:51:29 |
| 65 forum posts 48 photos | Hi, it looks as though there are a number of us making the 1” Minnie. I seem to be a little ahead of pgk pgk, in that my boiler is completed, and I have pressure tested it to my satisfaction. I have a similar problem of boiler inspection. I live in the South of France, so access to a boiler inspector is out of the question. I belong to my local Model Club, but am the only constructor in steam. I find boiler making irksome, and can fully understand anyone buying one. I wonder what percentage of these models are made just for the pleasure of construction, and in fact never envisaged for fires and steaming. I have just fitted the horn, spectacle, and back plates, and was pleased to be able to purchase them as laser cuts from Blackgates. Laser cut material is a great saving in precious workshop time. Shafts placed in the pre-cut bearing holes are parallel, so no fear of misalignment. My only worry is that the centres may not be perfect for the gears. Mr Mason emphasises clock making methods to ensure correct meshing of the gears. I will cross that bridge when I get there. Three photos of work so far. Happy constructing, to pgk, and other Minnie builders.
|
| pgk pgk | 09/04/2016 19:46:34 |
| 2661 forum posts 294 photos | Raymond, Looks nice so far. At my rate of build you're weeks ahead. Was this your first boiler? Any little tips, tricks you discovered along the way? As you say, many will hardly ever be steamed. For me it's really about whether i can make one rather than wanting one. |
| Brian Abbott | 09/04/2016 21:52:18 |
 523 forum posts 95 photos | Well this makes 3 of us making a Minnie, anyone else ?
|
| Tony Simons | 09/04/2016 22:02:08 |
| 37 forum posts | Yes! Boiler completed 35 years ago - just started progress again, front axle done, all gears cut, winding drum finished wheel rims turned. Will take pics soon. |
| julian atkins | 09/04/2016 23:29:07 |
1285 forum posts 353 photos | Hi Raymond, You are to be congratulated on an excellent boiler. Small boilers are not easy to make. Plus in the case of traction engine boilers they require a higher degree of precision than miniature loco boilers, plus lots of awkward add ons, so I am always in awe of those who make their own boilers for traction engines. Pgk pgk is to be congratulated on his own achievements so far and starting this thread. I personally think it would make an excellent series in ME magazine, and would help recoup the cost of the copper and silver solder! Cheers, Julian |
| Raymond Griffin | 10/04/2016 16:39:37 |
| 65 forum posts 48 photos | So good to see the work of other Minnie builders. Pgk, I have made other boilers over the years, but none as complex as this one. My previous efforts have been in water tube boilers for model boats and stationary engines. I followed the guidelines in the book by Mr Mason for much of the construction of this boiler; with a few strategically placed copper rivets to hold assemblies together. My silver soldering is based on much of the existing literature. There is a helpful series written by Keith Hale of CUP alloys called “Overcoming difficulties in silver soldering” in the “Model Engineering in Miniature” magazines of November, December 2015 and January 2016. 1. I try to get joints that are not too tight or too large. Too tight restricts capillary flow: too large, hard to fill with expensive silver solder 2. I clean all my copper pieces in acid before each heating cycle. I use nitric acid, diluted to about 5% from the 25% stock sold by our local hardware shop: adding acid to water, of course. Copper immersed in the dilute nitric acid will become clean in seconds. I learnt to use nitric acid for silver soldering in metalwork classes, at school in the 1950’s. However, all the safety precautions for using strong acids must be followed rigorously. I clean mine in the open air as obnoxious/toxic fumes can be evolved if care is not taken. Nitric acid will not normally be available in the UK, so dilute sulphuric acid or citric acid can also be used. I do wonder if the acid treatment is a bit over the top, as in reality only the areas to be soldered need to be bright copper. This can easily be done with wire wool. The flux should take care of any local oxidation from heating. 3. The size of torch used is important even in a small boiler such as this. I found that the Sievert 3491 (3.1Kw) burner normally used for heating smaller jobs could not provide sufficient heat quickly. So changed to a 2942 (26Kw) burner used with an extension tube, as it gets very hot. The larger burner did the trick for me; it brings the job up to temperature quickly and easily. 4. I used silver solder with two melting points as normally recommended for work of this nature. I used No. 438 (650°-720° 5. I find some form of insulation around the work essential when heating. Coke is mentioned a lot in older literature; but I don’t know where you would get it. Anyway, the fumes from the hot coke could be a bit daunting. I have two insulation blankets from CuP alloys at £10.80 each they are cheap and for me, indispensable. One is kept whole and wrapped around the boiler; the other is torn into pieces and stuffed into large orifices to prevent the circulation of cooling air through the boiler. Good luck with your soldering. Brian, your gears look really nice. Do you have any tips on getting them to mesh nicely? I am just starting on the bearings for the shafts. Bonne courage, to all Ray |
| Raymond Griffin | 10/04/2016 18:14:26 |
| 65 forum posts 48 photos | Addendum to my recent post. I made a real faux pas with my Minnie boiler. Once it was completed, but before the side stays were in place I did a hydraulic pressure test for leaks, as recommended by Mr Mason. He suggests 10lb/sq. in. Me, being clever, thought that a bit more pressure could be more revealing. So I took mine to about 15lb/sq.in: lo and behold, the internal and external side panels of the fire box puffed out, like trumpeters cheeks. It was a miserable job getting them back to parallel and straight using clamps. I think that this intermediate test could be left out, as there is a full pressure test when the stays are in place. Leaks can be rectified at this stage. |
| pgk pgk | 10/04/2016 22:17:33 |
| 2661 forum posts 294 photos | Ray, Thanks for the extra comments. I bought some conc. sulphuric acid today (one shot drain cleaner) and along with vermiculiye bricks i had also bought some loose vermiculite. I'm delayed on getting more done due to wife having to go away for a few days and that leaves me with all the animal feeding and domestic chores as well as my usual ones. |
| Brian Abbott | 10/04/2016 22:51:40 |
523 forum posts 95 photos | Hello Ray, hope all is well with you. Regards the gears, I just used the method described in the book, made the small setting tool. Possibly a little tighter than I would have like but I think they will be ok, I fabricated all the parts for the boiler, but had to get help to solder as I failed miserably, so have a great deal of respect for anyone who can master it.. |
| pgk pgk | 15/04/2016 21:51:01 |
| 2661 forum posts 294 photos | Ok so I've been getting a bit more done but very slowly..probably 'cos i'm on the edge of my comfort zone and spend too much time worrying about each step but wife tells me that I've stressed about every hobby I've ever had - so no change. I cut annealed and bent up the inner support plates. To get them right i turned down my scrap block of ally to id minus 13g thickness as a former.. scribed a horizontal line and matched that to lines scribed on the plates to try and get the curve on the midline. Before bending I drilled 1/16th holes in the location required that i could later open to my rivet size - just easier to mark and get right while the plate is flat
I really had a hard time figuring how to drill up the rivet holes for the throatplate/wrapper/tube combo. re-reading the text I'd missed that Mason stated a 'couple of rivets each side' in the throatplate.. initially I'd read that as just a couple of rivets through ears/wrapper/tube and had wondered how that could possibly hold the throatplate straight. The book simply states 'clip it together' for drilling. I do wonder how he did that. The top hole is easy.. just scribed seperately on wrapper and tube and bound to match. Once bolted through I eyeballed and marked where wrapper holes should be relative to the throatplate ears.. spot drilled and drilled the wrapper then marker ink and align wrapper over the tube to mark through for first tube hole...lots of time with it set up in the mill vice and a magnifying lens to centre on that marked circle. (I tried a transfer punch but the wrapper is too thin for that to work). Once both top and one side hole bolted up I could do the other side hole the same way.. the the issue of drilling the throatplate ears.. wrapper off for access and clamped as you'll see. the backhaus towel forceps aren't rigid enough..they just twist compared to bone fragment forceps but the rochester-pean gave a half decent hold. Spotting and drilling were further supported by hand as well as various packings. then all those parts were bolted together, checked for alignment and perpendicularity before clamping up the end of the wrapper for the last holes. I should have done those in two stages too.. 'cos the last one did slip a tad. I managed to recover that by slotting the hole a little with a tiny slot drill and the rivet head holds it correctly.
I thought I'd have a go at sweating the two pieces of pump plate together with high temp silver solder.. assembled my hearth and figured i could get away with a simple hand can blow torch for such small bits of copper. Total disaster. I got it bright luminescent orange hot -like a glowing satsuma but the solder stayed solid. I got my new big torch out only to find the vendor had forgotten the regulator adapter.. which he's since sent. So that's the next job. But it illustrates quite how much heat I'm going to have to get into this thing and I'm going to have to practice handling and access to the different parts and how to keep them insulated before i contemplate the first big cook-up. I'm going to have to practice on bits of scrap too. I've also now marked the wrapper length to trim back..leaving a little for final tidying up later. i also bought a new hacksaw frame thats nice and rigid and I'll be free cutting these. |
| JasonB | 16/04/2016 07:30:13 |
25215 forum posts 3105 photos 1 articles | That bright a red does sound a bit hot, solder should have run by then. did your flux melt and flow like water after the initial bubbling up? What flux did you buy? |
 ) and fiddling with the throatplate ears so they'd lay right for clamping to drill and bolt up- which i'll do when imperial drills arrive. It's where i miss some of the wonderful bone-fragment holding tools I used to have...not that you'ld want to use pricey stuff like that on a dirty job at £1-200+ per clamp. Artery forceps don't work too well here but some of the cheap disposables could easily be bent to work well if one had access to them.


 and No.455 (630°-660°


Please login to post a reply.
Magazine Locator
Want the latest issue of Model Engineer or Model Engineers' Workshop? Use our magazine locator links to find your nearest stockist!
Sign up to our Newsletter
Sign up to our newsletter and get a free digital issue.
You can unsubscribe at anytime. View our privacy policy at www.mortons.co.uk/privacy
Latest Forum Posts
- *Oct 2023: FORUM MIGRATION TIMELINE*
05/10/2023 07:57:11 - Making ER11 collet chuck
05/10/2023 07:56:24 - What did you do today? 2023
05/10/2023 07:25:01 - Orrery
05/10/2023 06:00:41 - Wera hand-tools
05/10/2023 05:47:07 - New member
05/10/2023 04:40:11 - Problems with external pot on at1 vfd
05/10/2023 00:06:32 - Drain plug
04/10/2023 23:36:17 - digi phase converter for 10 machines.....
04/10/2023 23:13:48 - Winter Storage Of Locomotives
04/10/2023 21:02:11 - More Latest Posts...
- View All Topics
Support Our Partners


Shopping Partners
Subscription Offer

Latest "For Sale" Ads
- Reeves** - Rebuilt Royal Scot by Martin Evans
by John Broughton
£300.00 - BRITANNIA 5" GAUGE James Perrier
by Jon Seabright 1
£2,500.00 - Drill Grinder - for restoration
by Nigel Graham 2
£0.00 - WARCO WM18 MILLING MACHINE
by Alex Chudley
£1,200.00 - MYFORD SUPER 7 LATHE
by Alex Chudley
£2,000.00 - More "For Sale" Ads...
Latest "Wanted" Ads
- D1-3 backplate
by Michael Horley
Price Not Specified - fixed steady for a Colchester bantam mark1 800
by George Jervis
Price Not Specified - lbsc pansy
by JACK SIDEBOTHAM
Price Not Specified - Pratt Burnerd multifit chuck key.
by Tim Riome
Price Not Specified - BANDSAW BLADE WELDER
by HUGH
Price Not Specified - More "Wanted" Ads...
Get In Touch!
Do you want to contact the Model Engineer and Model Engineers' Workshop team?
You can contact us by phone, mail or email about the magazines including becoming a contributor, submitting reader's letters or making queries about articles. You can also get in touch about this website, advertising or other general issues.
Click THIS LINK for full contact details.
For subscription issues please see THIS LINK.
Digital Back Issues


Donate

 Register
 Log-in
Model Engineer Magazine
- Percival Marshall
- M.E. History
- LittleLEC
- M.E. Clock

ME Workshop
- An Adcock
- & Shipley
- Horizontal
- Mill

Subscribe Now
- Great savings
- Delivered to your door

Pre-order your copy!
- Delivered to your doorstep!
- Free UK delivery!
All Forum Topics > Traction engines > PGK's 1" Minnie