Forum sponsored by:

Class 22 Diesel (next project)
| Dave Smith 14 | 07/02/2021 15:10:01 |
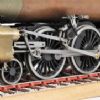
| 222 forum posts 48 photos | Ron That really is looking good. Are you going to detail the bogies and underframes, it would be shame not to? Dave |
| Ron Laden | 08/02/2021 06:01:06 |
 2320 forum posts 452 photos | Thanks guys Dave, although it doesn't pretend to be a scale model I will be adding some more chassis detail, though any rivet counters had better look away but they probably have already.. |
| Ron Laden | 14/02/2021 09:47:09 |
2320 forum posts 452 photos | Should anyone be interested something else I came across in the paint line is some weathering paint at a very good price. I found a MIG Ammo railway set of 6 colours in water based acrylic, it is actually a track weathering set but I thought it would also serve for some of the loco weathering. Priced at £14.95 and free postage makes each of the 17ml bottles £2.50 each which is half the price of most of the weathering paints of a similar size. I got it via ebay but the supplier is Jadlam Models UK. MIG do a large range including sets for military vehicles and aircraft as well as 160 colours and other items. The railway set is Track Rust, Old Rust, Medium Rust, Matt Black, Dust and Earth May be of interest.
Edited By Ron Laden on 14/02/2021 09:48:47 |
| Ron Laden | 21/02/2021 12:59:00 |
2320 forum posts 452 photos | Al the windows and screens fitted I used 2mm acrylic which I glued in with R/C Modellers Canopy Adhesive, first time I have used it but it's very good. Grabs hold in 3-4 minutes and dries crystal clear, should you have any that needs removing then a damp cloth shifts it completely with no residue. Another new to me product I, m about to use is Humbrol Maskol (liquid rubber like solution) for masking off the windows, apparently its very good. So about to start weathering the body working from the roof down, airbrushing using some roof dirt paint and others then with the body on the chassis working the frame and bogie finishes into the lower body and blending in.
|
| Dave Smith 14 | 21/02/2021 13:47:11 |
| 222 forum posts 48 photos | Ron Sorry if this is teaching you to suck eggs then disregard, but with weathering make sure you use a photograph of the prototype as a guide. It is the only way to get realistic weathering. Dave |
| Ron Laden | 27/02/2021 19:20:18 |
2320 forum posts 452 photos | I,ve had a change of mind re the weathering, I was going to go with a light scheme but I have decided to go with something heavier. I have a model of a quite heavily weathered Class 52 which is also in a Maroon scheme. Using some diluted roof dirt enamel I have given all the body a wash as a base, it has toned down the colour quite a bit which I can now add to.
Edited By Ron Laden on 27/02/2021 19:24:04 |
| Ron Laden | 07/03/2021 09:48:08 |
2320 forum posts 452 photos |
Getting there, quite pleased with how it's starting to look.
|
| JasonB | 07/03/2021 10:00:43 |
 25215 forum posts 3105 photos 1 articles | Be OK once it's had a clean up Not much left to do now. |
| Ron Laden | 07/03/2021 13:05:37 |
2320 forum posts 452 photos | Funny you should say that Jason as someone else told me not to weather it. I am a fan of weathered loco,s though they are not to everyone's taste. In fact I could count on one hand the number I have seen on club tracks and only one of those was fully weathered. I could also be a fan of weathered/aged stationary engines |
| Jon Lawes | 07/03/2021 13:37:54 |
 1078 forum posts | I think with all weathering less is more. You seem to have a really good balance. |
| Jeff Dayman | 08/03/2021 01:42:39 |
| 2356 forum posts 47 photos | It's looking great Ron! |
| DiogenesII | 08/03/2021 07:47:04 |
| 859 forum posts 268 photos | That's looking really good, Ron, nice work an' a useful read as well.. |
| Ron Laden | 17/03/2021 10:13:36 |
2320 forum posts 452 photos | Not to everyone's taste but it is to mine. Not too much more detail to add but the build is complete enough for a track test once the club opens up again. Electrics next and I had forgotten the front and rear side valances so some alu angle is on order. Not too far away now and then onto other things, I am in need of a machining fix.
|
| Ron Laden | 26/03/2021 10:38:36 |
2320 forum posts 452 photos | That will do for now, side valances have been added and there is still some small details to add but they can wait until after the track test. I have electrics on order and decided to go with a plug in hand control which I will make up myself. I now have the AUW which is as near as matters 61kgs so a bit of a lump but it breaks down for handling and assy into the chassis 26kgs, the body 7 kgs and the pair of 12 volt batteries 14kgs each. Hopefully traction should be good, I cant see why not as there is a battery sitting immediately above each of the two bogies, well thats the plan at least.
|
| Jeff Dayman | 26/03/2021 14:31:50 |
| 2356 forum posts 47 photos | Looking great Ron, I'll bet you can't wait to take it for a run, Hope that is possible soon. |
| Bazyle | 26/03/2021 15:42:06 |
 6956 forum posts 229 photos | Enjoy seeing your updates - keep it coming with whatever is next. On the electrics may I suggest a headphone socket, 1/4 in type, put in series with some part of the control circuit and attached to the driving trolley so in the event of a breakaway it is pulled out. Also don't make the lead for the control long enough for children to dangle it near the wheels when driving. |
| Ron Laden | 26/03/2021 15:58:24 |
2320 forum posts 452 photos | Thanks Jeff Yes hopefully it wont be too long before the club track is open again and I must admit I am now looking forward to the test run. It will be tinged with a bit of nervousness though, thinking are my motor calculations correct, is the gearing good, how will the belt drive perform etc etc. I am fairly confident it should be ok but like they say one should never count their chickens. Ron |
| Ron Laden | 26/03/2021 16:13:16 |
2320 forum posts 452 photos | Thanks Bazyle The dead man,s connection is a good idea, thanks for that. Talking of too long a control lead I embarrassed myself not long after I joined the club. A club member let me take his class 37 for a run and that had a control lead which was way too long at about 6 feet or more, he did mention it to me so I coiled all the excess cable up and hung it on the trolley handbrake lever. I was half way around the track when I stopped for a red light and didnt notice the lead had uncoiled, when I set off again the trolley ran over the lead cutting it clean in half. He was ok about it but I could tell he was none too pleased.. |
| Ron Laden | 17/04/2021 17:54:40 |
2320 forum posts 452 photos | One day,s work should see it wired I said well tomorrow is day 4 and still quite a bit to do. I,m not the brightest spark when it comes to electrics (excuse the pun) but a lot of what you guys think is simple has me deep in thought trying to fathom it out. Anyway what I,ve wired so far seems OK, I am now wirng the sound plus the lights which I am connecting into a double pole direction switch. The idea being when the direction is switched the headlights and rear lights are switched to match the direction or at least that's the plan.
|
| Ron Laden | 25/05/2021 10:19:44 |
2320 forum posts 452 photos | Ready for a track test, a short video where I had the loco jacked on the bench for a motor/controller test, not much to see but it gives the sound and the headlights and rear lights changing with the direction switch. The two lower rear lights are red but they only show as white in the video..? I dont know why but I,m sure someone will. I did have a sound system for the loco but it unfortunately went pop and I doubt I will buy another one and just go for a two tone horn. With the loco jacked on the bench I took a maximum rpm reading at the wheels which comes out at 7.5 mph but that is unloaded of course. I would think though with the 500 + watts across 4 motors it should be capable of 7mph (ish) with half a dozen passengers but the club track limit is restricted to 5mph anyway. It will be interesting to see how it pulls especially when pulling away from standstill, I have gone with the 16T pulleys that came fitted to the motors which gives a 4.5/1 ratio. I would have gone with 6.0/1 by choice but as the motors had the fitted pulleys and apparently they are a bugger to remove I thought I will see how it goes. Should it need lower gearing I can change the pulleys to 12T. Ron Edited By Ron Laden on 25/05/2021 10:34:24 |


Please login to post a reply.
Magazine Locator
Want the latest issue of Model Engineer or Model Engineers' Workshop? Use our magazine locator links to find your nearest stockist!
Sign up to our Newsletter
Sign up to our newsletter and get a free digital issue.
You can unsubscribe at anytime. View our privacy policy at www.mortons.co.uk/privacy
Latest Forum Posts
- hemingway ball turner
04/07/2025 14:40:26 - *Oct 2023: FORUM MIGRATION TIMELINE*
05/10/2023 07:57:11 - Making ER11 collet chuck
05/10/2023 07:56:24 - What did you do today? 2023
05/10/2023 07:25:01 - Orrery
05/10/2023 06:00:41 - Wera hand-tools
05/10/2023 05:47:07 - New member
05/10/2023 04:40:11 - Problems with external pot on at1 vfd
05/10/2023 00:06:32 - Drain plug
04/10/2023 23:36:17 - digi phase converter for 10 machines.....
04/10/2023 23:13:48 - More Latest Posts...
- View All Topics
Support Our Partners


Shopping Partners
Subscription Offer

Latest "For Sale" Ads
- Reeves** - Rebuilt Royal Scot by Martin Evans
by John Broughton
£300.00 - BRITANNIA 5" GAUGE James Perrier
by Jon Seabright 1
£2,500.00 - Drill Grinder - for restoration
by Nigel Graham 2
£0.00 - WARCO WM18 MILLING MACHINE
by Alex Chudley
£1,200.00 - MYFORD SUPER 7 LATHE
by Alex Chudley
£2,000.00 - More "For Sale" Ads...
Latest "Wanted" Ads
- D1-3 backplate
by Michael Horley
Price Not Specified - fixed steady for a Colchester bantam mark1 800
by George Jervis
Price Not Specified - lbsc pansy
by JACK SIDEBOTHAM
Price Not Specified - Pratt Burnerd multifit chuck key.
by Tim Riome
Price Not Specified - BANDSAW BLADE WELDER
by HUGH
Price Not Specified - More "Wanted" Ads...
Get In Touch!
Do you want to contact the Model Engineer and Model Engineers' Workshop team?
You can contact us by phone, mail or email about the magazines including becoming a contributor, submitting reader's letters or making queries about articles. You can also get in touch about this website, advertising or other general issues.
Click THIS LINK for full contact details.
For subscription issues please see THIS LINK.
Digital Back Issues


Donate

 Register
 Log-in
Model Engineer Magazine
- Percival Marshall
- M.E. History
- LittleLEC
- M.E. Clock

ME Workshop
- An Adcock
- & Shipley
- Horizontal
- Mill

Subscribe Now
- Great savings
- Delivered to your door

Pre-order your copy!
- Delivered to your doorstep!
- Free UK delivery!
All Forum Topics > Locomotives > Class 22 Diesel (next project)