Member postings for Andrew Johnston
Here is a list of all the postings Andrew Johnston has made in our forums. Click on a thread name to jump to the thread.
| Thread: Hole diameters for single point threading |
| 13/08/2021 10:19:29 |
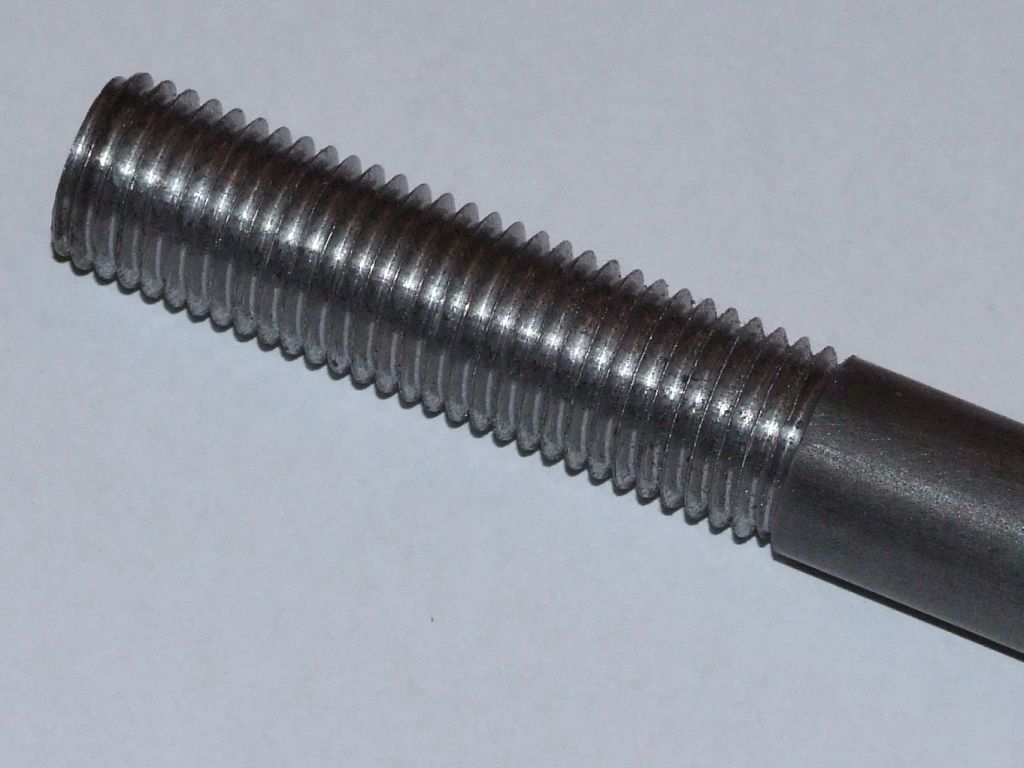
Posted by SillyOldDuffer on 13/08/2021 10:00:11: .......EN8 often tears roughly when cut.......Agreed when turning, high surface speed often cures the problem. Strangely though the same isn't true when threading. Here's an M16 thread in EN8 I made earlier: It's not a super smooth finish but works fine as a drawbar on the horizontal mill. The thread was cut on an imperial lathe, so I couldn't use my high speed threading attachment. Instead I was slow 'n' steady with the half nuts always engaged, 85rpm I think. Incidentally H=0.866P is the theoretical depth of the 60° triangle, it's not the same as the actual thread depth, that's 5/8H, unless one uses Zeus. Andrew |
| 13/08/2021 09:34:45 |
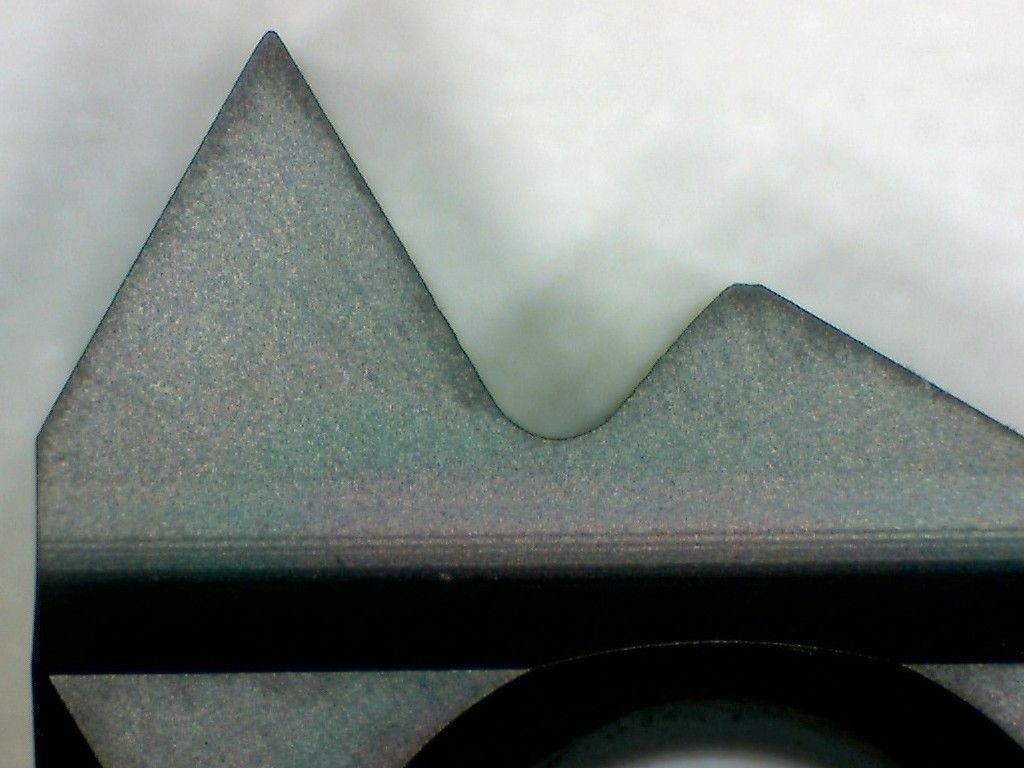
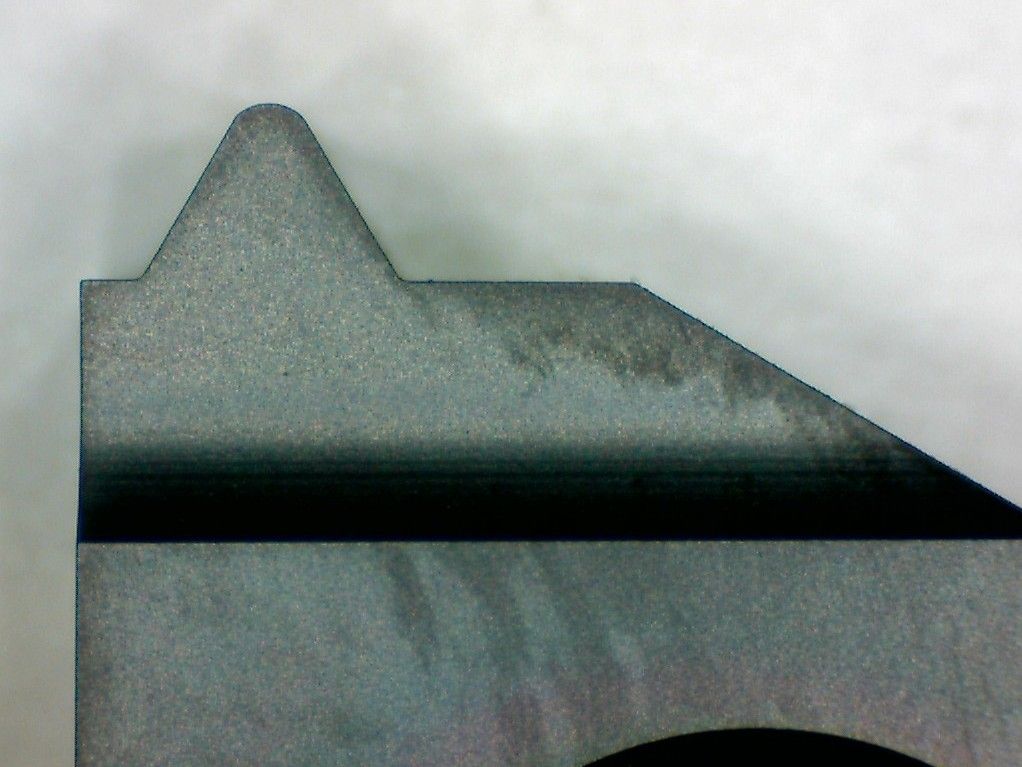
To expand on the reply by Tony; this is a 16ER-AG60 insert: It is an external insert intended to cut a range of ISO metric pitches. The nose radius will be set for the smallest pitch in the range covered. For larger pitches the radius will be too small and the depth of cut needed will be larger than theoretical to compensate. However the outer diameter will remain the same; for internal threads the core diameter will remain the same. In contrast this is an 16ER 2.0ISO insert, full profile intended to cut only 2mm pitch external threads: Note the larger nose radius. I will be using this insert later today as I have some M16 threads to screwcut. Andrew |
| 12/08/2021 22:11:57 |
When single point threading I ignore tapping tables and percentage thread engagement. For internal threads I turn the bore to the theoretical core diameter, ie, assuming 100% thread depth. When screwcutting I aim for the theoretical thread depth, checking fit with a mating part. Once near the theoretical depth I take fine cuts, may be a couple of thou off the diameter. When checking fits it is important to do a spring pass and clean the thread with a fine brush. Almost invisible dust or swarf can be the difference between a nice fit and loose. Most of my single point threading is done with full profile inserts rather than HSS, so I can assume that the thread profile is correct. Andrew |
| Thread: chinese lathe tailstock is 3/16" too high |
| 12/08/2021 11:13:20 |
Posted by Neil Wyatt on 12/08/2021 10:40:29: What is important is making sure it is level so it doesn't rise/droop when extending it. The accuracy limits for my lathe gives tolerances for the parallelism of the tailstock barrel (with barrel extended and locked) compared to carriage movement that are biased upwards and forwards. Although the tolerances are small, 0.015mm and 0.02mm per 100mm in horizontal and vertical respectively. So if the tailstock barrel isn't perfectly parallel to the carriage movement it should be pointing slightly up and/or to the front. Andrew |
| Thread: Making Tapered Castellations in Aluminium |
| 11/08/2021 15:29:59 |
Posted by Dr_GMJN on 11/08/2021 15:06:33:
Can anyone recommend a rotary table then for an SX2P Mill? Not specifically as I'm not familiar with the mill, but offer the following points for consideration:
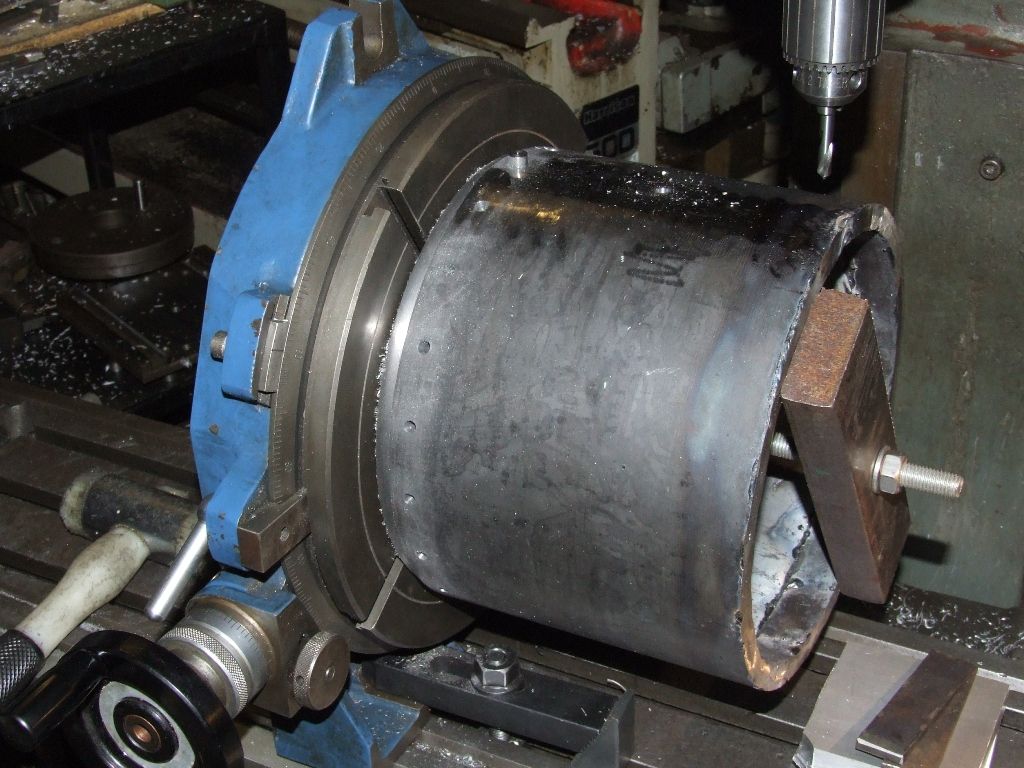
To illustrate the points, here's a horizontal setup: Note the central rod; simply stock bar with a 1" spigot turned on the end. The clamps under the gear only just fit on the table. And a vertical setup: Andrew |
| Thread: Beam Engine - where to start? |
| 11/08/2021 15:19:46 |
Posted by Roderick Jenkins on 11/08/2021 14:58:02:
Andrew, I have actually started with the governor drive gears- mostly as a test of my fading intellect(?) to understand the manufacture of parallel depth bevel gears That makes you one up on me; I've never made parallel tooth bevel gears. Andrew |
| Thread: Making Tapered Castellations in Aluminium |
| 11/08/2021 14:45:54 |
Given that the sides of the wedges are radial lines all that is needed is to offset the cutter by half its diameter, away from the wedge, while indexing round each tooth with the rotary table and the wedge shapes will appear. Opposing sides of the wedges need equal, but opposite, offsets. Each cut only goes to the centre, not across the diameter. I expect Jason will knock out a quick Alibre drawing to show the method. Andrew |
| 11/08/2021 13:31:16 |
The existing parts don't look like they've got a taper on the teeth. Machining straight-sided teeth is a simple operation involving a rotary table to machine the sides of each tooth in turn. If a taper really is needed, simply tilt the head of the mill, or the rotary table. Aluminium seems an odd choice of material. Steel would be better wearing and less prone to fatigue. Andrew |
| Thread: Beam Engine - where to start? |
| 11/08/2021 13:23:53 |
I'd start with the drawings. Understand how the parts fit together, how each part will be machined and how it will be held for each operation. Identify which dimensions are important and which not. Note tools that will be needed but not avaiable, or change the design. Check for drawing errors, especially on important fits between parts. I expect my parts to fit together even if they are machined months apart, so I make parts in the order than interests me. Early on I made the spur gears for my traction engines even though the engines didn't come together for several years afterwards. If machining in a conventional order I'd start with the base. Andrew |
| Thread: chinese lathe tailstock is 3/16" too high |
| 10/08/2021 08:14:20 |
There's an almost identical thread on 'practicalmachinist' with the predictable blunt responses. That, and mention of 'littlemachineshop', implies that the OP is based in the US? Andrew |
| Thread: Leveling machines |
| 04/08/2021 18:40:14 |
Confuse would have been a better word. Andrew |
| Thread: Tapping Drill sizes |
| 03/08/2021 18:47:35 |
Posted by Peter Greene on 03/08/2021 18:35:41:
My "bible" for all this is Tubal Cain's "Drills Taps and Dies" (Workshop Practice Series No. 12) Mine too. Andrew |
| 03/08/2021 16:17:35 |
Depending on material I'd use 3.9 or 4mm, with 75% or 60% engagement respectively. Andrew |
| Thread: self catering v independent |
| 03/08/2021 14:39:10 |
Posted by not done it yet on 03/08/2021 14:02:42:
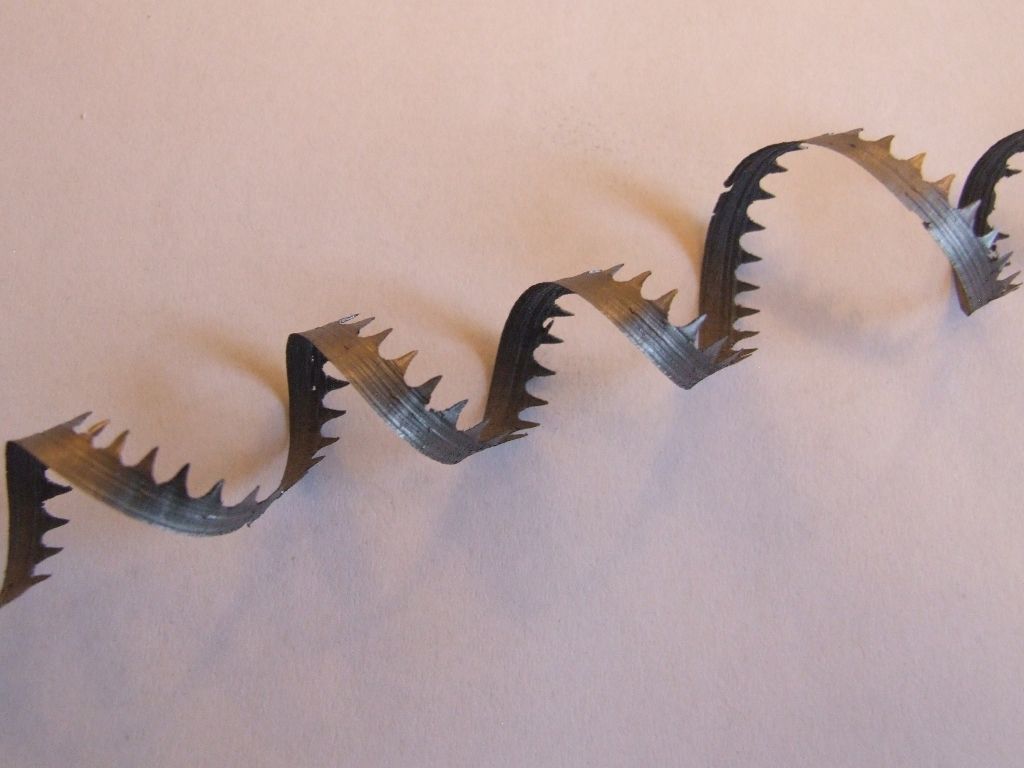
How fast were you turning and how thick were those ‘curly band saw blades’.......... Probably running at 1000rpm. I don't have any swarf left (that I can find) but thickess is likely around 8-10 thou. Without measuring I don't know the exact feedrate, as the lathe in question only has an uncalibrated hydraulic feed - you adjust it to give the required finish. Andrew |
| Thread: Centec 2B - New arrival and Q&A |
| 03/08/2021 14:31:05 |
Posted by not done it yet on 03/08/2021 14:20:18:
.............Andrew had 3 (or maybe 5)HP! My horizontal is 5hp in the high speed range, 4hp in low speed. That's why I've never made it cough whereas I've stalled the other mills (and lathe) by being over-ambitious. Andrew |
| Thread: self catering v independent |
| 03/08/2021 13:30:47 |
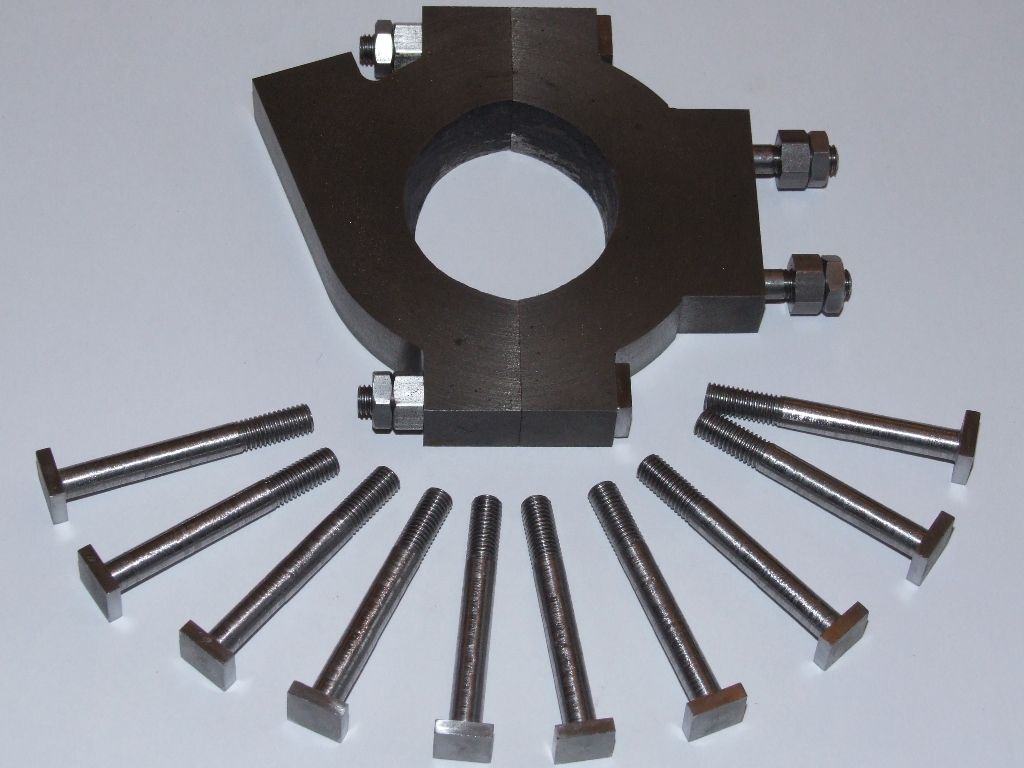
It would be better to take one cut rather than lots of small cuts. The 2" bolts at the bottom of this photo were turned from 1/2" square steel down to 1/4" diameter in one pass with no tailstock support: And the resultant swarf: To be fair the work was held in a 1/2" square collet which doesn't work loose, but still no support needed. Andrew |
| Thread: Centec 2B - New arrival and Q&A |
| 03/08/2021 09:15:37 |
Posted by William Ayerst on 03/08/2021 08:52:45:
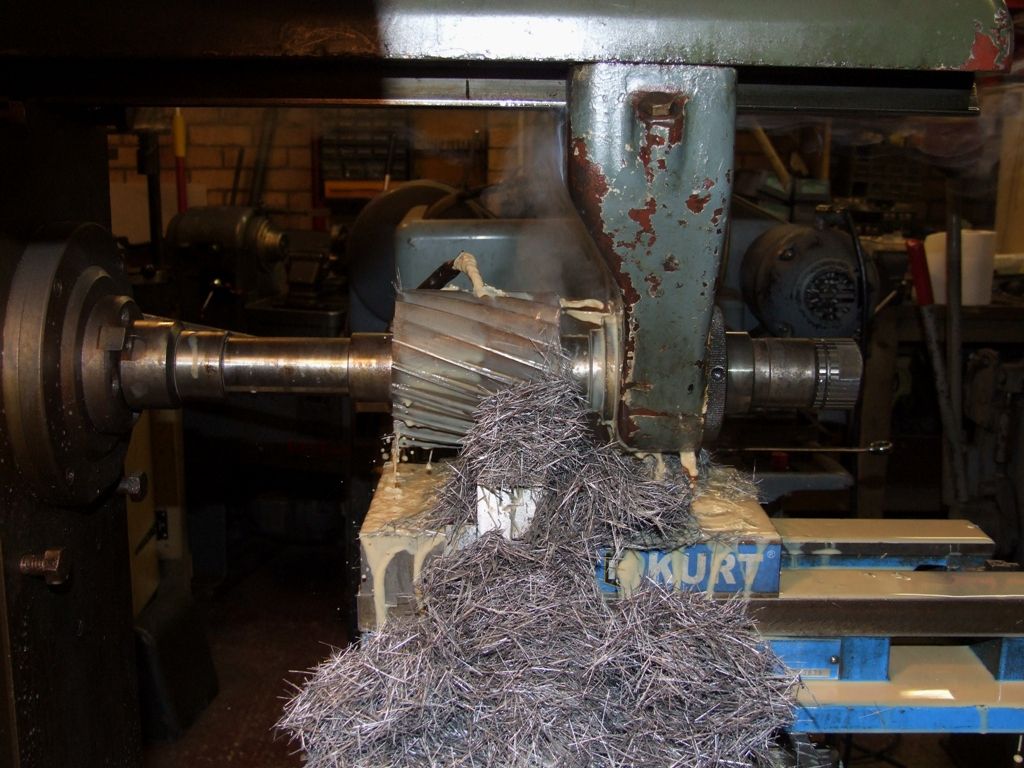
I'd not considered a slab cutter but that does make alot of sense. My widest horizontal cutter is 5/8" - other than a 1" bore is there anything I should be considering with regard to teeth/etc. on a cutter like this? Do everything up tight, and then tighten some more, and ensure the cutter is well supported. Make sure the work is firmly held; I've had a slab mill lift work out of a Kurt vice. Spindle speed the same as any other cutter of the same diameter. Feeds based on number of teeth and number of thou per tooth. I usually start at 4 thou per tooth. From a practical viewpoint I suspect the lack of arbor keyway and lack of power will be the limiting factors. A slab mill can remove serious amounts of metal; this is pussyfooting as the mill didn't even notice as the cut started: Andrew |
| Thread: Allchin 1 1/2” scale Traction Engine Shaft Manufacture |
| 01/08/2021 17:13:18 |
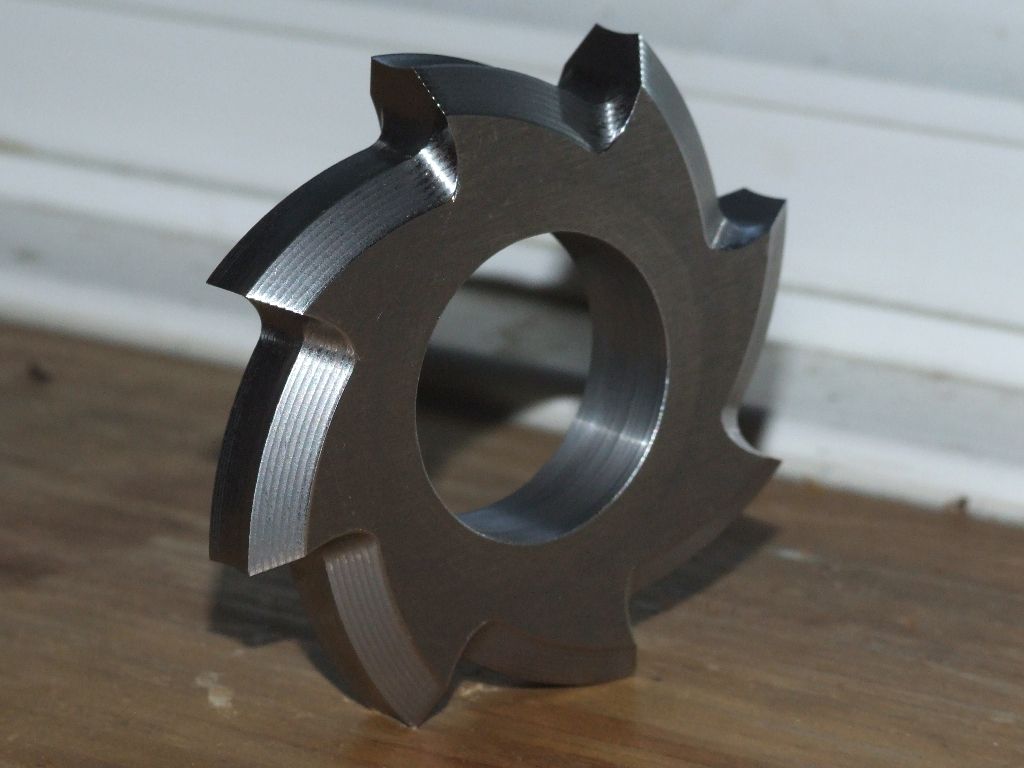
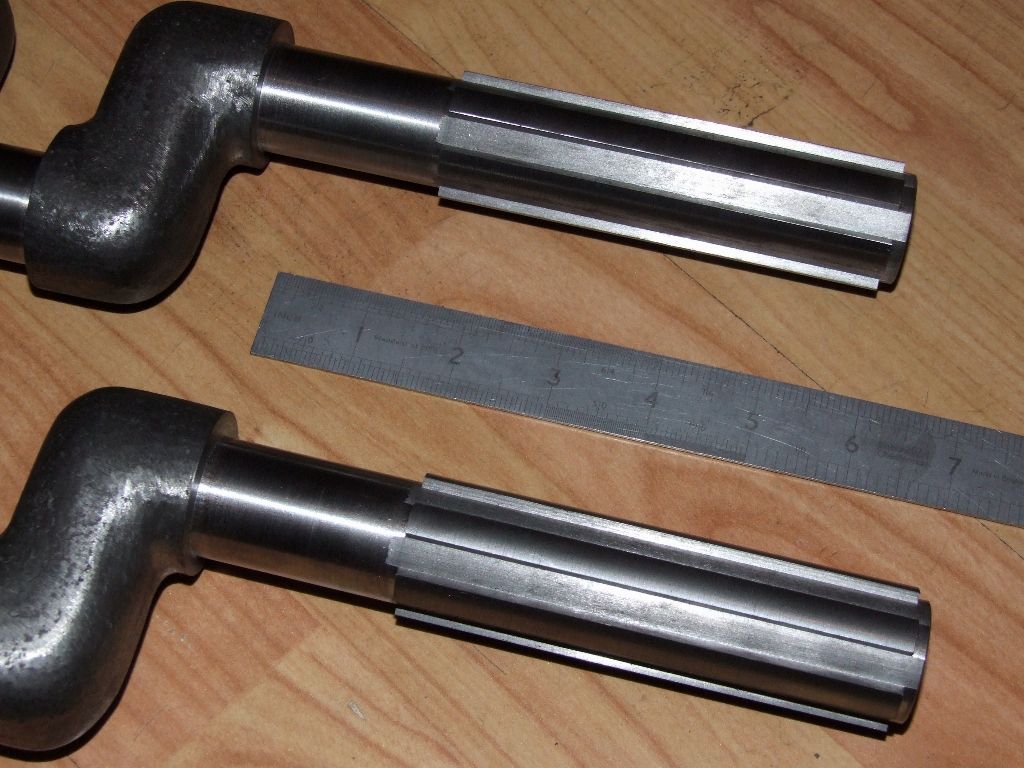
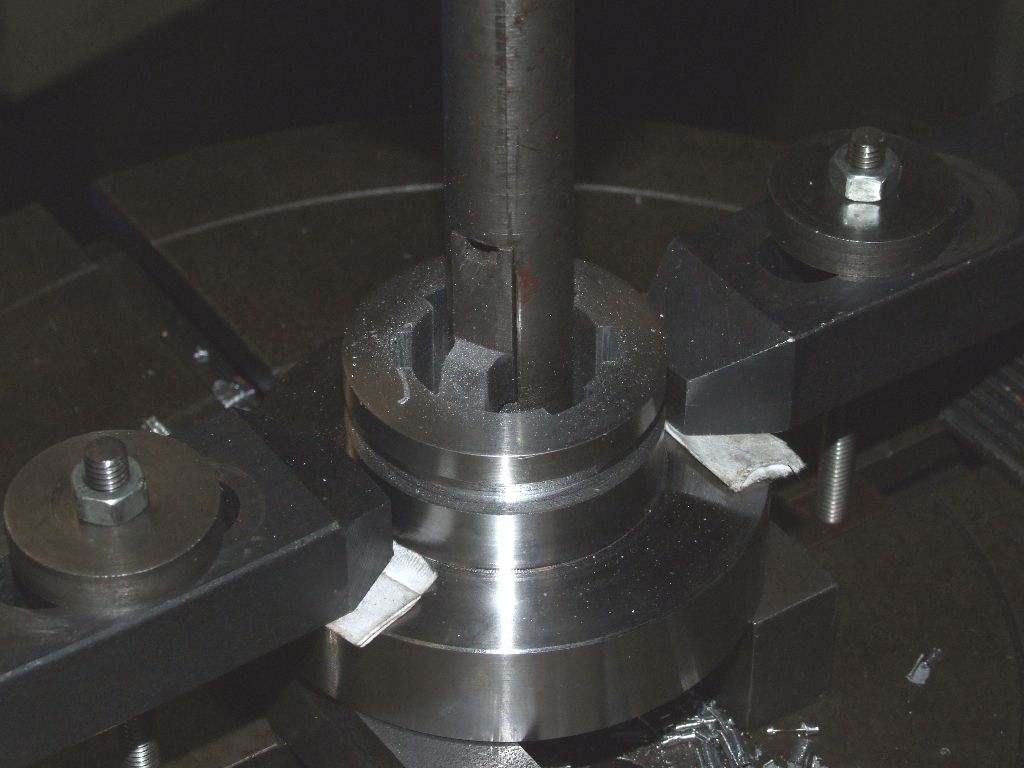
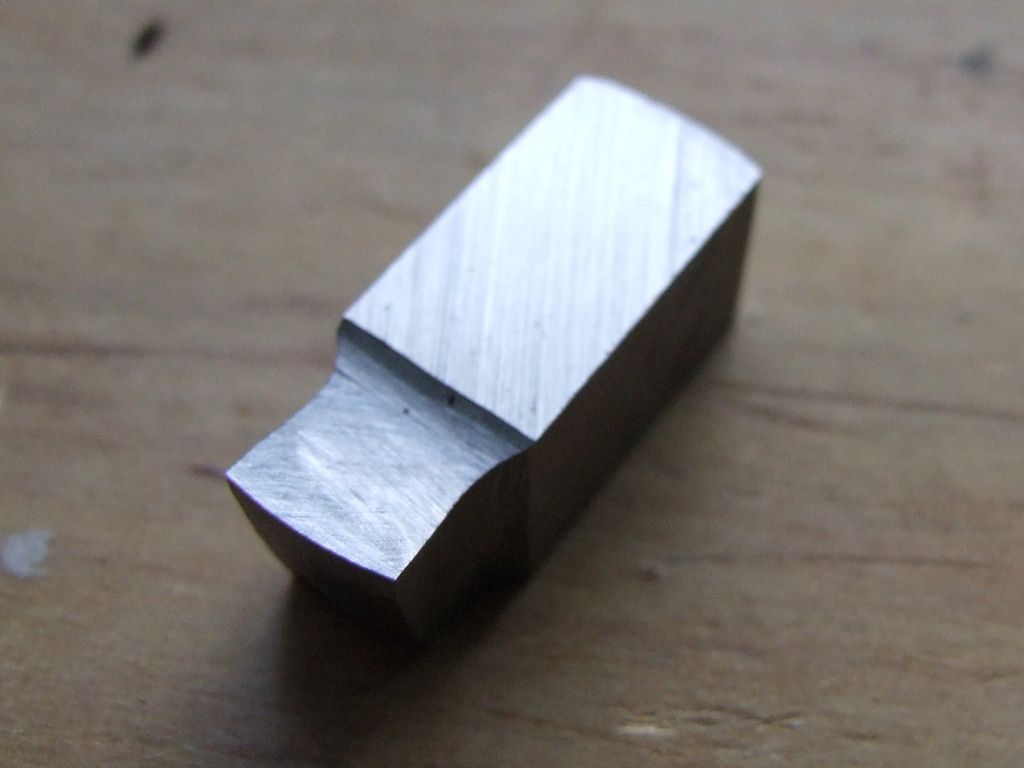
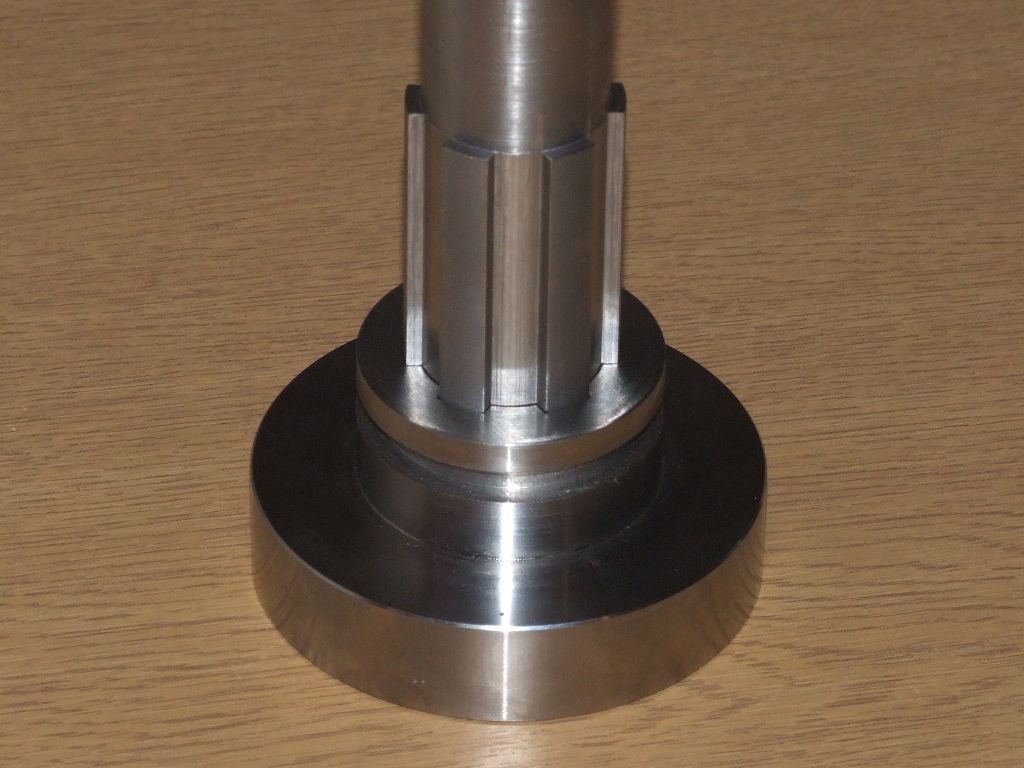
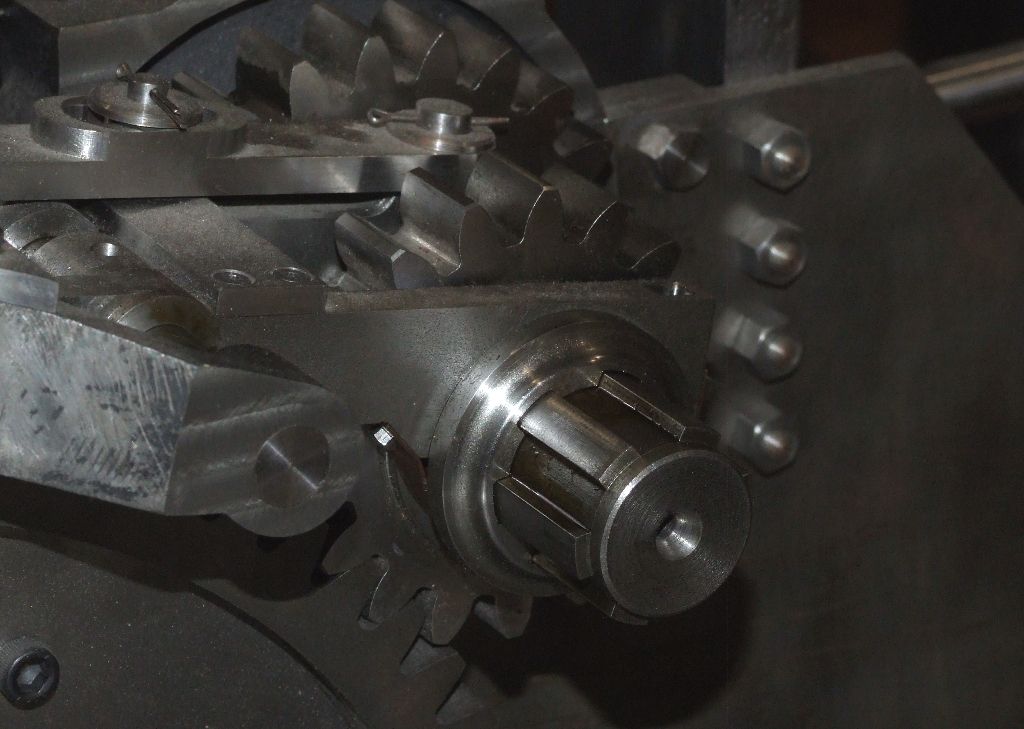
When it came to machining the 6-sided splines on my Burrell SCC crankshafts I considered the slot 'n' key method, or using an offset endmill to form the sides of the spines and then nibbling out the space in between the splines. Neither seemed satisfactory, or prototypical. It is possible to buy commercial spline cutters, but none were available in the size needed. So I designed and made my own, from gauge plate which was hardened and tempered: The splines were cut on a horizontal mill plus dividing head, the same setup as for gear cutting. Finished splines: The internal splines were cut using a HSS toolbit and a slotting head with rotary table: A length of HSS was ground on a cylindrical grinder to get the correct end radius (by measuring the diameter) and then cut in half and clearances added by hand: The internal HSS toolbit is a couple of thou under width so final fitting of the gears to the splines was done with files. I made a test piece on scrap bar, and a messed up gear blank, to check out the process beforehand: These are the finished splines, and outer gear: Note that there is clearance on the inner and outer diameters, so the splines drive purely on the sides. The gears fit in all six orientations, although the shake varies from nothing to a little in the different orientations. I made a few mistakes along the way. I didn't support the middle of the crankshaft when cutting the splines. Consequently the splines vary in width by a thou or two along their length. Each gear only works on half the spline length, so they are hand fitted to that length. The inner gear goes all the way along the splines, while the outer gear will only go half way down the spline. Originally i made a set of gears with a lot of inner clearance and with a straight ended slotting tool. But they didn't look right, so I binned them and made another set. In addition I hadn't got to grips with machining EN8 at the time, so the finish on the first set of gears was poor - another reason to recycle them. Andrew |
| Thread: Metric thread dimension wanted. |
| 31/07/2021 15:17:08 |
Posted by JasonB on 31/07/2021 14:28:25:
..........what would be the reason that Machinery's has it as 0.541 and Zeuz etc have it at 0.613mm? No idea. The ISO standard doesn't distinguish between internal and external thread depths. Clearance is achieved by a tolerance class which specifies the amount above, or below, a reference line for the internal and external threads. The thread depth is the same for internal and external, simply moved up, or down, a bit. I've got a set of Zeus tables but haven't used them in over 40 years because they don't explain where their numbers come from, or why, so I don't trust them. Andrew |
| 31/07/2021 14:15:54 |
All the information needed is in Machinery's Handbook. The theoretical depth of the full triangle (H) for a given pitch (P) is: H=0.866P aka H=sin(60)P By definition the thread depth of an ISO metric thread is: 0.625H or 0.541P So for a 1mm pitch thread the thread depth will be 0.541mm or 21.3 thou. Simples! Andrew |
Want the latest issue of Model Engineer or Model Engineers' Workshop? Use our magazine locator links to find your nearest stockist!
Sign up to our newsletter and get a free digital issue.
You can unsubscribe at anytime. View our privacy policy at www.mortons.co.uk/privacy
- *Oct 2023: FORUM MIGRATION TIMELINE*
05/10/2023 07:57:11 - Making ER11 collet chuck
05/10/2023 07:56:24 - What did you do today? 2023
05/10/2023 07:25:01 - Orrery
05/10/2023 06:00:41 - Wera hand-tools
05/10/2023 05:47:07 - New member
05/10/2023 04:40:11 - Problems with external pot on at1 vfd
05/10/2023 00:06:32 - Drain plug
04/10/2023 23:36:17 - digi phase converter for 10 machines.....
04/10/2023 23:13:48 - Winter Storage Of Locomotives
04/10/2023 21:02:11 - More Latest Posts...
- View All Topics
- Reeves** - Rebuilt Royal Scot by Martin Evans
by John Broughton
£300.00 - BRITANNIA 5" GAUGE James Perrier
by Jon Seabright 1
£2,500.00 - Drill Grinder - for restoration
by Nigel Graham 2
£0.00 - WARCO WM18 MILLING MACHINE
by Alex Chudley
£1,200.00 - MYFORD SUPER 7 LATHE
by Alex Chudley
£2,000.00 - More "For Sale" Ads...
- D1-3 backplate
by Michael Horley
Price Not Specified - fixed steady for a Colchester bantam mark1 800
by George Jervis
Price Not Specified - lbsc pansy
by JACK SIDEBOTHAM
Price Not Specified - Pratt Burnerd multifit chuck key.
by Tim Riome
Price Not Specified - BANDSAW BLADE WELDER
by HUGH
Price Not Specified - More "Wanted" Ads...
Do you want to contact the Model Engineer and Model Engineers' Workshop team?
You can contact us by phone, mail or email about the magazines including becoming a contributor, submitting reader's letters or making queries about articles. You can also get in touch about this website, advertising or other general issues.
Click THIS LINK for full contact details.
For subscription issues please see THIS LINK.
Model Engineer Magazine
- Percival Marshall
- M.E. History
- LittleLEC
- M.E. Clock
ME Workshop
- An Adcock
- & Shipley
- Horizontal
- Mill
Subscribe Now
- Great savings
- Delivered to your door
Pre-order your copy!
- Delivered to your doorstep!
- Free UK delivery!



 Register
 Log-in


