Member postings for Huub
Here is a list of all the postings Huub has made in our forums. Click on a thread name to jump to the thread.
| Thread: Thread Recutting? |
| 15/01/2023 14:42:02 |
There are a lot of thread cutting video's on YouTube. This will get you started. This thread has only a small (1 mm) pitch. To keep it "simple", you can cut this thread at a 0° infeed angle (top slide angle). To avoid overloading the lathe, you can do the cuts using cutting depths of 0.05 mm. For a self ground sharp tool (60° tip), you need a total cutting depth of 0.65 mm. If you find the thread to loose, you can make a new one and cut it a bit (0.05 mm) shallower. Success |
| 14/01/2023 21:40:04 |
Posted by old mart on 14/01/2023 18:02:58:
Can your lathe cut 1mm pitch threads? A bit of mild steel would do, and the centre bolt could be any thread which is strong enough, it doesn't have to be exactly the same as the original, just the tip has to fit the crankshaft without damaging it. Having a lathe, this is the way to do it. If you are new to thread cutting, it will take some time to learn but it is time very well spent. As a last resort, find some one near that will cut the thread for you, watch how (s)he does it and learn something new. Edited By Huub on 14/01/2023 21:40:53 |
| Thread: Steel to make a collet chuck |
| 12/01/2023 22:43:16 |
I have made several collet chucks and Hex holders from 42CrMo4, CK45 and mild steel. They all will last longer than the lathe (or me). I prefer making my own collet chucks because it is my hobby, it is cheaper and most of all, wen made on the lathe the chuck is used on, the runout can be far better then when buying a top quality chuck. |
| Thread: Quality end mill cutter that last long? |
| 12/01/2023 22:33:22 |
Posted by samuel heywood on 12/01/2023 22:08:38:
To extend end mill life i use the flutes for cutting whenever possible rather than the end. My mill is only a hobby one and i can't cut deep when doing steel. Most cutter wear is on the tip. I use HSS-M2 type cutters (the hardest HSS without Cobalt) and when they are dull, I will grind the tip (0.25 mm) to sharpen them again. Doing so, my HSS cutters last several years. For just flattening the workpiece, I use (some are self made) insert cutters (DCMT & CCMT). That works OK for me. Beware that the top layer of steel (hot rolled) is pretty hard and will ruin a HSS cutter fast. |
| Thread: what brushless motor for a peatol lathe |
| 06/01/2023 12:29:35 |
I have received the 57 mm motor, BLDC driver, controller and tested it using a 24V power supply. To setup the driver you need a USB to RS485 interface. It took me half a day to get things wired and running. The motor runs quit as expected. I can control the RPM between 400 and 3500 RPM and the RPM is stable under load. Below 400RPM, the motor doesn't start. I reduced the max current to 5A (50%) and still can drill a 6 mm hole in aluminium in one pass. I am going to use this 57 mm motor to drive my tool post drill and metal router. The PCB router will get the smaller 42 mm motor. For the routers I will replace the driver by a cheaper version and use a simple pot and switch to control the motor speed.
|
| Thread: Making gear cutters and gears |
| 03/01/2023 19:05:47 |
Posted by Alex du Pre on 03/01/2023 17:10:41:
Huub, thank you so much for checking and confirming my suspicions that the 20 degree table on page 114 of Ivan’s book appears incorrect. Interesting that the 30 deg table is correct, I wonder how the error crept in. I made some 0.75 MOD gears about 15 years ago, using button tools that I assume were based on the 20 degree table (can’t quite remember). They did seem to work ok but maybe because I machined a bit of extra clearance for good luck. I made a Eureka tool at the time which worked ok but was slightly out of tolerance; I am going to remake its main spindle part. I am looking to make some 0.6 MOD button cutters. The button sizes are really tiny for the gears with few teeth, so I may end up making the gears with 25 or more teeth and buying the smaller ones. Thank you again. A T15 M0.6 gear cutter has a 0.65 mm tip. That requires some precision but I think making a fly cutter using the mill and a vice or CNC lathe is still doable. To compensate for the low rigidity of my mill, I cut the gears 0.1 mm deeper than required. A rotary table can also be used for making a fly cutter. Rotating the cutter 180° to mill the actual cutting edges is a bit more accurate then using the vice. |
| 03/01/2023 15:36:03 |
I have checked the results using the formula's of MikesWorkshop. I find exactly the same results as in his table so I probably used, at least part of, his formula's. The 30° table in the book of Ivan Law is OK. |
| 03/01/2023 11:44:12 |
Posted by Alex du Pre on 03/01/2023 08:43:08:
Huub, thanks from me also for the video and spreadsheet. I have a question - are the button tool calc tables on p114 of Ivan Law's book correct (Gears and Gear Cutting book)? Ivan's tables do not agree with the results of Huub's spreadsheet or my own calculations from playing with CAD. My calcs agree with Huub's! Ivan's tables give button diameters/separations about 50% bigger. Ivan's tables also don't appear to match the results I would expect using his figure on p113. To get from Ivan's figures to the values you want, you have to divide his figs by the diametral pitch of the gear required. If using Module gears rather than DP, 25.4/MOD = the DP value. e.g. 0.75 MOD = 33.87 DP. I'd be very grateful if anyone can confirm, or otherwise, the accuracy of Ivan's tables! Thank you! My book of Ivan Law is the reprinted version of 2013. On page 107 if have made a note for the bevel gear calculation to use cos not sin On page 113 if have made a calculation note: Button Diameter = sin (pressure angle) x PDM (Pich Diameter in mm) The table on page 114 is made for 1 DP gears 20°. Divide the value in the table by de DP of the gear to cut. According to this table, a T17 20DP 20° gear would need a button diameter of 0.39" and a button separation of 0.435". I can confirm there is a difference in the results of the spreadsheet and the table in the book. I will check the results using the formula's of MikesWorkShop and will report it later this day.
|
| Thread: Parallelism of carriage to spindle. Taper. |
| 30/12/2022 14:15:25 |
Posted by SillyOldDuffer on 30/12/2022 14:02:40:
If the cause is a twisted bed, simply fixed by shimming the feet, it's a bad mistake to take the headstock off and attack the bed with a Dremel! By no means I mean you should use a Dremel. If mean use a Dremel diamond disk and do it by hand. Keep the Dremel in the Box. |
| 30/12/2022 13:29:45 |
Posted by Cedric Blaver on 30/12/2022 09:10:06:
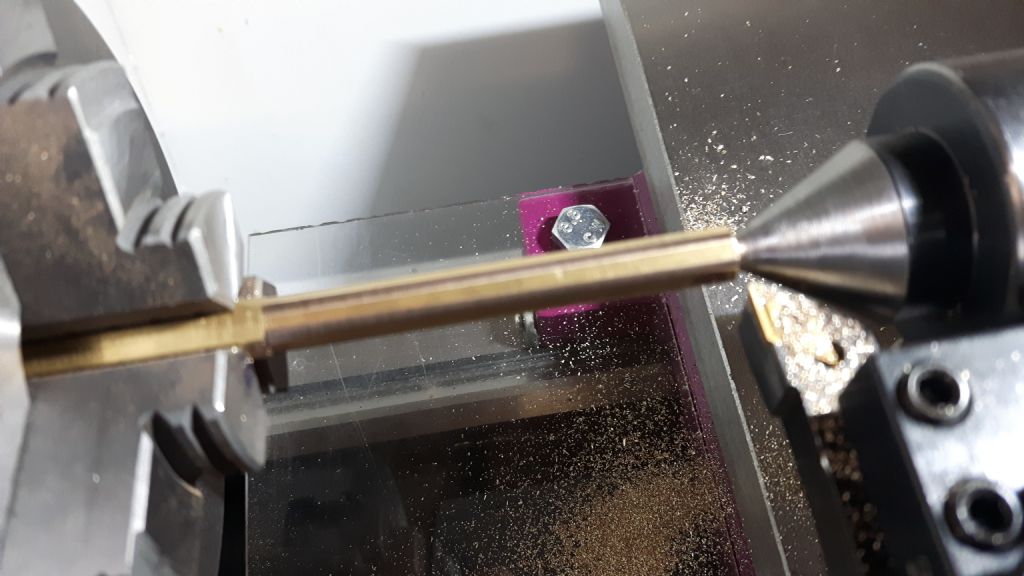
Chuck dist =21.830mm radius =10.915 End dist =21.845mm radius =10.923 Zeroing the dial gauge at the END and rotating the gauge flickers between 0 and 0.01 Then traming down to the chuck end I get a runout of minus 0.10mm. Please see attached photo of a length of 6mm hex bar. 
I assume you did not use the tail stock to turn the 22 mm test bar because that would make the results dependent of the alignment of the tail stock Correct me if I am wrong your measurements Rotation of the headstock as seen from above:
If have checked an online Optimum TU2406 manual but did not find bolts to adjust the headstock. This means that you have to grind/file/sand/scrape the bottom of the headstock to make adjustments. I used a 20 mm worn diamond dremel disk to adjust the headstock of my small lathe. Adjusting takes about half a day. To do that, you have to dismantle the lathe so you can reach the bottom of the headstock. That takes a bout a day. In short the procedure I followed using the diamond disk and grounded manually:
If you grind the flat surface and both the angled surfaces on the front side, the headstock will bend over and you can adjust a vertical misalignment. You grind away the top spots. To find a top spot, you mark the bed with a black pentel pen, place the headstock on the bed and move it from left to right and back, 2 mm, a couple of times. The black ink on the headstock indicates the top spot. You will find "scratches" on the lathe bed at the same place. I used the "same procedure" to correct the misalignment of the tail stock from my bigger lathe. You can measure the vertical alignment of the headstock by placing the dial on top of the headstock. Before you do this, you better consult the seller of the machine. In the netherlands, Optimum has a far better reputation than HBM (my lathe brand).
|
| 28/12/2022 15:51:54 |
According to some foto's I have found, this small lathe can't be bolted to the table. That won't mean the lathe bed can't be twisted (due to inaccurate grinding or metal relaxation). You found a facing misalignment of 0.03 mm/100 mm. Causing a taper towards the chuck that can explain the turned taper. The facing misalignment the sum of the headstock misalignment and the carriage misalignment. The next step will be measuring the "headstock alignment" using the method in the first video.
Edited By Huub on 28/12/2022 15:52:20 Edited By Huub on 28/12/2022 15:57:54 |
| 28/12/2022 10:18:14 |
Posted by Chris Mate on 28/12/2022 00:38:35:
Greetings to all... This is how I test "facing alignment" video Edited By Huub on 28/12/2022 10:19:32 |
| 27/12/2022 22:36:48 |
The tool maybe not at centre height. If you have bolted the lathe to the floor or table, you may have twisted the bed. You could loosen the bolts to see if the problems reduces. I have made a video explaining how to measure your headstock alignment: |
| Thread: Finding Centre Height |
| 19/12/2022 22:24:30 |
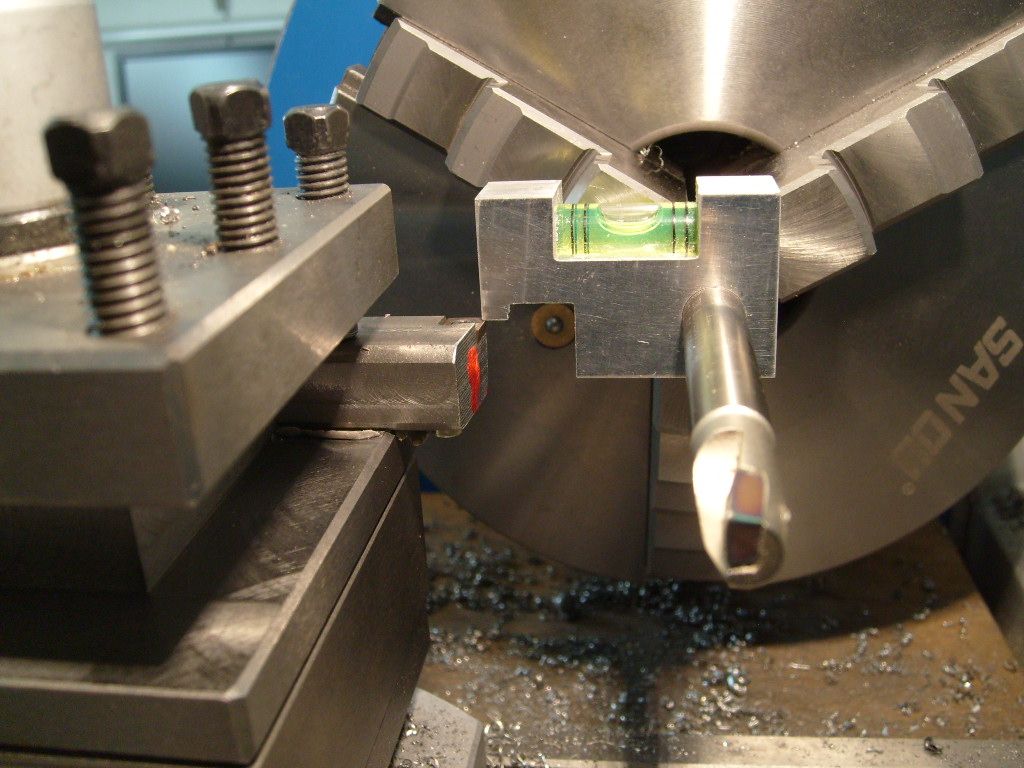
I use a level for setting/checking. That gives a centre height within 0.1 mm. After that, I face a bar and check the pip is turned, not broken off. My level: |
| Thread: Dividing head |
| 04/12/2022 22:03:54 |
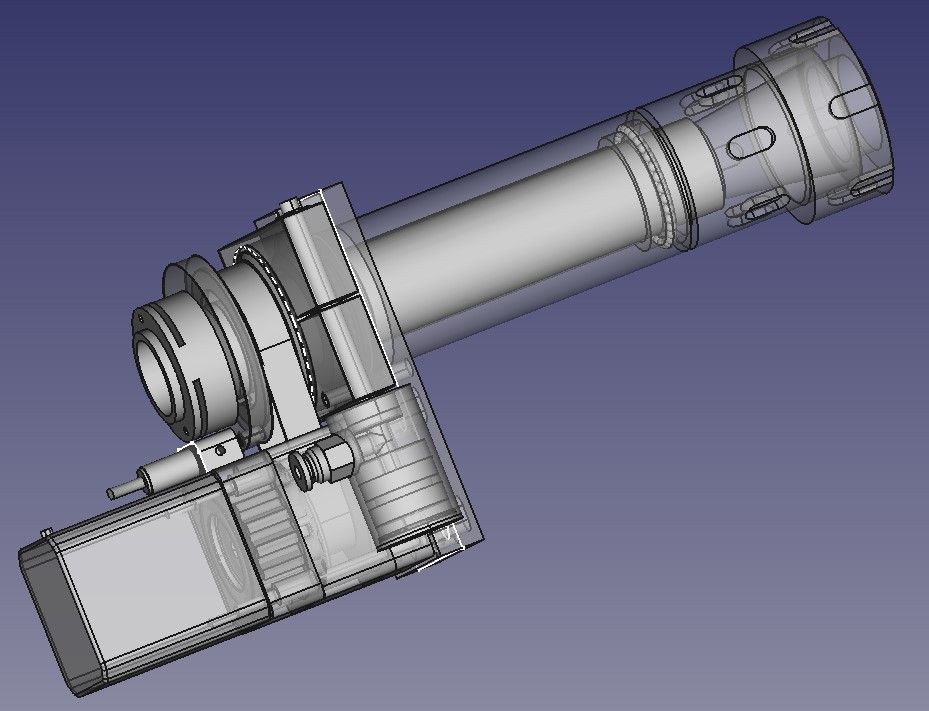
I have a 80 mm Saba rotary table. It was cheap (€ 60,--) and a peace of junk but I have used it for many years. I use the rotary table mainly for milling gears and hex nuts. I build one (40 mm) that fits in my vice so it is ready to use in seconds. It is controlled by a Nema17 stepper (1:30 gear ratio) and locked pneumatically. I used 3 mm balls to make 45° contact angle bearings so the spindle is free of play. I fitted an ER32 collet holder for clamping 20 mm bars. The runout measured at the collet taper is 0.015 mm. Once it is ready (documentation and video) I will publish a video and the (freecad) drawings. I estimate it will take about 40 hours to make one.
|
| Thread: Yet another mini lathe question |
| 03/12/2022 21:40:03 |
Posted by Nicholas Farr on 03/12/2022 21:04:47:
you shouldn't let a bundle persuade you unless it contains what you are actually looking for. Look at the machine specs first to see which one is the most likely one to fill your needs.
I agree with the above. Keep in mind, whatever you choose, it is always a compromise. Pick the one that will do most of your jobs with "little effort". There will always jobs that are hard to do and some that can't be done on the lathe of your choice. |
| Thread: Unlocking a Lock Washer |
| 17/11/2022 22:14:11 |
That "washer" isn't meant to be taken out. The outer top ring is probably pressed in. Maybe an inner bearing puller could pull it out. It looks like a "Star Lock Washer".
Edited By Huub on 17/11/2022 22:14:35 |
| Thread: Drilling straight |
| 08/11/2022 22:35:32 |
If you are using a mill, then check if the mill quill is square to the table. You can do this by placing an indicator in the chuck and measure a square object. A 1,2,3 block or an angle block. Measure on both sides (X and Y). edit: Checkout this video: https://www.youtube.com/watch?v=asmH4HjZLRY
Edited By Huub on 08/11/2022 22:45:58 Edited By Huub on 08/11/2022 22:48:12 |
| Thread: what brushless motor for a peatol lathe |
| 07/11/2022 18:59:47 |
I am not going to order the BLDC motor and controller now because there is not German stock and I can't estimate the VAT and other cost when shipping from China.
I have a servo motor ( Lichuan A4 600W as second motor) on my bigger lathe for driving the spindle in position mode (gear cutting, radial drilling, etc). For driving a lathe spindle you could also use this Servo motor Edited By Huub on 07/11/2022 19:01:41 Edited By Huub on 07/11/2022 19:02:02 |
| 06/11/2022 16:43:27 |
The stepper online driver comes with a manual and supports RS485 communication. That is something that could be handy. I am going to order the Stepper Online driver and the Nema17 BLDC 6.4A 0.25 Nm motor. They also have a Nema23 motor ( 57BLR90-24-01) that provides 0.6 Nm torque but also requires a 14A driver.
|
Want the latest issue of Model Engineer or Model Engineers' Workshop? Use our magazine locator links to find your nearest stockist!
Sign up to our newsletter and get a free digital issue.
You can unsubscribe at anytime. View our privacy policy at www.mortons.co.uk/privacy
- hemingway ball turner
04/07/2025 14:40:26 - *Oct 2023: FORUM MIGRATION TIMELINE*
05/10/2023 07:57:11 - Making ER11 collet chuck
05/10/2023 07:56:24 - What did you do today? 2023
05/10/2023 07:25:01 - Orrery
05/10/2023 06:00:41 - Wera hand-tools
05/10/2023 05:47:07 - New member
05/10/2023 04:40:11 - Problems with external pot on at1 vfd
05/10/2023 00:06:32 - Drain plug
04/10/2023 23:36:17 - digi phase converter for 10 machines.....
04/10/2023 23:13:48 - More Latest Posts...
- View All Topics
- Reeves** - Rebuilt Royal Scot by Martin Evans
by John Broughton
£300.00 - BRITANNIA 5" GAUGE James Perrier
by Jon Seabright 1
£2,500.00 - Drill Grinder - for restoration
by Nigel Graham 2
£0.00 - WARCO WM18 MILLING MACHINE
by Alex Chudley
£1,200.00 - MYFORD SUPER 7 LATHE
by Alex Chudley
£2,000.00 - More "For Sale" Ads...
- D1-3 backplate
by Michael Horley
Price Not Specified - fixed steady for a Colchester bantam mark1 800
by George Jervis
Price Not Specified - lbsc pansy
by JACK SIDEBOTHAM
Price Not Specified - Pratt Burnerd multifit chuck key.
by Tim Riome
Price Not Specified - BANDSAW BLADE WELDER
by HUGH
Price Not Specified - More "Wanted" Ads...
Do you want to contact the Model Engineer and Model Engineers' Workshop team?
You can contact us by phone, mail or email about the magazines including becoming a contributor, submitting reader's letters or making queries about articles. You can also get in touch about this website, advertising or other general issues.
Click THIS LINK for full contact details.
For subscription issues please see THIS LINK.
Model Engineer Magazine
- Percival Marshall
- M.E. History
- LittleLEC
- M.E. Clock
ME Workshop
- An Adcock
- & Shipley
- Horizontal
- Mill
Subscribe Now
- Great savings
- Delivered to your door
Pre-order your copy!
- Delivered to your doorstep!
- Free UK delivery!


 Register
 Log-in


