Member postings for Dr_GMJN
Here is a list of all the postings Dr_GMJN has made in our forums. Click on a thread name to jump to the thread.
| Thread: Ball Nose End Mill / 10V Bearings Question |
| 14/05/2020 19:37:23 |
Posted by SillyOldDuffer on 14/05/2020 15:26:29:
Posted by Dr_GMJN on 14/05/2020 14:37:18:
Posted by SillyOldDuffer on 14/05/2020 14:09:07:
I'd expect a Ball Nose nose cutter to be round too! Just in case it's an operator or set-up problem can we have a picture of the cutter to confirm it isn't round please? Good tools produce odd shapes if the work or machine moves during the cut. Don't ask how I know!!!
Dave
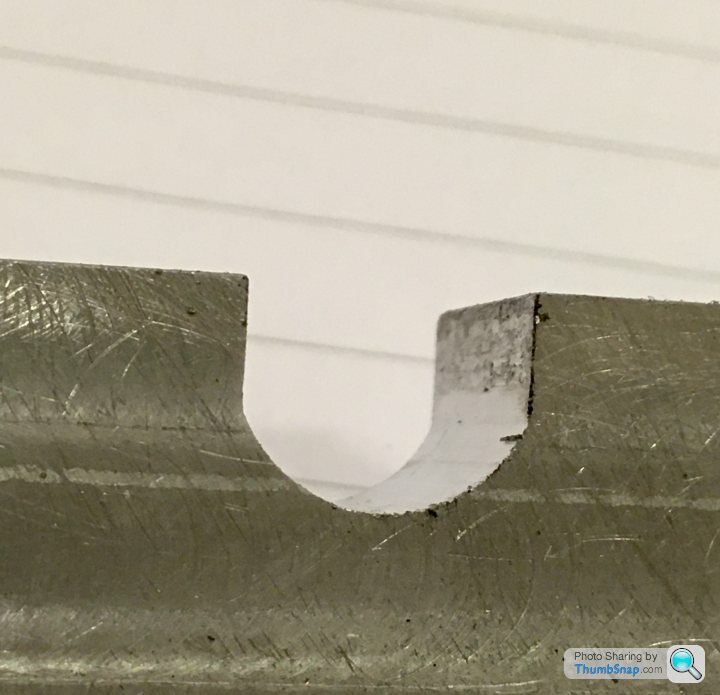
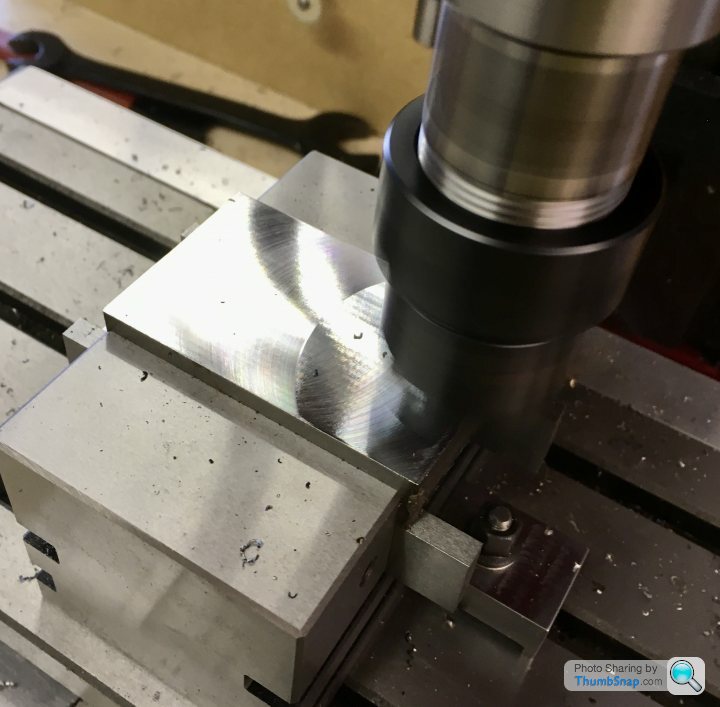
I'll try to get a decent picture, but with all the vibration and cack-handedness in the world, I doubt I could have ever got a non-tangential slot edge from a tangentially edged cutter? True, but it's best not to assume anything. For example in this photo, the rounded part of the slot doesn't look symmetrical to me. What would cause that?
Could be a camera artefact. If not, even if a ball-nosed cutter isn't round, it should cut equally both sides, provided everything is rigid and straight. But in the real-world, perfect rigidity is hard to achieve especially on a small hobby mill. Slightly odd shaped slots will be cut if anything moves even slightly, and this might happen in this example because one side (I think!) is conventional milled while the other is climb milled. One side of the cutter experiences more force than the other. It might be enough to move the work in the vice. Or, if the quill is fully extended (which maximises leverage), or the gibs are loose, the cutter may move off track or bend. Just a suggestion, your problem might well be the tool. But when I started cutting metal I unfairly blamed lots of problems on my tools. Then I found my junk box was full of poor materials. Once I got a feel for my machines cutting decent metal, it turned out most of my difficulties were, ahem, me! Now I rarely break taps. Drills, cutters and saws last longer, holes are straight, finish better, and I get accurate results faster with fewer mistakes. In the early stages I found having to think about absolutely everything made it hard to see the wood for the trees. It was only after I got enough experience to subconsciously do stuff like locking slides that my tools suddenly turned out to work rather well! Some talented people learn faster than others and seem to have a natural feel for tools from day one. I'm not one of them, and have probably made every mistake in the book! It's useful to pin down causes where possible. If the ball-nosed cutter is innocent, waste of money replacing it. And if it's a work-holding problem, or operator error, they can be corrected next time. Dave Edited By SillyOldDuffer on 14/05/2020 15:31:33 Thanks Dave. I think in the image, the brass casting is displaced to the left slightly, and the depth of the slot is such that the radius wouldn't be concentric even if the brass was central. In other words the slot isn't quite deep enough. There's no doubt though that there isn't a smooth transition from flank to radius - at least on the resulting cut in aluminium. I'll try it on some other material if I get chance. |
| Thread: SX2P Mill - Birds Nest? |
| 14/05/2020 19:31:39 |
Posted by JasonB on 14/05/2020 19:07:37:
Good to know it was just something simple, I thought contacting ARC would be best as they know the machines better than most and now what to look for. I actually thought it may have been a fan or tacho sensor come loose and that was still spinning after the spindle had stopped. Thanks Jason. I would have taken the top end to bits myself, but since I had nothing but an exploded diagram I didn't want to do anything stupid. It was always going to be something loose or a duff bearing. |
| Thread: Ball Nose End Mill / 10V Bearings Question |
| 14/05/2020 19:01:03 |
I spoke to Ketan this afternoon about the cutter, and he assured me it was the correct geometry. I might do a quick test on a differnent material later on, but since I should have ordered something smaller it doesn't really matter that much. |
| Thread: SX2P Mill - Birds Nest? |
| 14/05/2020 18:56:26 |
So Ketan from ARC gave me a call this afternoon, and we quickly sorted the issue. On removing the motor (to test it for noise), it became obvious what the problem was: the countersunlk pulley retaining screw had loosened, allowing the thick washer behind it to spin freely. This was making the dry bearing type noise after the spindle had stopped, and intermittently when running. The other, more worrying noise, was probably casued by the screw head contacting the top casing and making a squealing noise. It was also intermittent because on contact with the case, it partially screwed itself back up into the shaft, out of contact, until vibration caused it to run back down. 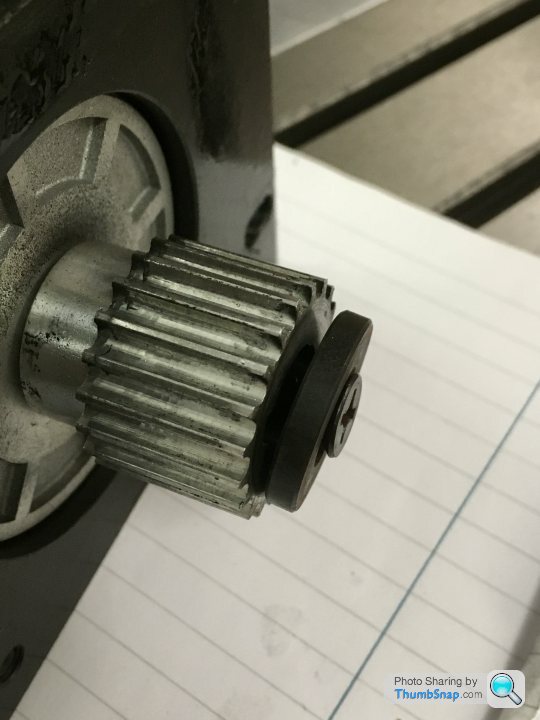 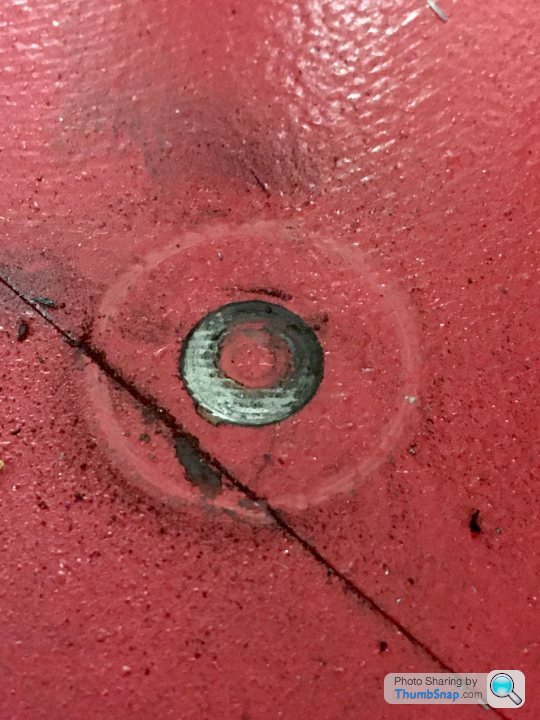 Removal of the top casing showed no excessive dust from the belt, or swarf, and the spindle turned freely. So it's now back in one piece (with some Loctite) and running quietly again. Thanks Ketan! |
| Thread: Setting up a Mini Mill & Stuart 10V Machining |
| 14/05/2020 16:05:04 |
Posted by Martin Connelly on 14/05/2020 12:45:11:
You need to have the quill locked and the spindle bearings properly adjusted to make these type of cuts. The head should be as low as possible with minimal quill extension. Martin C Thanks Martin, but there is no quill extension to lock on the SX2P. As I said, the head (z-axis) was locked, as was the x-axis. I was using an ER25/R8 collet chuck, with the cutter inserted as far as possible. The workpiece was in a vice, so head height was also minimised. Spindle bearings? No idea. There is no discernable play in the spindle, but I think there could be an issue with them judging by the noises now coming from that area. Something tells me it's not that though. It's not rough, but I think rather some plastic part is rubbing somewhere. I can't find any strip-down guides to the SX2P, but I'm sure it's not rocket science. Since it's only been used a few times, I've contacted ARC, so we'll see what they say. |
| Thread: Ball Nose End Mill / 10V Bearings Question |
| 14/05/2020 14:50:33 |
Posted by not done it yet on 14/05/2020 14:45:14:
Is there not a discernible difference between a “bull nose end mill” and a “ball end mill”? Maybe the terminology was too subtle? Sometimes, maybe, it pays to be a pedant? I think a Bull Nose has a flat end with radiussed corners? I ordered a Ball Nose, and that's what I was sent according to the box - I assume I ordered the right thing? Either way, surely the end radii should be tangential to the face and flank? |
| Thread: SX2P Mill - Birds Nest? |
| 14/05/2020 14:39:40 |
I've emailed ARC and attached a couple of video clips so we will see what they say. I suspect it's a bearing, or something that's fallen off a bearing such as a sealing ring. It's certainly not right though. |
| Thread: Ball Nose End Mill / 10V Bearings Question |
| 14/05/2020 14:37:18 |
Posted by SillyOldDuffer on 14/05/2020 14:09:07:
I'd expect a Ball Nose nose cutter to be round too! Just in case it's an operator or set-up problem can we have a picture of the cutter to confirm it isn't round please? Good tools produce odd shapes if the work or machine moves during the cut. Don't ask how I know!!!
Dave
I'll try to get a decent picture, but with all the vibration and cack-handedness in the world, I doubt I could have ever got a non-tangential slot edge from a tangentially edged cutter? |
| 14/05/2020 14:35:33 |
Posted by Mick B1 on 14/05/2020 13:59:52:
Posted by Tony Pratt 1 on 14/05/2020 08:08:30:
Decent quality ball nosed cutters will have the correct radius on the end. Tony +1 for this. I don't think I've ever seen one with a radius as far out as the one in your picture. Its box calls it a ball nose, which plainly ought to mean a full hemispherical rad. A thou or so out of round on the rad is one thing, but yours is clearly not what it's supposed to be. I'm surprised, because when I bought from Arc they took real care to make sure the goods were right. The alternative ops described above are fine - I did my 10V so long ago I can no longer remember how I did those slots, though if I'd used a 7/16" ballnose I'd still have it. - but you should be able to use your ballnose for the legitimate purpose of cutting a slot with that radius at the bottom. I'd ask for an exchange or refund. My assumption too. In fact even if it was correct, the brass insert isn't 7/16", it's smaller, so the fit would have been sloppy anyway. I should have checked before buying. Anyway, I'm glad I did a test on scrap - my casting is intact...for now. |
| 14/05/2020 14:33:55 |
Posted by JasonB on 14/05/2020 13:30:18:
Did you say you had bought a 10mm, if so hold base flat and mill down the middle and then work outwards taking equal amounts off each side until the brass bearing is a snug fir and then file out the bottom until the two wings sit snugly down. It's a simple filing job and good for getting your hand in before you get to the more critical and visual things that need to be filed. This is mine done in my teens.
Edited By JasonB on 14/05/2020 13:30:28 No, it was 7/16" as per the drawing. The brass is slightly smaller (should have checked I guess) and would approximate with slight clearance to 11mm diameter. As noted, the critical dimension is probably from the machined sole plate top, to the bearing axis. Some clearance at the base of the radius might be beneficial. |
| Thread: Stuart 10V Build Log - Complete Beginner... |
| 14/05/2020 14:29:51 |
Posted by JasonB on 14/05/2020 07:01:01:
It is not a critical height so they don't give it, holes best placed to look right, best drawings I have seen on this type of thing had "COB" on the which equates to Centre on boss. Back in the day when this was likely to have been filed to finish you did not want to file more than needed. Good job you went at it with crabide, that bright shiny edge to the underside is where the casting has some chill (hard) as the edge/corners have cooled quickly, there there is more mass in the mounting lugs it has cooled slower so you have got the matt (soft) finish Leave the 4 holes in the top until you have done the base and then drill them to match. Edited By JasonB on 14/05/2020 07:02:01 Jason, My plan was to align the sole plate centrally - by eye - on the box bed - after all I want as equal gaps as possible all around, and I assume doing this by eye on castings like these is as good as any other method? I might put a few spots of pva on the joint so I can move them around together for aligning the sole plate on the mill table. I'll confirm I've got a best fit in x & y by putting a pointer in the chuck and moving it along the casting edges and bearing features, then center it to 0,0 in the middle of the piece using the DRO's. Then I can take co-ordinates for drilling the corner holes. Then clamp together and drill the 7BA tapping holes straight through both parts. Then open up the sole plate holes only to 7BA clearance, and spot-face. I'll use the head vertical hard stop to make sure there are no screw ups with depth. Then remove the base and tap the box bed. I think I may need to displace the holes outwards slightly to get a clean spot face, but If I note the drilling co-ordinates from the DRO's it shouldn't be an issue. Cheers.
|
| Thread: SX2P Mill - Birds Nest? |
| 14/05/2020 12:38:07 |
Posted by Pete. on 14/05/2020 00:21:02:
Did you post a picture of your mill in another thread? If it is that one, it looks almost new, I'd strip it to investigate before buying any parts. Yes I did, it's brand new pretty much. I'll end up stripping it, but will email ARC first with a video and see what they say. I'm not sending it back - way too much hassle, plus I've modded it with DRO's etc. Cheers. |
| 14/05/2020 12:36:43 |
Posted by Pete. on 13/05/2020 23:51:01:
What kind of lube did you use? Where abouts did you squirt it? I had one of the original x2's and don't remember oiling points on the spindle? Is it still under warranty? Teflon spray squirted into the bearing pockets. I realise the bearings are sealed, but it sounds like something else spinning around on the shaft. I was hoping some of the spray might find its way into the head and at least change the noise. |
| 14/05/2020 12:34:45 |
Posted by Paul Lousick on 14/05/2020 00:06:51:
If it is made like an SX3, the spindle bearings are sealed and does not have a lube point and you may need to replace the bearings if there is a problem. Link to arcurotrade web site showing dismantling procedure: **LINK** Paul. Thanks Paul, it's different from the SX3. |
| Thread: Ball Nose End Mill / 10V Bearings Question |
| 14/05/2020 12:33:27 |
Thanks All. JasonB - I think I ordered the cutters before I'd appeciated the different grades. Certainly before ordering the carbide inserts form Cutwel. I think an 11mm diameter slot drill would be a good size for the brass. I like the idea of plunging the cutter from the top (slot drill?), or incrementing it in from the side. Cheers.
|
| Thread: SX2P Mill - Birds Nest? |
| 13/05/2020 23:32:54 |
So the more I use the SX2P, the more I'm getting used to its foibles. This evening though, it started chirping. Like a bird. It's coming from the spindle I think. It sounds almost like hard plastic catching on metal. Also, when I switch the power off, there's a strange noise after the over-run, like a dry ball race when you spin it (even though the spindle itself is stopped). I tried squirting some lube in the top and bottom, but it had no effect. I'm kind of reluctant to start stripping the head, because I'm already spending more time on chasing various issues than machining parts. Has anyone else noticed this on an SX2P, or have an idea of what it might be? Thanks. |
| Thread: Setting up a Mini Mill & Stuart 10V Machining |
| 13/05/2020 23:22:27 |
Posted by Dr_GMJN on 12/05/2020 13:22:37:
Posted by Ron Laden on 12/05/2020 05:37:54:
This morning just as a quick test I put up a piece of 8mm gauge plate on my SX2P and tried a 0.5 mm deep edge cut using a 10 mm 3 flute HSS TIAIN cutter from the ARC premium range. No issues at all the mill sounded and felt fine which is something I always go by. I went with 1250 rpm and a steady not too fast feed. I tried it at slower speeds but it was best at 1250. A picture below of the finish which I can't detect with my finger nail so good enough I think. p. s. I forgot to say going by the hanwheels my machine has 0.2 mm backlash which never gives me any problems and with the DRO, s I am lazy and tend to ignore it. Also I sometimes climb mill for a better finish but nothing too heavy. I guess I really should try to reduce the backlash before it catches me out.
Edited By Ron Laden on 12/05/2020 05:58:51 Edited By Ron Laden on 12/05/2020 05:59:52 Thanks Ron. Looks good. I'll do some further tests when I get my new end mills. They've not arrived yet. So I got the new end mills from ARC today. Again, face milling is fine, but there's no way side milling is right. even a 0.1mm cut in 15mm thick steel is hopeless - noise, vibration, terrible surface finish. I tried it again with a Sandvik cutter, and it's the same. I'm wondering if it's the material I'm trying to cut. Pretty sure it's mild steel - I've made 4 vice clamps now, with no real issues with fly cutting, face milling or drilling. As soon as I switch to side milling, there's just no way it's having it. All axes are locked apart from, in this case, y. Tried changind speeds and feed rates, to no avail. Thanks. |
| Thread: Ball Nose End Mill / 10V Bearings Question |
| 13/05/2020 23:14:26 |
I just started building the Stuart 10V, and I bought a 7/16" (0.4375" Apart from "so use a file" - any comments on the best way of doing this? I'd like to use the mill seeing as I've got it, and assumed a 7/16" Ball Nose cutter would have at least given me the right shape. Second question on the bearings: my plan is to machine them from the brass casting in the lathe, drill out until I can use a reamer, then fit them to the sole plate, aligning them with a suitable dowel (maybe the appropriate drill bit). Then mount on an angle plate on the mill, align with the drill again, and ream them both at the same time. Is this a sound method? Thanks! |
| Thread: Stuart 10V Build Log - Complete Beginner... |
| 13/05/2020 23:04:48 |
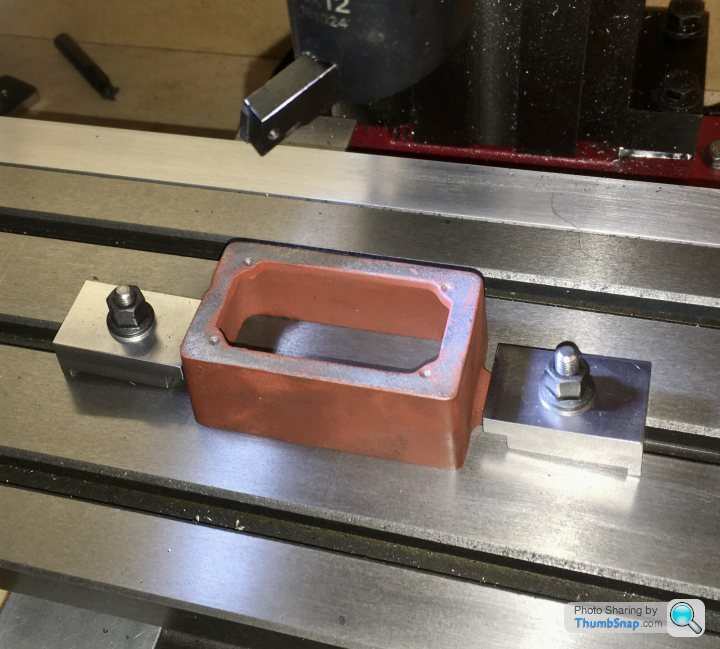
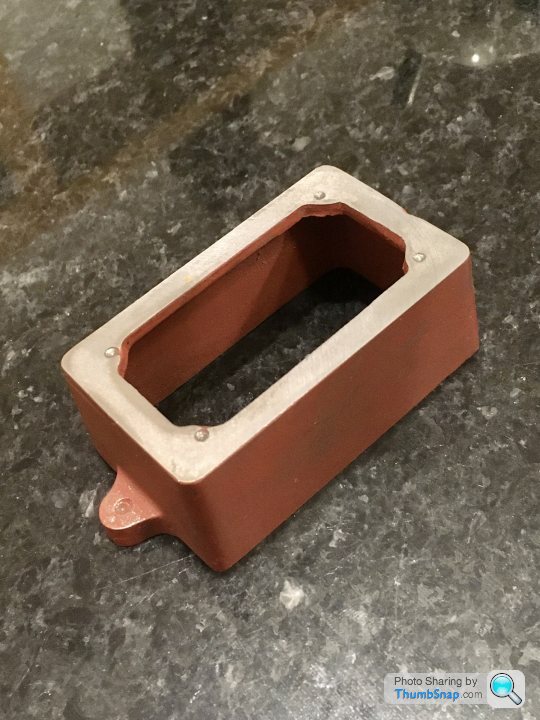
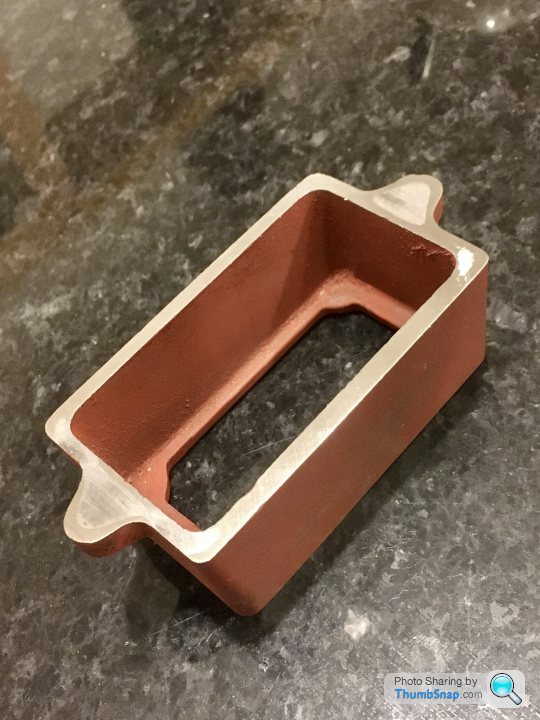
Finally took the plunge and machined my first casting. Nothing spectacular, but it feels like a big step for me. I opted to use the fly cutter with an insert for cast iron, mainly because it's by far the best method I've used for getting a good finish. I used my fixture plate for one side, and the remaining two vice clamps (finished this evening) for the other. There's no height specified on the drawing, so I just did the mimimum clean-up. I think the different colours through the wall must be something to do with how the metal cooled: |
| Thread: Carbide Insert Designations & Suppliers |
| 12/05/2020 22:09:07 |
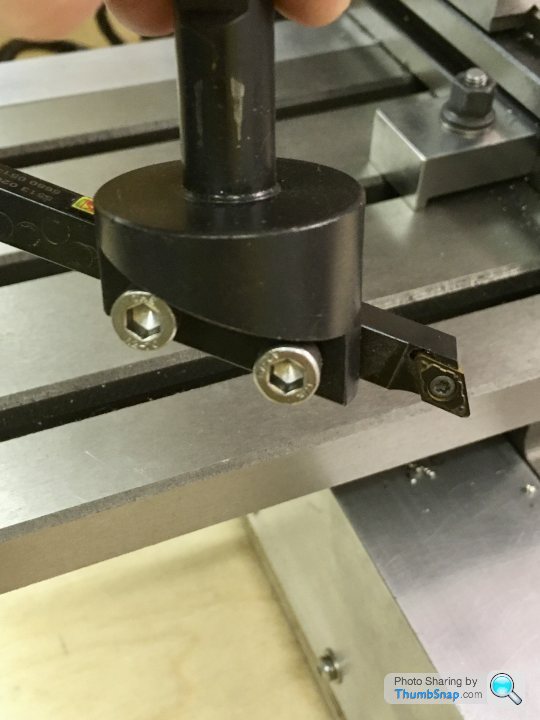
I should have posted this here I guess, just to say what I did as a result of the advice given (it's also in another thread). I got a selection of 4 types of insert from Cutwel. Ordered 16:30 yesterday, arrived this morning. DCMT, DCGT, 0.2mm and 0.8mm nose radius, some for cast iron, some for non-ferrous and others for steel. There was an online chat thing, so I was able to confirm I was getting the best inserts for my tools and what I wanted to do: So the small fly cutter holder arrived today. I put my Sandvik 8mm left hand tool holder in it, fitted with a DCMT 070208 insert for steel, and had a go at fly cutting for the first time. Must say I was really happy with the results, finally a bit of progress. Workpiece was the same mild steel I've been using for the vice clamps. I went up to 0.5 mm cut depth with no issues. As an addendum to this, I'm a bit unsure as to feed rates and spindle speeds. Pretty much everything within reason worked without any complaint from the machine. I got the impression I might have been running at too high an rpm though, becasue the chips appear to be blued by heat. Still, I faced my remaining vice blocks, and got much better surface finish than milling, and parallel over 25mm x 40mm to within 0.0006" according to a my micrometer, over an average of 5 measurements. Sorry to mix units! |


 Ball Nose end mill, with the intention of using it to make the 7/16" wide slots for the main bearings, as specified on the drawing. The brass casting supplied is actually a bit smaller than 7/16", at 0.4285" wide. The cutter itself measures approx. 0.4350" according to my verniers, and made the same width slot in some aluminium I used as a test:
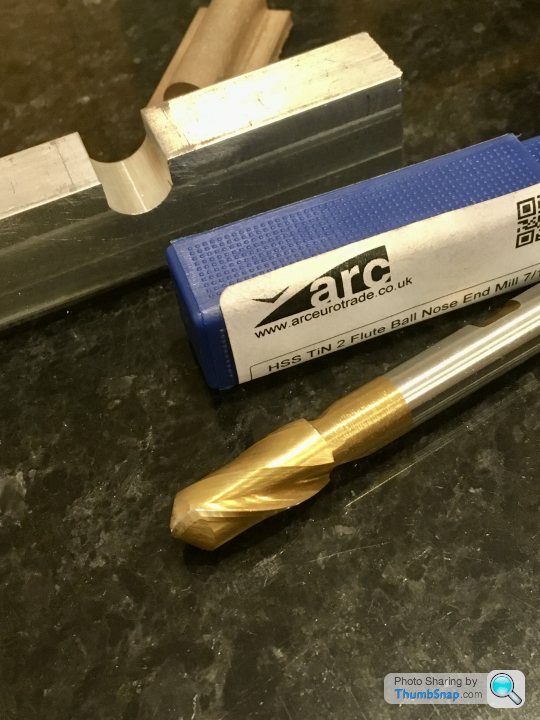

Magazine Locator
Want the latest issue of Model Engineer or Model Engineers' Workshop? Use our magazine locator links to find your nearest stockist!
Sign up to our Newsletter
Sign up to our newsletter and get a free digital issue.
You can unsubscribe at anytime. View our privacy policy at www.mortons.co.uk/privacy
Latest Forum Posts
- *Oct 2023: FORUM MIGRATION TIMELINE*
05/10/2023 07:57:11 - Making ER11 collet chuck
05/10/2023 07:56:24 - What did you do today? 2023
05/10/2023 07:25:01 - Orrery
05/10/2023 06:00:41 - Wera hand-tools
05/10/2023 05:47:07 - New member
05/10/2023 04:40:11 - Problems with external pot on at1 vfd
05/10/2023 00:06:32 - Drain plug
04/10/2023 23:36:17 - digi phase converter for 10 machines.....
04/10/2023 23:13:48 - Winter Storage Of Locomotives
04/10/2023 21:02:11 - More Latest Posts...
- View All Topics
Support Our Partners


Shopping Partners
Subscription Offer

Latest "For Sale" Ads
- Reeves** - Rebuilt Royal Scot by Martin Evans
by John Broughton
£300.00 - BRITANNIA 5" GAUGE James Perrier
by Jon Seabright 1
£2,500.00 - Drill Grinder - for restoration
by Nigel Graham 2
£0.00 - WARCO WM18 MILLING MACHINE
by Alex Chudley
£1,200.00 - MYFORD SUPER 7 LATHE
by Alex Chudley
£2,000.00 - More "For Sale" Ads...
Latest "Wanted" Ads
- D1-3 backplate
by Michael Horley
Price Not Specified - fixed steady for a Colchester bantam mark1 800
by George Jervis
Price Not Specified - lbsc pansy
by JACK SIDEBOTHAM
Price Not Specified - Pratt Burnerd multifit chuck key.
by Tim Riome
Price Not Specified - BANDSAW BLADE WELDER
by HUGH
Price Not Specified - More "Wanted" Ads...
Get In Touch!
Do you want to contact the Model Engineer and Model Engineers' Workshop team?
You can contact us by phone, mail or email about the magazines including becoming a contributor, submitting reader's letters or making queries about articles. You can also get in touch about this website, advertising or other general issues.
Click THIS LINK for full contact details.
For subscription issues please see THIS LINK.
Digital Back Issues


Donate

 Register
 Log-in
Model Engineer Magazine
- Percival Marshall
- M.E. History
- LittleLEC
- M.E. Clock

ME Workshop
- An Adcock
- & Shipley
- Horizontal
- Mill

Subscribe Now
- Great savings
- Delivered to your door

Pre-order your copy!
- Delivered to your doorstep!
- Free UK delivery!