Member postings for Joseph Noci 1
Here is a list of all the postings Joseph Noci 1 has made in our forums. Click on a thread name to jump to the thread.
| Thread: Sieg KX3 Y_Axis Skipped Stepper Steps😢 |
| 06/05/2021 09:13:22 |
Actually, the table is gradually moving away from me, meaning it's having problems 'moving' the spindle in the + direction.
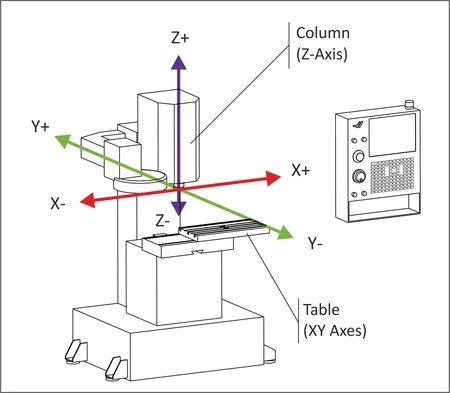
Very strange behaviour if none of those fixes sort it out! I suppose it could be a Stepper driver failure, but I doubt it. Nicola, I am not sure I understand your axis direction - If the table is moving away from you, its the same as the table remaining still and the head moving toward you - that is Y -Ve direction, not +Ve... Not really important here as it still has no bearing on the problem.. I doubt backlash comp has anything to do with this - backlash comp is a symmetrical function and would not create such asymmetry. Nicola, if the G-Code file is not to big would you care to post it here?
|
| 05/05/2021 22:41:30 |
Nicola, Are you using MACH3 or UCCNC software with the UC300ETH? Are the X and Y steppers the same type, ditto the stepper driver modules? Are the two driver modules set up the same way, dip switches, if any, etc. Some drivers can be set to go Half Current in the steppers during short pauses in moves, which when driven in microstepping mode can lose micro-step position within the native motor magnetic detent step - if that accumulates it can result in an accumulating step error. If your drivers have such capability, disable it. I would also suggest checking the stepper pulse train definition setup in the software - MACH3 and UCCNS both have a section where you set up the dwell period between stepper direction control change and the beginning of the next step pulse train - if that is to short for your stepper driver, it can result in lost steps. Likewise, the minimum width of the stepper pulse train can be set up as well - I would make them not less than 5us, even go for 10us, for your kind of setup. At least make sure the Y axis setup is the same as the X Axis. From your description is seems the Y axis is loosing steps in the -Y direction, biasing the cut to the +Y side. Does the part you are cutting have any rapid Y moves that are more in the -Y direction than +Y? If so , could be that the Y max acceleration ( or velocity) setting for the Y axis are to enthusiastic. X has to move only the X axis, vice and workpiece - Y axis moves include the whole X axis, vise and workpiece, and the Y axis mechanics. Joe |
| Thread: Magnetic swarf |
| 03/05/2021 17:49:20 |
Irritatingly, I have had chuck jaws ( the hard type) become magnetic and then it's a pain clearing the fine swarf from the jaws when inserting the workpiece. Likewise tool steel lathe cutters, and some milling cutters and even the hard steel capscrews in the tool-holder. This only occurs in the hard steel bits on the lathe - I have never had issues with the lathe structure. I am not sure how, for example, the chuck jaws, become magnetic but they do so repeatedly. I demag all the bits with a homebrew demagnetiser, and all is well for a few weeks. There is that high-school science trick where you align a hard steel rod say North/South, hold it so and smack the one end with a hammer a dozen strokes - it becomes magnetic - maybe I should stop smacking the lathe so hard.... Joe |
| Thread: Issues 303 stepper driven rotary table with hobbing capability |
| 01/05/2021 22:53:22 |
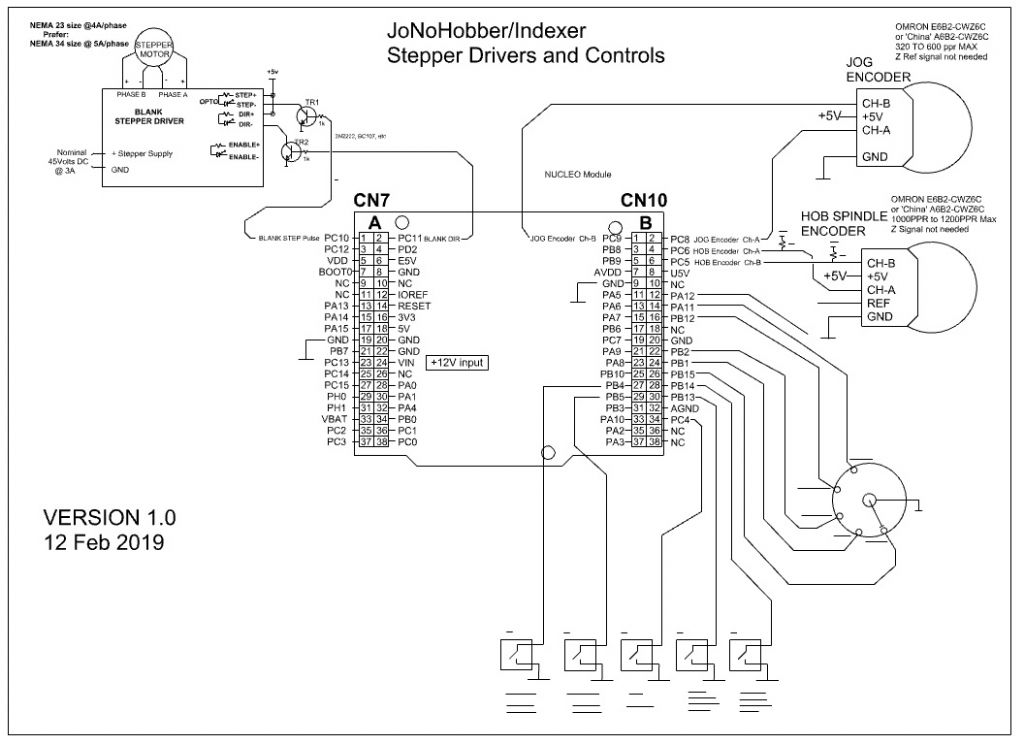
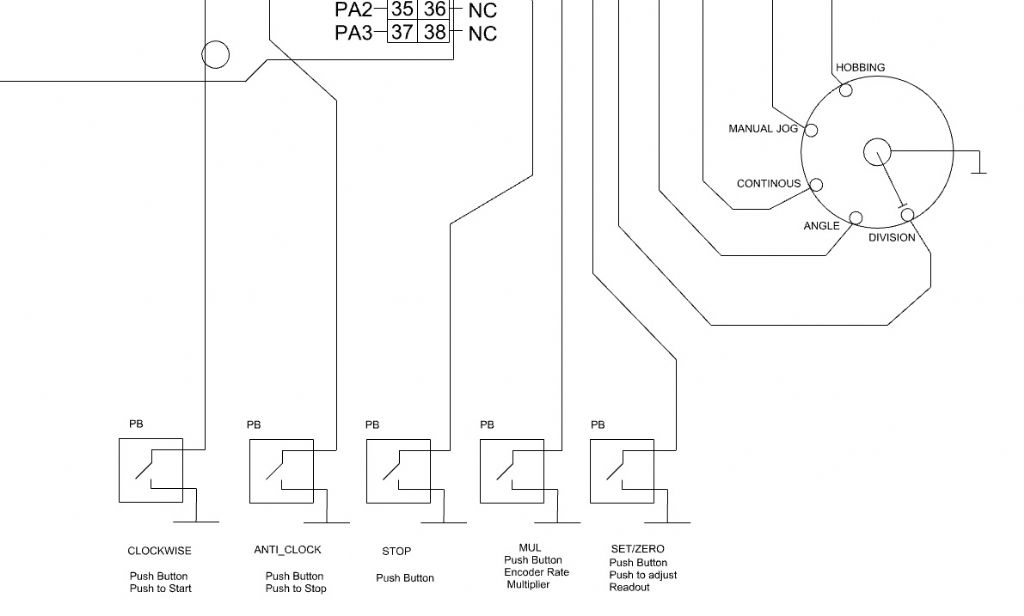
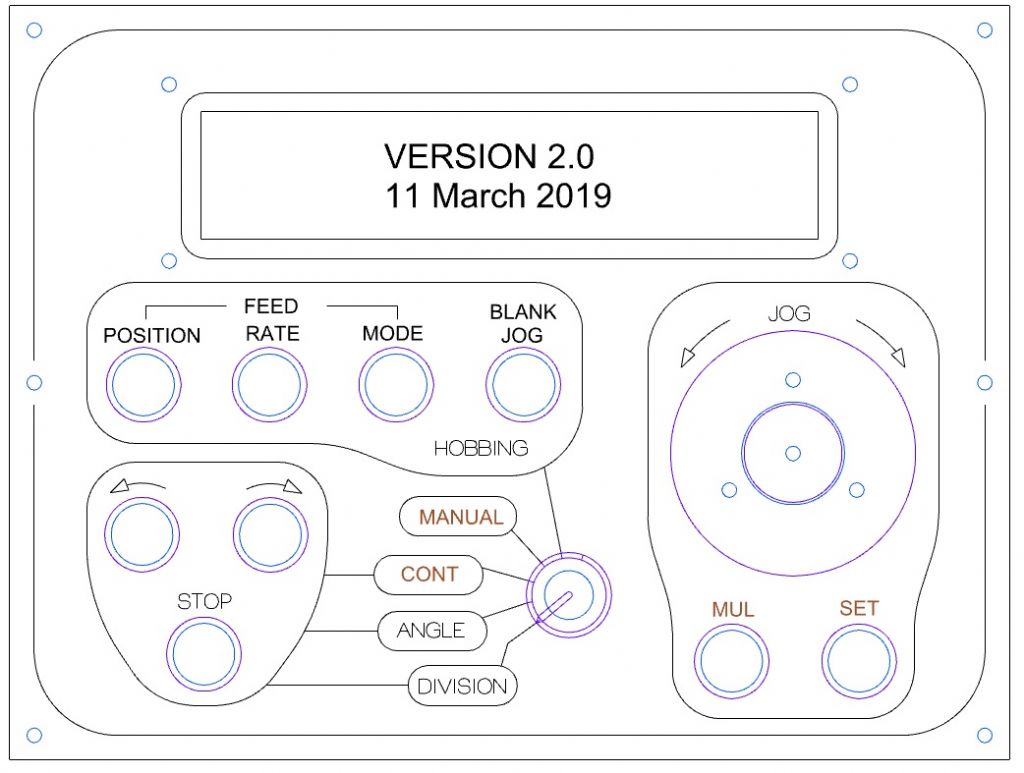
This describes basic operation of a hobber WITH AUTOFEED capability. It is easily understood from this which modes are not applicable to the non-AutoFeed mode type... The Rotary Switch selects the various modes. Each Mode may require the setup of some parameters, such as continuous rotation RPM, angular step size, No of divisions in the circle, No of teeth on the blank gear, etc. When a mode is selected, the JOG encoder is active and used to set the required parameter. The SET/ZERO switch enters the parameter as the active such as number of teeth in hobbing, angular step size, number of divisions to step, rotary table rotational RPM, etc The JOG wheel increment size on the display can be increased by xN (N depends on your encoder PPM..) by pressing the MUL pushbutton and rotating the jog wheel. Useful when big increments are needed. Your Hobber, rotary table, may have different gear ratios – these can be adjusted. Rotary Switch selections: DIVISION ANGLE. CONTINOUS. MANUAL. HOBBING. 5.1 BLANK JOG The BLANK can be positioned as required by pressing and holding BLANK JOG, while jogging the blank with the JOG wheel. 5.2 FEED MODES Since there is the option of Auto-feed of the cutter advance, the feed mode also needs to be set up ( Position, rates, auto/manual) 5.2.1 POSITION: To position the cutter in relation to the blank, ie, almost touching, ready to cut, press FEED POSITION and use the JOG wheel to move the blank and cutter into the correct relationship. 5.2.2 FEED RATE To set the feed rates ( in mm per blank rotation) press FEED RATE and use the jog wheel to set the value. 5.2.3 FEED MODE The feed mode can be AUTO or MANUAL or NONE. This is selected by repeated presses of the FEED MODE button and will show on the display. 5.2.3.1 AUTO MODE The feed will proceed in the selected mm per blank rotation and starts when the hob spindle starts running. Pressing ANY other HOBBING mode button, eg, BLANK JOG, FEED POSITION or FEED RATE will immediately CLEAR the feed rate to NONE and if in AUTO-FEED, FEED will STOP – no AUTO feed will take place and the JOG encoder will not cause manual feed. Use FEED MODE to re-select the desired feed mode. The FEED Mode can be changed on the fly, with the machine running or not. This allows manual take-over of feed, or AUTO from manual, or change of feed rate, and then back into auto, etc. 5.2.3.2 MANUAL MODE In this mode the JOG encoder will drive the FEED axis Stepper. The JOG wheel is disconnected from ALL other functions and only generates FEED increments. Pressing ANY other HOBBING mode button, eg, BLANK JOG, FEED POSITION or FEED RATE will immediately CLEAR the feed rate to NONE, and the JOG encoder will not cause manual feed. The FEED Mode can be changed on the fly, with the machine running or not. This allows manual take-over of feed, or AUTO from manual, or change of feed rate, and then back into auto, etc. Gear Ratio Selection. For those still awake, and interested, let me know what else you may need - greater detail etc is probably best by PM or emails. |
| 01/05/2021 22:42:14 |
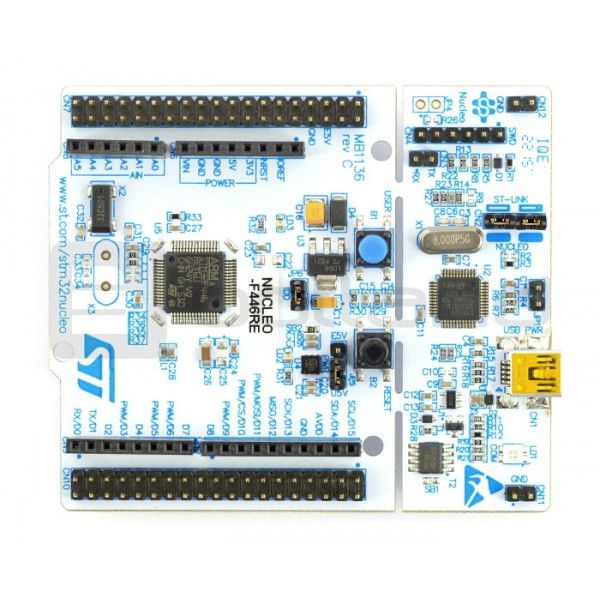
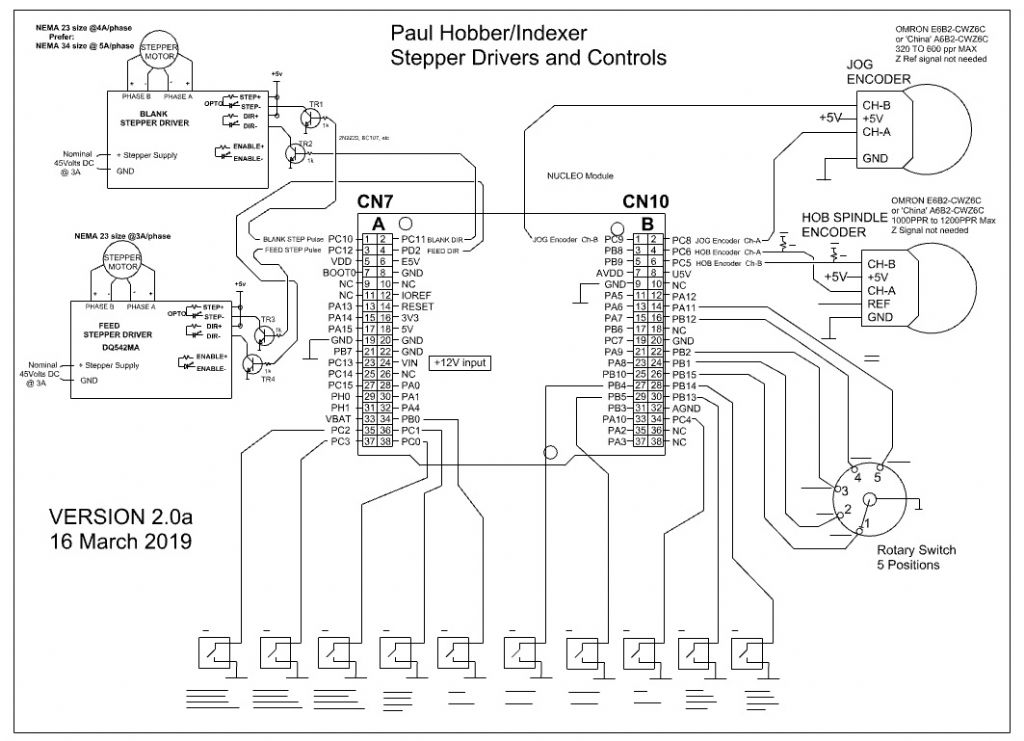
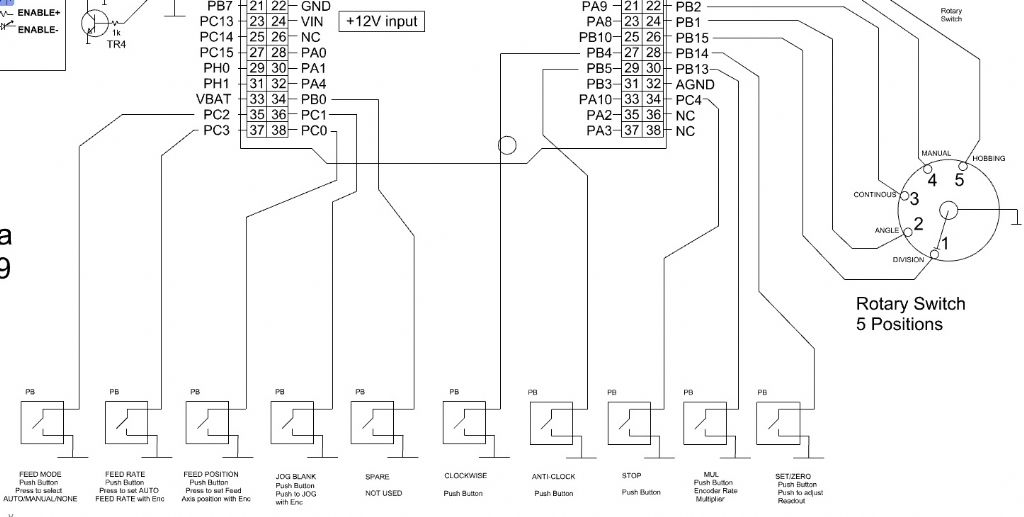
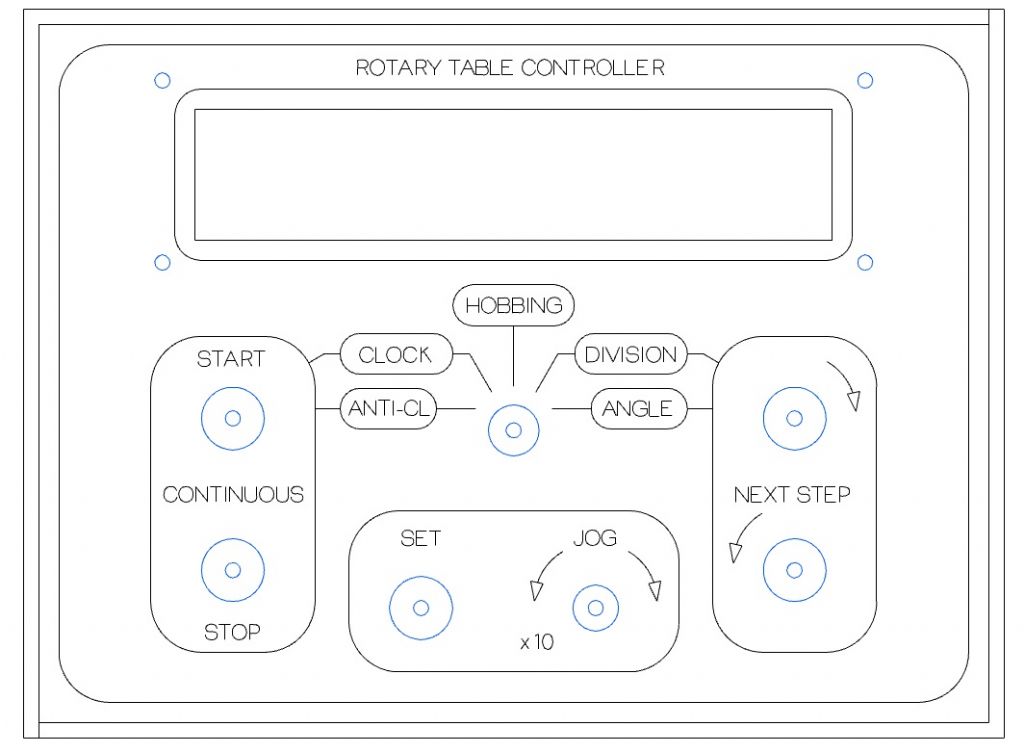
This will take a few posts as I will be limited by number of characters/images per post at some point... My previous postings on this subject relate to a 7 segment LED display array version of the front panel - this changed to the present version using an LCD ( as in the MEW article) There are two versions of this setup - one is for rotary table controller type applications , including a hobbing function, and the second ( as done for Paul White) is more for a hobbing 'machine' in that it provides control of a stepper for the blank feed into the hob. This could be used for example on a mill, with the hob encoder fitted to the spindle, hob in the spindle, a stepper fitted to say the X axis for feed, and the rotary table placed on the mill bed feeding into the hob - ( see my photos and video in the previous posting to see the basic setup) previous posting on this subject To re-iterate, the unit is based on an STM 32bit uP, using a NUCLEO module, similar to the Arduino type modules. The right hand section is a USB based programmer for the main CPU, center/left. Open source ST-LINK programmer software from the STM site is used to program the module, on a windows PC. The circuits follow - note that resolution is limited in the size image I can paste, so some areas are repeated , zoomed in, for better viewing. Circuits for the Hobber WITH FEED controls: The pushbuttons with blanked text at the bottom are repeated next , zoomed in.
Circuits for the Hobber WITHOUT FEED controls: Zoomed detail:
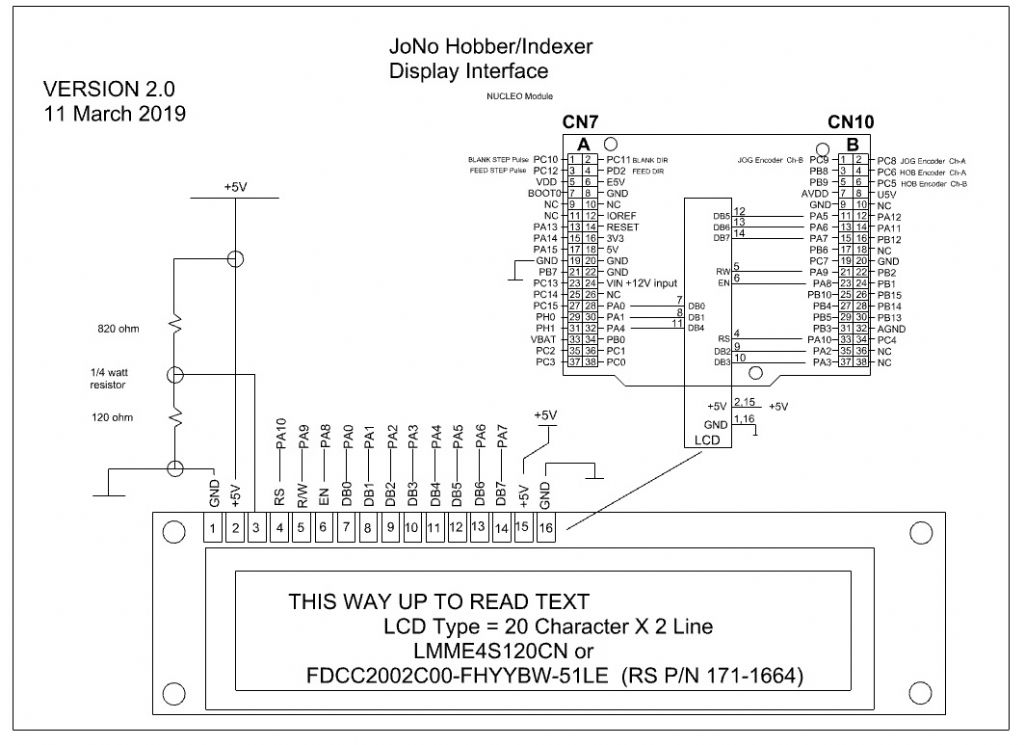
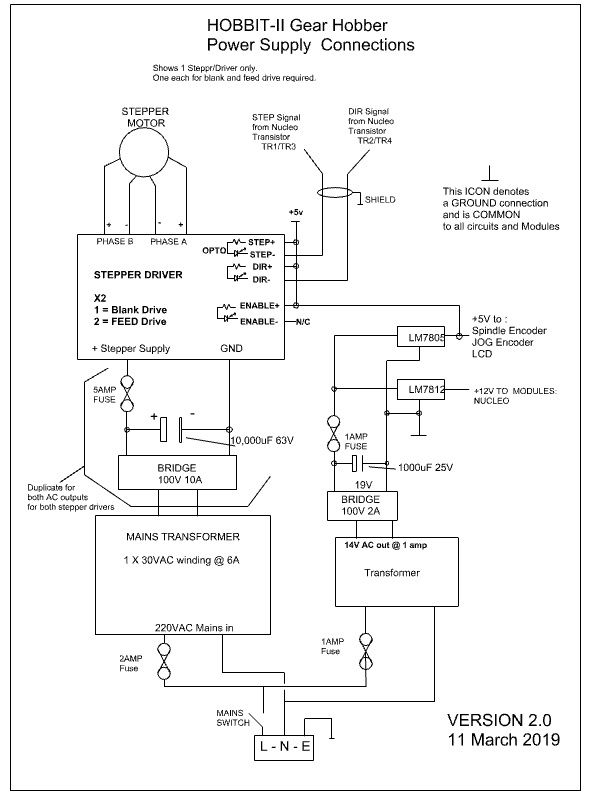
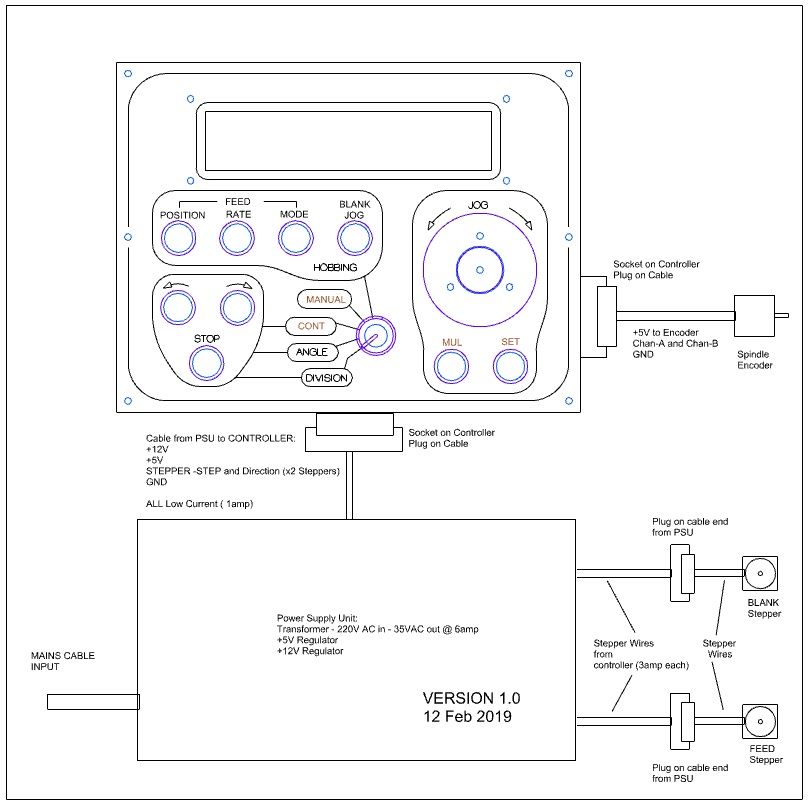
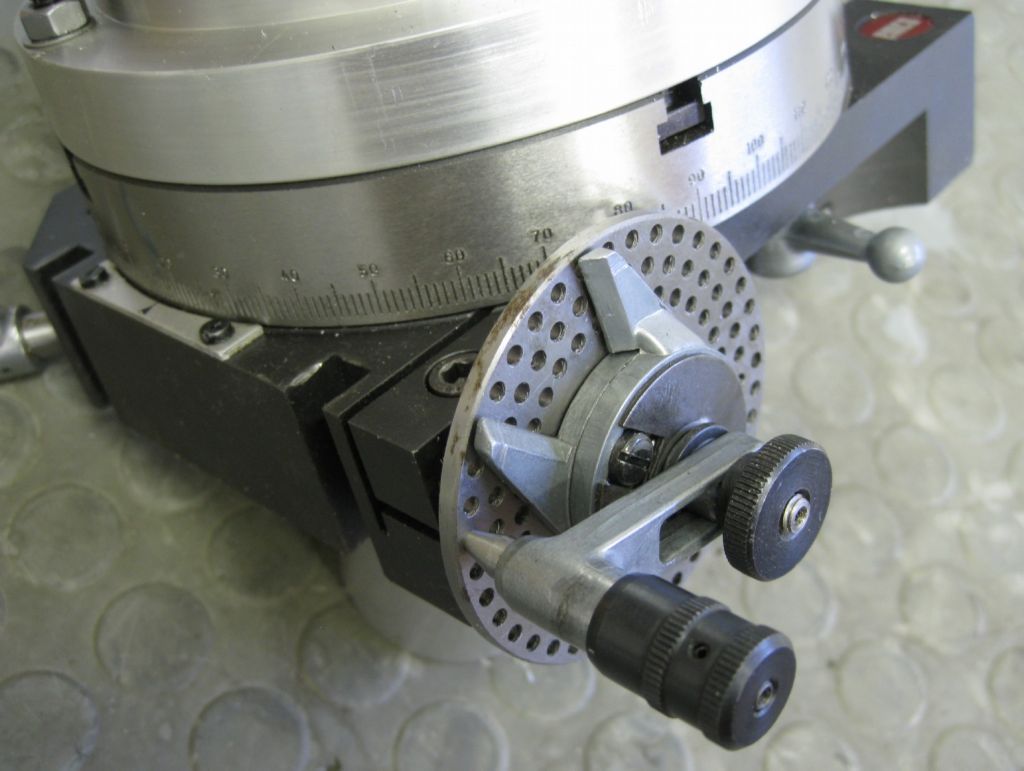
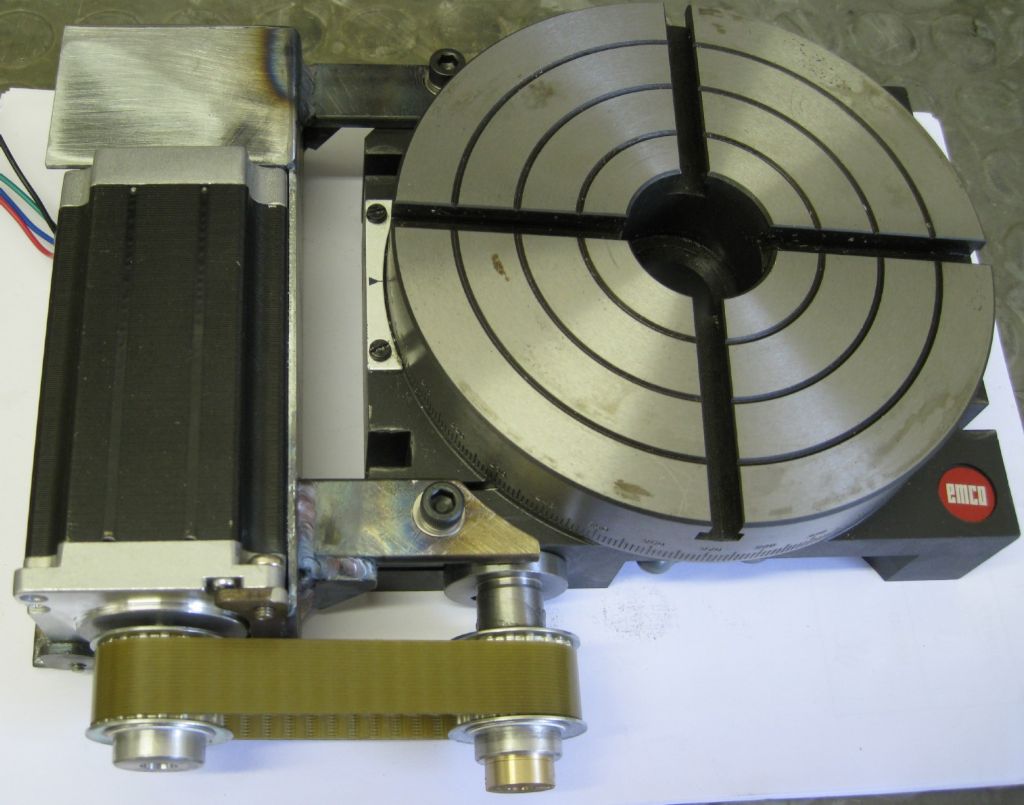
This is the Display Interface, common to both Hobber types: This is a typical Power supply for the unit - no part numbers since you can easily make do with what may be available to you: This is a sample front panel for a unit with Hobber AUTOFEED function And this for a Hobber with MANUAL FEED function. This shows the basic interconnection between items in the system: PSU, Hobber/Nucleo controller, Steppers, Spindle rotary encoder, etc The un-modified rotary table at the start:
And the stepper fitted.
It is simple to change parameters in the software to cater for stepper pulse/rev, stepper to table gear ratios, table worm ratio, etc.
Next post, the basic operation... Joe
|
| 01/05/2021 17:57:46 |
What I can try is post some detail here - some circuits if they appear legible, wiring diagrams, etc, and some details on mechanical concepts. I will also try to provide more detail on how it works, and maybe post the user manual in some form. Interested folk can then maybe see if they wish to attempt this and then I can mail PDF's and source/binary code as needed. Unless there are better ways of doing this, I will try do post some info in the coming day or two.. Joe |
| 30/04/2021 20:48:55 |
Posted by JasonB on 30/04/2021 18:54:00:
Joe will hopefully see this thread and respond, he also did a thread about it here He saw and here he is... Always a trade off with articles like that - to make it a DIY construction article would probably occupy two or three magazine editions and would perhaps tend to bore most folk. It's not really fair on subscribers to pay for the magazine and have heavy, possible uninteresting content, occupy many issue perhaps? I would not know.. Anyway, I don't really see the need for frustration - as Jason indicated I did do some posts which show in some detail what you would be letting yourself in for if you wished to build something like this, and I generally am around these forums and happy to assist any wishing to give it a try! Paul White, another UK forum member was actually the motivator for this - to build an electronic hobber, and so this was born and Paul did build and use it. I can provide circuits, C source code if you wish to modify/roll your own, or binary code to you requirements ( within practical reason!) etc. My Wife is the software boffin behind all this. We do not use the Arduino development / compile, etc environment - it's to tacky for our way of working - so we use open source tools on a PC. The code runs on an STM32 microprocessor, on a NUCLEO module - very similar to the arduino type modules, but 32bit and much faster. So all interested let me know how you wish to go! All/most of the bits should be available from RS, Digikey and Mouser, and other favourites you may have. The unit is not complex, but you need to be able to read a circuit, solder some electronics, deal with LCD character displays, etc, albeit at basic levels. Can be via email, or on the forum, whatever works and very happy to help. Joe |
| Thread: CNC Lathe Scratch Build |
| 26/04/2021 22:06:22 |
Posted by Ross 77 on 26/04/2021 13:25:42:
Joe I think 8mm of travel would cause you problems with the bellevilles by raising the opening force. we had 4mm tooth height and 1mm clearance so total travel of 5mm. that was generating a lot of force to reach the opening distance. Martin The coupling is quite easy to machine on a rotary table if you do full passes, then it is only 8 changes. T.B mentioned early that any error isnt really a problem as it is always repeatable.
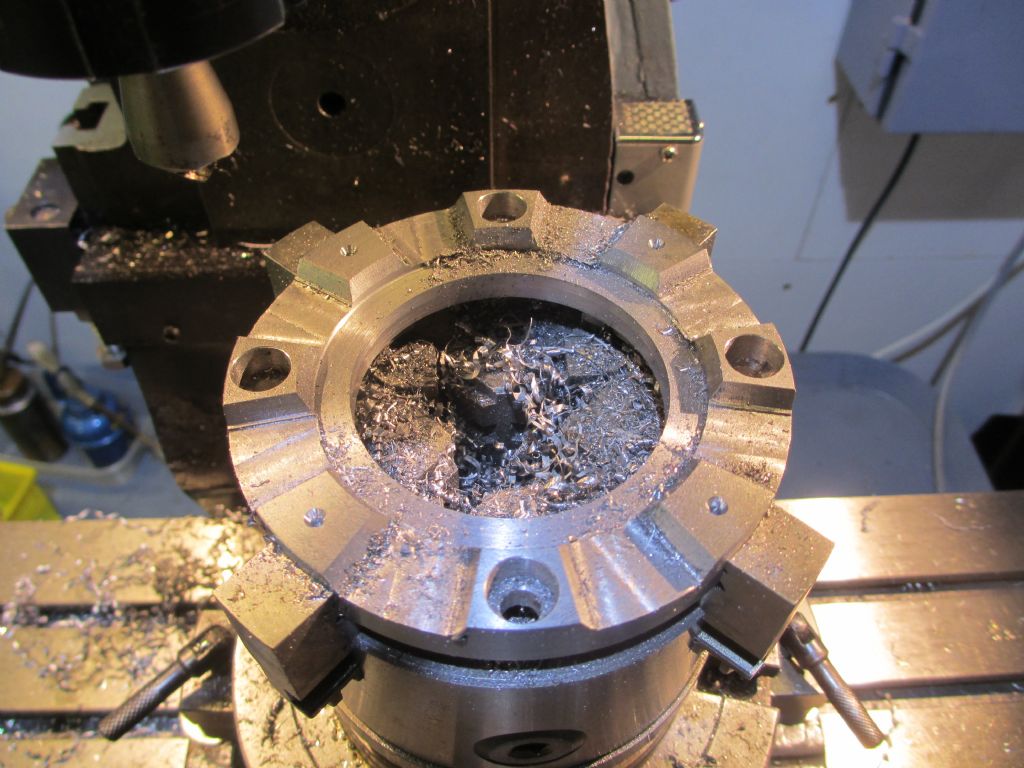
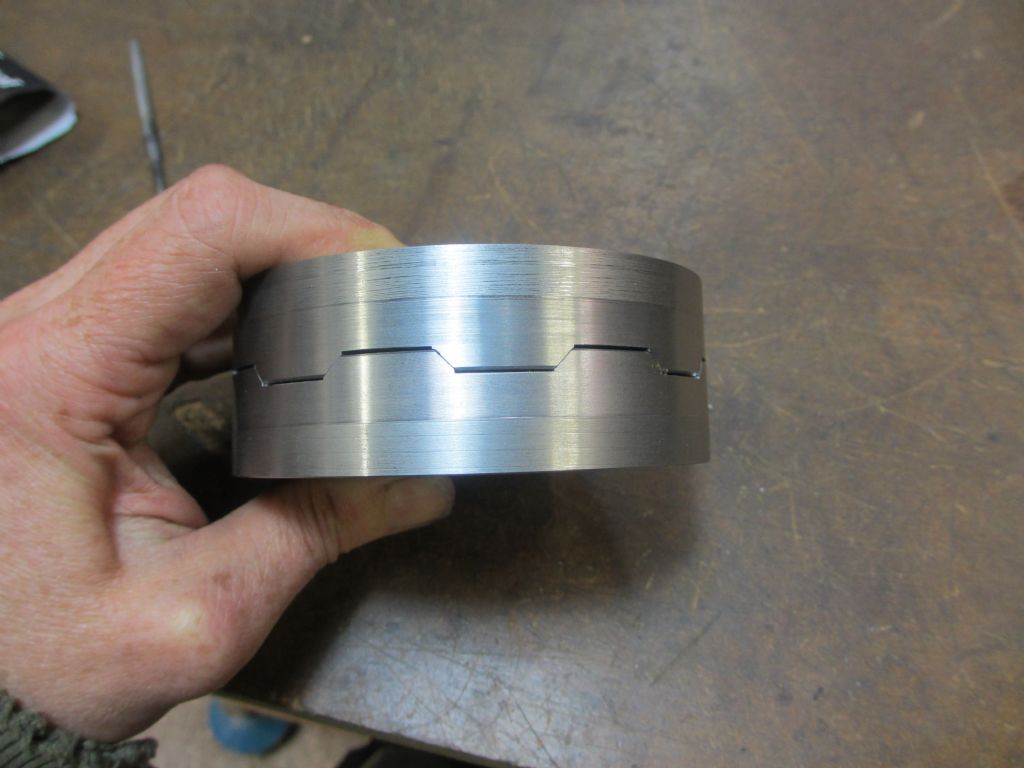
Ross, The 8mm teeth were just a modelling test - far to tall. What is the actual contact height ( axial height) of the teeth in your design? Around 3mm? - 4mm tooth height with what seems to be about 1mm between tooth crest and opposite trough? What sort of milling cutter did you use? seems to be an angled cutter with a carbide insert? The rotary table seems to be horizontal, so cutter is angled. How did you do 'full pass' machining? Milling the flank of a tooth would require the cutter to be offset , say, to the left of the tooth flank, and then past the tooth, to the center of the disc, where the offset would need to be shifted to the right of the flank of the opposite tooth ( the tooth @ 180degrees). I glibly thought to use my shaper to do full pass cuts - Not Possible! Joe
Edit - text changes Edited By Joseph Noci 1 on 26/04/2021 22:08:30 |
| 26/04/2021 09:33:46 |
Posted by John Haine on 25/04/2021 13:49:15:
Hi Joe, I know that you've been focusing on the ATC but did you make any progress on the tool touch sensing? John, to be honest, no.. I did play around with a number of ideas, but there is still so much on the lathe's mechanical side to resolve ( and get on with!) that I was not fully applied in the experiments! One idea which showed good promise I do wish to pursue - I took apart an old hand held Piezo gas igniter stick thingy - it had an obelisk of piezo in it - about 4mm square by 25mm long with a silvered cap at each long end. A scope attached showed a 8 to 15 volt spike, with the slab on a wooden surface and very gently tapped in the center of the slab using a tooth pick. I think this fitted into a contact probe for side and end touch detection has good promise! Too many things on the go...Also busy upgrading the CNC mill, which I need to make the ATC tool plate, etc..! Joe |
| 26/04/2021 09:26:30 |
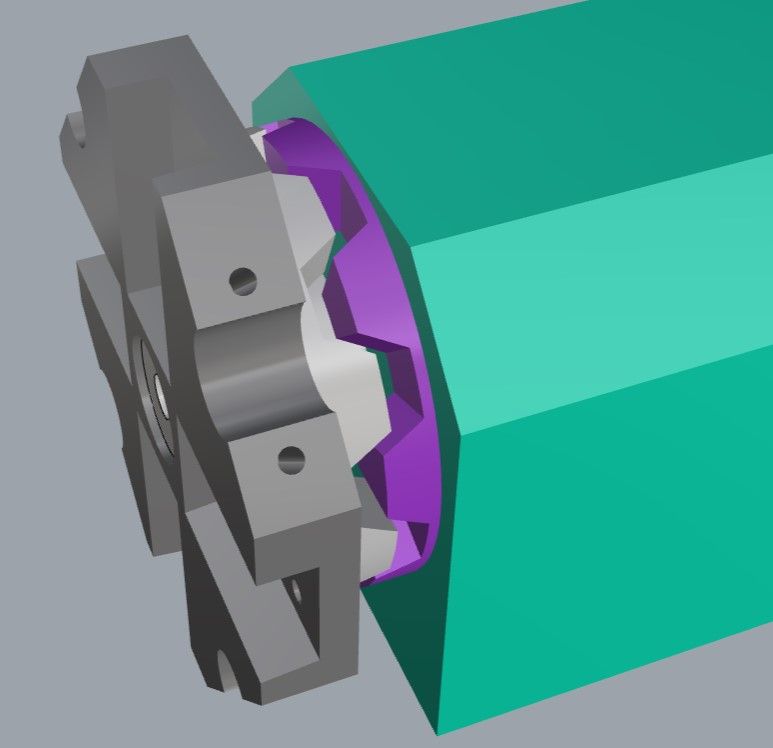
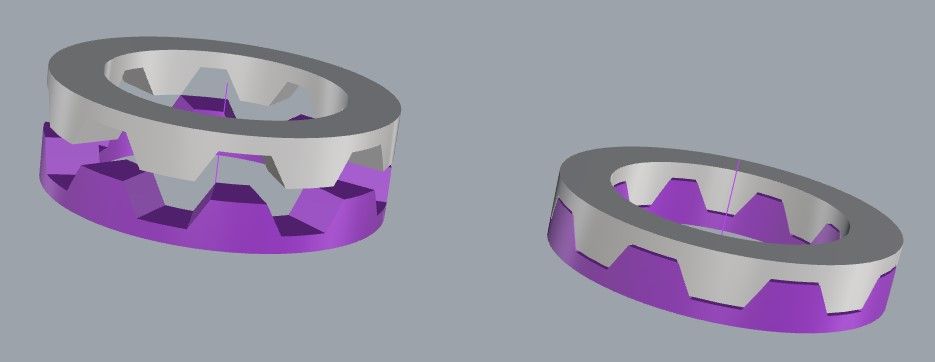
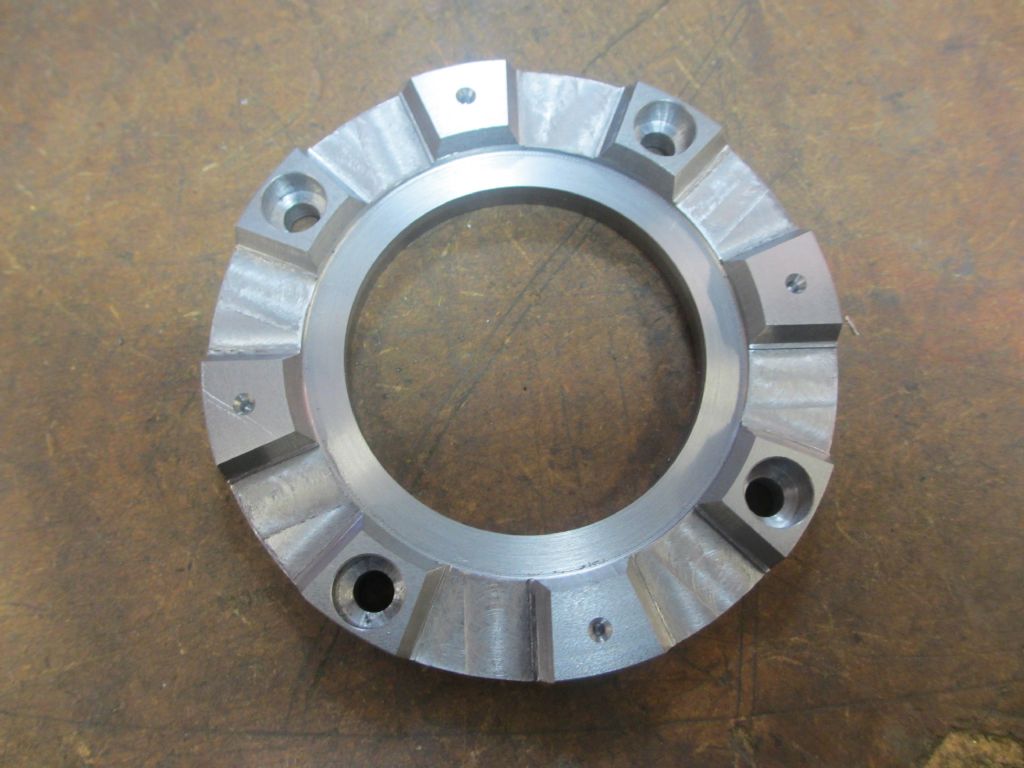
Thanks Ross. I had approached it from the periphery rather that the flat face - drew the side view of the disc peripheral 'teeth' and wrapped it around the disc, but extruding it was a mess! your way worked a treat. here is a quick hack - as you say, now to juggle with teeth height and angles, etc. The teeth in this hack are very tall - would require 8mm movement to clear, but proved the extrusion technique. The loads in my case are perhaps a little less since my stock size is limited to that of the 5C collet max opening. Since loss of air pressure stops the job regardless, would it not be easier to reverse the role of the cylinder? Let the air pressure close the Hirth, and a lower effort spring push the Hirth open when the air pressure is released? I am contemplating a double acting cylinder to do both functions but maybe that's a road to hell... Thanks again Ross - you have been most helpful!
Joe
Edit - added text Edited By Joseph Noci 1 on 26/04/2021 09:35:53 |
| 25/04/2021 07:32:41 |
Hello Dave, I don't find a specific paper at that URL - it appears to just be a general search on Hirth using Bing? I have seen about all those items that appear on that search page while searching previously using google. Most of the 'slightly' mathematical or more technical descriptions that I have found also describe the more conventional coupler, ie, where the teeth are fully formed triangles ( with tops slightly flattened for clearance). I have not found any design detail on the type as in the images above from T.B / Ross. Joe Edit - there is a paper in there..I have seen that one - by a group of Italians - University Bologna - but lacks design info - focuses mainly of tooth shapes versus load bearing capability.. Edited By Joseph Noci 1 on 25/04/2021 07:38:09 |
| 24/04/2021 14:34:14 |
|
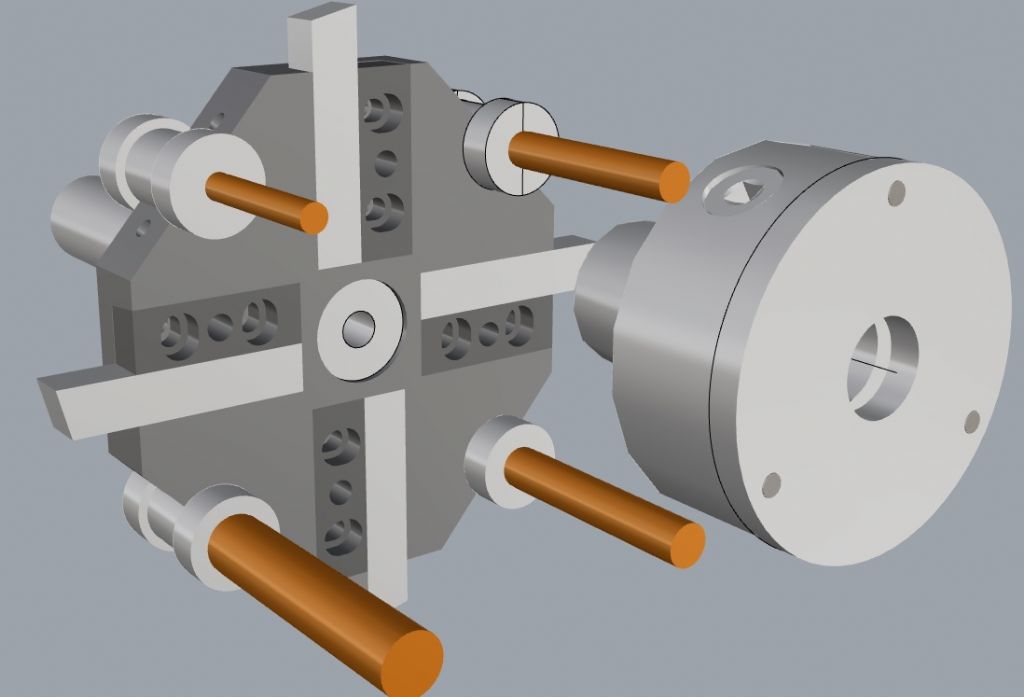
T.B / Ross, Why am I battling to model the Hirth coupler on CAD??!! It looks so simple! I have dug through all the Hirth sites I could find on internet, ifinding some pretty tools where you input the parameters ( no of teeth, angle of teeth, etc) and it generates a pretty 3D model, but have not found any sensible Mathematic or geometric explanation! Have you some pointers for me? Joe |
| 23/04/2021 07:18:19 |
Posted by Ross 77 on 23/04/2021 00:43:40:
No problem and thanks for the positive feedback. Unfortunately I do tend to over complicate my designs. T.B always seems to pull them back to some sort of reality and make them buildable. It will be interesting to see what you come up with and I don't think I will be criticising your work any time soon. Im quite interested in your 5c spindle design for one of my projects. I wish I had your skills to make all those parts. I see you are having trouble with the seals. Is the whole bearing/shaft assembly full of oil? or is it a drip feed? I don't think its overcomplicated - perusing in some detail shows little room for simplification...I suppose the design could be flipped - place the stepper drive pulley inside the housing and the air cylinder on the right , outside - this may permit use of some variant of commercially available air cylinder? But that brings all sorts of other complications which brings you back to the same amount of effort anyway, in addition to the unit growing in width, etc!
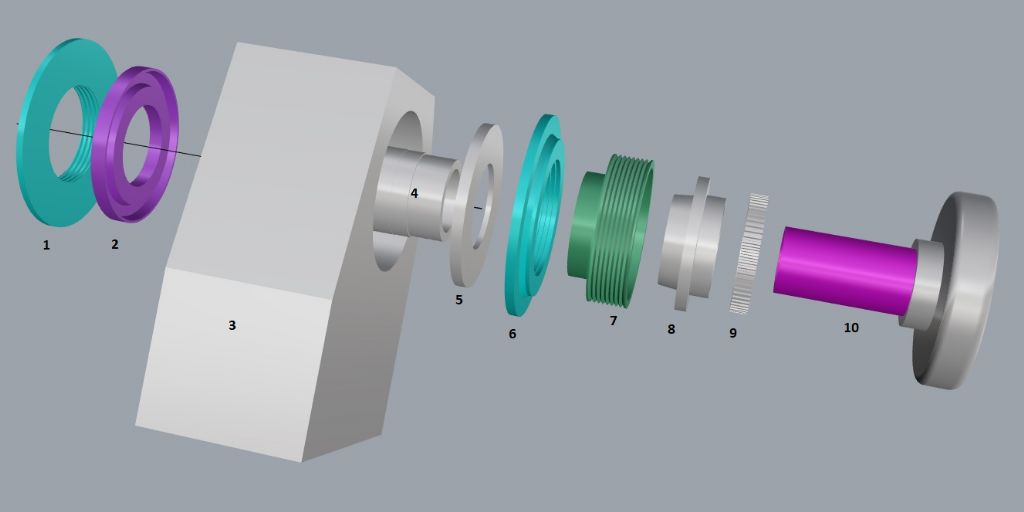
Ross, the 5C spindle is a story on its own - I did cover its birth early on in my series of posts, but possible did not highlight the compromises I endured because of it! First, its size was again limited by material availability - the spindle end up being machined out of a piece of Caterpillar side shaft...which was rather short...In addition the headstock was made from a chunk of aluminium on hand..which was rather narrow...So the space available for bearings, oil flingers, labyrinth seals, etc, was very limited. These combined bits were what drove the dimensions for the rest of the lathe in its entirety - sort of the tail wagging the dog.. There is no room in the headstock for a conventional oil bath/drain hole at bearing type design. I bored rebates for the bearings and then through for the spindle shaft, and made a trough or sorts feeding the oil drain oil to outside ( for oil changes). The idea was to have the bottom 10mm of the bearing in an oil 'bath' - this level being way below the external labyrinth seals, and hope for the best - turned out for the worst! Works well at high rpm, but below 200-300 rpm it leaks - the flingers are not effective there. In the end the short spindle is a big problem for boring bar clearance in the ATC tool plate, so we have to compromise further - add a 4" 5C chuck instead, which means a new spindle, etc, etc... As posted previously - 1 + 6 (blue) Labyrinth seals.End seals. 2+5 Oil Flingers 7+8 Drive pulley preload nut and conical pulley lock 9 encoder pulley 10 5c collet closer
If you want detailed drawings I am happy to oblige - but perhaps more to show how NOT to do it.. Joe
|
| 22/04/2021 20:50:38 |
I am very grateful to both of you for being so forthcoming with drawings and design information. This is really a gem, an excellent design. When I initially looked at the 3D images I thought the design very complex and too much work to duplicate, but the mere outlining of all the parts in CAD showed just how simple and neat it is! I think I have enough data here to be able to model something to good detail. I will certainly post all of it here for your joint criticism! Thanks very much! Joe |
| 22/04/2021 14:01:51 |
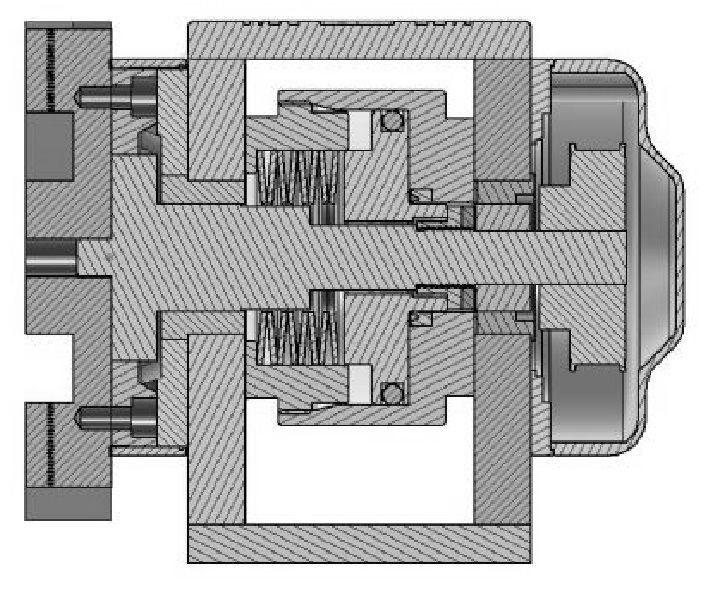
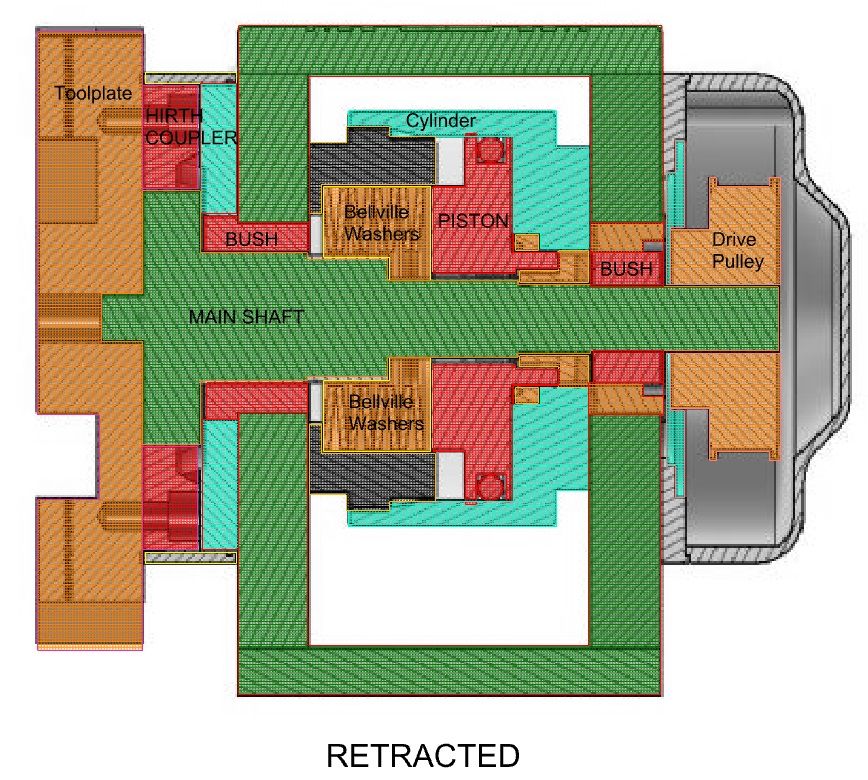
T.B - Thanks very much for those 3D sections. I have blown the one up, and filled in some detail as I understand it. If I may pick your brain a little now, to understand better the operation please...
This is just an enlarged greyscale version for view placement:
Then on top of the greyscale, some detail and colour hatching:
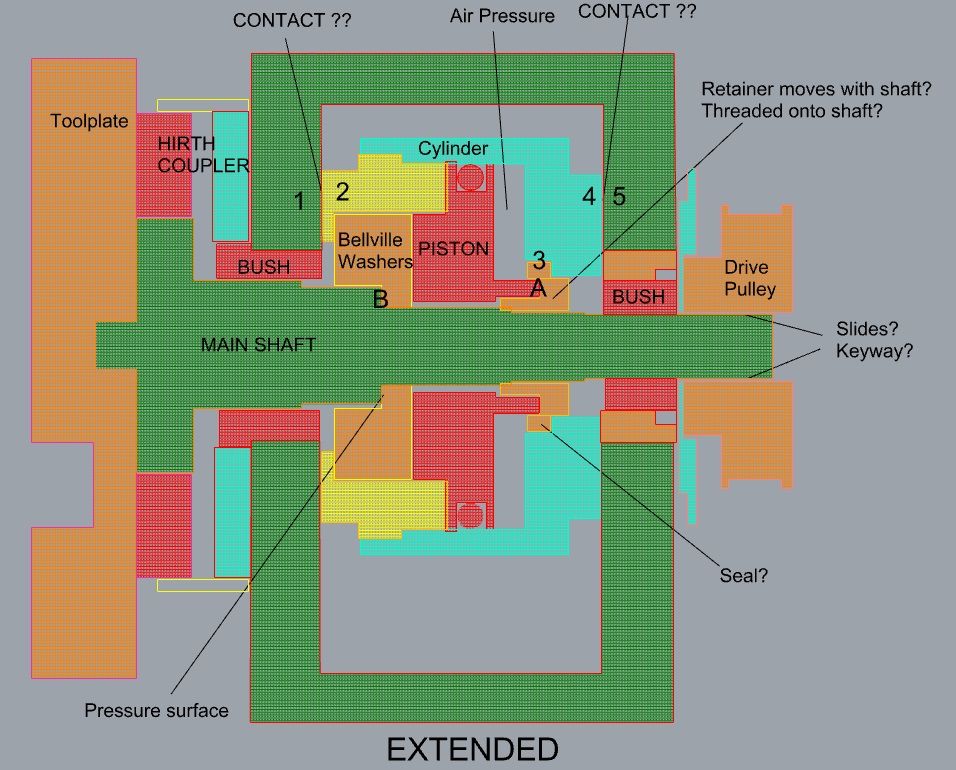
Then without the greyscale background, but in extended position, with some descriptors:
And then my questions! Is the pneumatic cylinder fixed to the housing or can it rotate somewhat? - Fixed somehow at interface surfaces 1/2 and 4/5 ? When the main shaft moves forward, does the Drive Pulley slide on the shaft? With a keyway? Is item 3 the air seal between the shaft/piston/retainer ( my naming) against air leaks? I presume the 'Retainer' moves with the shaft, ie, is fixed to the shaft ( Threaded?) - I also presume operation as follows- Piston moves forward with air pressure as labelled. Piston flatten bellville washers and pressure is applied to shaft surface at B - pushing shaft forward. Losing air pressure causes bellville washers to press piston away, placing pressure on retainer at surface A, pushing shaft backwards.
What is the thin 'blue' item between the drive pulley and the housing? What is the orange 'bush' surrounding the RED shaft bush at the pulley end of the shaft? - it also has a rebate between it and the RED bush, at the pulley side? Does that orange bush thread into the housing and is then used to press up against the cylinder ( blue) to take up any side to side play of the pneumatic cylinder assy?
Please forgive the many questions.. Looks like a very nice design indeed! Joe
|
| 21/04/2021 16:07:42 |
Thank You. Looking forward to any info! Joe |
| 21/04/2021 14:18:26 |
Very nice indeed! The video is excellent. It would be great if you have details of the insides of that air cylinder. And how does the piston interface with the shaft - I presume it does not rotate with the shaft as that would make the piston/cylinder seals difficult. In fact, seals in general there must be a challenge as the shaft passes through the entire cylinder and piston.
I recall writing a few hundred words earlier I did not want to go the hydraulic of pneumatic route, but your setup is to neat to ignore! I guess this is now my challenge. very neat! Joe |
| 21/04/2021 09:20:55 |
Simon, Thanks for the kind words! This project was a mental exercise started some 6 or 7 years ago and all the targets were formed in the mind way back with not much real thought applied to the work involved! And that is becoming a little overwhelming right now..But I am really keen to see the 'end' of it, or rather to see it working, so perseverance has it! From your MEW articles I found the reference to the Onshape info and did register there and take a look, thank you. I suppose I will go the Hirth coupler route - as usual decisions are also driven by what materials I can get. I can get almost any thickness 'steel' plate cut to 'size' - Living about 50km from a Marine repair and servicing Harbour there is a lot of ship hull steel plate! Cut to size is relative - within 5mm or so, cut with rough plasma, leaving lousy cutting tool tip unfriendly surfaces, etc..No idea what the grade of steel is - the shaper does not approve of it. A challenge in every way here! I want to try steer clear of hydraulics and pneumatics if possible - life is complicated enough with this thing, but who knows.
T.B. I am impressed by that ATC! Very nice and very well finished indeed. If I may be so bold - have you any detailed drawing or models of the internals that you would be willing to share ? The one thing I have not understood well enough yet is exactly how the tool plate and its shaft slides forward in the ATC block, to clear the Hirth teeth - In the many ATC DIY effort's I have seen on internet, that bit of detail is missing..I would assume the shaft rotates/slides in bushes rather than bearings? That implies that the shaft to bush fit must be very good to ensure rigidity, or does the Hirth coupling provide all the business end rigidity? How does the shaft slide in your design and what drives it? Your (3d printed?) covers hide many secrets! Your Hirth Coupler design as a bolt on has potential of being done on the shaper, so that will help! Regarding tool / chuck clearances - When modelling my ideas I placed a standard lathe tool in the tool plate, its tip at chuck center height and about 3mm past stock center line, ie, such as a parting tool might move to when cutting just past center, and then located the boring tools/drill on the circumference of a circle around the lathe spindle axis, so that a 16mm boring bar would clear the 4inch chuck with 4 mm gap. Where that circle intersects a circle centered on the ATC spindle axis, the tools are placed. That ensures those tools will always clear the chuck OUTER periphery, so no crunches, and no shortened tools - well, unless the tools are longer than the chuck and smack the headstock Very interested to see how you did your implementation of the ATC innards.. Thanks both.. Joe
T.B. - Sorry, an Edit - You kindly offered to assist via a PM, which I will take you up on - just a thought though - seems there are a few folk 'dabbling' in this, and maybe some technical discourse on design within the forum may be of interest to all - if it becomes to heavy for the forum pages we can PM further?
Edited By Joseph Noci 1 on 21/04/2021 09:40:41 |
| 20/04/2021 21:19:49 |
Nigel, Thank You for the post Nigel - A lot of very useful info there!
WRT your comments on the tooling clamping wedges - This was on of the areas that bugged me - Your proposed method is as on the two turrets I showed at the beginning of my ATC post - The reason I did not go that route ( but have decided to change now..) is simple - its a lot more steel to hog out of the tool plate on my small EMCO FB2 Mill! The wedges and such like are easy - all hogging will be done on the shaper, but the tool and wedge slots are all endmill stuff. But the result is not that elegant. The triangular wedge pressure plate is loose and will flop about when trying to tighten down the wedge, etc, so I decided to go the better route..
The indexing and clamping arrangement is still going to challenge me - There is a good series of article in MEW , by Simon Davies - No's 269-272 - He uses a taper cone interface between the tool plate and base and is rather attractive, but does require the base stock material for the tool plate to be very thick with lots of lathe work! I favour the Hirth coupling, but I am not sure I will be able to achieve appropriate fit and tolerances - My mill is just on the small side for that size work at those tolerances in steel , if not spending days standing at the mill! I suppose for this small size of lathe I could get away with an aluminium toolplate, but that just does not seem right.. Live tooling on this lathe is a bit of a misnomer! I intend to have only a single milling spindle, up to max 8mm endmill/drills with the spindle axis at the same height as the lathe spindle axis. The mill spindle will be able to swing so that its axis is either axial or radial to the lathe spindle, ie, you could mill a hexagon on the end of a shaft or a spiral groove into the side of the shaft in the lathe chuck, for example. The ATC really does not downsize well! It has to have all the features with reasonable rigidity as its bigger brother's do, but fit on a small lathe with much reduced axis motor torque, etc. On top of it, my lathe is a 'slant bed' so the weight of the ATC falls down, affecting the X axis +ve acceleration..At least in my case the workpiece diameter is limited to the 5C collet capabilities, so ATC performance constraints are reduced somewhat. Thanks again for taking the time to respond in detail Nigel. We will see where this one takes me! Regards Joe
|
| 19/04/2021 07:36:54 |
Posted by DiogenesII on 18/04/2021 18:11:29:
Joe, if it is any help in any way (and you haven't been there already) there are some useful downloads on high speed spindle /contact-free seals here, including labyrinth sections, photos, detail of design aspects: GMN Contact - Free Seals - Downloads
Thank You for that info. I have searched 'somewhat' for commercial seals and did find quite a lot of info and a good number of sources. I don't have the capability to manufacture seals even similar to those types though! I would gladly purchase some seals but sit with my usual problems of sourcing from our backwater! Not to mention pricing! for a seal of 50mm ID x 90MM OD, prices vary ( for polymer seals..) from $140 US to $370 US - over here thats a lot of money! Better spent on tooling.. I had not seen the GMN source you provided - I will try contact them and see if they would quote. Thank You. Joe |
Want the latest issue of Model Engineer or Model Engineers' Workshop? Use our magazine locator links to find your nearest stockist!
Sign up to our newsletter and get a free digital issue.
You can unsubscribe at anytime. View our privacy policy at www.mortons.co.uk/privacy
- *Oct 2023: FORUM MIGRATION TIMELINE*
05/10/2023 07:57:11 - Making ER11 collet chuck
05/10/2023 07:56:24 - What did you do today? 2023
05/10/2023 07:25:01 - Orrery
05/10/2023 06:00:41 - Wera hand-tools
05/10/2023 05:47:07 - New member
05/10/2023 04:40:11 - Problems with external pot on at1 vfd
05/10/2023 00:06:32 - Drain plug
04/10/2023 23:36:17 - digi phase converter for 10 machines.....
04/10/2023 23:13:48 - Winter Storage Of Locomotives
04/10/2023 21:02:11 - More Latest Posts...
- View All Topics
- Reeves** - Rebuilt Royal Scot by Martin Evans
by John Broughton
£300.00 - BRITANNIA 5" GAUGE James Perrier
by Jon Seabright 1
£2,500.00 - Drill Grinder - for restoration
by Nigel Graham 2
£0.00 - WARCO WM18 MILLING MACHINE
by Alex Chudley
£1,200.00 - MYFORD SUPER 7 LATHE
by Alex Chudley
£2,000.00 - More "For Sale" Ads...
- D1-3 backplate
by Michael Horley
Price Not Specified - fixed steady for a Colchester bantam mark1 800
by George Jervis
Price Not Specified - lbsc pansy
by JACK SIDEBOTHAM
Price Not Specified - Pratt Burnerd multifit chuck key.
by Tim Riome
Price Not Specified - BANDSAW BLADE WELDER
by HUGH
Price Not Specified - More "Wanted" Ads...
Do you want to contact the Model Engineer and Model Engineers' Workshop team?
You can contact us by phone, mail or email about the magazines including becoming a contributor, submitting reader's letters or making queries about articles. You can also get in touch about this website, advertising or other general issues.
Click THIS LINK for full contact details.
For subscription issues please see THIS LINK.
Model Engineer Magazine
- Percival Marshall
- M.E. History
- LittleLEC
- M.E. Clock
ME Workshop
- An Adcock
- & Shipley
- Horizontal
- Mill
Subscribe Now
- Great savings
- Delivered to your door
Pre-order your copy!
- Delivered to your doorstep!
- Free UK delivery!



 Register
 Log-in


