| Thread: Wandering mill table |
| 23/10/2021 09:14:51 |
Bit a of a long shot this its 40 years since i built my Dore wesbury mill, the two steel flat bars that are fitted to the underside of the table one of which provides the narrow guide for the gib strip to run on and sit under the two steel strips which form the bearing surface for the table to traverse on ,all of these strips of steel are attached with countersunk screws ,the guide strip should have a a couple of hollow spring dowels to secure the strip to the table .It may be worth checking if the guide strip that is fitted to the underside of the table is still secure and the screws are still tight as if the strip moves about the table would wobble as you have described.
John
|
| Thread: Myford ml7 "parting off"and "max working size" |
| 22/10/2021 12:53:46 |
Wash the drive belt and pulley's with paint thinners dry off and get some belt dressing spray (Rocol) it will help with the belt slipping problem for a while until the belt gets contaminated with oil again ,have similar problems with my super 7.
John
|
| Thread: Spacing of buttons for making involute cutters |
| 21/10/2021 18:43:23 |
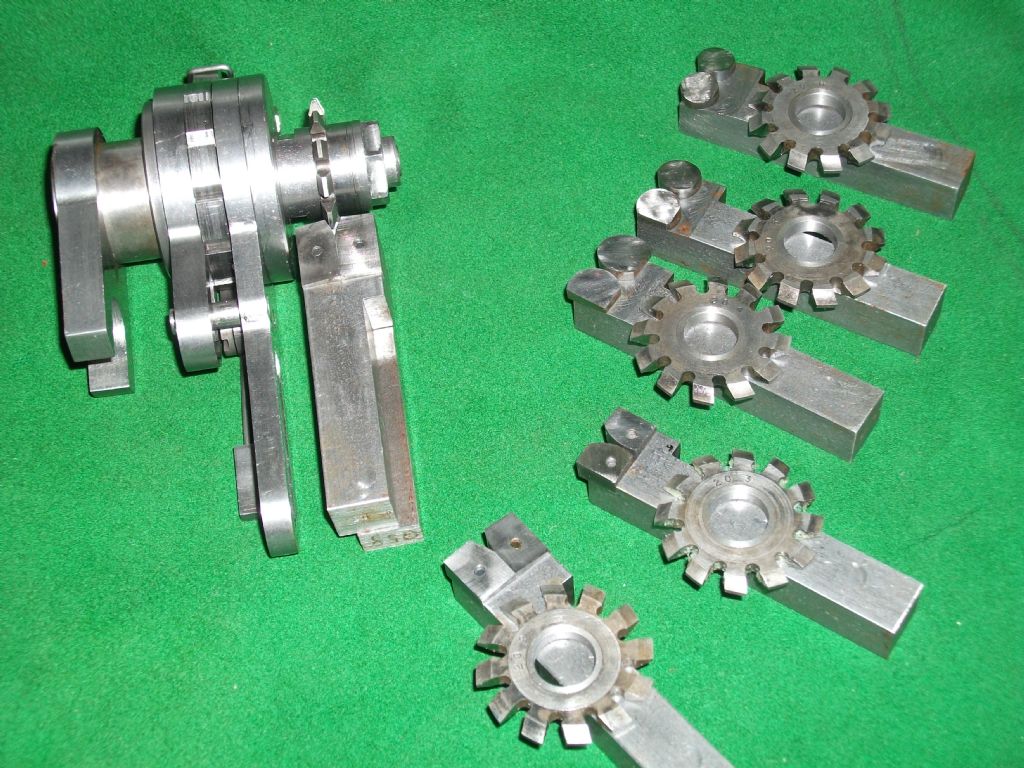
Button form tools used on the Eureka device can be a problem
to make in the sizes above cutter No 4 the radius is so large
that it would interfere with the body of the device , see here the photo
of 6 off 20 DP 20 pa cutters and tooling to make them .
Only a small part of the circle is needed to form the cutter in the
sizes 3 to 1.
These illustrations taken from an old book shows how this used
to be done and may be of some interest especially if you have
a shaper ,i don't need to add any more the pages show it all.
John


|
| Thread: cutting spur gears on a mill |
| 08/10/2021 09:42:46 |
Posted by Jason B 8 10 2021 07:15:50
Brian Wrote
"I wonder what DP Myford gears were made to? They look crude and square CI to me at first glance must examine one closely. I stole a spotty neighbours kids USB microscope (Bresser) and it provides very usable pix at 20X on my PC screen, at 80x I can even see little living amoeba in our pond water, maybe grow some tardigrads"
Why on earth would you need to go to the trouble of using a microscope to find out the DP of Myford gears?
With all the links to various gear calculation charts in this thread etc You should have no difficulty in working it out all you need is OD and number of teeth which should be easy enough to see and in most cases give you a usable answer. PA has also been mentioned here and probably DP too. This is the way a beginner with limited resorces can work out gear sizes I would have thought that would be right up your street.
Hopefully beginners have learnt from this thread but from your methods to work out the DP of Myford gears you certainly have not picked up much useful information and it is no wonder you have not been able to come up with 2:1 gears yet as it's these every things that need to be understood to be able to design simple gears.
Edited By JasonB on 08/10/2021 08:07:40
================================================
I just wonder who that this reply was aimed at as all of Brian Jones 11 's postings seemed to have disappeared from this thread ,shades of Barrie Lever .I thought that the posting that you put up in Home cnc the other day here
"From Previous posts on here the Wabeco machines seem to perform well, have a look back for posts by barrie Lever. "
was bit daft as all of his postings have been removed and is only referred to as Former member.
John
|
| Thread: gr 8.8 ht bolt steel which carbide tip |
| 06/10/2021 20:00:40 |
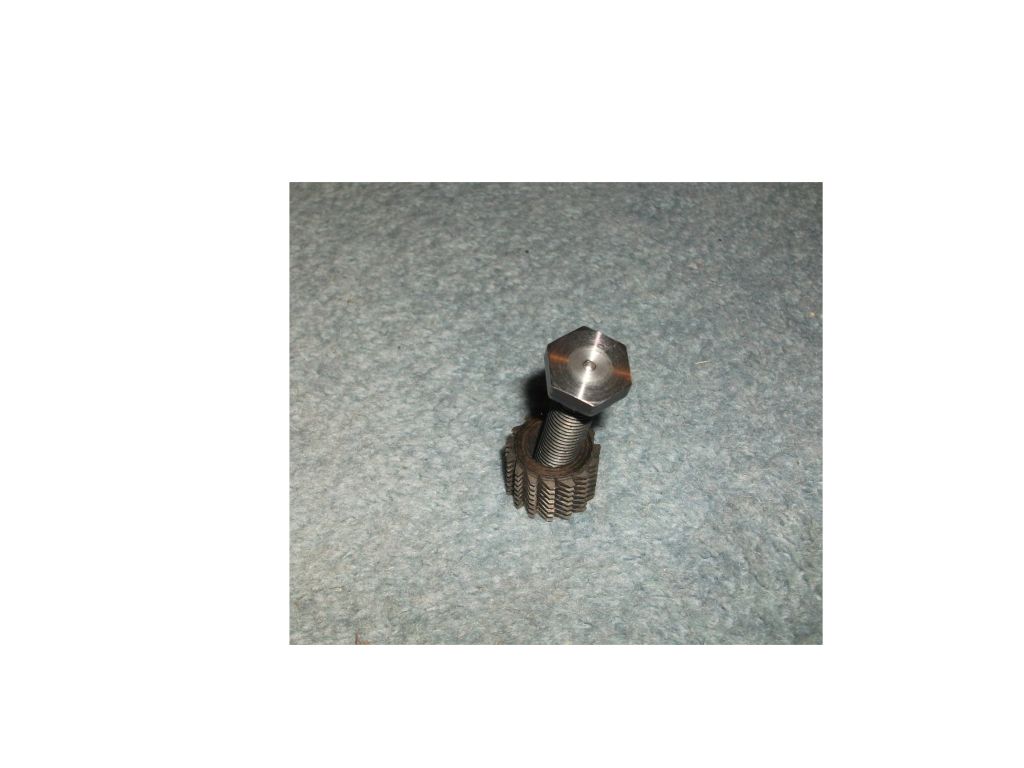
Here is an 8.8 bolt head faced off by hand with a 23 pence tip from Ali******s ,one real difference that you can positively identify from a £5 one is £4.77 in change.
John
|
| 06/10/2021 16:22:58 |
Posted by Brian jones 11 06/10/2021 15:24:33
obtw I think Ive been down this road before but it seems EB is utterly flooded with
PRC offers of complet???? sets of tools and inserts most of which i dont want
AFAIK you cant buy individual tool holders like I want 3 for lh rh centre for a
triangle insert say and 10mm (not the more popular 12mm
any suggestions - how i hate abusive EB pursuing profits before public
benefit - where have I heard that already
Brian
Hi Brian,
I buy my cutting tips from Ali*****ss the last set i bought were
CCMT 060204 VP15TF Mitsubishi they are only £2.30 for a box
including the VAT and free shipping for 10 tips and are as good as any
tips that i have had over the years .
If you look around on that site the tool holders are there for probably
less than £8 each.
I can't put up the part numbers on here as they will be taken down, if you
want them send a PM and i will send back by return.
John
|
| Thread: MES Kennett tool and cutter grinder |
| 04/10/2021 19:36:17 |
The Kennet much like the Quorn grinder has about the most
useless wheel guard you could imagine ,since building
my Quorn grinder about 36 years ago although i made and
finished the guard i have never used it ,the access when
grinding tools with a guard fitted is so poor even if you do
make a guard is such that you will also most probably
never use it , invest in some face covering and protection
don't use the machine and stand in line with the wheel when running
and above all don't let anyone else use the cutter grinder .
Used sensibly the wheels will last a very long time i
still have all of the original wheels that were supplied with
the kit when i bought it .
If you intend to go the diamond wheel route Alie****ss
do several variations of nickle plated wheels which are ideal for use
on the Quorn or Kennet ,there is no point in giving the part numbers
here as they will only be removed.
John
Edited By John P on 04/10/2021 19:37:43 |
| Thread: cutting spur gears on a mill |
| 28/09/2021 10:06:33 |

|
| Thread: Turning (approximating) a Domed Surface |
| 27/09/2021 18:52:30 |
Just found this photo re my last post showing
set up for turning small radius.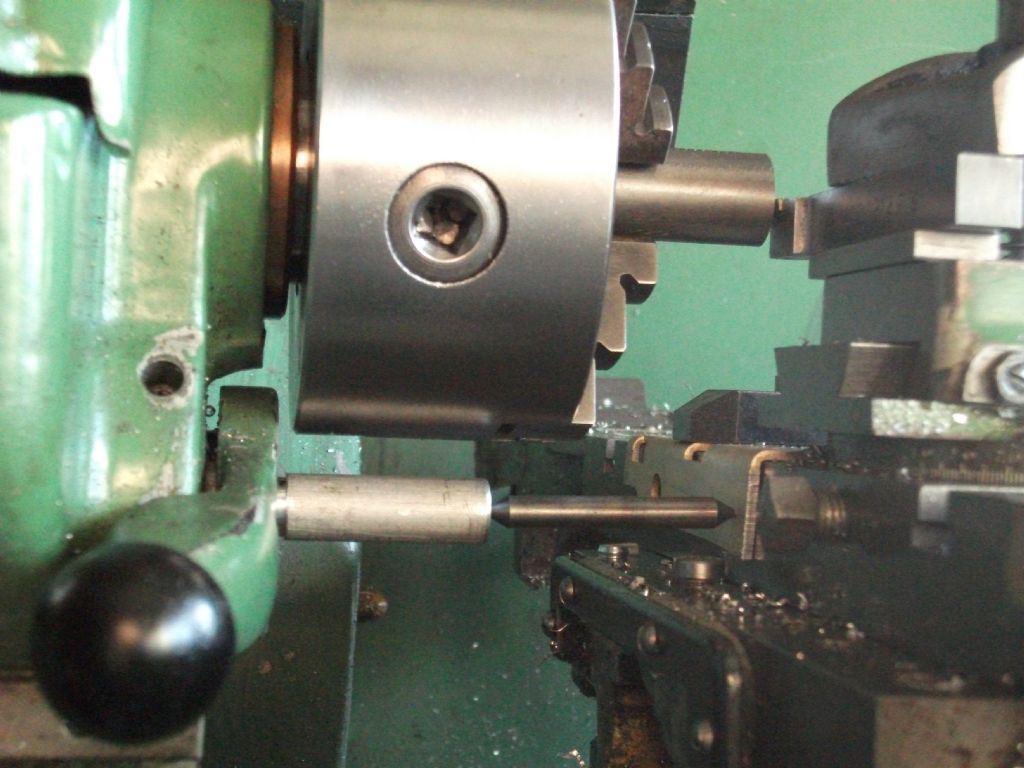
John
|
| 27/09/2021 18:44:59 |
Posted by Dr_GMJN 27/09/2021 16:30:39
All,
I need to turn a dome shape for a pair of cylinder caps. Similar to a typical
smokebox door kind of thing.
I've heard of using co-ordinates on the cross and top slide,
presumably in conjunction with turning the top-slide to different
tangent angles. Can anyone tell me the procedure, and also what's the best
way of smoothing the facets generated? I want them to be identical.
Material is cast iron. Radius of the dome is about 50mm, and
the diameter of the domed disc is about 25mm
Thanks.
----------------------------------------------------------------
The easy route to turn this type of radius
is to use fixed length rod the radius you need
with point on each end and one fixed place
on the lathe bed for one end of the
radius rod and one fixed place on the crosslide
for the other end see sketch.
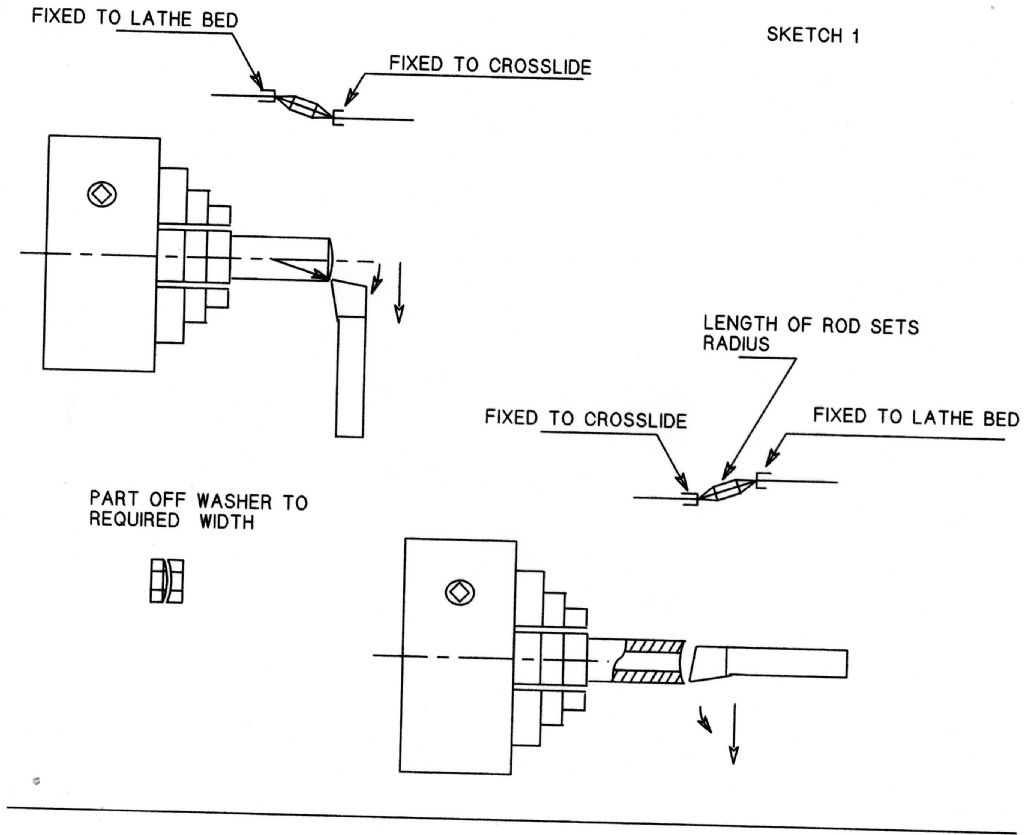
In use some pressure is applied with the carriage
feed handle to keep the rod in place.
With the tool tip on centre the radius rod is parallel
with the lathe bed,as the crosslide is moved out the
pressure applied to the carrage feed moves the tool
in the required radius,depth of cut is applied via the topslide.
John
|
| Thread: cutting spur gears on a mill |
| 26/09/2021 11:28:49 |
Posted by brian jones 11 25/09/2021 15:48:26
Looking at the Crown and bevel pinion, without the
benefit of CNC how does one make those pieces
---------------------------------------------------
It would be worth Brian getting a copy of
Gears and gear cutting and reading through it.
Making parallel depth bevel gears is not that difficult
if you follow the the instructions in the book.
I have made several sets of parallel depth gears over the
years ,if you set up and mark the centre they can be done
in just two passes ( which would obviously please one
particular poster on here ,or maybe not).
I had always been a bit skeptical as the the long term use
and how much power they would transmit until the last set
that i made.
Material selection is obviously of importance ,so a rummage
around in the scrap box and a couple of likely rusty candidates
emerged.
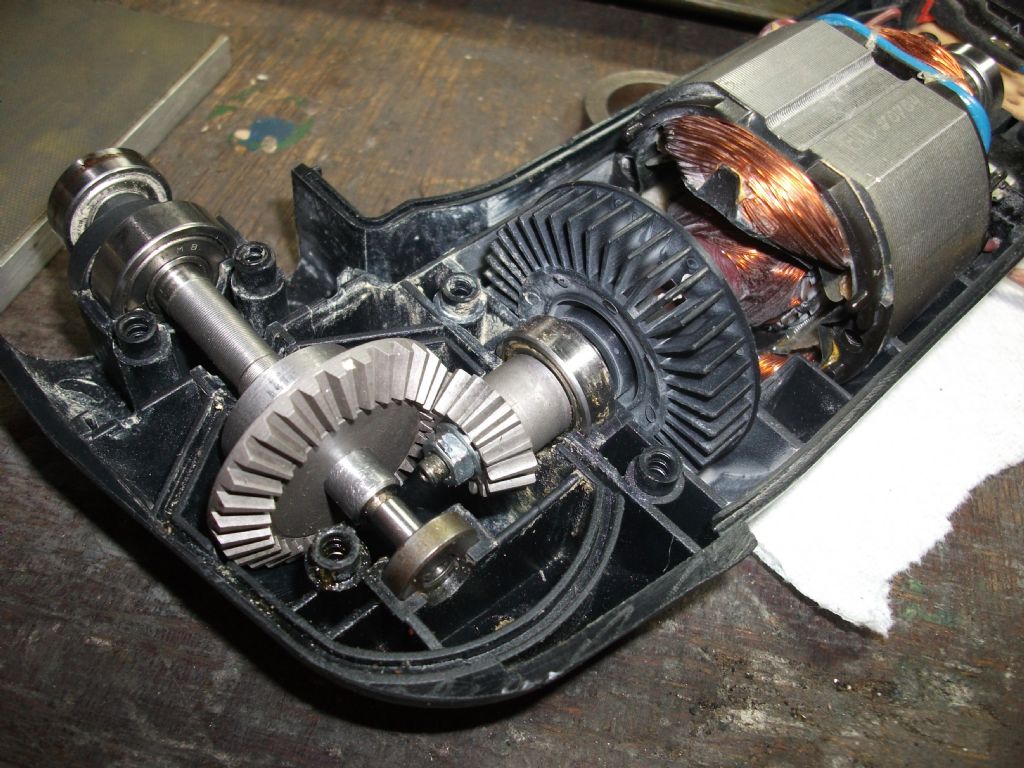
The job was a pair of gears to replace the stripped bevel gears
in a detail sander (Wickes).
I was unable to get the exact tooth count of the original gears
but the gears that were made are close enough.
The cut gears were lapped together for a while with some
Timesaver green label fine abrasive, cleaned and sandblasted
then soaked in some Kasenit in a sealed tin for an hour .
Here is the finished job ,the pinion runs at about 18 to 19000
rpm and surprisingly reasonably quiet.
I wonder if Brian has looked in at this forum post and the link
to this amazing piece of work.
Do you think that the gears have been
cut one tooth at a time
https://www.model-engineer.co.uk/forums/postings.asp?th=174884
John
|
| 25/09/2021 19:44:03 |
Posted by brian jones 11 25/09/2021 19:21:37
What astonishes me JP that in this day of unbelievable high tech gadgetry at such
low cost, we havent seen a means of laser scanning the gear you showed in your
pic above cos thats the degree of measurement needed. Feed the data into an
app and get a best estimate of what you have.
After all thats what the big boys do when making big gears, they measure to
microns across a diameter of 10 meters
thats cooking on gas
-------------------------------------------------------------------------------------
The micrometer was only £25, i guess that your eyeball
measuring system of measuring PA has failed on this
occasion.
Gas supply failure!
|
| 25/09/2021 18:22:51 |
Posted by brian jones 11 24/09/2021 14:41:58
ll you needed to know about CP and the Base Bitch
https://www.geartechnology.com/articles/0992/Base_Pitch_Tables/
this past post went into the problems of measuring a gear (as opposed to calcs + suck it and see)
You cant just use calipers / disc mic and measure PCD just like that
https://www.model-engineer.co.uk/forums/postings.asp?th=166048
If you have two gears meshed together you can deduce the pcd from distance between centres
then there's the eyeball method
======================================
The last 2 lines is where Brian's methods of measuring all fall down.
Whilst it is true you can deduce the PCD from the distance between
centres it is of little use if you are making a pair of gears to fit
between pre determined and existing fixed centres ,you would need to be able
to measure the gears with some accuracy before they are removed
from the machine on which they are cut.
Still we have seen from his methods of working from
posting on 13 / 9 / 2021 12:30:19
Difficult to make two gears that will mesh together from fixed centres.
Drill your centers afterwards.
---------------------------------------
With regard to eyeballing the pressure angle , here is
a small gear the OD is 18.970 mm or .7468", the span across
2 teeth is 6.112 mm as can be best determined from the
micrometer reading.
Now is it possible to eyeball the pressure angle as suggested
by BJ 11 or will a guess do .
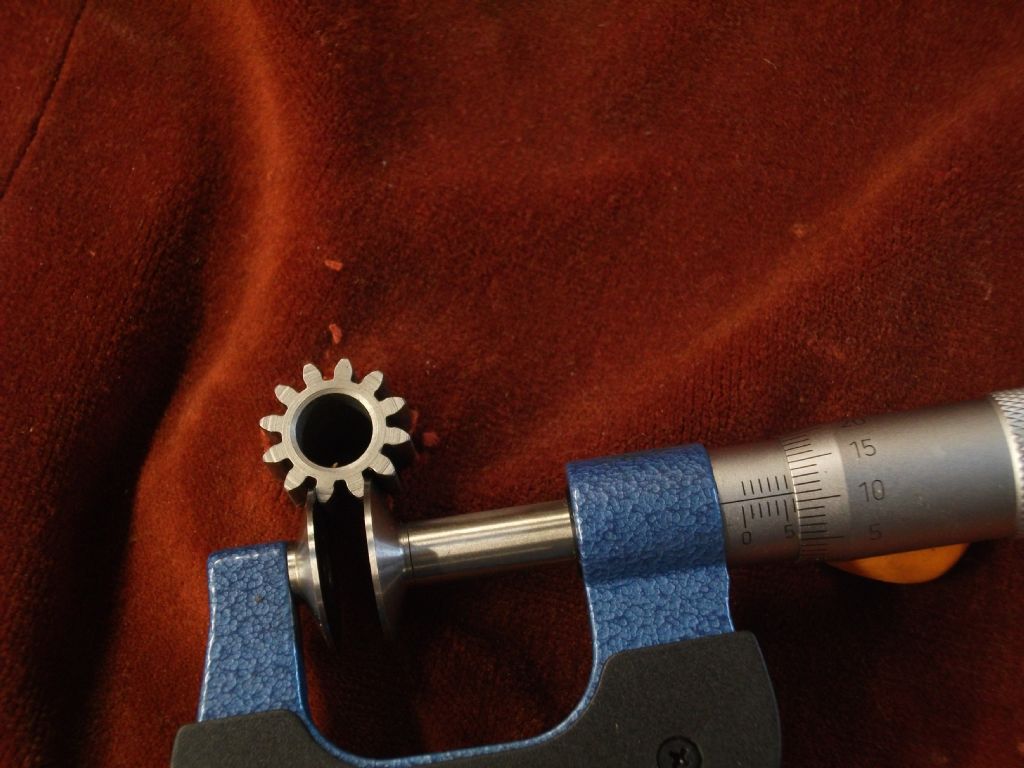
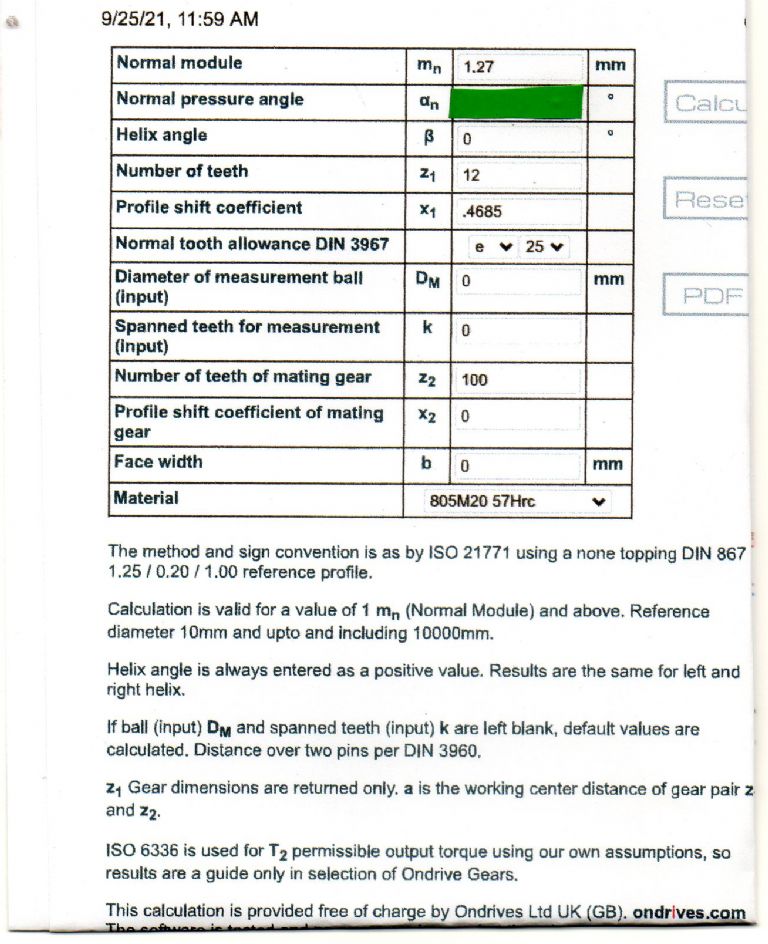
There are only 2 options 14.5 deg pa or 20 deg pa.
Here are the required inputs for the Ondrives gear tooth
calculator only the input for pa is missing , give it a try
and see which one of the two that it is and how close the
answer is to the micrometer reading. The results for both
are very close but one is a clear leader.
Seeing Andrew's posting 23/09/2021 21:25:25
When I started making gears I spent some time faffing about with gear verniers
I didn't find them easy to use and the results were indifferent. Now I just calculate
the theoretical values and machine to those.
-----------------------------------
I can understand this point of view with the gear tooth calipers ,they always
seemed to me to be a hit and miss method , the span measurement seems to offer
a slightly more accurate solution ,the Ondrives also does give the measurement
across 2 pins which is likely to be the most accurate method obviously the requirement
to grind 2 suitable pins is just more to do.
Hobbing can be different to using form cutters in as much you can keep cutting in
and still retain the tooth form which you can't do with form cutters.Only one of the hob
cutters that i have has the infeed marked on ,using the general recommendation for
cut depth does not work either ,eg in Gears and gear cutting the tooth depth cut
for 20 dp is .108 inch both my 20 dp hobs need to infeed by .1115 inch
to cut to standard form.All of the hobs that Arc Euro used to sell were Topping
cut hobs and still did not conform to standard cut depths,all of this you find out
in time until it is no longer a problem ,being able to measure is just a help.
I suppose it could be time to reflect on the heading of this
thread
cutting spur gears on a mill
and on the first lines
" I have seen vids of using diving head for use with a milling form tool for cutting
a spur gear say 3" dia, 1/4" thick with say 80 teeth
OMG what a painfully slow process as you mill each one"
All of this diversion into the discussion of wind turbines etc has seen a complete
lack of gears made, maybe we will be getting on to hot air engines very soon,
should be enough of it to keep one running until the sun goes dim.
John
Just seen this from BJ: "Maureen has my secret weapon in her jaws I must get on"
Stay tuned for the next thrilling installment!.
John
|
| 23/09/2021 19:11:52 |
Posted by Andrew Johnston 23/09/2021 15:22:18
Posted by brian jones 11 on 19/09/2021 23:06:16:
....CP Circular pitch addresses the same size issue and is
physically realisable ie you can measure it with calipers...
You can't measure CP with calipers. Circular pitch is defined
as the length of an arc on the pitch circle diameter. A caliper
measures between two points on a line, which is also not likely
to intersect the PCD at the point of measurement. Using a caliper
to measure across multiple teeth doesn't give CP either. There
are published tables that give theoretical values measured across
multiple teeth to get pitch and backlash, but they don't give CP.
Andrew
------------------------------------------------------------
Whilst this is true and you can calculate the sizes of gears in
circular pitch, you can check the size of the made gear by
measuring across a number of teeth using this calculator from Ondrives
https://www.mesys.ch/calc/ondrives.fcgi
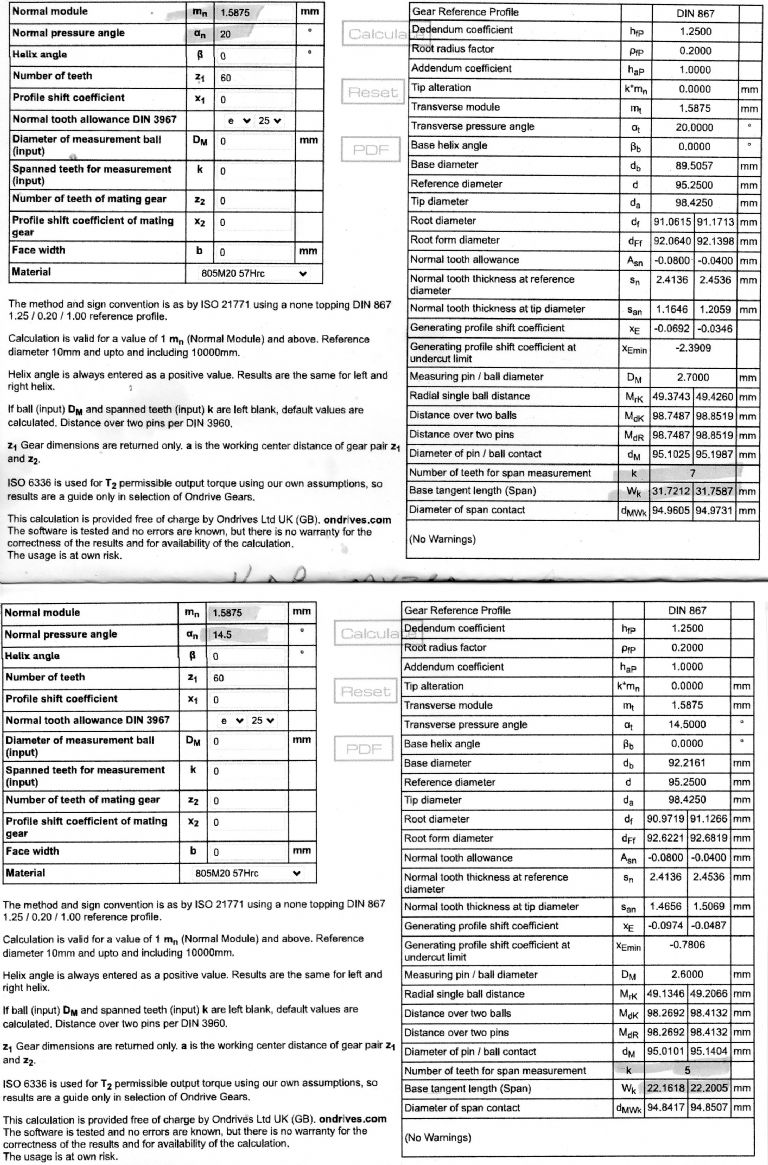
The inputs are module gear sizes for example the bull gear
here on the Myford at 16 DP
Input on the top left column 16 Dp = 1.5875 module
second line down pressure angle 20 deg
9th line down if you put in a tooth count any number
eg 60 tooth the diagram at the bottom of the page
will show the tooth profile of the main and mating gear.
The 6th column down is the normal tooth allowance
DIN 3967 adjusting the number in the check box will adjust the
Base tangent span at the bottom of the right hand column
(Left box)
and display the gear profile and backlash at the bottom of the
page.The two examples here also show how you can check
the PA of a gear ,something that crops up fairly often on the
forum ,as can be seen numbers of teeth in the span are different,
at around 30 tooth the differences are quite small but still enough
to be a reliable indicator.
Getting back to the CP measurement to convert cp to mod
eg .150" = 3.81 mm 3.81/ Pi = 1.212760666 module
feed this into the Ondrives calculator here.
and use this to check the gear.
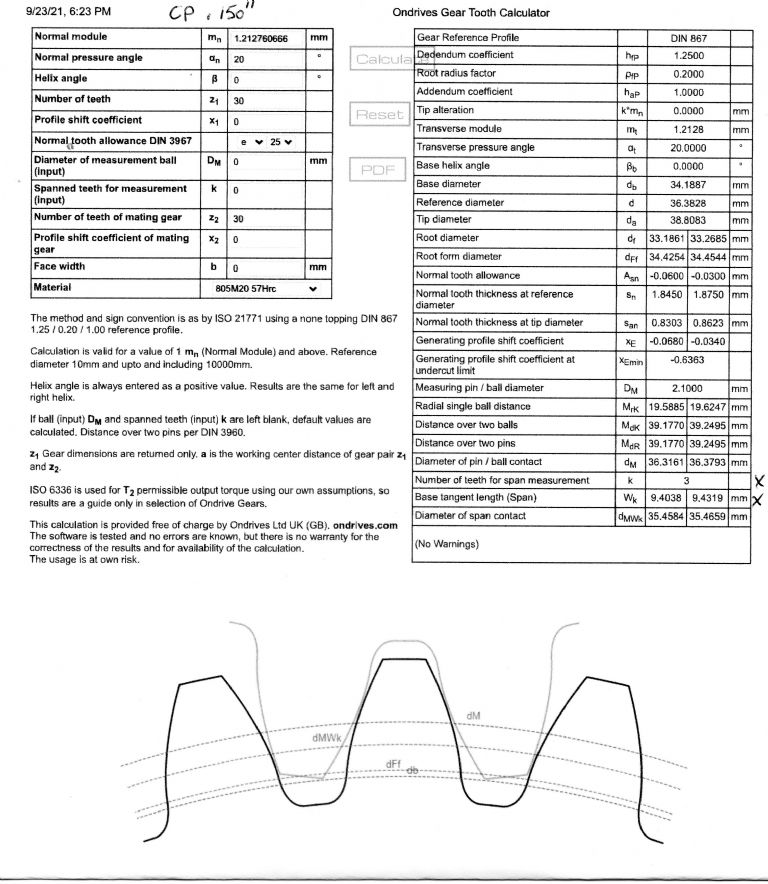
.
Going back to the Myford gear.
From the previous table for the Myford bull wheel
here is the gear as measured appears to be about
.006 mm over the size indicated on the table.
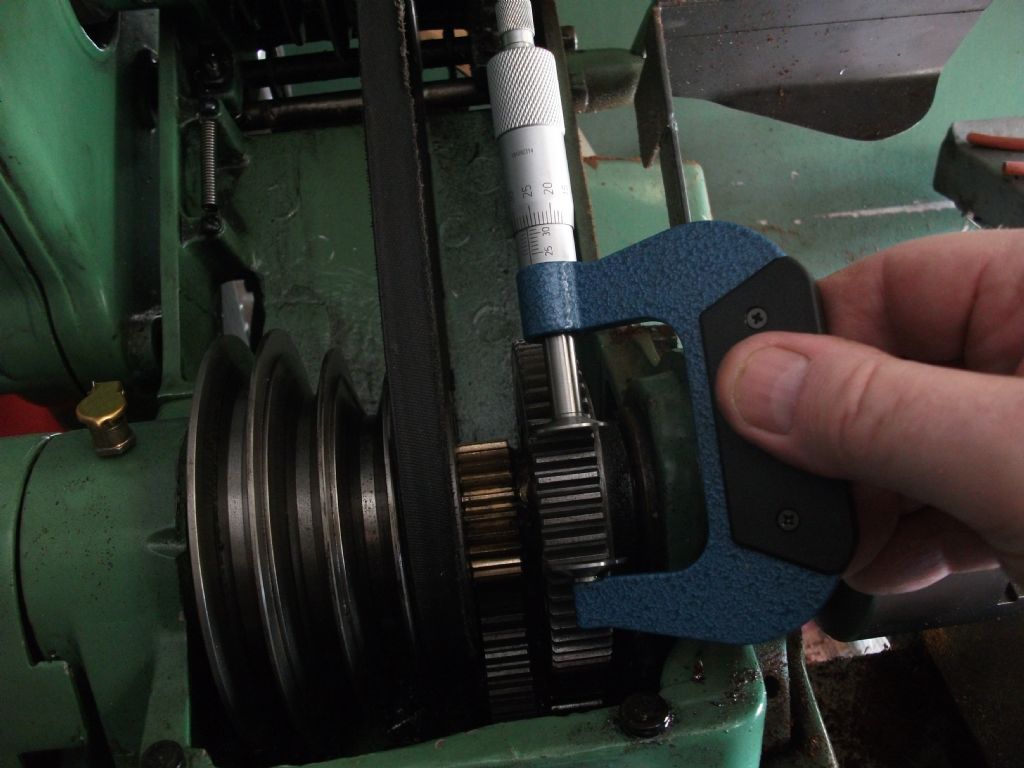
A disc type micrometer is a useful thing to have
to measure these gears a normal caliper may fit in
providing the jaws will get past the pitch circle.
John
|
| 23/09/2021 15:13:13 |
I'm being generous here , Brian 5/10 but Andrew gets 10/10.
John
|
| 23/09/2021 13:55:08 |
Posted by brian jones 11 23/09/2021 11:58:05
Posted by John P on 18/09/2021 11:40:12:
Somehow doubt if BJ 11 would be interested in cutting a rack.
This one here took over 5 hours to cut the 159 teeth.
Was definitely a "OMG what a painfully slow process as you mill each one"
John
----------------------------------------------------------------------------
You see I knew you were doing it wrong
you need a cycloid profile for rack and pinion
https://www.geartechnology.com/articles/0115/Non-Involute_Gearing,
_Function_and_Manufacturing_Compared_to_Established_Gear_Designs/
That why I suggested a motor bike chain
fascinating stuff
Whack a Mole
------------------------------------------------------------
I suppose 5 hours + for cutting rack teeth passes into
insignificance in comparison 14 + years and still
counting in making the parts the rack fits to.
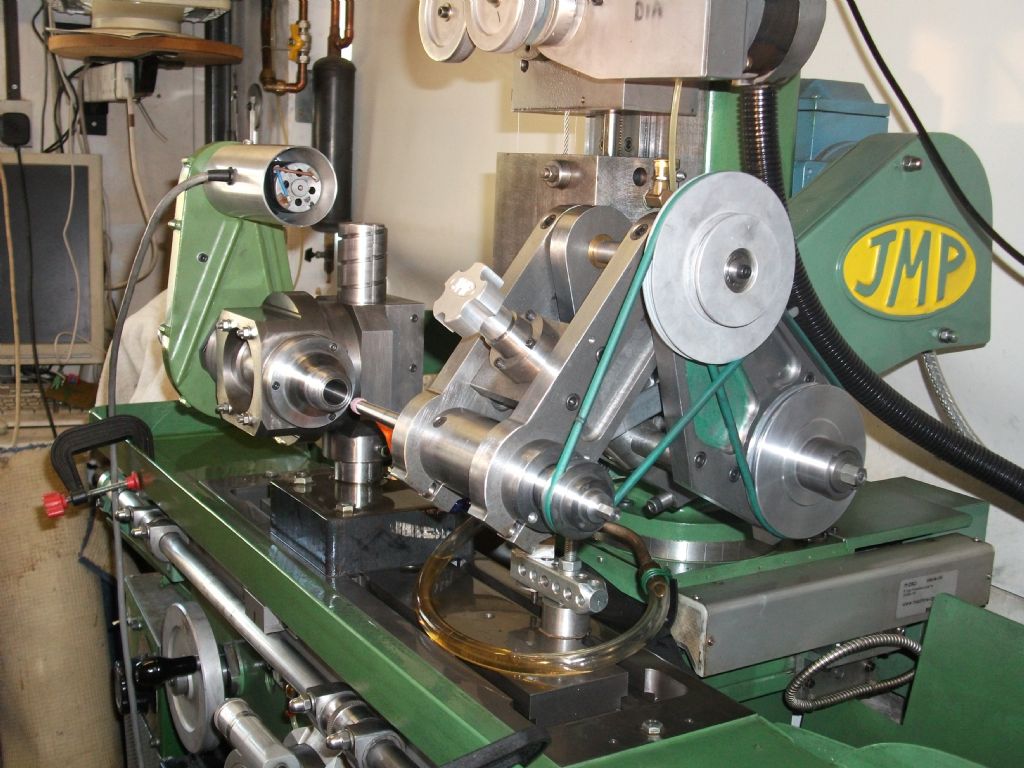
It's called making things
John
|
| 23/09/2021 11:41:42 |
Posted by brian jones 11 19/09/2021 23:06:16
Why was the concept of DP Diametral Pitch introduced when the CP
Circular pitch addresses the same size issue and is physically
realisable ie you can measure it with calipers
----------------------------------------------------------
I expect it was more to do with the folk around at the time of his
avatar setting out gears with calipers and circles of whole inches.
Maybe it goes back further than this even to the time
of wooden gears in wind mills.
Although this does raise an interesting point for model makers ,
just like using stock size threads mostly all gearing is
Dp or module and made to a standard, for the production of
small gearing and rack type rotary cutters this does not make
much sense.For model engineering applications the only considerations
for gears would be to fit in the space available the required tooth count
and to look in the correct proportions it does not matter whether
they are mod or dp or cp standard.
Pitching out a 20 dp circular rack type cutter at .1571 inch is just
plain daft, since a cutter is being made it would seem to be
more sensible to use a CP system either imperial or metric
depending if that you favor one or the other units.
Laying out the spacing between each tooth can be so much easier
using this system .The page here
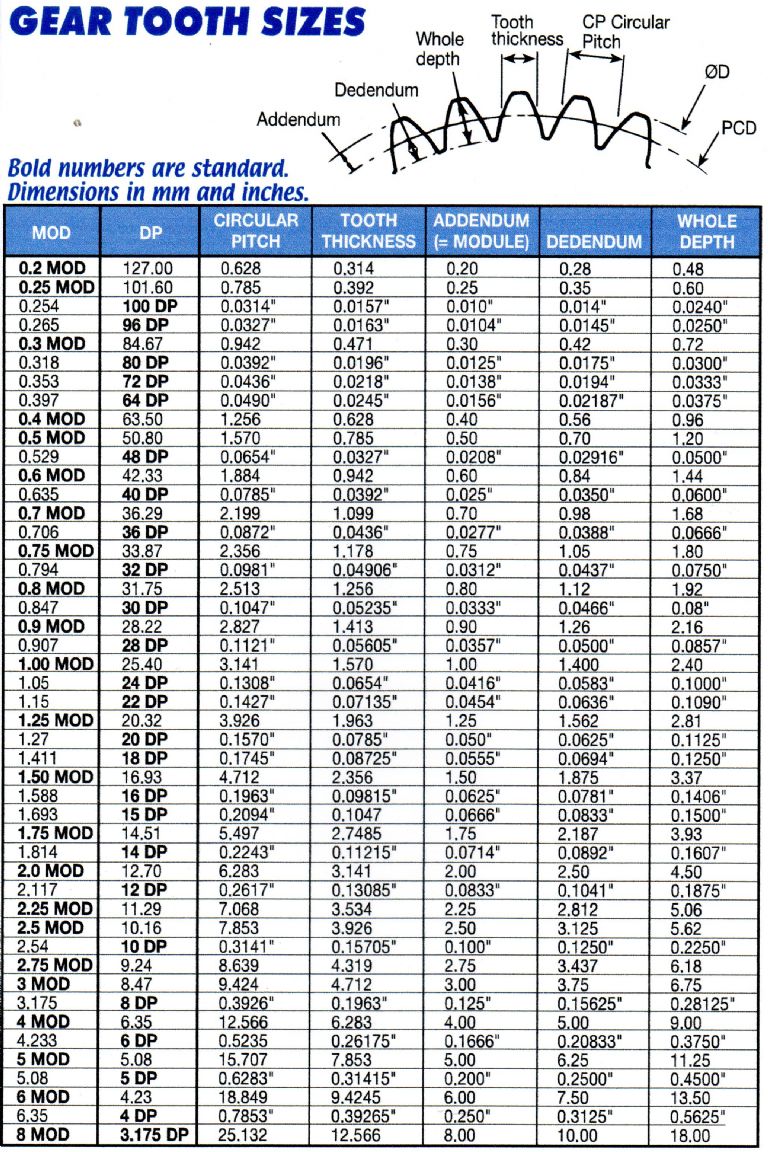
shows the near equivalent DP,CP ,MOD ,providing there is no intention
to link up to a commercial gear train there is little point in doing it from
a model engineering perspective.
Dividing also becomes somewhat easier from the example above of 20 dp.
eg for 20 tooth gear pitched out now at .150" CP instead of .1571 "
moving the cutter down by . 030 inch and setting the dividing head
to cut 100 divisions would ensure accurately timed cuts leaving just a
few facets on each tooth.Similar combinations of other size gears
just need to be worked out.
The chart here
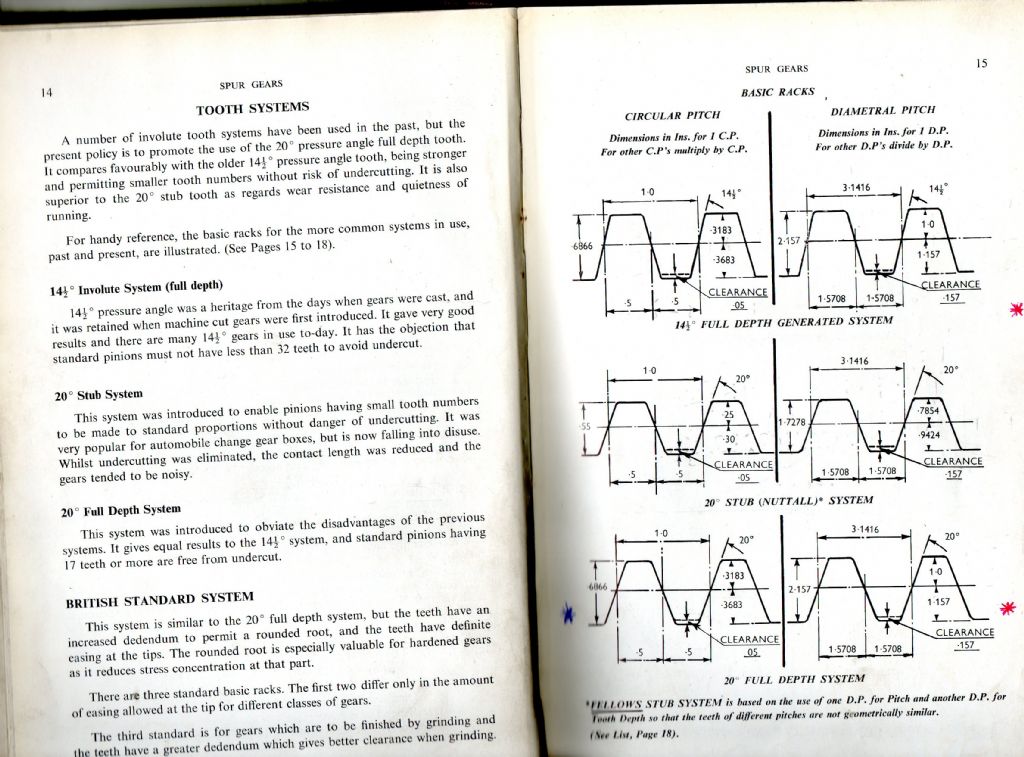
shows the basic rack dimensions
and there is enough information there to calculate the tip width
and from that a form tool can be ground to make the cutter.
There is some benefit to having cutters properly form
relieved to avoid the type of finishes noted by
Roger Best in his posting 21/09/2021 21:57:52
"I did see some very good imitations of severely worn traction engine
gears. Modelling to such realistic detail is wonderful."
I made one of these circular rack cutters around 1985,because the
cutter had no form relief the cutting action was so poor i never
pursued the idea further,seen here a pair of
timing gears and a cast crank case it was never completed.
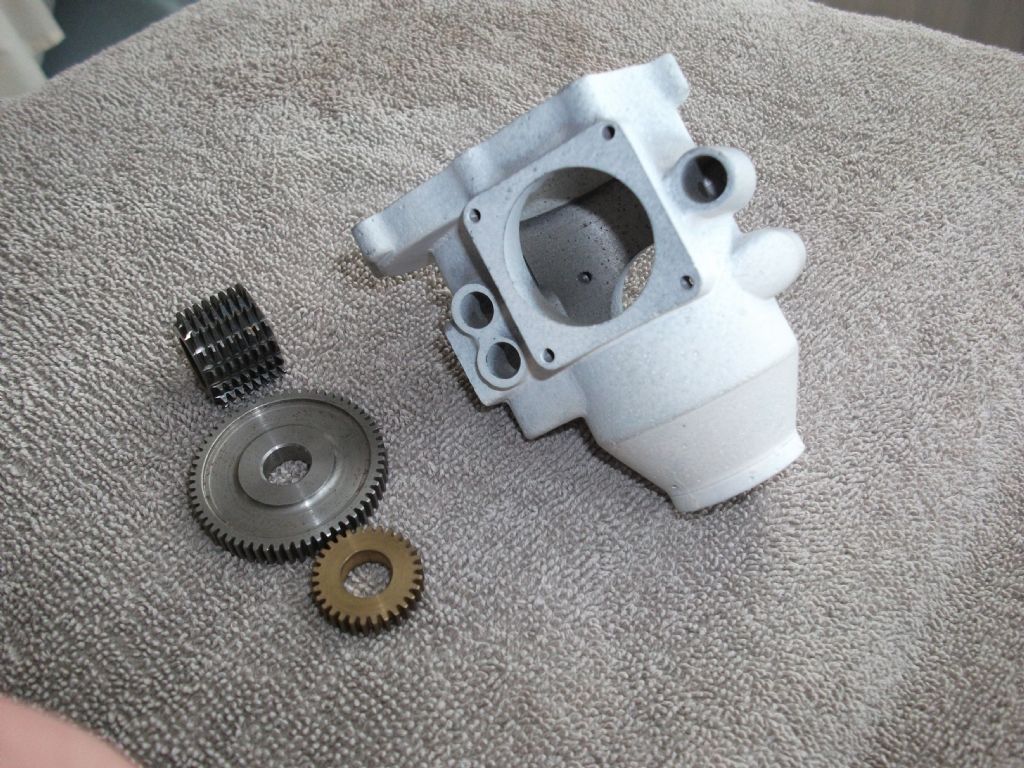
A few years later the Eureka device was published and provided
an easy solution to the making of form relived cutters.
Look in at Lathes .uk the latest submission there is a
Micron gear hobber 102 a very interesting machine,
apparently will cut gears down to 800 dp.
In the section Brief General Catalogue 1960s-70s
shows the smallest gear in the world the profile of the teeth
looks remarkedly similar to BJ 11's gears.
Finally with interest shown on here with horology and armchairs
maybe a combination project would be of interest.
John

|
| 20/09/2021 10:53:33 |
Posted by brian jones 11 19/09/2021 22:54:39
Piccie of the armchair, big trough in the squab is there?
Cant really see what happening at the business end, the
spindle is clamped and you motor the y slide in and out to
cut the tooth, then index along x wise for the next tooth is it?
5 hours phew, were you compensated by the hour?
Could this duty not have been done with a motorbike chain?
---------------------------------
Here is another view of the cutter and the rack .
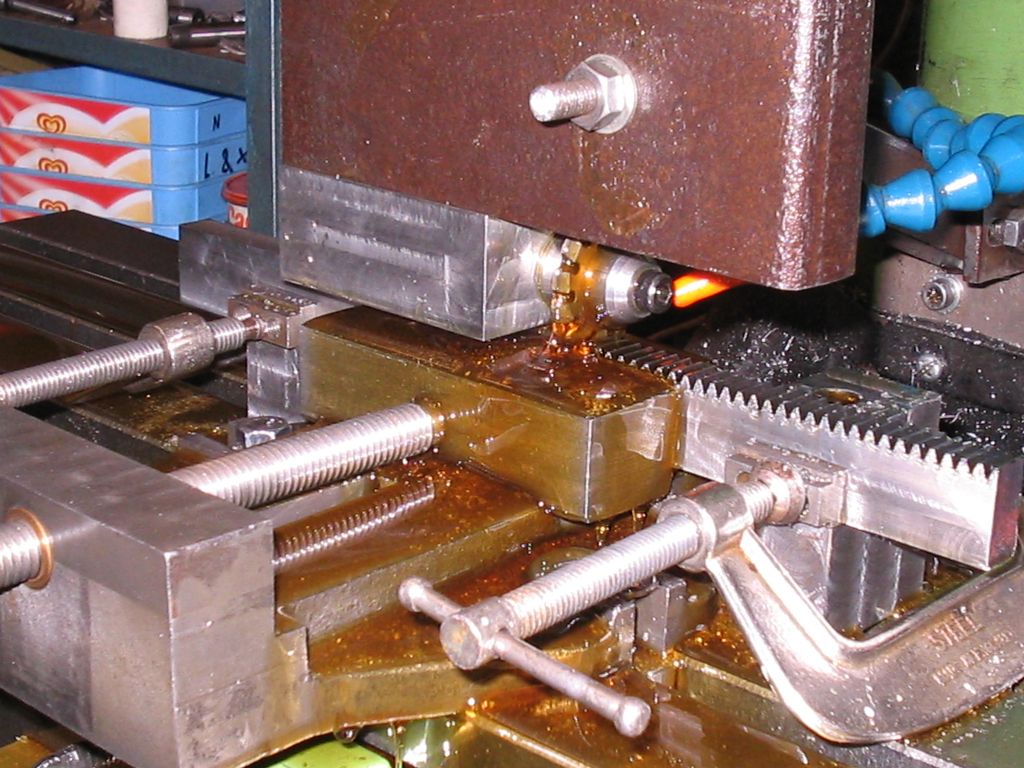
Not really as bad as it sounds at 159 tooth and 2
minutes a tooth ,that is to cut the tooth retract set to
next position . 2 x 159 = 318 minutes 5 hours 9 minutes.
It is only a hobby machine ,i have 7 other machines
that run as part cnc that use the same system ,both Doreen and
Maureen have been Cnc'd for about 16 years.
It would of course be possible to have the all running at the same
time i guess it would be like

but much better to have just the one running at a time so you can
enjoy the

The bike chain idea has some appeal ,easy enough to nip into
town with a pair of bolt cutters ,plenty of choices there ,still
leaves the problem of cutting the sprockets ,back to one
tooth at a time ,another plan foiled.
I'm just worn out writing all of this,where's that armchair.
John
|
| 19/09/2021 22:39:21 |
Posted my Me 18/09/2021 11:40:12
Somehow doubt if BJ 11 would be interested in cutting a rack.
This one here took over 5 hours to cut the 159 teeth.
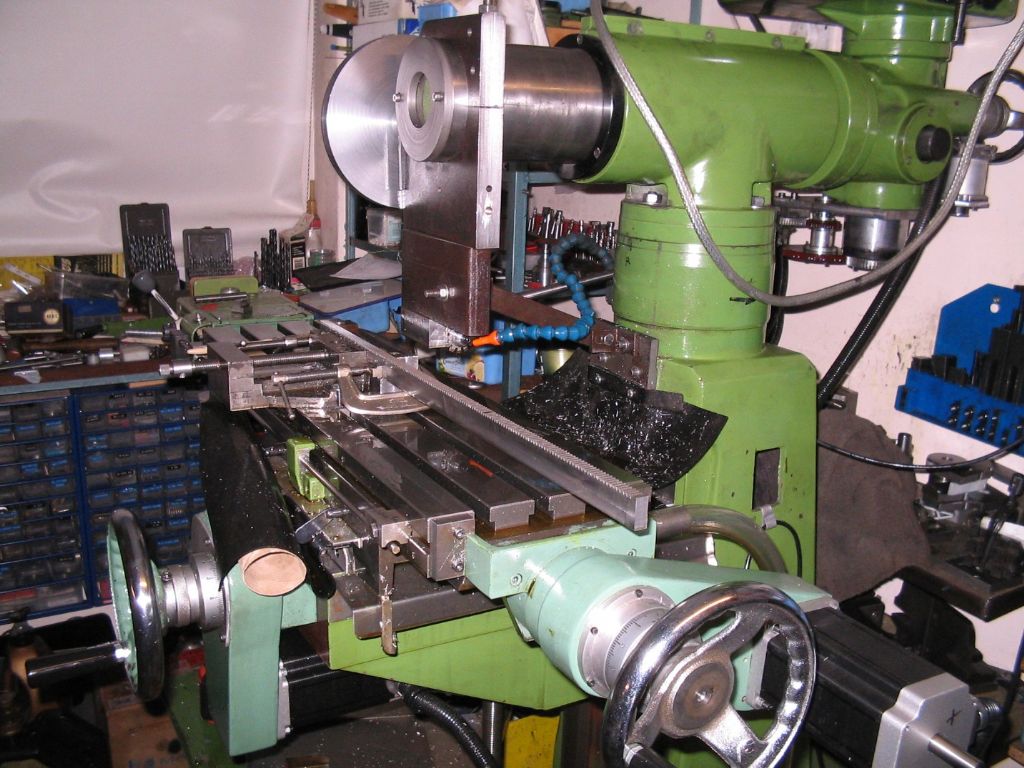
Was definately a "OMG what a painfully slow process as you mill each one"
John
Should have pointed out the machine is part Cnc but he rack is about
25 inches long, table traverse about 21 inch so done in 3 stages ,
reset to do each 8 inch or so length ,plenty of time for a snooze
in an armchair, machine beeps at end of sequence so no need for
alarm clock , pumped oil system so no laborious squirting
of oilcans to disturb slumbers.
John
|
| Thread: What Did You Do Today 2021 |
| 19/09/2021 15:17:36 |
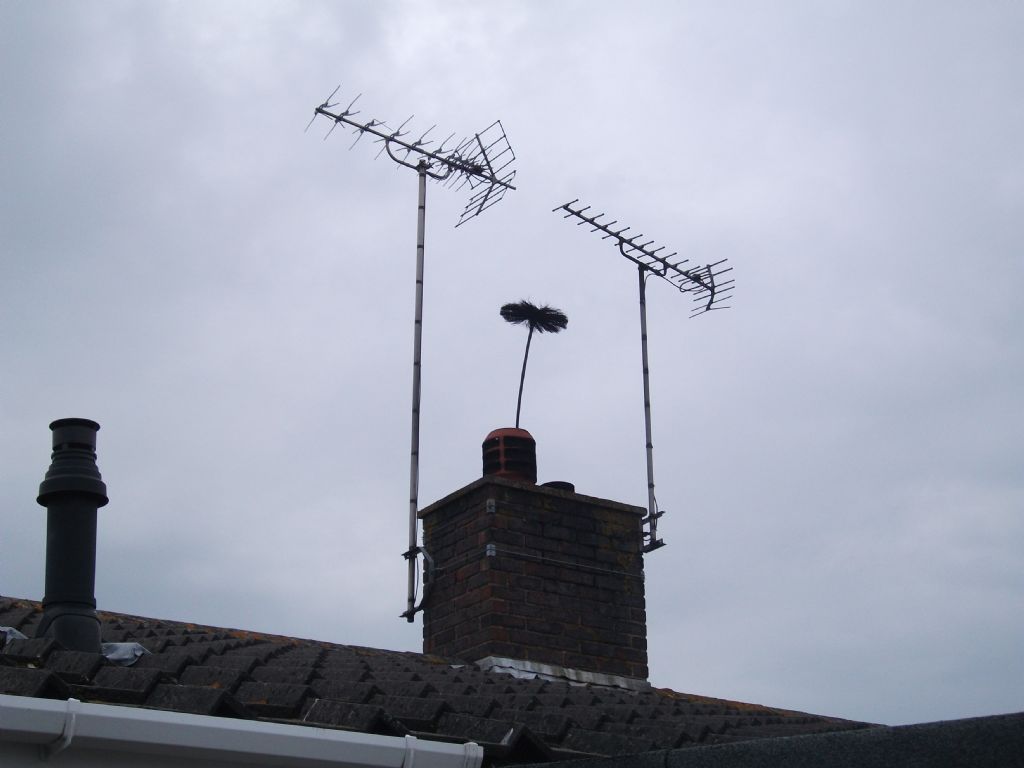
Made a clean sweep today ,last time brush got stuck
in the chimney, managed to retrieve it without enlisting
the help of a 4 year old.
Handle fell of the vacuum cleaner haven't been in the
workshop since mid April had to venture out for emergency
repairs, everything where i left it , still can't find it though.
John
|


 Register
 Log-in


