Member postings for Johan Crous
Here is a list of all the postings Johan Crous has made in our forums. Click on a thread name to jump to the thread.
| Thread: Radius Jig Plan |
| 26/09/2023 19:57:09 |
Noel, I have done some crazy stuff in my life. I am sure I will think of something. I am now busy with an endmill jig that use a MT3 collet chuck ean therafter I will tackle this. I will keep you guys up to date. |
| 26/09/2023 14:21:51 |
Thank you. |
| 25/09/2023 18:38:11 |
I am looking for a plan to construct a radius jig for the Harold Hall grinding table.
I would like to grind radiuses on HSS tool shafts and I would like to sharpen ball shaped milling cutters. I am thinking in the line of adding the Harold Hall end mill attachment on top of the radius jig or the other tool holeder to clamp HSS rods or shafts. A picture / photograph from where I can get an idea will also be appreciated. |
| Thread: CBN advice seeked. |
| 12/03/2020 16:25:14 |
Posted by Joseph Noci 1 on 03/03/2020 05:07:40:
Johan, I had CBN and Diamond wheels or various grits, shapes and sizes made for me at the place indicated below. Pierre was very helpful. They are close to your location ( I am in Swakopmund) and were quick to make.
Bay Abrasives cc 60 Worraker Street, Newton Park Port Elizabeth, South Africa Tel : 041-3653137 Fax : 0862703723 Cell : 0827826235 Email : [email protected] Web site: **LINK**
Edited By Joseph Noci 1 on 03/03/2020 05:10:27
Thank you Joseph, Pierre was very helpful and and I will get my CBN wheel tomorrow. I will recommend his services to anyone. |
| Thread: Basic Harold Hall Rest movement |
| 12/03/2020 16:15:08 |
I am about two thirds completed with the basic grinding rest of Harold Hall. I noticed, as designed, the table have almost unlimited in tilt forward and backwards, but very limited to left and right. With a few small changes to the bottom half of the design, it will be able to tilt just as must to the left and the right as forward and backwards. Is it really essential to be able to tilt left and right much? I am going to implement one of the two changes, as I feel it will make my life easier. The other one depends on the answer. I will show my mods with a pic or two when completed. |
| Thread: CBN advice seeked. |
| 02/03/2020 19:39:03 |
I am in the process of building Harold Hall's grinding rest, along with others as well. I am now also making the grinding head as Mr. Hall described in his book, by using a bench grinder. I could not yet find a form 11 Norton wheel in Cape Town. Everyone is sold out. I am now thinking of buying CBN and diamond wheels at Amazon.com. What grades must I buy? The Aluminium Oxide was 60 grit, but the CBN comes out in several grades. I bought a 150 mm size bench grinder, but I can still use as small as 100 mm wheels.
|
| Thread: Simpler the Better -what do you use? |
| 28/12/2013 19:37:17 |
I agree with you John Although it works great, not everyone have that money to spend.
Although I use ViaCAD 8 Pro (PunchCAD) as mentioned (it can also render and show everything in 3D as well as imports), there are freeware equivilants like Blender 3D (3DS Max equal) - it can do rendering and animations as well. Then you get FreeCAD as well - How good I do not know.
A relative affordable alternative is TurboCAD, but the Pro is getting expensive. There are also a few software giants that allow free student or amateur users to use their products with a few limitations. |
| 19/12/2013 10:08:50 |
I am using ViaCad Pro 8 and have 7 as well. This CAD is produced by PunchCAD. You get consumerCAD: the standard and the Pro, Then you get professional: the Shark lite and Professional.
I am using this now for more than two years and will recommend it to anybody. The learning curve with the video tutorials build in, is reletive easy. Thereafter it is easy to figure things out (for a person not used to 3D CAD) and the forums also give very good assistance.
Th program may be small, compare to industry giants but for what I do, I could not get better. I design everything myself in real size befor I try and in different colours. It is then so easy to see if it will work or not.
Once I have bought ViaCAD 7 Pro, the upgrade to 8 was only half the price. I cannot wait for 9 to come out. Money well spend. 9 onwards will be full 64 bit and 32 bit, but 8 and earlier is 32 bit, but functions perfectly in both Win 7 and 8, and 64 bit.
The program imports other format relative well. When I design for example a Belt sander, I import the elctrical motor and the pillow block bearings and maybe some of the grub screws. No need to redesign everything from scratch. I recently had to draw a 12 inch bicycle wheel for a hand pushed hoe. I imported it perfectly. Edited By Johan Crous on 19/12/2013 10:12:18 |
| Thread: Bender mount Question |
| 15/07/2013 19:51:02 |
I bought such a bender today: http://www.amazon.com/Universal-Bender-Bending-Metal-Square/dp/B0081TLV5A I need advice to mount this bender so that the handle be moved up and down and not side ways. I am partially disabled after a series of surgery and several to come (Hopefully I will heal completely}. In the meantime I am a bit limeted. I would like it if the mount can be portable. Any ideas? |
| Thread: Brass Durability |
| 31/01/2013 20:01:16 |
I have seen countless examples where aluminium was used in stead of steel and it worked. Not so hard but working. |
| Thread: Carbide insert Dovetail Milling Cutter |
| 25/01/2013 16:47:28 |
I have run it now while cutting a deep dovetail for a QCTP tool holder. It is working like a charm. The fluid coolant prevents it from heating up. The swarf produced is razor sharp splinters as the carbide tip is a very sharp, very positive raked tip. The finish is very smooth. It is just slow on my mini-mill, but I am getting there! |
| Thread: Cool down a mini-mill motor. |
| 25/01/2013 16:44:16 |
I have run a long dovetail cut with my homemade dovetail cutter with a single carbide tip. The motor is not getting hot, only moderately warm. |
| Thread: Cheap Coolant system for a mini-mill |
| 25/01/2013 16:41:18 |
There is one further need, and that is perspex sides as splash covers. The dovetail cutter makes a mess!
|
| 24/01/2013 18:52:33 |
I have milled for about an hour today. The motor keeps moderately cool and the cutter remains cold. IT works, even for a homemade carbide insert dovetail cuter. However I have ruined the cutter that ran too hot before the coolant. Tapping fluid as a coolant did not cooled it down enough. The cutter, after sharpened will again be excellent for aluminium and brass. |
| Thread: Mini mill DRO |
| 23/01/2013 18:09:58 |
Any pics? |
| Thread: Cheap Coolant system for a mini-mill |
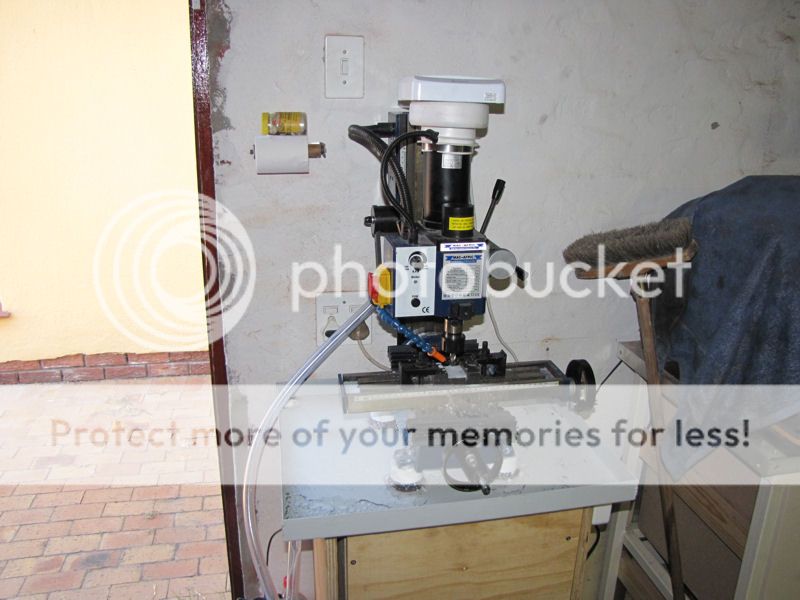
| 23/01/2013 17:00:13 |
OK, here is my humble attept:
First, I have used a 17l bucket, cheaply bought from Plastics for Africa. The nearest I could get in the shape that would still allow the garage door to close.
I have added a drip tray that I have painted gray. On top of the mill you can also see the motor cooling system I have added. Now the motor runs cooler as well as the milling cutter.
The mill is mounted on spacers, that I have sealed with silicone rubber seals as well as a lot of silicone. It is not leaking at all.
The drain is from a boat shop. A smaller than usual basin drain, linked with a pipe to the container.
The return pipe I have covered with a T-shirts sleave to catch all steelal swarf. The material is freeflow for the water. The motor is lying loose. I will make a T fitting later to circulate some fluid directly back to lighter the strain on the motor. It is stronger than needed.
The pipe is coupled to a cheap plastic coolant spout set. Easily and very cheap to replace. This whole set-up is the price of one milling cutter.
Here the coolant is running at the rate I like currently. Time will learn if I should adjust. The flow is aimed on the workpiece, well away from the cutter, but the cutter get enough fluid to stay almost cold, but without the rotating cutter spattering water. (OK, OK, OK, I know the cutter is stationary but I have already switched off when I realised I forgot to take a pic of this last step.
This is a cheap set-up. Only time will learn if the motor's seals or the motor will last. Some people say it will not. Other said they have used it some years like that. So the hell with that. I am trying. If it can last at least a year, then I would have got my money back. I will have to drill a drainage hole in the tables side plate, as currently the coolant is damming up in the t-slots. The cover plate can be removed, so a hole of about 6mm will be enough. Edited By Johan Crous on 23/01/2013 17:06:31 |
| 21/01/2013 20:29:43 |
Amix of 1 : 20 soluble oil and water. Greenish in colour.
|
| 21/01/2013 19:55:25 |
I am now making an El Cheapo coolant system for my mini-mill Johan |
| Thread: Cool down a mini-mill motor. |
| 15/01/2013 21:18:10 |
Ultra quiet. As soft as the sound of a notebook / PC. |
| 14/01/2013 18:38:00 |
I have listened to several replies, also to one that said that the motor can still burn out if it gets too hot inside while you may get the external cool. I have decided on a fan and shrowd, but I am too lazy to make a big project yet, as I would like to evaluate first before I do the mod permanently, and only if it works. I bought a 115 mm extracter fan tha can deliver 76 cubic meters of air per hour and that can run for a very long time. I have set it up to run permanently, as long as the mill is plugged in and the plug switched on, although the machine may be off.
The mill before anything done.
At the bottom of the motor there are four narrow grooves to circulate the air.
On top is a cover that needs to be removed. The little round holes on top is just for show and only air the bearing.
Below the cover there are 8 vetilation holes, but no fan. I guess the rotation of the armature will circulate some air, but very littllow speed, or almost nothing.
Don't laugh. A plumbing coupling fitting for toilet pipes, with a hole cut to allow for the motor's wiring. This fitting is made of white rubber and is flexible. Added to it is a hose clamp. One side ring on the narrow part (nearest to my hand) is cut away to make space for the hose clamp. The ridge is still visable.
Added to the motor with the hose clamp. The motor's wire can be seen extruding through the cut gap.
Air blowing in from the top will be forced through the motor's vetilation holes. None can get past the motor. The fitting will be a tight fir und the extracter fan. No air can escape and the fit is tight enough to keep the fan in place.
The fan in place. The fact that it is white is not so bad in appearance.
The fan's specs.
The current job. Quite a lot of steel to be removed. This will be a parting tool holder for a QCTP. I am cutting the dovetail here. Firt the innitial removal of lots of steel.
AND: It works! It works! It works! It did not get hot tonight. Just comfortable warm to the tough. I guess about 40 degrees of C. The fan is kept running in between stops so that the cooling effect may last. The sound is a very soft hum, like a running PC. The air is blown from the top downwards and can observed if you keep your hand close to the motor. Currently I am not interested in colouring it black. White is fine. Now I am not worried anymore. Thanks for all the advice and encouragement. Johan |


Magazine Locator
Want the latest issue of Model Engineer or Model Engineers' Workshop? Use our magazine locator links to find your nearest stockist!
Sign up to our Newsletter
Sign up to our newsletter and get a free digital issue.
You can unsubscribe at anytime. View our privacy policy at www.mortons.co.uk/privacy
Latest Forum Posts
- *Oct 2023: FORUM MIGRATION TIMELINE*
05/10/2023 07:57:11 - Making ER11 collet chuck
05/10/2023 07:56:24 - What did you do today? 2023
05/10/2023 07:25:01 - Orrery
05/10/2023 06:00:41 - Wera hand-tools
05/10/2023 05:47:07 - New member
05/10/2023 04:40:11 - Problems with external pot on at1 vfd
05/10/2023 00:06:32 - Drain plug
04/10/2023 23:36:17 - digi phase converter for 10 machines.....
04/10/2023 23:13:48 - Winter Storage Of Locomotives
04/10/2023 21:02:11 - More Latest Posts...
- View All Topics
Support Our Partners


Shopping Partners
Subscription Offer

Latest "For Sale" Ads
- Reeves** - Rebuilt Royal Scot by Martin Evans
by John Broughton
£300.00 - BRITANNIA 5" GAUGE James Perrier
by Jon Seabright 1
£2,500.00 - Drill Grinder - for restoration
by Nigel Graham 2
£0.00 - WARCO WM18 MILLING MACHINE
by Alex Chudley
£1,200.00 - MYFORD SUPER 7 LATHE
by Alex Chudley
£2,000.00 - More "For Sale" Ads...
Latest "Wanted" Ads
- D1-3 backplate
by Michael Horley
Price Not Specified - fixed steady for a Colchester bantam mark1 800
by George Jervis
Price Not Specified - lbsc pansy
by JACK SIDEBOTHAM
Price Not Specified - Pratt Burnerd multifit chuck key.
by Tim Riome
Price Not Specified - BANDSAW BLADE WELDER
by HUGH
Price Not Specified - More "Wanted" Ads...
Get In Touch!
Do you want to contact the Model Engineer and Model Engineers' Workshop team?
You can contact us by phone, mail or email about the magazines including becoming a contributor, submitting reader's letters or making queries about articles. You can also get in touch about this website, advertising or other general issues.
Click THIS LINK for full contact details.
For subscription issues please see THIS LINK.
Digital Back Issues


Donate

 Register
 Log-in
Model Engineer Magazine
- Percival Marshall
- M.E. History
- LittleLEC
- M.E. Clock

ME Workshop
- An Adcock
- & Shipley
- Horizontal
- Mill

Subscribe Now
- Great savings
- Delivered to your door

Pre-order your copy!
- Delivered to your doorstep!
- Free UK delivery!