Forum sponsored by:

Myford ML1
| woody1 | 12/11/2011 09:41:47 |
 91 forum posts 21 photos | Hi.
May I introduce myself. My name is david I found this wonderful site whilst browsing machinery as we do
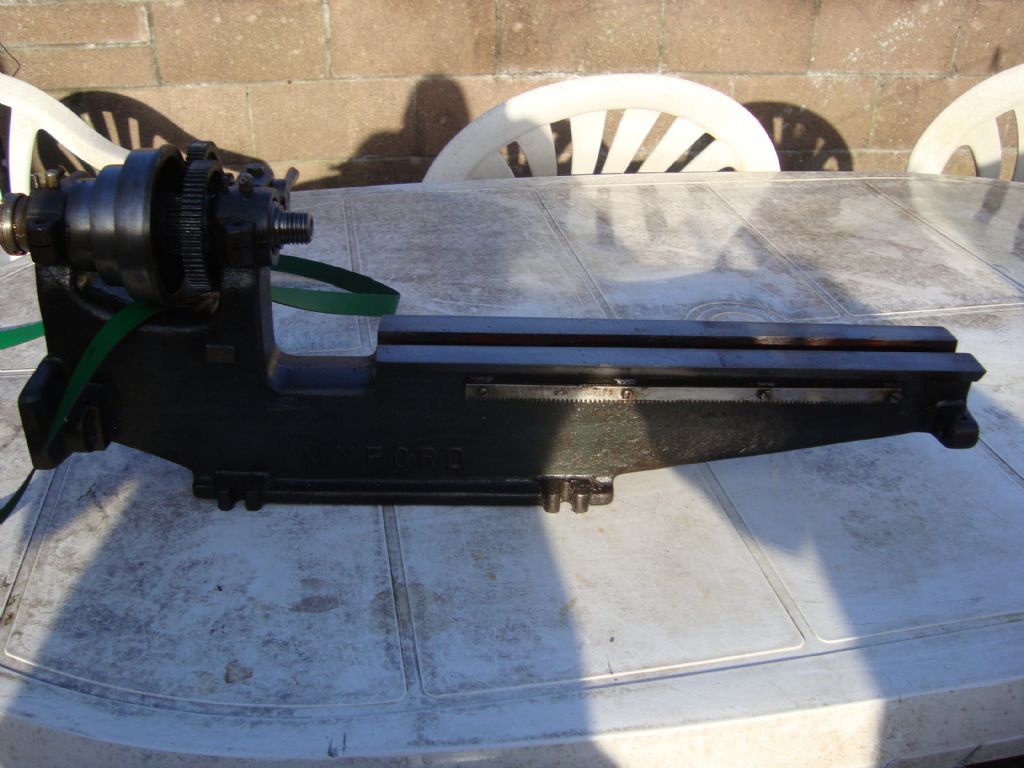
 I have just had a myford ml1? given to me (headstock cast as one) and would just like to ask if anyone can give me some advice on removing the spindle its reading 2 thou runout. Its my first refurb of a lathe, Its going well so far all seems to be in pretty good nick with minimal wear to any of the parts. I have some basic machining skills but I lost my mentor earlier in the year so i'm now on my own! I have just had a myford ml1? given to me (headstock cast as one) and would just like to ask if anyone can give me some advice on removing the spindle its reading 2 thou runout. Its my first refurb of a lathe, Its going well so far all seems to be in pretty good nick with minimal wear to any of the parts. I have some basic machining skills but I lost my mentor earlier in the year so i'm now on my own! Cheers.
David
|
| woody1 | 12/11/2011 10:16:19 |
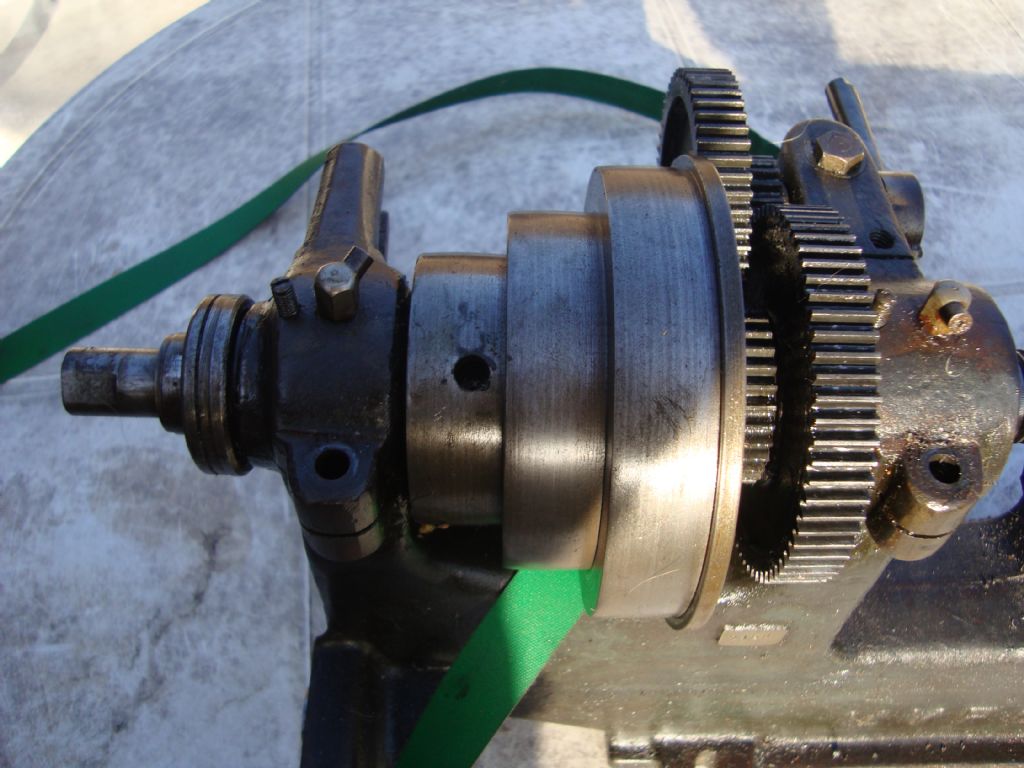
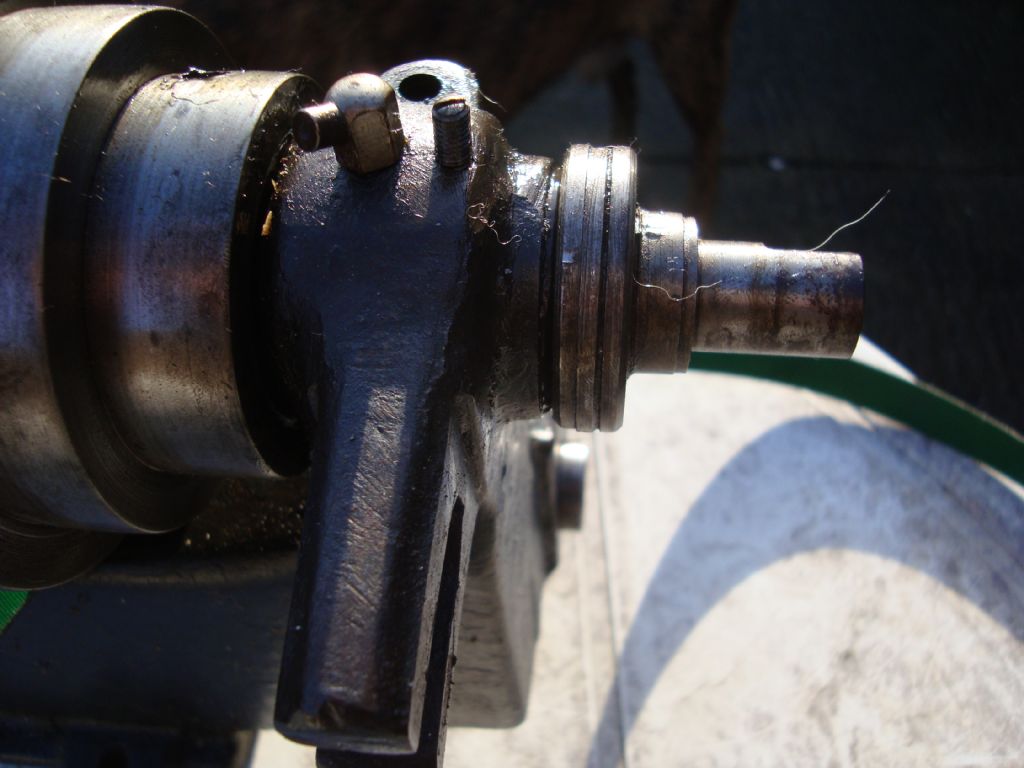
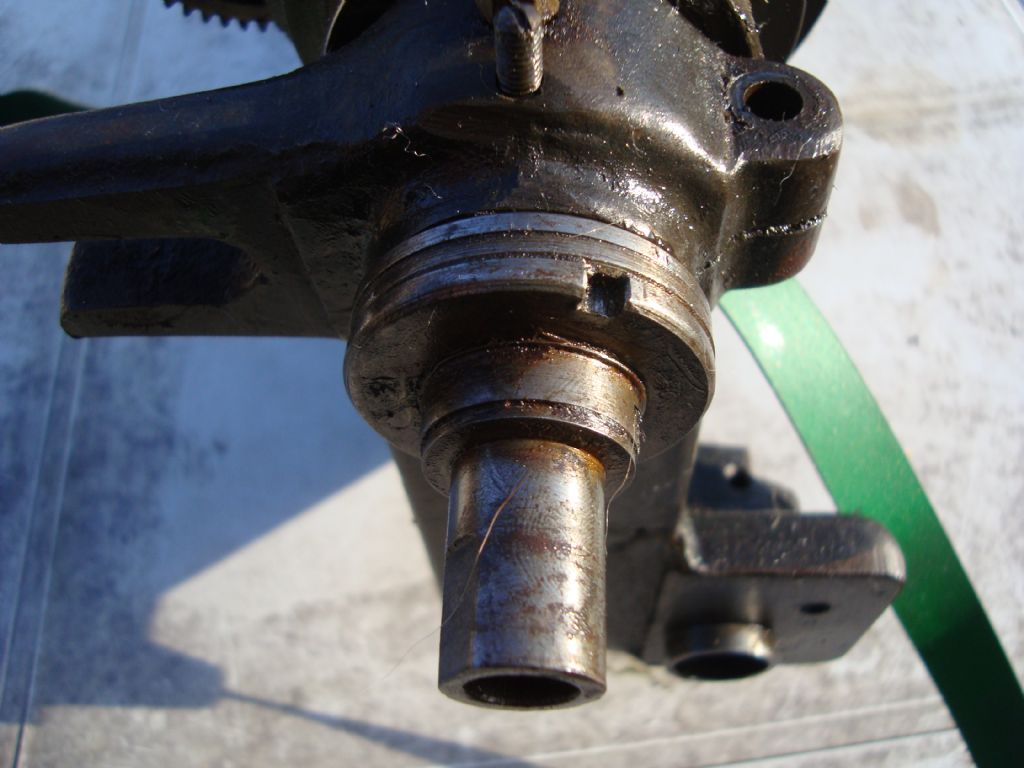
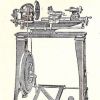
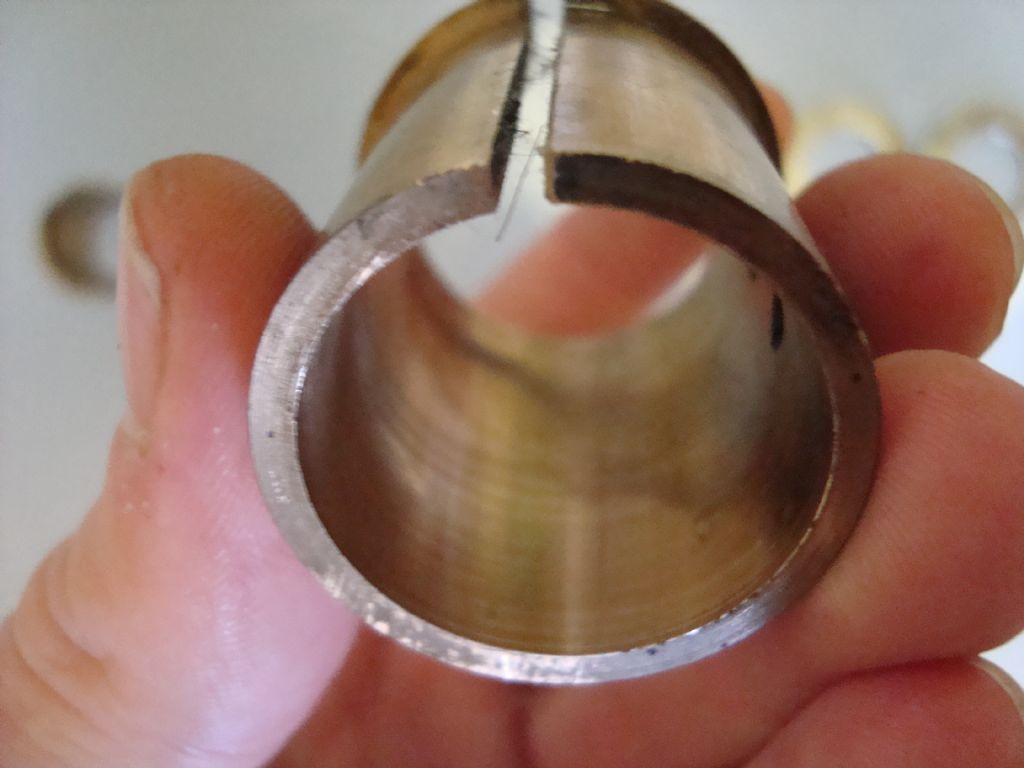
91 forum posts 21 photos | Couple pictures guys, I have got as far as removing spindle collar and gear, bull wheel/pulley locking nut im stumped on the thrust collar though.
     |
| ady | 12/11/2011 12:07:26 |
| 612 forum posts 50 photos | Don't know about rear collars on ML1s but it's probably on a fine thread, around 18tpi, so it can be adjusted, and is locked in place with another collar nut or a grubscrew. On the Drummond M series you have to knock on the rear spindle bit to push the spindle out the front of the housing. The spindle taper increases from the back to the front The bull gear (big front cog) is locked to the spindle with a key, may take a few whacks to separate them. The pulley arrangement should spin freely and be completely separate from the spindle, if it doesn't then something needs to be unscrewed. If they exist, watch for bits like rear thrust bearing stuff which is located on the inner side of the rear bearing housing and conveniently drops out sometimes shedding its ball bearings around your feet as you withdraw the spindle using both your hands to carefully hang on to all the bits.(sigh) Edited By ady on 12/11/2011 12:28:54 |
| AndyB | 12/11/2011 12:53:40 |
 167 forum posts 7 photos | Hi,
I agree with Ady.
It looks like a spring clip in front of the castelated adjuster nut, so remove that, undo the nut and, exactly as Ady says, watch for tiny ball bearings dropping out of the thrust washers if they have them. Put a towel down underneath the headstock, and if you are doing it all on a bench, lay newspaper down under it all so you can see any bits that drop out!
Search for and undo grubscrew/s set into the pulley (you can see one in your photo) and undo the bullwheel to pulley locking arrangement (I don't know how yours works but it is a bit unusual in that the drive gear is next to the bullwheel). Search for any other locking mechanisms; oilers are often used to lock bearings in place, so remove anything that mounts in the vicinity just to be sure.
You will have to knock the mandrel out through the nose end but make sure you use a rubber or nylon hammer!!!! And set a piece of soft pine against the end of the mandrel and hit that so you don't damage it in any way. Damage to the mandrel is terminal!
M types are completely different as they were designed by Drummond, but the principle is the same for all lathes.
There is a brochure on file at the Myford Lathes forum http://groups.yahoo.com/group/myfordlathes/ that doesn't really offer any practical advice but may give you hints.
Have you Googled for a manual?
Andy |
| AndyB | 12/11/2011 13:11:41 |
167 forum posts 7 photos | Just a thought...
You say 2 thou runout.
Where did you measure that?
Is it a constant in that the spindle is not concentric to everything else (measuring along a bar)?
Is it eliptical so that measuring at one point gives a variation in the reading)?
Are you measuring the spindle itself or a bar held in a chuck?
Are you measuring between centres (it could be your tailstock is not concentric)?
If you are measuring in a three jaw chuck then that is likely your inaccuracy...and 2 thou is reasonable! Try centring a ground test bar in a four jaw and measuring again.
Is the runout just something in the outer machined surface? What is it like if you measure a centre in the mandrel?
I am not saying that you are wrong in your measurement, I just don't know what you have measured. I have an M type that had a bent spindle that was 2 thou out, got another spindle and it transformed the lathe. That got me paranoid about the other lathes and I got myself all knotted up over the measurements then I found that even my (cheap) test bar is not that accurate as the tapers are as old as the rest of the lathes (getting on for 100 years old) so I stopped worrying and everything turns out nicely which , in all honesty, is the real test.
What are you making? If you use one machine only then all your parts will turn to the same increments.
Andy |
| ady | 12/11/2011 23:35:31 |
| 612 forum posts 50 photos | I think he just wants to take it to bits. The machine owns the man, or the man owns the machine. He can only learn from his endeavors. |
| woody1 | 13/11/2011 10:57:59 |
91 forum posts 21 photos | Cheers for the info guys, needed the confidence boost it came out like a dream, with lots of ball bearings
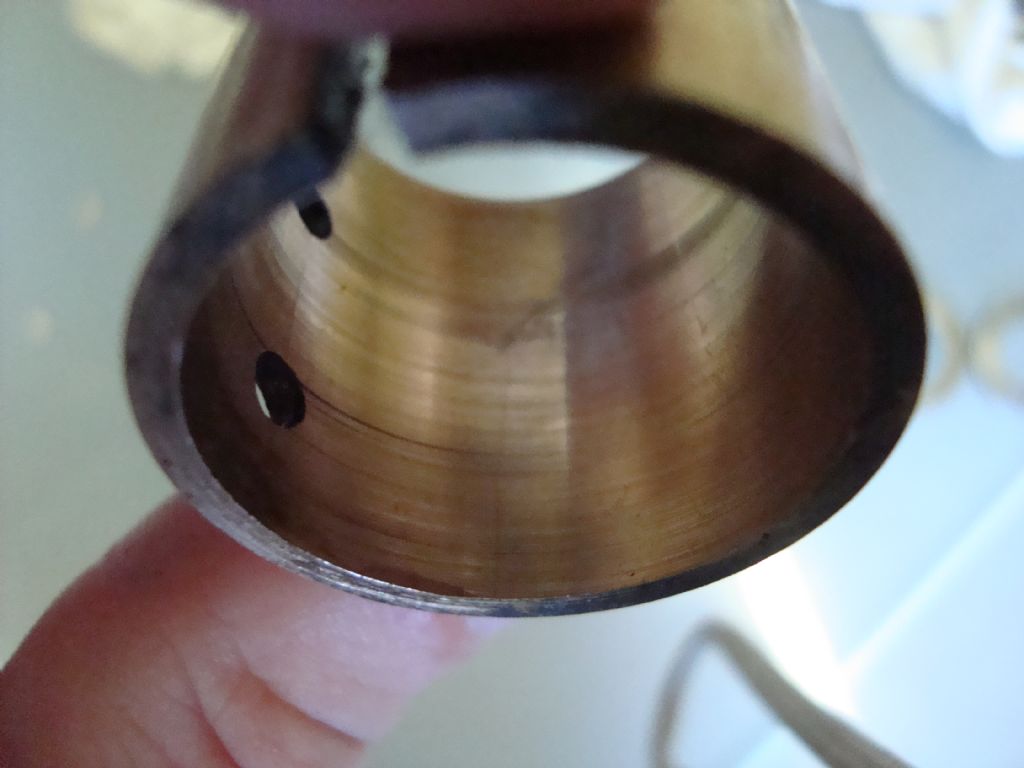
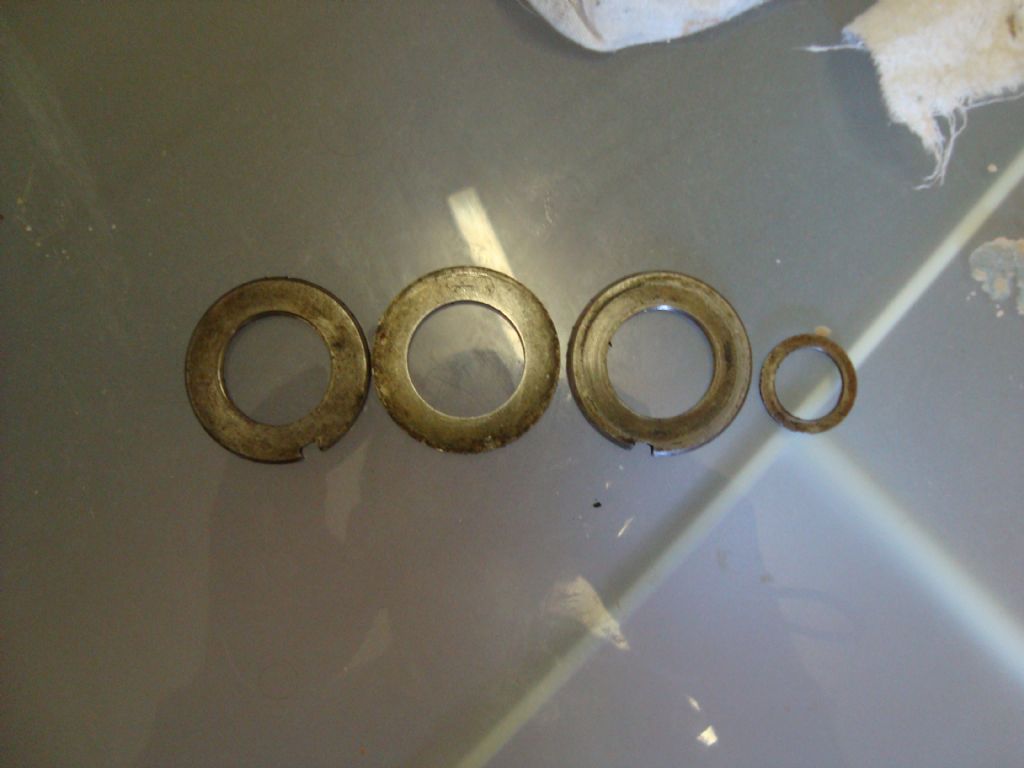
 . The bushes are a little worn but its something I will have to accept. It is the only machine I have I would just like to learn. My readings came directly off the spindle back and front. The work coming out is acceptable just looking for smoother running really. One thing I will add is the lack of any shims/spindle adjustment its is a most basic of machine. Anyways off to get some paint and primer. . The bushes are a little worn but its something I will have to accept. It is the only machine I have I would just like to learn. My readings came directly off the spindle back and front. The work coming out is acceptable just looking for smoother running really. One thing I will add is the lack of any shims/spindle adjustment its is a most basic of machine. Anyways off to get some paint and primer.Cheers guys.
    |
| ady | 13/11/2011 11:08:34 |
| 612 forum posts 50 photos | How did your bullgear lock to the spindle? A grubscrew? |
| woody1 | 13/11/2011 15:41:02 |
91 forum posts 21 photos | yeah just one, into the spindle like the pulley. the bushings pictured are the wrong way round its my fault. Would it be hard to find a new pair, I would like to get it up and running again it came with a pile of the original bits to.
Cheers.
|
| ady | 13/11/2011 18:08:37 |
| 612 forum posts 50 photos | If I was you I would clean it up, put it back together again, and spend the next 6-12 months or so making swarf and learning the trade. Then you'll know exactly what YOU want to do, no more chicken and egg stuff. Your bearings are the very simplest type, and if you get infected with the bug like many of us in here you'll be perfectly capable of making your own after a few months. Keep an eye on fleabay a couple of times a week to see what ML1 stuff comes up as you progress, don't spend too much cash, lol Be mega-careful with those bearing cap adjusters, many have been overtightened with disastrous consequences. If you do get smitten it's almost certain that you'll want to upgrade at some point because an ML1 is very much an entry level unit. Edited By ady on 13/11/2011 18:17:00 |
| Stub Mandrel | 13/11/2011 18:22:54 |
 4318 forum posts 291 photos 1 articles | I'll echo Ady's warning, if you overtigthen the bearings trying to close them up you cold crack the casting. Some people put shims in the gap to stop overtightening. Neil |
| woody1 | 21/11/2011 12:15:48 |
91 forum posts 21 photos | Appreciate the advice guys. managed to get all parts primed ready for painting just going to put it back together and make some swarf. Deffo going to buy a bigger machine I'v just moved into a new house from a flat Which is why a bought such a small machine. its going a little slow, I'm spending quite a bit of my time building a new workshop
David.
|
| ady | 21/11/2011 12:46:26 |
| 612 forum posts 50 photos | It usually starts off slow...then you start getting more efficient as your tooling inventory and familiarity with different materials and machining processes increases. Beats watching TV etc, especially in winter. A fascinating hobby where the most limiting factors are your own ability, imagination and determination. One of the weaknesses of an ML1 is it's not too stiff, relatively speaking...but this will teach you different skills to overcome this limitation, skills like tool grinding and setting up which will make a bigger machine a complete doddle when you do eventually upgrade. The muscle between the ears becomes a serious power tool in its own right, great fun. Edited By ady on 21/11/2011 12:54:27 |
| woody1 | 03/12/2011 00:05:46 |
91 forum posts 21 photos | Hard to find time on a 9 to 5 though
 . Used all my will to to not go out. Managed to get the painting and spindle etc back together as well as a little on the workshop. Have a question though, if I may ask. Where would it be best to take DTI readings from? what also would be best lubricant wise. I did take a couple of readings with the DTI off the centre. I read 1 thou run out in normal direction, in reverse half a thou maybe less!!!??? . Used all my will to to not go out. Managed to get the painting and spindle etc back together as well as a little on the workshop. Have a question though, if I may ask. Where would it be best to take DTI readings from? what also would be best lubricant wise. I did take a couple of readings with the DTI off the centre. I read 1 thou run out in normal direction, in reverse half a thou maybe less!!!??? Cheers.
David.
|
| ady | 03/12/2011 08:20:57 |
| 612 forum posts 50 photos | Hard to find time on a 9 to 5 though Worth the effort, it's a hobby where you eventually get out more than what you put in because you're also learning a highly skilled trade. I try to do an hour and evening after work, after tea, even if I'm really knackered. I no longer watch TV at night, which makes things easier. Where would it be best to take DTI readings from? what also would be best lubricant wise. The lathe bed. Anywhere which is in a solid relationship with the particular task you are measuring, and take the measurement directly opposite, 180 degrees, to the opposing force whenever possible. You will get various lube replies, I've only used cheap motor oil for everything so far. The main thing is, whatever oil you have, you learn to use it where it's needed. |
| ady | 03/12/2011 08:32:32 |
| 612 forum posts 50 photos | I did take a couple of readings with the DTI off the centre. I read 1 thou run out in normal Take a bit of metal and chuck it so it sticks about 2 inches beyond the chuck jaws. Put the DTI against it on the opposite side to the tooltip, 2 inches out from the jaws. Push the tooltip against the workpiece with mild cutting pressure and you will see a shocking amount of movement, which is flex, coming from the DTI This is the sort of thing we're all up against, so don't get too hung up on amazing accuracy until you learn to overcome the limitations of your machine when it's doing work. Edited By ady on 03/12/2011 08:37:59 |
| Robert Vine | 13/03/2012 23:34:06 |
| 6 forum posts | Hi All, I've just bought an ML1 with a flat pulley cone arrangement as Woody's. I'm really stuck as I don't have a counterpulley to match and at present can't drive the lathe. I'm really not sure whether to convert this to a vee pulley system and if so, what vee pulleys will fit? I've picked up an ML7 cone pulley complete which appears to be the correct bore and dimensions to fit - but will it?? Otherwise I could leave the flat pulleys in place but would then to find a similar arrangement for the counterpulley which is proving equally difficult to source. Any thoughts or advice welcome.
Regards
Rob |
| Ady1 | 14/03/2012 12:59:34 |
 6137 forum posts 893 photos | You don't have to have a countershaft, a direct drive will do. I would definitely go for the v-belt system if you can, more stable.
I set up a temp direct drive system about 2 years ago, then found it great for when I messed up because the belt slips when you crash into something you shouldn't or the tool digs in You make quite a few mistakes at the start and a "slippy" belt system is not a disadvantage. Too much power/speed is not a good thing for a newbie
I would recommend setting things up so your spindle speed is less than 500rpm max at the start
After a few months you'll take your own path |
| Robert Vine | 28/04/2012 10:48:02 |
| 6 forum posts | Hi All, I've taken the spindle out now and mine must be one of the very first lathes as there is no bearing shell only the headstock casting alone. There are no ball bearings either - the spindle just sits in the headstock with play taken up by the pinchbolt. I'll add some pictures later but there is a lot of wear in the headstock casting and on the spindle. I am inclined to thing that this lathe may well have turned its very last piece of metal some years ago!
Rob
|
| woody1 | 11/06/2012 18:02:14 |
91 forum posts 21 photos | Hi guys.
Its been a while! manged to buld a workshop Cheers. David.
David Edited By woody1 on 11/06/2012 18:04:49 Edited By woody1 on 11/06/2012 18:05:57 Edited By woody1 on 11/06/2012 18:09:27 |


Please login to post a reply.
Magazine Locator
Want the latest issue of Model Engineer or Model Engineers' Workshop? Use our magazine locator links to find your nearest stockist!
Sign up to our Newsletter
Sign up to our newsletter and get a free digital issue.
You can unsubscribe at anytime. View our privacy policy at www.mortons.co.uk/privacy
Latest Forum Posts
- hemingway ball turner
04/07/2025 14:40:26 - *Oct 2023: FORUM MIGRATION TIMELINE*
05/10/2023 07:57:11 - Making ER11 collet chuck
05/10/2023 07:56:24 - What did you do today? 2023
05/10/2023 07:25:01 - Orrery
05/10/2023 06:00:41 - Wera hand-tools
05/10/2023 05:47:07 - New member
05/10/2023 04:40:11 - Problems with external pot on at1 vfd
05/10/2023 00:06:32 - Drain plug
04/10/2023 23:36:17 - digi phase converter for 10 machines.....
04/10/2023 23:13:48 - More Latest Posts...
- View All Topics
Support Our Partners


Shopping Partners
Subscription Offer

Latest "For Sale" Ads
- Reeves** - Rebuilt Royal Scot by Martin Evans
by John Broughton
£300.00 - BRITANNIA 5" GAUGE James Perrier
by Jon Seabright 1
£2,500.00 - Drill Grinder - for restoration
by Nigel Graham 2
£0.00 - WARCO WM18 MILLING MACHINE
by Alex Chudley
£1,200.00 - MYFORD SUPER 7 LATHE
by Alex Chudley
£2,000.00 - More "For Sale" Ads...
Latest "Wanted" Ads
- D1-3 backplate
by Michael Horley
Price Not Specified - fixed steady for a Colchester bantam mark1 800
by George Jervis
Price Not Specified - lbsc pansy
by JACK SIDEBOTHAM
Price Not Specified - Pratt Burnerd multifit chuck key.
by Tim Riome
Price Not Specified - BANDSAW BLADE WELDER
by HUGH
Price Not Specified - More "Wanted" Ads...
Get In Touch!
Do you want to contact the Model Engineer and Model Engineers' Workshop team?
You can contact us by phone, mail or email about the magazines including becoming a contributor, submitting reader's letters or making queries about articles. You can also get in touch about this website, advertising or other general issues.
Click THIS LINK for full contact details.
For subscription issues please see THIS LINK.
Digital Back Issues


Donate

 Register
 Log-in
Model Engineer Magazine
- Percival Marshall
- M.E. History
- LittleLEC
- M.E. Clock

ME Workshop
- An Adcock
- & Shipley
- Horizontal
- Mill

Subscribe Now
- Great savings
- Delivered to your door

Pre-order your copy!
- Delivered to your doorstep!
- Free UK delivery!
All Forum Topics > Manual machine tools > Myford ML1