Forum sponsored by:

Gerhard's Lady Steph
Many had a go at this model - now it is my turn...
| Gerhard Novak | 13/02/2022 16:12:53 |
 109 forum posts 114 photos | Having my workshop settled I need to build something. Well that's a lie, I started already during the Christmas holidays... But now I have no excuse. Unfortunately I do not have any building description, but the plans should do it. So I thought I start with the frame. I tried to get enough material to repeat every part minimum once. Good decision as we will see at the second picture. I was happy with the precision of the opening for the cylinder pedestal.
This didn't last long, it is quite tricky to cut small threads into thick mild steel.
Here we go, one tap less. And no chance to get it out... By the way it was M1.6, I have a good collection of metric taps and dies, so the lady will be a little bit 'metricized'. I hope she doesn't mind. Anyway. Another go. This time right. Cabinet base and cabinet top done.
Now it is time for a bit of bling, lower columns.
Also here I was using the spare one, as I ruined the first one by cutting in the flutes. Because of the removal of my machines into my new garage workshop (good bye cold shed, now I have a massive radiator plumbed into the central heating which costs less than the shed heating and doesn't produce water vapour) I had to remove one of the DRO sensors - and I didn.t fix it properly. Means I got some play which ruined my flutes... Finally I am playing now with the upper columns. I am not sure if I make them round and tapered or square. I started with the square one, as I still had the mill set up nicely for that from the work on the lower columns. And in the next pictures you can see the outcome.
I think I tricked my phone with the blue background, as the columns are brass. in these photos they look rather like steel. Yes - this is where I am at the moment, I will give you an update from time to time.
Edited By Gerhard Novak on 13/02/2022 16:13:20 |
| Bob Unitt 1 | 14/02/2022 11:58:57 |
 323 forum posts 35 photos | Posted by Gerhard Novak on 13/02/2022 16:12:53: Unfortunately I do not have any building description, but the plans should do it. There's a full series of construction articles in Engineering in Miniature, in these back-issues :- 1981 November & December 1982 All issues 1983 January
|
| Gerhard Novak | 14/02/2022 12:53:49 |
109 forum posts 114 photos | Thanks Bob, I did know that. Question is how to get hold of them... |
| Bob Unitt 1 | 14/02/2022 14:00:16 |
323 forum posts 35 photos | Try The original publisher, or google engineering in miniature back issues for other sources. |
| Gerhard Novak | 14/02/2022 20:09:30 |
109 forum posts 114 photos | Bob, Thanks for the link, I will try it. |
| Former Member | 14/02/2022 20:26:18 |
| 1085 forum posts | [This posting has been removed] |
| Gerhard Novak | 15/02/2022 10:49:38 |
109 forum posts 114 photos | Again thanks to Bob, was a great hint, will get all 15 issues direct from TEE publishing (some as photocopies) for 36£50. |
| Bob Unitt 1 | 15/02/2022 12:02:31 |
323 forum posts 35 photos | I have a file of which component is described in which issue somewhere, I'll see if I can find it for you. |
| Bob Unitt 1 | 15/02/2022 12:13:40 |
323 forum posts 35 photos | Posted by Bob Unitt 1 on 15/02/2022 12:02:31:
I have a file of which component is described in which issue somewhere, I'll see if I can find it for you. Found it, added it to my albums :-
|
| Gerhard Novak | 15/02/2022 22:00:17 |
109 forum posts 114 photos | Thanks a lot Bob, There is a file (excel) at TEE publishing which contains the contents of every article. So in principle I had it, but the list you sent is more detailed, so I am sure it will help. |
| Huub | 15/02/2022 22:22:33 |
| 220 forum posts 20 photos | I seems (holes are dry) that you don't use tapping fluid. This is killing for your taps.
|
| Bob Unitt 1 | 16/02/2022 10:07:48 |
323 forum posts 35 photos | Posted by Huub on 15/02/2022 22:22:33:
I seems (holes are dry) that you don't use tapping fluid. This is killing for your taps.
I use a paste called Trefolex that I picked up at an exhibition 25 years ago (!). It still works as well as the day I bought it, and I still have an unopened spare pot. |
| Gerhard Novak | 16/02/2022 10:41:05 |
109 forum posts 114 photos | Huub and Bob, I actually used WD40 cutting oil. This stuff, even not very thick, does make a change. Anyway. The postman was there a few minutes ago, and my treasure arrived. Most of the back issues are photo copies, but 4 of them are still the original ones! So now I have something to read...
Edited By Gerhard Novak on 16/02/2022 10:41:47 Edited By Gerhard Novak on 16/02/2022 10:42:55 |
| Jim Nic | 16/02/2022 10:58:05 |
 406 forum posts 235 photos | Gerhard You say you use DW40 as a cutting fluid. If that is a misprint and you meant WD40 then that is a problem. WD40 is a water displacing lubricant consisting of a grease held in a light solvent and is not designed for high pressure situations such as tapping. In any event, for small threads you need a tapping compound such as Trefolex as mentioned above or I use a liquid called CT 90 which not only helps to cut clean threads but has saved me a fortune in broken taps. Jim |
| Gerhard Novak | 16/02/2022 11:44:28 |
109 forum posts 114 photos | Jim, In the meantime I corrcted the misprint. Also I am aware that standard WD-40 is not a lubricant. What I am speaking about is WD-40 specialist multi purpose cutting oil. This is not the standard WD-40 everybody has in its tool box. Gerhard |
| Roger Best | 16/02/2022 18:43:01 |
 406 forum posts 56 photos | Branded products - always fun working out what they are with the wrong glasses on. |
| bernard towers | 16/02/2022 19:14:14 |
| 1221 forum posts 161 photos | When cutting small threads like 1.6 mm it is a good idea to reduce engagement by upwards of 10 % as we are not talking torque level fittings, nice c/sunk lead in and out the other side as your thread strength cannot exceed the equivalent thread diameter. And use the best cutting oil money can buy (ROCOL RTD) it pays for itself hundreds of times over. |
| Gerhard Novak | 16/02/2022 21:26:16 |
109 forum posts 114 photos | Well - to Bernard and all the others giving good advice... If I would use my glasses and start with the tap no 1 and not no2 I probably woudn't have broken it.... Anyway. today was the day of the cylinder pedestral. I am quite far, a few holes and threads are missing. But the main dimensions are there and the important flange and hole are done. Should be all straight and level. There are a few traces from the milling which I will file away. Happy modelling!
Edited By Gerhard Novak on 16/02/2022 21:27:12 |
| Gerhard Novak | 20/02/2022 22:05:45 |
109 forum posts 114 photos | Played with the upper columns today, produced one exactly according to Tubal Canes plan (16 flutes) but I do not like it. the flutes are touching, you get a sharp, cog wheel like structure. May be this is like it was in the past, the flutes were made for strengthening the cast column. I made one with 10 flutes to see how it looks. On the photo: square, 16, 10 flutes
I prefer the 10 flute look, so I made six of those. Enough flute milling. My right hand hurts... Anyway, they are done. The ends on both sides are still too long, I made them longer to avoid problems of running with the clamping nut of the mill into the chuck of the rotary table.
|
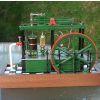
| Gerhard Novak | 27/02/2022 22:03:22 |
109 forum posts 114 photos | Short update. The upper columns and their pedestal pieces are ready. Of course I needed to put all I have together. The screws on the top will of course be changed to something nicer.
The entablature was slightly warped, but easy to correct. What is interesting is the change of hardness in the casting. You find everything from soft as butter to hard as a rock...
Edited By Gerhard Novak on 27/02/2022 22:06:27 |


Please login to post a reply.
Magazine Locator
Want the latest issue of Model Engineer or Model Engineers' Workshop? Use our magazine locator links to find your nearest stockist!
Sign up to our Newsletter
Sign up to our newsletter and get a free digital issue.
You can unsubscribe at anytime. View our privacy policy at www.mortons.co.uk/privacy
Latest Forum Posts
- *Oct 2023: FORUM MIGRATION TIMELINE*
05/10/2023 07:57:11 - Making ER11 collet chuck
05/10/2023 07:56:24 - What did you do today? 2023
05/10/2023 07:25:01 - Orrery
05/10/2023 06:00:41 - Wera hand-tools
05/10/2023 05:47:07 - New member
05/10/2023 04:40:11 - Problems with external pot on at1 vfd
05/10/2023 00:06:32 - Drain plug
04/10/2023 23:36:17 - digi phase converter for 10 machines.....
04/10/2023 23:13:48 - Winter Storage Of Locomotives
04/10/2023 21:02:11 - More Latest Posts...
- View All Topics
Support Our Partners


Shopping Partners
Subscription Offer

Latest "For Sale" Ads
- Reeves** - Rebuilt Royal Scot by Martin Evans
by John Broughton
£300.00 - BRITANNIA 5" GAUGE James Perrier
by Jon Seabright 1
£2,500.00 - Drill Grinder - for restoration
by Nigel Graham 2
£0.00 - WARCO WM18 MILLING MACHINE
by Alex Chudley
£1,200.00 - MYFORD SUPER 7 LATHE
by Alex Chudley
£2,000.00 - More "For Sale" Ads...
Latest "Wanted" Ads
- D1-3 backplate
by Michael Horley
Price Not Specified - fixed steady for a Colchester bantam mark1 800
by George Jervis
Price Not Specified - lbsc pansy
by JACK SIDEBOTHAM
Price Not Specified - Pratt Burnerd multifit chuck key.
by Tim Riome
Price Not Specified - BANDSAW BLADE WELDER
by HUGH
Price Not Specified - More "Wanted" Ads...
Get In Touch!
Do you want to contact the Model Engineer and Model Engineers' Workshop team?
You can contact us by phone, mail or email about the magazines including becoming a contributor, submitting reader's letters or making queries about articles. You can also get in touch about this website, advertising or other general issues.
Click THIS LINK for full contact details.
For subscription issues please see THIS LINK.
Digital Back Issues


Donate

 Register
 Log-in
Model Engineer Magazine
- Percival Marshall
- M.E. History
- LittleLEC
- M.E. Clock

ME Workshop
- An Adcock
- & Shipley
- Horizontal
- Mill

Subscribe Now
- Great savings
- Delivered to your door

Pre-order your copy!
- Delivered to your doorstep!
- Free UK delivery!
All Forum Topics > Stationary engines > Gerhard's Lady Steph