Forum sponsored by:

Don Young's 'Doncaster'
Articles in ME starting 1`st Jan 2021 'Flying Scotsman 5" gauge
| Peter Seymour-Howell | 23/02/2021 15:38:53 |
 125 forum posts 25 photos | Hi everyone
This thread is really in response to another topic where it was pointed out about the lack of threads on locomotive builds and so I thought that I would do my bit for the forum in helping to add more content. However, I'm not going to start a build log here. Some may have seen or even be following my articles currently running in ME and thus don't want to take away from the editors hard work. I did think though that what I could do is to start this thread for people who wish to know more about my quest to build a highly detailed model of 4472 or have a specific question about the build. feel free to ask ask here and get a quick and honest response directly from thehorse's mouth' so to speak. This is perhaps something a little different, whether it's of interest to other members here? well, only time will tell..
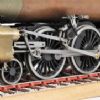
This image was taken two years ago at an event to commemorate the late Bob Todd, held at my home club track, NLSME. The model has moved on a very long way since 2018 but this was the last time that she was assembled (only for that day) and so perhaps the best picture to post to see her true form. She is being built to show her as she would have been seen in 1938 although there is a little modellers license which has already been detailed in the magazine. Everything is being built either to scale or as close as humanly possible and most parts are planned to be working. Well except for carriage heating, the gauge will work though..
Anyway, as I say, I'll try to answer any questions that may arise during the series here asap.
Regards
Pete
|
| Phil H1 | 23/02/2021 20:04:19 |
| 467 forum posts 60 photos | Pete, I really nice engine. I am struggling in the lower division with the small 0-6-0 Rob Roy build so it is nice to see something substantial. I'd be very interested to know all sorts of information e.g., how long, all traditionally built or have you used laser parts. Who built that very neat boiler etc. Phil H |
| Jon Lawes | 23/02/2021 20:28:49 |
 1078 forum posts | The article in the Magazine is very enjoyable; well worth a read! Beautiful engineering. |
| Peter Seymour-Howell | 23/02/2021 20:49:07 |
125 forum posts 25 photos | Hi Phil
All models are just a 'sum of their parts', Rob Roy being no different, admittedly the larger the longer they take to build. I bought the drawings in 1998, spent some time researching the subject, in fact, I still spend a few hours each week researching material for the part currently being made. I guess the true start date is 2010 and most days since I have worked on the model. There was a 2-year gap where I completed a part built Heilan Lassie and also some time taken when building my highly modified car engine. I use laser cut parts where I can, most are so cut but the traditional saw and file has been used when required. I'm not a CAD man so I get most of this done by those more experienced for which I owe them a great dept. The boiler is very much a one-off, it was built for me by Paul Tompkins of Southern Boiler Works ltd, IMHO he is the best boilermaker today. It's not fully to the DY design, in fact, in many ways, it follows the stronger designed Australian boiler code. This has allowed the working pressure to be increased from 90 to 100 PSI. It is very much a 'scale' boiler in as far as it's profile, including a proper barrel taper with no step as normally seen and backhead layout are concerned. The main backhead difference being the water gauge mounting points which are a little further apart than 'true scale' to give a larger glass area. The manifold turret and steam valves will be true scale and still able to use the correct steam/water bore size for the required injectors. As is the Firehole door and general layout. The boiler is a mixture of tig and silver solder, the tubes are bigger than DY's too, giving a better tube to grate ratio, a live blower tube is used as per full-size practice. Hope that helps to answer your questions, Phil.
Kind regards
Pete |
| Peter Seymour-Howell | 23/02/2021 20:50:15 |
125 forum posts 25 photos | Posted by Jon Lawes on 23/02/2021 20:28:49:
The article in the Magazine is very enjoyable; well worth a read! Beautiful engineering.
Thank you Jon, hope you find it of interest...
Kind regards
Pete |
| Greensands | 23/02/2021 20:52:54 |
| 449 forum posts 72 photos | Hi Pete - A really lovely engine and I think the early builds without the German type smoke deflectors were certainly the more attractive. I notice that you are using gunmetal cylinders which was a favourite of Don. Did you follow his method of burnishing using a moly compund to achieve the required finish? Second question, have you fitted rings to the piston valves and if so how many and what choice of material. I shall follow your build with great interest. Keep up the great work |
| Peter Seymour-Howell | 23/02/2021 21:23:48 |
125 forum posts 25 photos | Posted by Greensands on 23/02/2021 20:52:54:
Hi Pete - A really lovely engine and I think the early builds without the German type smoke deflectors were certainly the more attractive. I notice that you are using gunmetal cylinders which was a favourite of Don. Did you follow his method of burnishing using a moly compund to achieve the required finish? Second question, have you fitted rings to the piston valves and if so how many and what choice of material. I shall follow your build with great interest. Keep up the great work Good questions Greensands and yes I agree fully about the smoke deflectors although I wouldn't take away anything from those who love FS no matter from which era. For me, a Gresley A1 is/was the most beautiful steam locomotive ever built, more so than the A3 or A4, the form just has everything that I think makes a fine-looking locomotive. To answer your questions, I have used an industry trick for burnishing the cylinder bores which involved the final cut in reverse using a bit that was shaped to burnish the bore on it's return stroke. It worked very well, in fact I couldn't ask for better, this will all be covered in detail. For the piston valves, I am using bobbins following Jim Erwin's adjustable design with a few changes. These have a floating bobbin on a central bolt. The material for the seal is fluorosint, each being machined to match don's original solid bronze dimensions. Fluorosint has a similar expansion rate to bronze and higher temp range than other Glass reinforced PTFE materials.
Thanks for the kind words
Pete |
| Greensands | 23/02/2021 22:16:08 |
| 449 forum posts 72 photos | Hi Pete - Your method for providing a burnished finish somehow reminds me of the technique used by Bristols during WW2 for achieving perfectly fitting sleeve valves in their range of aero engines a la Roy Feddon! In their case I think the answer was to use a blunt edge tool for the final pass. I always thought that Don's method of burnishing was very much hit and miss. As a matter of interest where did you source your fluorosint used to make up the piston rings? For what it is worth I do have a complete set of LLAS minus Issue One. Do let me know if you require any supporting information from the LLAS articles. |
| Peter Seymour-Howell | 23/02/2021 22:30:13 |
125 forum posts 25 photos | Posted by Greensands on 23/02/2021 22:16:08:
Hi Pete - Your method for providing a burnished finish somehow reminds me of the technique used by Bristols during WW2 for achieving perfectly fitting sleeve valves in their range of aero engines a la Roy Feddon! In their case I think the answer was to use a blunt edge tool for the final pass. I always thought that Don's method of burnishing was very much hit and miss. As a matter of interest where did you source your fluorosint used to make up the piston rings? For what it is worth I do have a complete set of LLAS minus Issue One. Do let me know if you require any supporting information from the LLAS articles. Yes, that is basically what I used, the front edge was sharp for the entering pass and for the return the power was reversed and the blunt rear face of the cutter did its work. I amazed myself by how well this worked, Doncaster's cylinders are blind bores too as with full size, just to add a little complication to the setup. Thanks for the offer of info from other LLAS issues, so far I have been able to find what I need, Don has a bad habit of saying, 'do this bit as I did on 'so and so' loco'. To be honest, I rarely read Don's notes now, I usually go my own way although did follow him religiously during the first few years of the build. I have built up a number of very full files on the subject matter with countless photos and works drawings thrown in. I get my fluorosint from m-machine metals, as I do most of my materials, very well priced and have a good stock of material and sizes. They will also cut to size if required, IIRC the fluorosint cost me £10 per inch, so not cheap but at least you can buy what you need.
Regards
Pete
|
| Peter Seymour-Howell | 25/02/2021 19:18:42 |
125 forum posts 25 photos | Evening all A few of the more interesting parts made which will be covered in the mag in due course...
Gresley's 2:1 conjugated lever
Piston valve bobbins (adjustable)
L/H crosshead and drop link ( i have since found a closer to scale copper pipe which will replace the one seen here, the smaller pipe also allows me to make the two missing brass elbows close to scale too) The crosshead is to the LNER 1934 pattern with the latter fitted copper gudgeon pin feed pipe which afaik was fitted after 1936, not sure of the exact date but it is seen in 1938 photos of 4472. BTW, making the crossheads (from solid), drop links and their mounting plates took 5 weeks of hard labour..
Regards
Pete. |
| Nigel Graham 2 | 18/04/2021 09:40:05 |
| 3293 forum posts 112 photos | Superb detailing - I am following the magazine serial too, though our projects are very different; in challenge as well as overall nature. One detail puzzles me on that cross-head, and I wonder how the LNER drawing-office solved it. I am impressed by the lubricator, but how is the castle-nut locked with the oil-feed presumably preventing using the usual split-pin or solid cotter? My old text-books show such techniques as retaining-plates screwed to the casting, but what is the method here? |
| Peter Seymour-Howell | 18/04/2021 10:46:27 |
125 forum posts 25 photos | Morning Nigel, thank you for your kind comment on my build and mag articles. The castle nut will be held the traditional way with a pin, I just haven't got around to it yet, one of those many 'to do' jobs on a very long list, I have done the middle cylinder though, just because it's more difficult to get too as more bits get added. As for the lubricating, I don't have a detailed drawing of this part and so have done something close to the prototype but also easy to maintain. The picture you see above was an early version of me seeing what's what. I have since added a screwed on end cap which the oil pipe slides into but not fixed. It's an easy job to just pull the pipe out a little to unscrew the cap and thus have access to the nut. I have also halved the OD of the oil pipe to be closer to scale. Hopefully, this picture explains things better than my words.
Kind regards
Pete |
| Peter Seymour-Howell | 18/04/2021 10:49:59 |
125 forum posts 25 photos | Oh, I best add that the photo above although it has the same lubricating system and crosshead, it's from a different class. This is a picture of a V2, the drop arm is different to the A1 and this also has the later grease nipple for the union link rather than the oil reservoir found on the A1..
Pete |
| Peter Seymour-Howell | 15/06/2021 15:38:45 |
125 forum posts 25 photos | good afternoon all, hope everyone is well... I haven't really posted any pictures on the tender, so here's a few closeups. These are pretty old now, the tender hasn't been touched in many years, patiently waiting for the loco to be finished.
hope they are of interest, if anyone would like to know details on any particular part of the model, just say so here and I'll do my best to answer quickly.
Regards
Pete |
| DMB | 15/06/2021 19:52:38 |
| 1585 forum posts 1 photos | Hi Peter, Been looking at your detail photos and streuth! Your work appears to be of the standard set by Cherry Hill, Bill Carter, Peter Dupen and others. Very well done. May I say that detailed descriptions in the mag. or on the forum, of the methods of constructing items are of very great interest to me and doubtless many others. Keep up your excellent work, it's a great inspiration. John Edited By DMB on 15/06/2021 19:53:06 |
| Former Member | 15/06/2021 20:04:09 |
| 1085 forum posts | [This posting has been removed] |
| Peter Seymour-Howell | 15/06/2021 20:44:13 |
125 forum posts 25 photos | Thanks for the kind words guys, they are very much appreciated. Due to things beyond my control I haven't worked on the model for nearly 8 weeks..hopefully this will be resolved soon and I can get back to the build. Lot's to do still....
Kind regards
Pete |
| Peter Seymour-Howell | 15/06/2021 22:16:40 |
125 forum posts 25 photos | A few more of the finer more interesting details... when finished everything on the model will hopefully be working as per full size, the exception will be the heating for the train but the gauge will be working.. Some parts have already been made, tested, and fitted, two such items are the sanders, both steam and gravity-operated as per full size. The front driving wheel sanders are gravity and the middle driver sanders are steam, Gresley pacifics didn't have sanders for the rear drivers.. Both being operated following full size. IE, the steam sander will be connected to the manifold and the gravity sander to the lever in the cab on the driver's R/H side, rod layout is again to full size. Here are a few pictures, first the steam ejector, please forgive the quality of some of these pictures, phone camera's have improved greatly since they were taken..
Close up of one of the sandtraps fitted to its sandbox, these things are tiny, approx 10mm wide and again built close to the full size design and working the same.
The R/H gravity sander. both these and the steam sanders work very well using children's play sand
. Gravity sander cab lever..
The first section of the rod linkage, note the shape of the rod that enters the cab, this is as per the full size and then it connects to the cross arm which then takes the rod behind the splashers
A better view of the cross arm, please ignore the paintwork, this was repainted after these photos, details as to what happened are in my blog.
. Once it passes the front splasher (there's a joint behind it here) it meets the r/h sander arms and then transfers across behind the saddle to the l/h arm so that both sanders work together.
The last picture for tonight.. is the manifold, it's a true scale 3D printed for me by Adam Cro (Cro Fittings). Details include wording etched onto the handles themselves. Not sure how well these will come out but plan to wipe them over with some Indian ink to bring out the words. IIRC the steam sander is the second or third valve from the left, i don't have my notes to hand. When the boiler was made by Paul at Southern Boilers, it was made for scale fittings, so the manifold bush will match that seen in this picture, to prototype. The same will go for the steam valves, other parts 3D printed and then cast in bronze are the ejector elbow and wakefield lubricators. Other fittings not yet drawn are the live steam injector and exhaust ejector although the internals will both be injectors. There are likely to be many more 3D printed items as and when I get to them.
Pete
|
| Peter Seymour-Howell | 17/06/2021 16:08:19 |
125 forum posts 25 photos | More working parts
Cylinder Relief valves, for these I have used my own internal design while following Don's basic profile and full-size images. These have all been tested and set to 110PSI
This earlier picture shows one of the valve broken down into its component parts.
An early picture of one of the draincocks, I have included the drain cock relief valve although in this case, it's a dummy. When first built these were the only cylinder relief valves, IIRC the cylinder cover type wasn't added till the 30's. For my era (1938) she had both sets of valves fitted although I have seen some evidence on other members of the class where the draincock valve has either been screwed down tight to keep it closed or the extruding threaded adjusting bar has been bent over. The lower draincock body itself has been taken from a commercial item from Polly.
The draincocks are operated by Bowden cable, I have used some fine wire rope and suitable copper piping. Here we see how the cable is routed around the firebox. The prototype has two small angled slots cut into the cladding here for access to what looks like grease nipples, I'll probably make up a couple of dummies for effect.
A picture of the draincock lever showing its position in the cab, this is an early picture, the cable is now fitted being held by small bolts, I will add a couple of ferrules on final assemble. Note: all pictures shown to date are very much 'part done', there are literally hundreds of finishing jobs still to do.
Pete
|
| Phil H1 | 17/06/2021 16:27:17 |
| 467 forum posts 60 photos | Pete, This is an incredibly beautiful job but are you edging towards the need for some sort of therapy. This must have taken a very long time to build. A serious question regarding the engine function... The valve bobbin photos - are the seals made from ordinary white PTFE. Have you used PTFE rings for the pistons? What do you use for the main glands? Phil H |

.jpg")


Please login to post a reply.
Magazine Locator
Want the latest issue of Model Engineer or Model Engineers' Workshop? Use our magazine locator links to find your nearest stockist!
Sign up to our Newsletter
Sign up to our newsletter and get a free digital issue.
You can unsubscribe at anytime. View our privacy policy at www.mortons.co.uk/privacy
Latest Forum Posts
- hemingway ball turner
04/07/2025 14:40:26 - *Oct 2023: FORUM MIGRATION TIMELINE*
05/10/2023 07:57:11 - Making ER11 collet chuck
05/10/2023 07:56:24 - What did you do today? 2023
05/10/2023 07:25:01 - Orrery
05/10/2023 06:00:41 - Wera hand-tools
05/10/2023 05:47:07 - New member
05/10/2023 04:40:11 - Problems with external pot on at1 vfd
05/10/2023 00:06:32 - Drain plug
04/10/2023 23:36:17 - digi phase converter for 10 machines.....
04/10/2023 23:13:48 - More Latest Posts...
- View All Topics
Support Our Partners


Shopping Partners
Subscription Offer

Latest "For Sale" Ads
- Reeves** - Rebuilt Royal Scot by Martin Evans
by John Broughton
£300.00 - BRITANNIA 5" GAUGE James Perrier
by Jon Seabright 1
£2,500.00 - Drill Grinder - for restoration
by Nigel Graham 2
£0.00 - WARCO WM18 MILLING MACHINE
by Alex Chudley
£1,200.00 - MYFORD SUPER 7 LATHE
by Alex Chudley
£2,000.00 - More "For Sale" Ads...
Latest "Wanted" Ads
- D1-3 backplate
by Michael Horley
Price Not Specified - fixed steady for a Colchester bantam mark1 800
by George Jervis
Price Not Specified - lbsc pansy
by JACK SIDEBOTHAM
Price Not Specified - Pratt Burnerd multifit chuck key.
by Tim Riome
Price Not Specified - BANDSAW BLADE WELDER
by HUGH
Price Not Specified - More "Wanted" Ads...
Get In Touch!
Do you want to contact the Model Engineer and Model Engineers' Workshop team?
You can contact us by phone, mail or email about the magazines including becoming a contributor, submitting reader's letters or making queries about articles. You can also get in touch about this website, advertising or other general issues.
Click THIS LINK for full contact details.
For subscription issues please see THIS LINK.
Digital Back Issues


Donate

 Register
 Log-in
Model Engineer Magazine
- Percival Marshall
- M.E. History
- LittleLEC
- M.E. Clock

ME Workshop
- An Adcock
- & Shipley
- Horizontal
- Mill

Subscribe Now
- Great savings
- Delivered to your door

Pre-order your copy!
- Delivered to your doorstep!
- Free UK delivery!
All Forum Topics > Locomotives > Don Young's 'Doncaster'