Forum sponsored by:

D H Gipsy mk1
Brief build thread
| David K | 29/02/2020 20:21:53 |
| 258 forum posts 259 photos | I was going to do a full build thread but time and forgetting to take pictures as I went along means it will be more of a quick build. So i purchased these castings second hand complete with plans ,
It took me a while to decide where to start but eventually took the plunge and started to machine .
Boring through for the cylinders
|
| Clive B | 01/03/2020 09:26:20 |
| 46 forum posts 21 photos | Hi David, Looks like you're making good progress. I have almost finished the crankcase on my own Gypsy Mk1 and am about to start on the crankshaft. Please keep the pictures coming. Clive |
| David K | 01/03/2020 15:16:09 |
| 258 forum posts 259 photos | more machining of the end plate
Using an extra long centre drill to mark through for the camshaft
Then open out using standard drill bits
|
| David K | 01/03/2020 15:20:53 |
| 258 forum posts 259 photos | Then the same for the main bearings but finished off with a home made boring bar
Happy with the final finish
|
| David K | 01/03/2020 15:30:17 |
| 258 forum posts 259 photos | Sitting a piece of bronze for the main bearings
I soldered the two halves together before machining, if I was to do it again I think I would use super glue.
Machined then heated and split again
trial fit
|
| Lee Rogers | 01/03/2020 15:45:42 |
 203 forum posts | Thanks for posting this. Memories of freezing cold mornings standing on the cowling and trying to undo the fuel cap with a heavy brass spanner. |
| David K | 01/03/2020 15:56:57 |
| 258 forum posts 259 photos | I couldn't find a reasonably priced piece of flat bar for my Crankshaft so I ended up machining some round down to size
I milled out the basic shape
Then transferred to the lathe and machined the bearings. I made some spacers to fit into the gaps between the crank webs but they seem to have disappeared in this picture
Edited By David K on 01/03/2020 16:03:07 |
| David K | 01/03/2020 16:00:36 |
| 258 forum posts 259 photos | I bought some extra long drills to put in the oil ways
Finished crank needed minor alterations to fit into the main bearing caps
|
| David K | 01/03/2020 18:17:39 |
| 258 forum posts 259 photos | Camshaft lobes being formed on the mill and rotary table
Lobes , bearings , spacers and shaft
Loctite the camshaft parts using rotary table and Dial gauge to set lobes
Finished camshaft
|
| David K | 01/03/2020 18:20:04 |
| 258 forum posts 259 photos | Machining shop supplied cam gear
Timing gears with idler gear
|
| David K | 01/03/2020 18:24:21 |
| 258 forum posts 259 photos | Cast iron blank ready for machining to shape for cylinders x4
Cutting the fins with a slitting saw, hated this job , everything was covered in black dust including me.
Recess for the cylinder studs
|
| David K | 01/03/2020 18:25:36 |
| 258 forum posts 259 photos | Boring the cylinders
Finished cylinders
|
| David K | 01/03/2020 18:28:55 |
| 258 forum posts 259 photos | Conrods basic shape
forming the rods on rotary table
Finished rods
|
| David K | 01/03/2020 18:36:03 |
| 258 forum posts 259 photos | Turning the pistons
Milling the cut outs and reaming the gudgeon pin hole
|
| David K | 01/03/2020 18:41:21 |
| 258 forum posts 259 photos | Parting off some piston rings from cast iron
Made a small oven to set the ring gap
Heat to cherry red
rings before fitting into cylinders and adjusting ring gap
|
| JC54 | 01/03/2020 21:00:31 |
 154 forum posts 14 photos | Enjoying your posts David. Could you please explain how the holder for the shop bought gear works please? I am still very much a beginner and have some gears to alter for a clayton steam wagon differential. Many thanks John |
| David K | 02/03/2020 08:57:09 |
| 258 forum posts 259 photos | Hi , that piece of Alloy I used was in fact an older jig I had lying around from a previous build. I had cut the four slots so it compressed slightly on my four jaw chuck in my lathe. As for the gear , all you need to do is turn a recess slightly smaller diameter than the gear and then tap the gear in with a soft mallet. The steel gear will slightly cut into the alloy as its tapped in and this is enough to hold it tight. Remember to bore a hole through the centre of the jig so you can drift the gear out when finished. |
| JA | 02/03/2020 12:06:46 |
 1605 forum posts 83 photos | David It is nice to see a build blog. I have not looked at it very closely but I have a few questions:
Many thanks JA |
| JC54 | 02/03/2020 15:34:37 |
154 forum posts 14 photos | Many thanks for the explanation David. Just need to dig in the useful box for some alloy of suitable size. John |
| David K | 02/03/2020 20:30:59 |
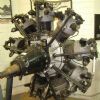
| 258 forum posts 259 photos | Hi JA, Just looked at the date on my first pictures and it seems I have been working on this for just over a year. Must admit I did not think it was this long but I do tend to make one part or so then take a break. I believe the castings were made by a ' Les Chenery' , I know there are a few around but rarely come up for sale. The castings are good , a few small 'blow holes' have appeared but nothing to cause problems. I have tapped a lot of small threads into the casting and they seem to be holding up so they must be pretty good.. Drawings are very good , a few decimal points on the dimensions have been in the wrong place and there are a couple of mistakes but so far the build is going well. The castings were quite solid and I have removed a lot of material from them , the only place were the material has got a bit thin is the side wall next to the camshaft bearings and cam followers. If I could start again I would move the crankshaft a few thou over to one side which intern would give a bit more camshaft clearance. |
.jpg")
.jpg")
.jpg")
.jpg")
.jpg")
.jpg")
.jpg")
.jpg")
.jpg")
.jpg")
.jpg")
.jpg")
.jpg")
.jpg")
.jpg")
.jpg")

.jpg")
.jpg")
.jpg")
.jpg")
.jpg")
.jpg")
.jpg")
.jpg")
.jpg")
.jpg")
.jpg")
.jpg")
.jpg")
.jpg")
.jpg")
.jpg")

.jpg")
.jpg")
.jpg")
.jpg")
Please login to post a reply.
Magazine Locator
Want the latest issue of Model Engineer or Model Engineers' Workshop? Use our magazine locator links to find your nearest stockist!
Sign up to our Newsletter
Sign up to our newsletter and get a free digital issue.
You can unsubscribe at anytime. View our privacy policy at www.mortons.co.uk/privacy
Latest Forum Posts
- *Oct 2023: FORUM MIGRATION TIMELINE*
05/10/2023 07:57:11 - Making ER11 collet chuck
05/10/2023 07:56:24 - What did you do today? 2023
05/10/2023 07:25:01 - Orrery
05/10/2023 06:00:41 - Wera hand-tools
05/10/2023 05:47:07 - New member
05/10/2023 04:40:11 - Problems with external pot on at1 vfd
05/10/2023 00:06:32 - Drain plug
04/10/2023 23:36:17 - digi phase converter for 10 machines.....
04/10/2023 23:13:48 - Winter Storage Of Locomotives
04/10/2023 21:02:11 - More Latest Posts...
- View All Topics
Support Our Partners


Shopping Partners
Subscription Offer

Latest "For Sale" Ads
- Reeves** - Rebuilt Royal Scot by Martin Evans
by John Broughton
£300.00 - BRITANNIA 5" GAUGE James Perrier
by Jon Seabright 1
£2,500.00 - Drill Grinder - for restoration
by Nigel Graham 2
£0.00 - WARCO WM18 MILLING MACHINE
by Alex Chudley
£1,200.00 - MYFORD SUPER 7 LATHE
by Alex Chudley
£2,000.00 - More "For Sale" Ads...
Latest "Wanted" Ads
- D1-3 backplate
by Michael Horley
Price Not Specified - fixed steady for a Colchester bantam mark1 800
by George Jervis
Price Not Specified - lbsc pansy
by JACK SIDEBOTHAM
Price Not Specified - Pratt Burnerd multifit chuck key.
by Tim Riome
Price Not Specified - BANDSAW BLADE WELDER
by HUGH
Price Not Specified - More "Wanted" Ads...
Get In Touch!
Do you want to contact the Model Engineer and Model Engineers' Workshop team?
You can contact us by phone, mail or email about the magazines including becoming a contributor, submitting reader's letters or making queries about articles. You can also get in touch about this website, advertising or other general issues.
Click THIS LINK for full contact details.
For subscription issues please see THIS LINK.
Digital Back Issues


Donate

 Register
 Log-in
Model Engineer Magazine
- Percival Marshall
- M.E. History
- LittleLEC
- M.E. Clock

ME Workshop
- An Adcock
- & Shipley
- Horizontal
- Mill

Subscribe Now
- Great savings
- Delivered to your door

Pre-order your copy!
- Delivered to your doorstep!
- Free UK delivery!
All Forum Topics > Work In Progress and completed items > D H Gipsy mk1