Cylinder bore measuring
Bore Gauge
| Graham Williams 11 | 21/02/2020 17:49:29 |
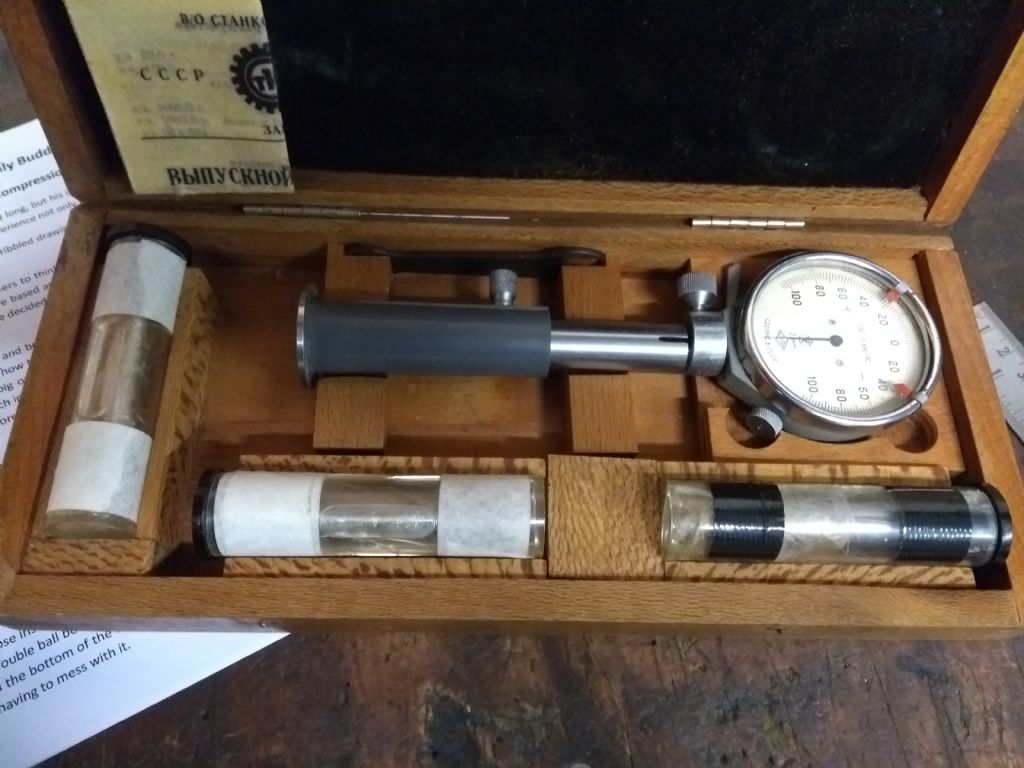
| 80 forum posts 41 photos | Chuffed today received a Russian 4 point Bore gauge, all the way from Bulgaria of all places, measure down to 2 microns in the range 10 - 18mm which covers all engines I'm likely to have an interest in. No guessing now as to how much pinch I've managed to get when lapping liners. Made a new liner for an AM 25 last few days, gauge saying 25microns pinch so well pleased Edited By Graham Williams 11 on 21/02/2020 17:51:41 |
| old mart | 21/02/2020 19:12:05 |
| 4655 forum posts 304 photos | Have you got any ring gauges in that range to set it with? |
| Alan Vos | 21/02/2020 19:36:02 |
| 162 forum posts 7 photos | Ok, I'll take the bait. This is 4 point. All the new bore gauges I see on sale are 3 point. Does anybody know enough about measuing holes to compare and contrast. I note CCCP on the paperwork. I like being able to measure things far more closely than I need, but even budget brand bore gauges are !!! expensive.
|
| Graham Williams 11 | 21/02/2020 20:09:24 |
| 80 forum posts 41 photos | Don't need a setting ring as just trying to find the difference between top and bottom of any liner. Choose 1 of 3 'probes' to suit bore set reading at one end to zero and then measure other to show the difference + or - basically a comparator, if you need a setting ring the guy has all sizes though quite costly. Was told by one who knows that the 4 point was superior and used by all the top combat engine makers (Ukrainian/Russian)and easier to use and so far I've found it easy to use. Was only 100 dollars delivered, they do like dollars, he had others that were cheaper. Searched online after only finding ones that didn't have the required scale and they all looked well used, pricey and used a different system to measure which looked clumsy. |
| Old School | 21/02/2020 20:36:00 |
| 426 forum posts 40 photos | Looks a useful bit of kit. Wouldn't mond measuring some of my liners. Roundness seems to be my problem with used liners the only real test is to make a new piston and run them. |
| Ramon Wilson | 21/02/2020 20:45:34 |
1655 forum posts 617 photos | Lovely find Graham No excuse now for that perfect liner eh Regards - Tug |
| Kiwi Bloke | 22/02/2020 02:17:40 |
| 912 forum posts 3 photos | I'll try to reply to Alan's question... The pic doesn't show the working end of the gauge, so it can only be an assumption that this is a standard 4-point-of-contact bore comparator, in which the two non-moving points are set on a chord of the cylinder, and the other two points oppose each other, lying in a line that perpendicularly bisects said chord and thus define the diameter of the cylinder. It is this diameter that is gauged. 3-point-of-contact bore micrometers have all three anvils moving, 120 deg apart (resembling a Mercedes Benz motif). And yes, they are horribly expensive, even used. |
| Graham Williams 11 | 22/02/2020 06:35:17 |
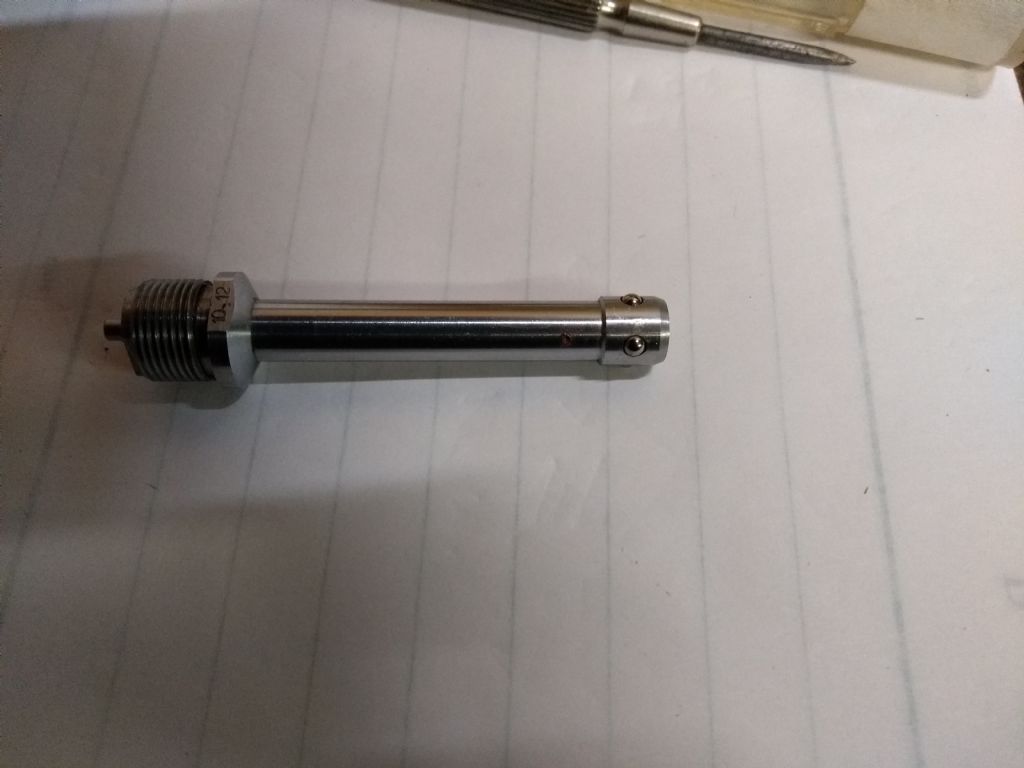
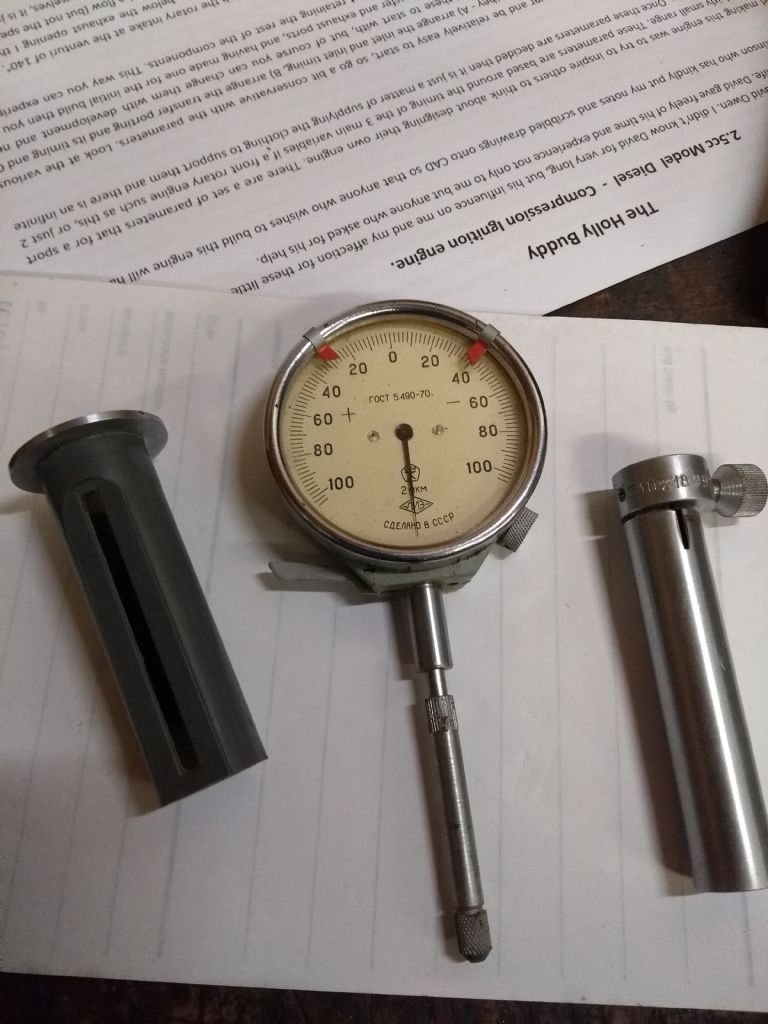
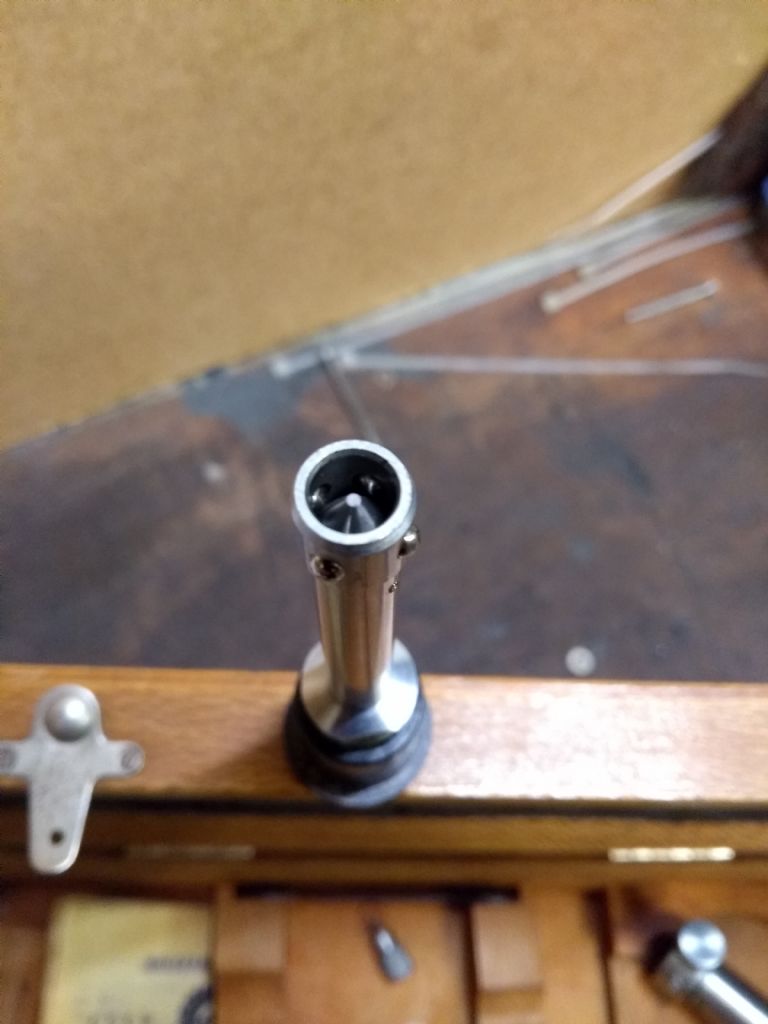
| 80 forum posts 41 photos | Hi Kiwi. I/we do use it basically as a comparator but it is capable of measurement, that is what it's designed to do. All 4 contact points (balls) move and are in contact with a central precision? made tapered spindle. I'll take pictures of a 'probe' and post later and perhaps you can tell me whether the design is superior or not to the 3 point type, which as you say are much more expensive and unless you have a no expense spared approach to model IC engine making putting them outside what is reasonable, in my opinion, to spend, Also I didn't want a micrometer (barrel) type as I wasn't confident in getting repeatable readings as all mikes, again in my opinion, depend a great deal on feel. For example measuring a liner with an ordinary inside mike I can get readings that differ by a thou maybe more taking one reading after another, heavy handed or what but it caused problems for me doing it that way. Also ball and telescopic gauges gave differing results so a decent dial bore gauge, economically priced with micron capability, looks good from here. Hiya Tug. Don't know about perfect but being able to decide on whether you've got the pinch to a working position looks easier to decide on with this gauge. Never underestimate the Russians on producing good stuff, look farther than a cold war Lada lol. Finished with the AM25's now so sorting material for the Holly Buddy engine, think I'll do the liner first LoL. Regards Graham W Edited By Graham Williams 11 on 22/02/2020 06:37:55 |
| Graham Williams 11 | 22/02/2020 07:45:48 |
| 80 forum posts 41 photos | |
| Kiwi Bloke | 22/02/2020 08:49:32 |
| 912 forum posts 3 photos | Fascinating Graham; never seen one like it. I'd still call it a comparator, however, although, like the more conventional bore comparators, quantification of deviation from the null can be read from the dial. That isn't really the same as a 3-leg bore micrometer. As to why the Russians used four moving (and apparently gauging) contact points, I've no idea. They liked to plough their own furrows, didn't they? Perhaps someone can offer a suggestion. Regarding inconsistent results from different measuring device concepts, I have to agree. I have a set of tiny Matrix 3-leg bore micrometers somewhere (not accessible at present). From memory, there is a fairly conventional-looking micrometer thimble, which sets the extent to which the legs can move out, under the influence of a spring. There's a set of different diameter heads, containing the legs. They are expanded by a shallow-tapered pin, the axial position of which is controlled by the mic. thimble. The pressure applied to the work is that of the spring, not the gorilla holding the device. In use, one moves a collar axially, to retract the legs when inserting and removing the device. Neat. Unfortunately, to span the entire measurement range, several pins are required. One is missing. It will be an awkward bit of watch-making to fashion one. It's not high up on the (infintely long) to-do list. |
| Bob Brown 1 | 22/02/2020 12:11:35 |
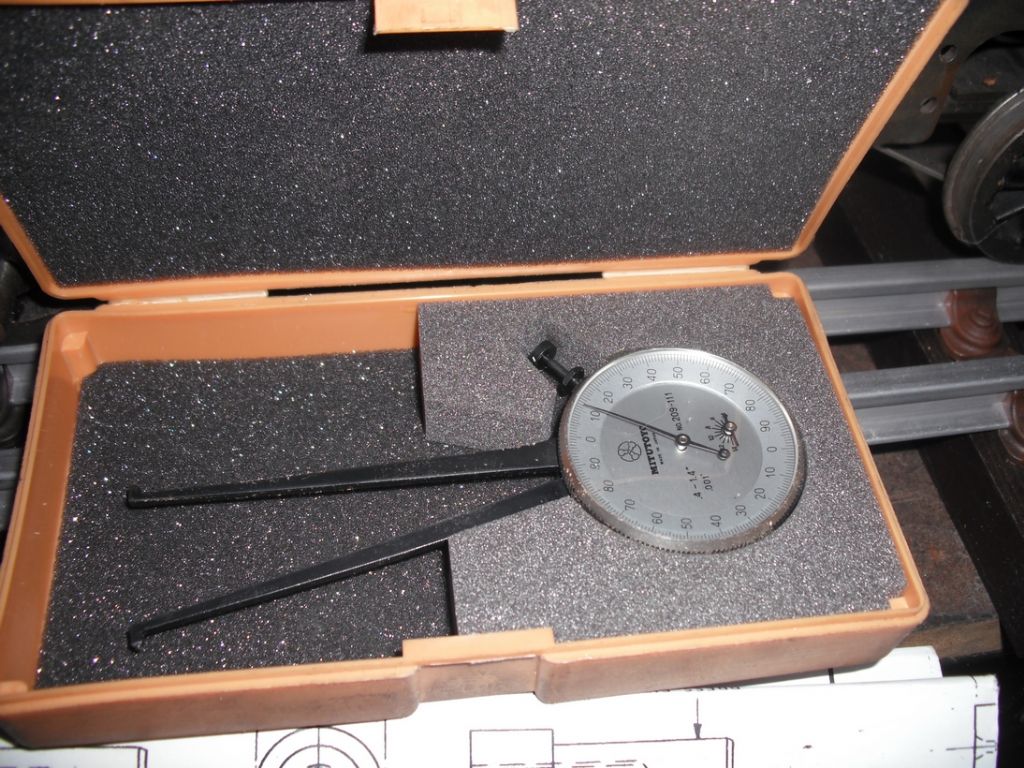
1022 forum posts 127 photos | |
| Graham Williams 11 | 22/02/2020 13:08:17 |
| 80 forum posts 41 photos | Hello Bob. Got something similar to that but it's graduated in thous as yours and was trying to get the taper in the liner to give 20 -30 microns pinch bottom to top so didn't work for me, no better than an internal mike. Cheers Graham W |
| Andrew Johnston | 22/02/2020 13:58:07 |
7061 forum posts 719 photos | Seems a bit odd. A circle can be uniquely defined by three planar, and not co-linear, points. Anything more is over-constrained. So three measurement points are guaranteed to sit exactly in a circle. A fourth point cannot be so, unless the circle is perfect. That's the reason most bore micrometers have three points. In all cases the measuring instrument has be aligned with the bore axis to get an accurate reading. With four points, and assuming the circle is near perfect, then it may be easier to judge when the instrument is aligned? Andrew |
| Martin Connelly | 22/02/2020 16:27:26 |
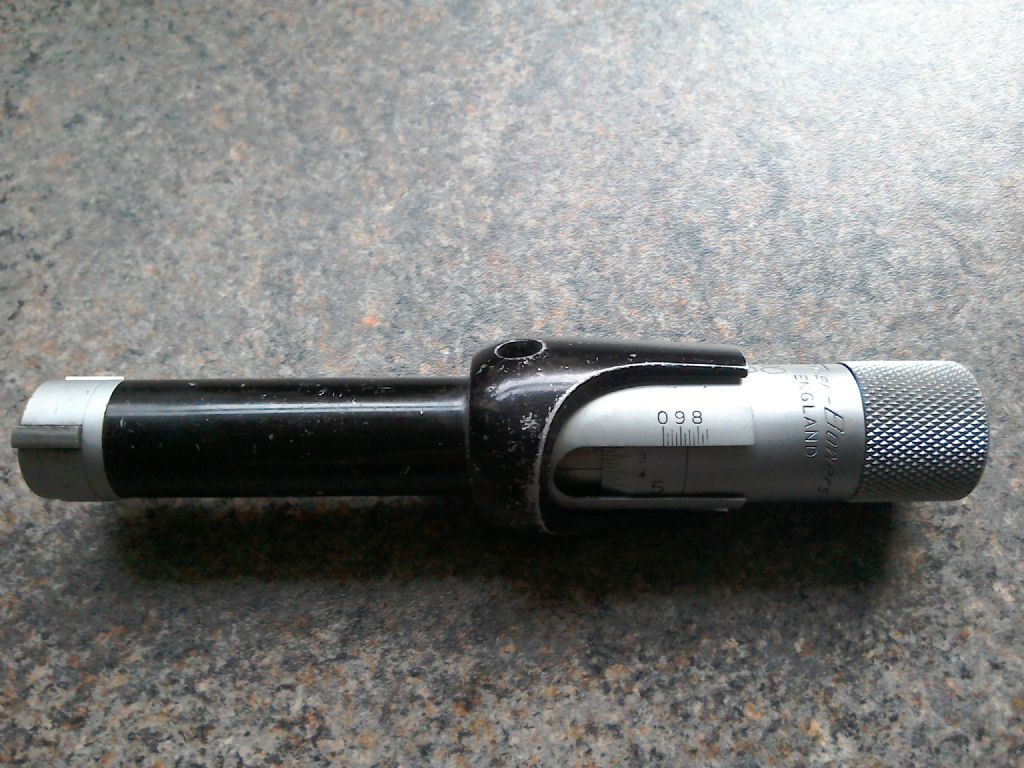
2549 forum posts 235 photos | This is my Fowler Bowers 3 point 0.75" to 1" bore gauge. I also do not have a ring gauge to check it against. Martin C |
| Graham Williams 11 | 22/02/2020 16:59:32 |
| 80 forum posts 41 photos | All very interesting as the guy in Rowan & Martin's show always said. Tried it out again this afternoon on 2 liners I've made and what I've got is exact repeatable readings on multiple attempts, gauge hand held so it's what I'm going to use from here on in. As to why the Russians went for 4 contact points I have no idea but I've always had a healthy respect for Russian technical products, were they not at the forefront of CMM introduction, they do indeed plough their own furrow and because of a desire for usually Dollars the products are within reach price wise. Martin, will your Fowlers gauge measure in microns? I'm not a fan of barrel (thimble) measurement for anything needing sub thou measurement for the reason I said previously. |
| gerry madden | 22/02/2020 17:05:46 |
| 331 forum posts 156 photos | Machining processes don't of course produce perfectly round rings or bores and these types of error become more significant when working with fine tolerance parts like bearing rings. All machining processes will cause 2, 3 and 5 point lobing (and other harmonics if you look harder) with the magnitude error dependent on the machine and the process used. With 3 point gauges or vee blocks you can pick up on or avoid these errors by carefully defining the angles between vee flanks or pins on a 3-point bore gauge to suit the typical shape of the parts you want to measure. Having said all that, I've never come across a 4 point bore micrometer either and I cant quite see the benefit. I can only guess therefore that the purpose of a 4-point device is just to make the process of getting a simple 2-point measurement a little more accurate than it usually is by minimising the operator error. ...but I may be quite wrong Gerry
|
| Martin Connelly | 22/02/2020 18:48:48 |
2549 forum posts 235 photos | The Fowler gauge is marked to 0.00025" (quarter thou) and you could theoretically estimate between the marks. Not having a temperature controlled workshop or inspection room I doubt I will worry about microns. Martin C |
| Ramon Wilson | 22/02/2020 19:02:29 |
1655 forum posts 617 photos | I don't want to appear dismissive here guys but are we not going off the beaten track here a little - surely this device can be seen as Graham first described it - a 'gauge' or comparator - it certainly isn't a micrometer. No different in principle to Bob Browns Mitutoyo gauge just vastly superior. To use it as a measuring device would require zeroing it to a known source ie a ring of specified diameter. Precision ground setting rings should be provided with three point micrometers to establish 'zero' like any micrometer standard but are not 'standard issue' for bore gauges Just been and checked my Mercer 3 point bore gauge - instructions are clear - set gauge to 'datum ring' (not provided), rock about center to establish 'zero' then use on bore being machined to estabish size. That datum ring can be machined from mild steel to as fine a tolerance as wished to the nominal size required - it does not need to be hardened and ground - and will see many bores 'sized' before wearing I have a Mitutoyo gauge the same as Bobs but find it very hard to establish an accurate zero to give the kind of accuracy required for the kind of bores that Graham is referring to. A bore for a compression ignition engine, as I'm sure that those who have made them will attest, requires a very fine tolerance on measurement and roundness. Personally I would love to have a set of three point mics to cover the ranges usually machined but desire and expenditure are a million miles apart I'm afraid. Good luck on the liners Graham however many you make
Regards - Tug |
| Neil Lickfold | 22/02/2020 19:15:14 |
| 1025 forum posts 204 photos | The 4 point ball comparator will show the error of a 3 lobed hole and a hole reamed with a standard reamer that is not round. Plus if careful you can use a micrometer or a slip stack to set the gauge with. The concept of the Russian style ball and pin style gauges, is that you can have differing arrangements of the ball orientation. The one I have, the pin slides in the assembly is quite a neat fit, but slides. The ball is also a very close fit to the mandrel. It works really well. Of course, there are many options to try and measure something, and what you are looking for will determine the type and style of bore comparator or bore micrometer being used. The more accurate you are trying to get, the more difficult it becomes to measure. The greatest difficulty is not the exact temp of the work environment, but the stability of that temp. To get back to a standard size, you can calculate how much bigger the item should measure from the standard of 20 deg C. |
| Graham Williams 11 | 22/02/2020 19:20:15 |
| 80 forum posts 41 photos | Just a thought Martin, what would the micrometer gauge you have cost, I've never heard of one I'm afraid. The advice I've had pointed me in this type of instrument as the one routinely used and it is easy to use where all the other gauges I've tried never gave me anything satisfactory and were quite variable in use. Cost to me is also a consideration as Tug says and if I had to guess the Fowler tool would cost more, maybe considerably more, than the Russian tool and it would in my opinion still be subject to my lack of feel. Cheers Graham W |
Please login to post a reply.
Want the latest issue of Model Engineer or Model Engineers' Workshop? Use our magazine locator links to find your nearest stockist!
Sign up to our newsletter and get a free digital issue.
You can unsubscribe at anytime. View our privacy policy at www.mortons.co.uk/privacy
- hemingway ball turner
04/07/2025 14:40:26 - *Oct 2023: FORUM MIGRATION TIMELINE*
05/10/2023 07:57:11 - Making ER11 collet chuck
05/10/2023 07:56:24 - What did you do today? 2023
05/10/2023 07:25:01 - Orrery
05/10/2023 06:00:41 - Wera hand-tools
05/10/2023 05:47:07 - New member
05/10/2023 04:40:11 - Problems with external pot on at1 vfd
05/10/2023 00:06:32 - Drain plug
04/10/2023 23:36:17 - digi phase converter for 10 machines.....
04/10/2023 23:13:48 - More Latest Posts...
- View All Topics
- Reeves** - Rebuilt Royal Scot by Martin Evans
by John Broughton
£300.00 - BRITANNIA 5" GAUGE James Perrier
by Jon Seabright 1
£2,500.00 - Drill Grinder - for restoration
by Nigel Graham 2
£0.00 - WARCO WM18 MILLING MACHINE
by Alex Chudley
£1,200.00 - MYFORD SUPER 7 LATHE
by Alex Chudley
£2,000.00 - More "For Sale" Ads...
- D1-3 backplate
by Michael Horley
Price Not Specified - fixed steady for a Colchester bantam mark1 800
by George Jervis
Price Not Specified - lbsc pansy
by JACK SIDEBOTHAM
Price Not Specified - Pratt Burnerd multifit chuck key.
by Tim Riome
Price Not Specified - BANDSAW BLADE WELDER
by HUGH
Price Not Specified - More "Wanted" Ads...
Do you want to contact the Model Engineer and Model Engineers' Workshop team?
You can contact us by phone, mail or email about the magazines including becoming a contributor, submitting reader's letters or making queries about articles. You can also get in touch about this website, advertising or other general issues.
Click THIS LINK for full contact details.
For subscription issues please see THIS LINK.
Model Engineer Magazine
- Percival Marshall
- M.E. History
- LittleLEC
- M.E. Clock
ME Workshop
- An Adcock
- & Shipley
- Horizontal
- Mill
Subscribe Now
- Great savings
- Delivered to your door
Pre-order your copy!
- Delivered to your doorstep!
- Free UK delivery!



 Register
 Log-in


