Forum sponsored by:

Hemingway Myford Tailstock Swarf Guard
| Mike Donnerstag | 20/01/2020 17:28:54 |
 231 forum posts 53 photos | I'm sure this is a beginner's question: I recently purchased the Myford Swarf Guard kit from Hemingway Kits, as illustrated below. I turned the tailstock swarf guard having marked out the bolt circle before I bored the hole for the tailstock barrel. I was wondering how I should transfer these holes to the tailstock casting. I was hoping I could clamp the guard onto the tailstock in some way and drill through, though as the casting is irregular, I'm struggling to find a way to clamp it. Any ideas? The other concern is that the guard's 1.125" hole needs to be roughly concentric to the 1.116" tailstock barrel to ensure it doesn't rub on the barrel, thereby defeating its purpose of protecting it from wear. Should I use shim stock (about 4.5thou) to centralise it to the barrel?
Any ideas gratefully accepted! Mike Edited By Mike Donnerstag on 20/01/2020 17:30:21 |
| Brian Wood | 20/01/2020 18:21:54 |
| 2742 forum posts 39 photos | Mike, Slide your swarf guard over the barrel and fit a hose clip to the protruding barrel. Wind barrel back in to hold the guard. Bingo. Brian |
| not done it yet | 20/01/2020 22:42:39 |
| 7517 forum posts 20 photos | Or wrap a few turns of sticky tape around the tailstock barrel? Remove it afterwards. |
| ega | 20/01/2020 23:19:51 |
| 2805 forum posts 219 photos | I made the same addition some years ago but don't remember how I held the ring for drilling (assuming it was done in situ). I do, however, think your idea of centralising the ring with shim is a good one; I had to relieve my ring to stop it rubbing on the barrel. |
| Enough! | 21/01/2020 01:09:35 |
| 1719 forum posts 1 photos | Haven't really looked closely at this, but I'd: - turn the hole in the guard to a close (but not interference) fit on the tailstock barrel. - locate-drill-tap one mounting hole and install its screw. - drill-tap remaining holes. - then open up the hole in the guard if required. (I hate messing around with shims).
Edited By Bandersnatch on 21/01/2020 01:10:32 |
| Mike Donnerstag | 23/01/2020 12:09:38 |
231 forum posts 53 photos | Great advice chaps - many thanks. What is the best way to cut the 5mm felt neatly? Sharp wood chisel perhaps for the outer diameter? And maybe a inside-bevel gouge for the inside diameter? Can you tell I'm a woodworker at heart?? Mike |
| ega | 23/01/2020 13:38:37 |
| 2805 forum posts 219 photos | Posted by Mike Donnerstag on 23/01/2020 12:09:38:
Great advice chaps - many thanks. What is the best way to cut the 5mm felt neatly? Sharp wood chisel perhaps for the outer diameter? And maybe a inside-bevel gouge for the inside diameter? Can you tell I'm a woodworker at heart?? Mike Ideally, you would make up a simple press tool to cut the felt ring; no need for this to be hardened as it will get very little use. |
| ega | 24/01/2020 10:57:55 |
| 2805 forum posts 219 photos | PS My copy of the Riley plan is for the power cross feed S7 although my own machine is the older, plain version. On the latter, the slots for the pins operated by the half nut lever are open-ended and I have taken J A Radford's advice to instal a ring around the outside to prevent swarf getting in. I should be interested in seeing a photo of your leadscrew guard when installed. |
| Mike Donnerstag | 24/01/2020 13:28:51 |
231 forum posts 53 photos | Hi ega, I have posted photos of the two guards I've made so far below:
|
| ega | 24/01/2020 15:02:29 |
| 2805 forum posts 219 photos | Mike Donnerstag Thanks for the photos. The new leadscrew guard is clearly doing a good job already; I assume the standard guard is removed. From your photo it seems that the PXF machine's half nut lever does not need the protection I mentioned. FYI, here is a photo of the tool I made to produce the felts for my Quorn grinder:
Perhaps not justified for a one off but you could make more and sell them to Hemingway! |
| Mike Donnerstag | 24/01/2020 15:20:49 |
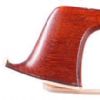
231 forum posts 53 photos | ega: Yes, I removed the standard guard and the plate that protects the half-nuts (which I can't find any reference to in the manual so I'm wondering whether it was home-made. Having said that, it does look as if it has been stamped out:
I like your felt cutter and was wondering how to make such a thing. How did you make yours? I assume it's made in several pieces? |
| ega | 24/01/2020 15:34:55 |
| 2805 forum posts 219 photos | Yes - a base, inner and outer ring; the outer ring looks as though I made it from a bit of scaffold tube. The OD of the felt produced would be about 36mm; would this suit your job, by any chance? I could easily put a felt in the post. I have no experience of the PXF machine. Presumably, the holes on the part in your photo are there to clear the screws associated with the gib strip and/or standard guard. Like you, I couldn't see this part in the manual (drawing LA) and I had some difficulty in visualising its orientation and function. Edited By ega on 24/01/2020 15:35:18 |
| Mike Donnerstag | 24/01/2020 15:54:30 |
231 forum posts 53 photos | How did you keep the inner and out ring concentric? I made a ring from the felt, just using very sharp chisels and gouges, though it wasn't perfect and perhaps fits a little too tightly, but many thanks for the offer. For interest, I measured the size needed in mm: OD: 39.7mm, ID: 28.6mm The part I photographed fits with the bent part upwards, covering the top of the apron above the half nuts, as in the photo on lathes.co.uk, which confirms that it must have been an original fitment:
|
| ega | 24/01/2020 17:34:50 |
| 2805 forum posts 219 photos | Like this:
The two cutting surfaces need to be more or less level, of course. Good idea to check lathes.co.uk - clearly, we both have out-of-date manuals! Credit is due to Myfords for detail improvements over the life of the Seven. However, it looks as though the Riley approach is more effective. So far as I can see they never directly addressed the problem caused by the redundant thread at the left hand end of the leadscrew; longer than necessary, it tends to transport chips back along the leadscrew. |
| Mike Donnerstag | 02/02/2020 15:10:55 |
231 forum posts 53 photos | That's brilliant ega. I'll try making one of those Many thanks, Mike |


Please login to post a reply.
Magazine Locator
Want the latest issue of Model Engineer or Model Engineers' Workshop? Use our magazine locator links to find your nearest stockist!
Sign up to our Newsletter
Sign up to our newsletter and get a free digital issue.
You can unsubscribe at anytime. View our privacy policy at www.mortons.co.uk/privacy
Latest Forum Posts
- *Oct 2023: FORUM MIGRATION TIMELINE*
05/10/2023 07:57:11 - Making ER11 collet chuck
05/10/2023 07:56:24 - What did you do today? 2023
05/10/2023 07:25:01 - Orrery
05/10/2023 06:00:41 - Wera hand-tools
05/10/2023 05:47:07 - New member
05/10/2023 04:40:11 - Problems with external pot on at1 vfd
05/10/2023 00:06:32 - Drain plug
04/10/2023 23:36:17 - digi phase converter for 10 machines.....
04/10/2023 23:13:48 - Winter Storage Of Locomotives
04/10/2023 21:02:11 - More Latest Posts...
- View All Topics
Support Our Partners


Shopping Partners
Subscription Offer

Latest "For Sale" Ads
- Reeves** - Rebuilt Royal Scot by Martin Evans
by John Broughton
£300.00 - BRITANNIA 5" GAUGE James Perrier
by Jon Seabright 1
£2,500.00 - Drill Grinder - for restoration
by Nigel Graham 2
£0.00 - WARCO WM18 MILLING MACHINE
by Alex Chudley
£1,200.00 - MYFORD SUPER 7 LATHE
by Alex Chudley
£2,000.00 - More "For Sale" Ads...
Latest "Wanted" Ads
- D1-3 backplate
by Michael Horley
Price Not Specified - fixed steady for a Colchester bantam mark1 800
by George Jervis
Price Not Specified - lbsc pansy
by JACK SIDEBOTHAM
Price Not Specified - Pratt Burnerd multifit chuck key.
by Tim Riome
Price Not Specified - BANDSAW BLADE WELDER
by HUGH
Price Not Specified - More "Wanted" Ads...
Get In Touch!
Do you want to contact the Model Engineer and Model Engineers' Workshop team?
You can contact us by phone, mail or email about the magazines including becoming a contributor, submitting reader's letters or making queries about articles. You can also get in touch about this website, advertising or other general issues.
Click THIS LINK for full contact details.
For subscription issues please see THIS LINK.
Digital Back Issues


Donate

 Register
 Log-in
Model Engineer Magazine
- Percival Marshall
- M.E. History
- LittleLEC
- M.E. Clock

ME Workshop
- An Adcock
- & Shipley
- Horizontal
- Mill

Subscribe Now
- Great savings
- Delivered to your door

Pre-order your copy!
- Delivered to your doorstep!
- Free UK delivery!
All Forum Topics > Workshop Techniques > Hemingway Myford Tailstock Swarf Guard