Forum sponsored by:

Just Started a 4 inch Foster
| Mr Mike | 04/09/2016 20:47:48 |
| 19 forum posts 12 photos | Hi today I made the first part for my 4 inch foster agricultural engine. I did my research, had to wait for my plans due to Dorset Steam fair but today I finally made the first step. I'm starting with the front hubs, axle and wheels. Metal has been ordered so all I could do until it arrives is knock out a front tow pin and the front axle pin. Next it will be the front hubs and axle both of these are being machined from scratch. I'm fortunate enough to have a lathe and milling machine at home and access to a full machine shop at work. Work also has a few very knowledgeable and experienced people so help is readily available should I need it. Being an engineer I plan to fabricate as much as I can. I was wondering if any users here have any tips for me, perhaps such things as known drawing errors. All advice is greatly appreciated. |
| JasonB | 05/09/2016 08:37:07 |
 25215 forum posts 3105 photos 1 articles | Ther was a long list of errors for the Foster but not sure if it is still up on the net as teh guy who's site it was on passed away. I'll have a look. Welcome to the forum too. J |
| JasonB | 05/09/2016 08:43:16 |
25215 forum posts 3105 photos 1 articles | Here you go, long list is also on Traction Talk Forum but you will justy have to register to view this thread. Also a very good forum for all things traction engine related, probably a few build threads of your engine in the miniatures section too. |
| Diane Carney | 05/09/2016 11:35:08 |
| 419 forum posts 11 photos | And lots of general and generic hints and tips ongoing in Chris Gunn's article on the 4 inch Garrett 4CD. Not specific, of course, but worth a look Diane |
| Graham Titman | 05/09/2016 15:35:22 |
 158 forum posts 28 photos | Hi Mike if you click this link it should take you to a page of the errors Jason was wrote about i don't think you have to log. http://modeleng.proboards.com/thread/3225/errors-on-drawings?page=2 Graham |
| Mr Mike | 05/09/2016 22:06:39 |
| 19 forum posts 12 photos | Wow er thanks I think, it'd appear there is no end of errors. I had noticed the drawings were vague in places. No big problem as like I said I plan to fab as much as I can so if I plan ahead all should be good. Can any reading be recommend? Bearing in mind I'm new to steam. Thanks sincerely for the help. |
| JasonB | 06/09/2016 07:26:10 |
25215 forum posts 3105 photos 1 articles | Some of the items of that list are more to do with detail than real errors, just depends how true to the original you want to build. Best book on the subject is "Scale Model Traction Engine Design & Construction" by Edward George. ISBN 0 9548393 0 7 Out of print a couple of years ago but the odd one does come up for sale and worth paying whatever is being asked for it. As I mentioned above there are many good build threads on TT forum in the miniatures section, ave a look through those, the guy who compiled that list is also on there should you have any queries. |
| Mr Mike | 07/09/2016 00:51:26 |
| 19 forum posts 12 photos | Sincerely thanks for your help. I've registered with TT but the section on model engines requires a donation which since for some reason I haven't received my activation email(it's not in my spam folder either) I can't donate nor post. My reason for asking is I'm about to start machining my front hubs and am reluctant to start untill im happy with the plans which im not. The drawing for the hub assembly is vague at best and im not happy the bearing set up will work properly. Perhaps me and others are not getting it but im thinking of doing the bearing to my own design. Thanks again and I will have to persevere with TT Edited By Mr Mike on 07/09/2016 00:58:09 |
| JasonB | 07/09/2016 07:29:54 |
25215 forum posts 3105 photos 1 articles | That must have changed as most people who have not made a dionation can see all except the "supporteres" section, the only thing you won't see if you don't donate is photos that have been posted as attachments, ones hosted elsewhere view fine. Wait until you get your activation e-mail - can take a few days. Usual way with a lot of TE front wheels is to press in two plain or flanged bearings leaving a gap in the middle that the oil can flow into. Edited By JasonB on 07/09/2016 07:30:26 |
| Mr Mike | 12/09/2016 02:02:08 |
| 19 forum posts 12 photos | Hi and again thanks for the help. My issue was with the collar that holds the hub assembly to the axle. My drawings are in metric so obviously have been converted from imperial. The axle has a diameter of 20mm the hub inner being 25mm this obviously being the outter diameter of the bearing I'll push in. The drawings showed the inside diameter of the collar at 25mm this made no sense to me as it would be very loose on the axle and it obviously didn't fit on the outside of the bearing. Anyway with a fresh mind I measured the drawings and found that the collar measured the same as the axle so it'd appear that whoever metricised the drawings got it wrong. I've learnt a valuable lesson here and it's check, check and check some more as I am now the proud owner of 4 axle collars. 2 I made beautifully with a 25mm inside diameter and 2 equaly beautiful ones with the correct 20mm diameter. Newbie mistake I guess and probably the first of many. Edited By Mr Mike on 12/09/2016 02:04:09 |
| Paul Lousick | 12/09/2016 04:03:58 |
| 2276 forum posts 801 photos | Hi Mr Mike, You will probably find that there are lots of mistakes on drawings which have been produced for model engines. Often drawn/converted by drafters who do not have a lot experience or done to a cheap price, hence the mistakes or poor quality drawings. (drawings would cost $1000's instead of $100's to purchase if professionally produced). My advise is to double check everything before machining a part. I had previously worked for 40 years as a professional mechanical draftsman and re-draw everything, mainly to check the compatability of components but to also make changes to suit available size materials. Paul |
| Mr Mike | 14/09/2016 19:02:29 |
| 19 forum posts 12 photos | Hi, again thanks for the advice. I think from now i'm going to draw the part i'm making along with everything else in that particular assembly as it'll help me notice any missing measurements and get a better idea of how things go together. Especially since I'm scratch building as much as I can and the drawings seem to be aimed at those buying castings and purely cleaning them up, therefor they have a lot of measurements missing. |
| Mr Mike | 04/10/2016 00:25:53 |
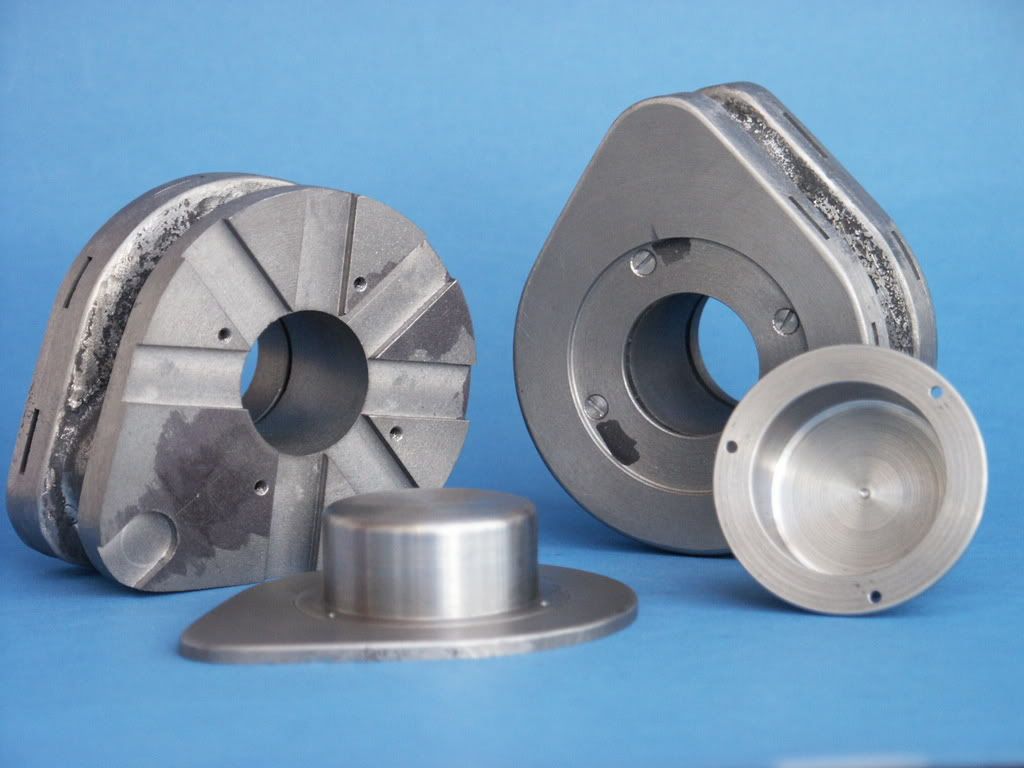
| 19 forum posts 12 photos |  Hi just a couple of pics to show I've not been idle. One shows my front hub and covers that have been made from one piece of round 100mm such as the one in the picture. I have since made another one of each from this piece of steel. Another pic shows a hub after I've machinex the slots for my spokes. Hi just a couple of pics to show I've not been idle. One shows my front hub and covers that have been made from one piece of round 100mm such as the one in the picture. I have since made another one of each from this piece of steel. Another pic shows a hub after I've machinex the slots for my spokes. Edited By Mr Mike on 04/10/2016 00:45:19 |
| Mr Mike | 04/10/2016 01:19:15 |
| 19 forum posts 12 photos |
|
| Mr Mike | 04/10/2016 01:38:32 |
| 19 forum posts 12 photos |
Edited By Mr Mike on 04/10/2016 01:44:08 |
| Paul Lousick | 04/10/2016 06:45:26 |
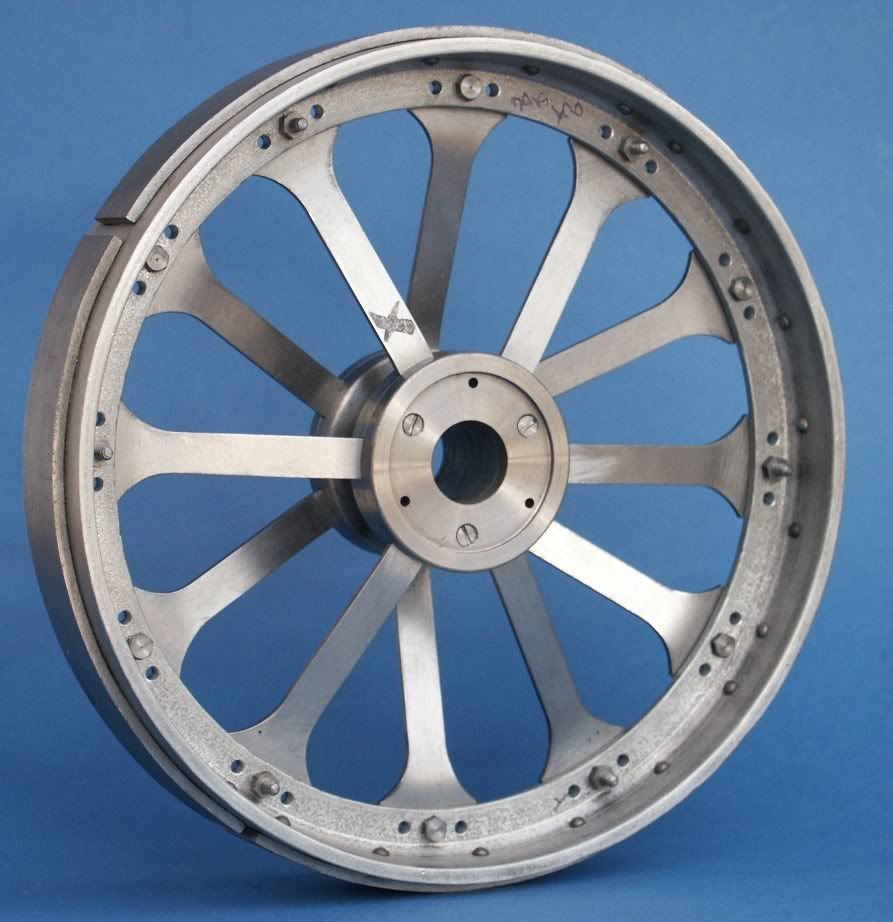
| 2276 forum posts 801 photos | Hi Mr Mike, This is link to a previous post of mine showing the building of my traction engine. Not a 4" Fowler but a 6" Ruston and Proctor which would be about the same size as yours. Paul. http://www.model-engineer.co.uk/forums/postings.asp?th=112162 Edited By Paul Lousick on 04/10/2016 06:46:25 |
| JasonB | 04/10/2016 07:55:27 |
25215 forum posts 3105 photos 1 articles | Off to a good start Mr Mike I'm not sure what the Foster drawings show but as the hubs were originally cast it is usual to replicate the radiused corners on the hubs which could still be added if you wanted to. It's a bit of a personal thing, some like to get the engine done and out on the rally field ASAP, others tend to like to get the details as original and may not steam the engine much.
|
| Mr Mike | 04/10/2016 19:43:07 |
| 19 forum posts 12 photos | Hi thanks for the replies. I'm aware that most use castings but as personal preferance im going to scratch build as much as I can. As mentioned previously the drawings tend to be aimed at those cleaning up castings so some measurements are missing. As for putting a radius on the edges the 3 parts in 1 picture are 1 complete hub assembly. Obviously the spokes go in the slots of the main hub and then the top hat shaped item is solid and fits on the inside of the hub I have put a radius on the part of this that sits up against the axle. The slim 8mm wide biscuit shaped cover goes on the outside of the hub covering the spokes. Since once the whole assembly is in place and held in situ via a collar it is then covered with a hollow usually brass cover to finish it off. Since the 3 items made so far all mate together I didnt think it'd look right with the hub having rounded corners being mated to other items with the same. Instead all 3 parts were turned at the same time to exactly the same diameter so when they are together it will be practically seamless joins throughout out the whole assembly. Obviously this is personal preference |
| Mr Mike | 04/10/2016 20:02:45 |
| 19 forum posts 12 photos | Paul thanks for the link. I was aware of your thread and had studied it previous. You do nice work and I'd actually shown friends your pictures as a reference for what I was about to produce. I'm an engineer by trade so may be biased but I think your pictures of the milled hub are a think of beauty. Now I have my own pair of near complete hubs they have pride of place on my desk at work and currently function as excellent paper weights though I'm certain few other paper weights have as many man hours invested in them. |
| JasonB | 04/10/2016 20:19:37 |
25215 forum posts 3105 photos 1 articles | Mike, it was not the mating faces that I was saying should be rounded, as you say when they are assembled with your favorite epoxy the joints should not be visible under a coat of paint so you need those as crisp as possible. It is the two inner faces and the outer faces of the inner and outer cover plates, Don't have a good close up photo of the front hobs on my Fowler only this part assembled wheel which were also cut from solid but if you look at this one of Paul's you can see the mating faces are square edged but the other external corners all rounded this can either be as cast on teh model hubs or if cutting from solid added with a simple form tool.
Edited By JasonB on 04/10/2016 20:33:35 |


Please login to post a reply.
Magazine Locator
Want the latest issue of Model Engineer or Model Engineers' Workshop? Use our magazine locator links to find your nearest stockist!
Sign up to our Newsletter
Sign up to our newsletter and get a free digital issue.
You can unsubscribe at anytime. View our privacy policy at www.mortons.co.uk/privacy
Latest Forum Posts
- *Oct 2023: FORUM MIGRATION TIMELINE*
05/10/2023 07:57:11 - Making ER11 collet chuck
05/10/2023 07:56:24 - What did you do today? 2023
05/10/2023 07:25:01 - Orrery
05/10/2023 06:00:41 - Wera hand-tools
05/10/2023 05:47:07 - New member
05/10/2023 04:40:11 - Problems with external pot on at1 vfd
05/10/2023 00:06:32 - Drain plug
04/10/2023 23:36:17 - digi phase converter for 10 machines.....
04/10/2023 23:13:48 - Winter Storage Of Locomotives
04/10/2023 21:02:11 - More Latest Posts...
- View All Topics
Support Our Partners


Shopping Partners
Subscription Offer

Latest "For Sale" Ads
- Reeves** - Rebuilt Royal Scot by Martin Evans
by John Broughton
£300.00 - BRITANNIA 5" GAUGE James Perrier
by Jon Seabright 1
£2,500.00 - Drill Grinder - for restoration
by Nigel Graham 2
£0.00 - WARCO WM18 MILLING MACHINE
by Alex Chudley
£1,200.00 - MYFORD SUPER 7 LATHE
by Alex Chudley
£2,000.00 - More "For Sale" Ads...
Latest "Wanted" Ads
- D1-3 backplate
by Michael Horley
Price Not Specified - fixed steady for a Colchester bantam mark1 800
by George Jervis
Price Not Specified - lbsc pansy
by JACK SIDEBOTHAM
Price Not Specified - Pratt Burnerd multifit chuck key.
by Tim Riome
Price Not Specified - BANDSAW BLADE WELDER
by HUGH
Price Not Specified - More "Wanted" Ads...
Get In Touch!
Do you want to contact the Model Engineer and Model Engineers' Workshop team?
You can contact us by phone, mail or email about the magazines including becoming a contributor, submitting reader's letters or making queries about articles. You can also get in touch about this website, advertising or other general issues.
Click THIS LINK for full contact details.
For subscription issues please see THIS LINK.
Digital Back Issues


Donate

 Register
 Log-in
Model Engineer Magazine
- Percival Marshall
- M.E. History
- LittleLEC
- M.E. Clock

ME Workshop
- An Adcock
- & Shipley
- Horizontal
- Mill

Subscribe Now
- Great savings
- Delivered to your door

Pre-order your copy!
- Delivered to your doorstep!
- Free UK delivery!
All Forum Topics > Traction engines > Just Started a 4 inch Foster