CNC Lathe Scratch Build
| T.B | 23/04/2021 01:33:40 |
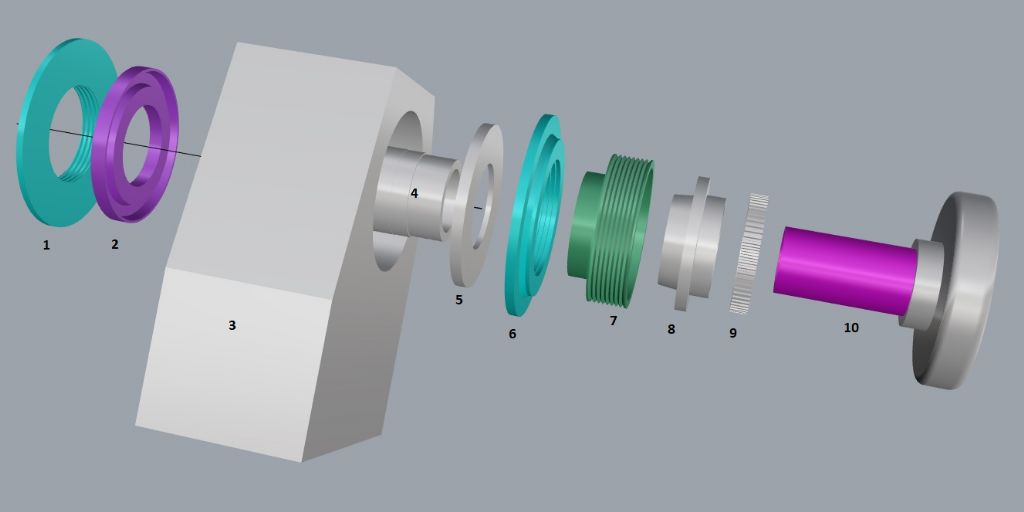
| 54 forum posts 21 photos | Hi just to add , the air cylinder is connected to the body at faces 4/5 , as Ross says we did have some problems with the piston binding , but if I remember correctly this turned out to be something causing misallignment in the rear bush and once this was rectified we where able to make this connection. It works whether connected or not but if not connected the air cylinder could move axially when energised enough to make an annoying knocking noise as it hit the inner face of the main body
|
| Joseph Noci 1 | 23/04/2021 07:18:19 |
| 1323 forum posts 1431 photos | Posted by Ross 77 on 23/04/2021 00:43:40:
No problem and thanks for the positive feedback. Unfortunately I do tend to over complicate my designs. T.B always seems to pull them back to some sort of reality and make them buildable. It will be interesting to see what you come up with and I don't think I will be criticising your work any time soon. Im quite interested in your 5c spindle design for one of my projects. I wish I had your skills to make all those parts. I see you are having trouble with the seals. Is the whole bearing/shaft assembly full of oil? or is it a drip feed? I don't think its overcomplicated - perusing in some detail shows little room for simplification...I suppose the design could be flipped - place the stepper drive pulley inside the housing and the air cylinder on the right , outside - this may permit use of some variant of commercially available air cylinder? But that brings all sorts of other complications which brings you back to the same amount of effort anyway, in addition to the unit growing in width, etc!
Ross, the 5C spindle is a story on its own - I did cover its birth early on in my series of posts, but possible did not highlight the compromises I endured because of it! First, its size was again limited by material availability - the spindle end up being machined out of a piece of Caterpillar side shaft...which was rather short...In addition the headstock was made from a chunk of aluminium on hand..which was rather narrow...So the space available for bearings, oil flingers, labyrinth seals, etc, was very limited. These combined bits were what drove the dimensions for the rest of the lathe in its entirety - sort of the tail wagging the dog.. There is no room in the headstock for a conventional oil bath/drain hole at bearing type design. I bored rebates for the bearings and then through for the spindle shaft, and made a trough or sorts feeding the oil drain oil to outside ( for oil changes). The idea was to have the bottom 10mm of the bearing in an oil 'bath' - this level being way below the external labyrinth seals, and hope for the best - turned out for the worst! Works well at high rpm, but below 200-300 rpm it leaks - the flingers are not effective there. In the end the short spindle is a big problem for boring bar clearance in the ATC tool plate, so we have to compromise further - add a 4" 5C chuck instead, which means a new spindle, etc, etc... As posted previously - 1 + 6 (blue) Labyrinth seals.End seals. 2+5 Oil Flingers 7+8 Drive pulley preload nut and conical pulley lock 9 encoder pulley 10 5c collet closer
If you want detailed drawings I am happy to oblige - but perhaps more to show how NOT to do it.. Joe
|
| Joseph Noci 1 | 24/04/2021 14:34:14 |
| 1323 forum posts 1431 photos |
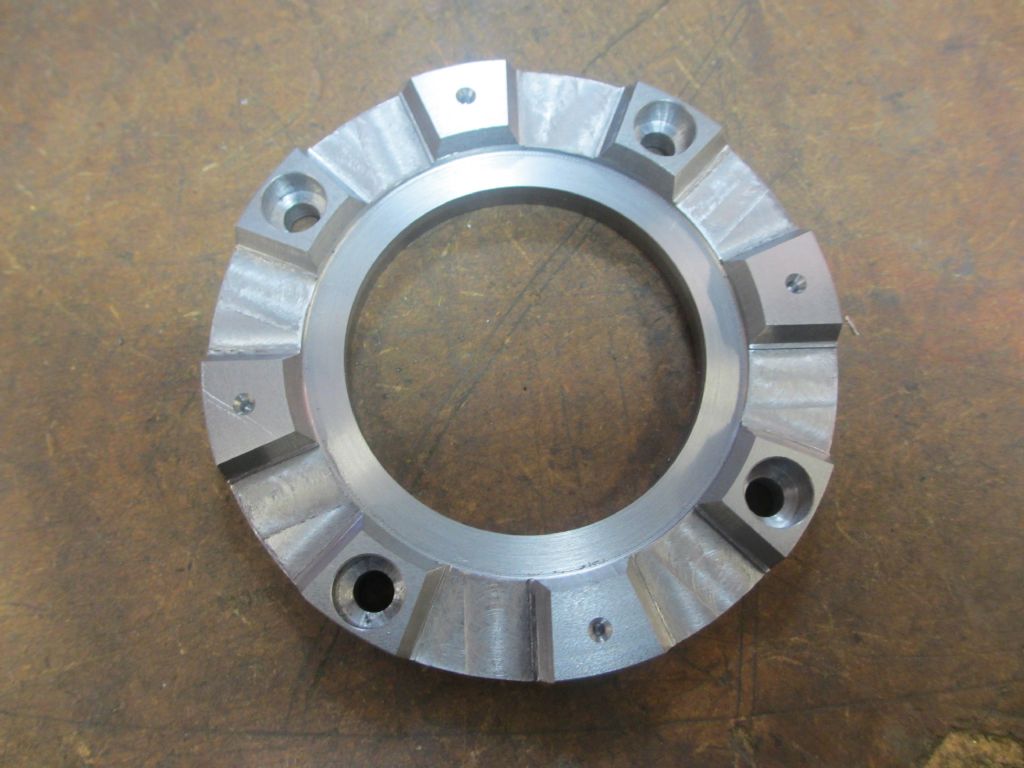
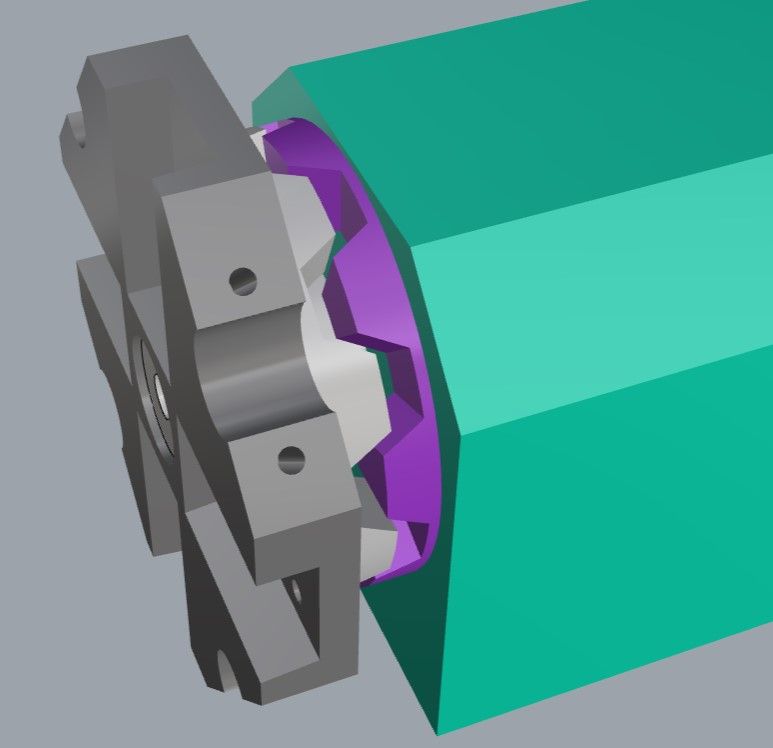
T.B / Ross, Why am I battling to model the Hirth coupler on CAD??!! It looks so simple! I have dug through all the Hirth sites I could find on internet, ifinding some pretty tools where you input the parameters ( no of teeth, angle of teeth, etc) and it generates a pretty 3D model, but have not found any sensible Mathematic or geometric explanation! Have you some pointers for me? Joe |
| Dave Smith 14 | 24/04/2021 22:57:35 |
| 222 forum posts 48 photos | Josef Have you seen this paper on hirth couplings. If the link does not work send me a PM and I will send it to you. Dave |
| Joseph Noci 1 | 25/04/2021 07:32:41 |
| 1323 forum posts 1431 photos | Hello Dave, I don't find a specific paper at that URL - it appears to just be a general search on Hirth using Bing? I have seen about all those items that appear on that search page while searching previously using google. Most of the 'slightly' mathematical or more technical descriptions that I have found also describe the more conventional coupler, ie, where the teeth are fully formed triangles ( with tops slightly flattened for clearance). I have not found any design detail on the type as in the images above from T.B / Ross. Joe Edit - there is a paper in there..I have seen that one - by a group of Italians - University Bologna - but lacks design info - focuses mainly of tooth shapes versus load bearing capability.. Edited By Joseph Noci 1 on 25/04/2021 07:38:09 |
| Dave Smith 14 | 25/04/2021 10:27:22 |
| 222 forum posts 48 photos | Josef Yes it was the Italian paper. Dave |
| T.B | 25/04/2021 13:31:51 |
| 54 forum posts 21 photos | Hi Joe Thats definately a question for Ross as opposed to me , he did the drawings for the ones pictured. I'll give him a nudge as I don't think he regually reads this forum. |
| John Haine | 25/04/2021 13:49:15 |
| 5563 forum posts 322 photos | Hi Joe, I know that you've been focusing on the ATC but did you make any progress on the tool touch sensing? |
| Ross 77 | 26/04/2021 00:05:49 |
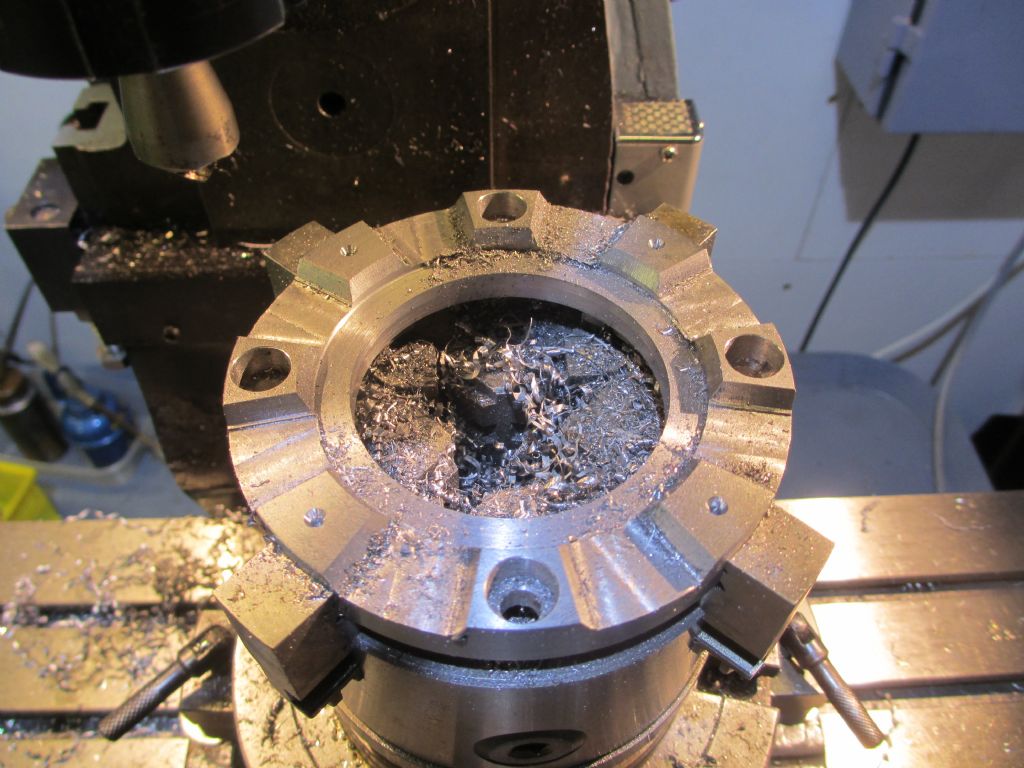
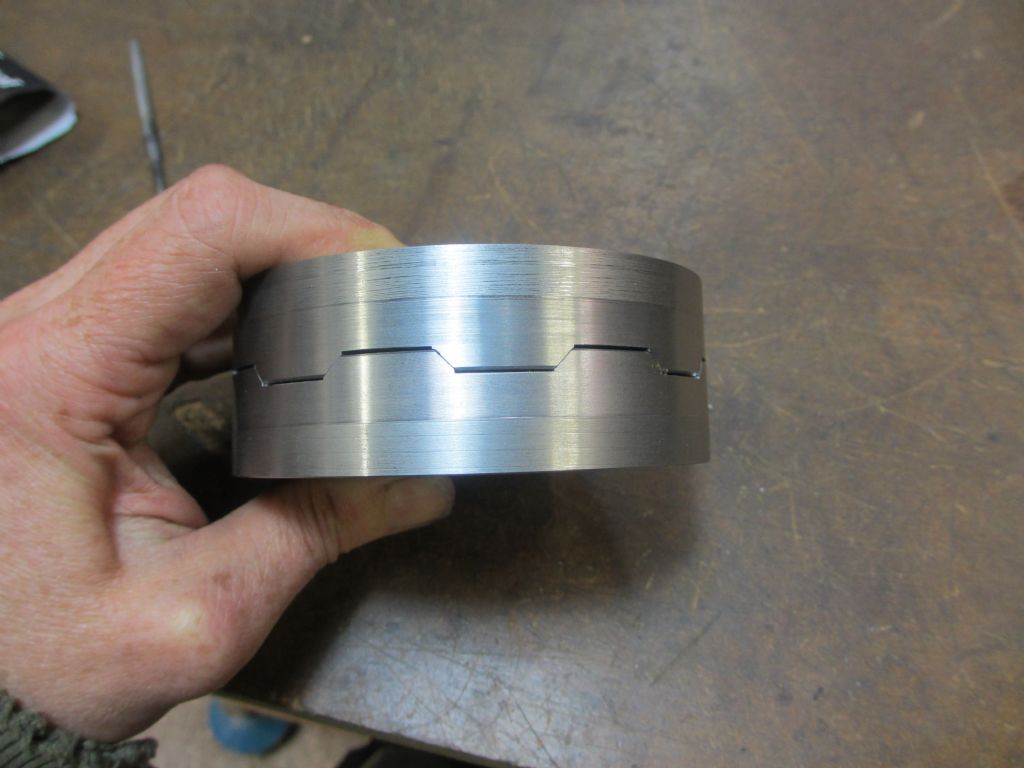
| 12 forum posts 5 photos | Hi Joe As you say there isn't much out there for the design of these things. I did find a design guide for curvic couplings Curvic Coupling Design - Nov/Dec 1986 Gear Technology In the end we decided to make it as big as possible to ensure it was really rigid. The angle of the teeth is important as it affects the loading on the Bellevilles. 45deg is easiest but the separating force is the full cutting force so we used a steeper contact angle of 60deg, which reduced the load on the belleviles and ultimately the strength of the puenmatic cylinder to open it. One point to note here is that the taller you make the teeth the further the piston has to push to open it. The Belleviles are pre-loaded in the closed position and the force to reach the open state can be considerable. we were going to look at reducing the tooth height to bring down the opening pressure. As usual its all a balancing act I cant find the calculations just now but I will keep looking. From memory we used a 800N cutting force, 2000N preload which needed a 90-100psi opening pressure. |
| Ross 77 | 26/04/2021 00:27:42 |
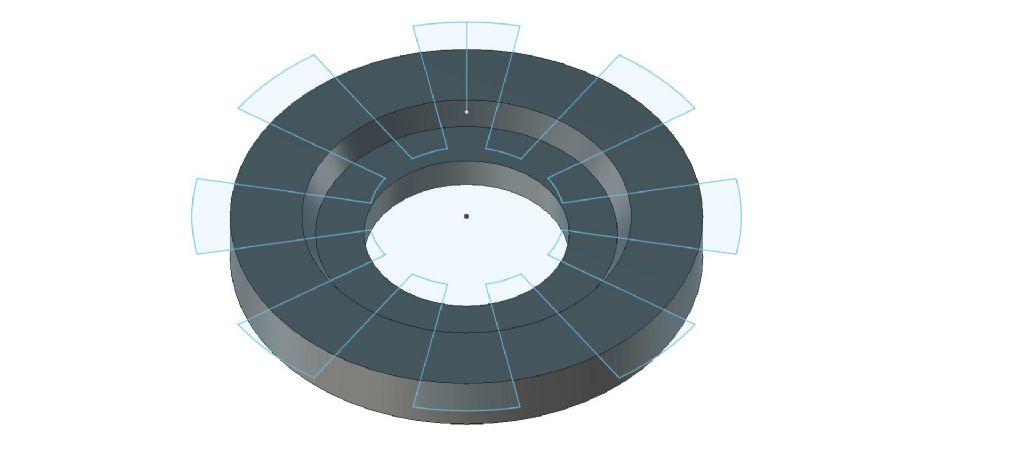
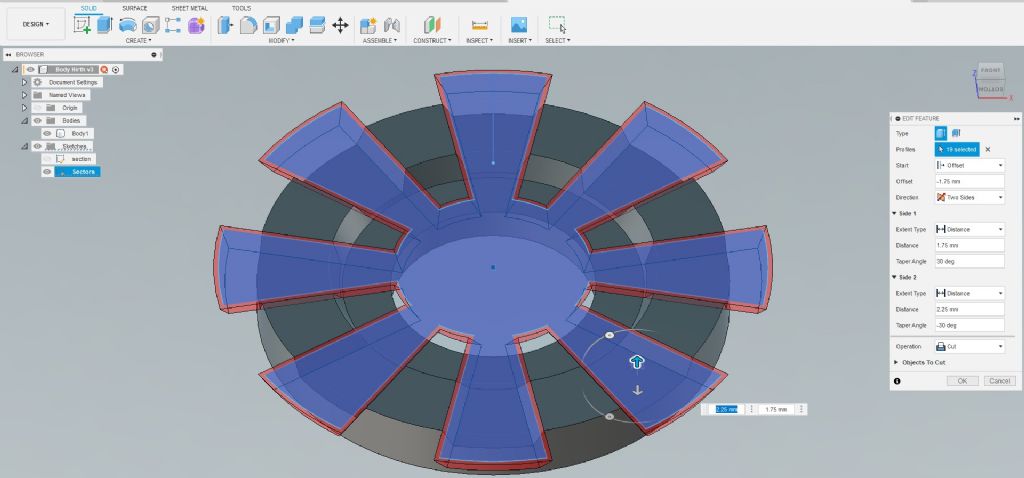
| 12 forum posts 5 photos | For the drawing side I just modeled it in the same order that I would machine it. Main ring first with the tooth profile Then on the top face I drew the 16 sectors to make the tooth cut outs. (its over sized to make sure it cuts the whole model) Then used the extrusion command to cut out the teeth. The tooth width is measured from the centre height so I offset the plane 1.75mm and then did a 2 sided extrusion, one positive 30deg and one negative 30deg. I did fudge the model slightly with unequal extrusion heights so it would only contact the side faces and not the tops and bottom. As the machining was done manually the drawing wasn't updated once we had the finished part. If you want I can send you my 3d file of the coupling. I use Fusion 360 but it can output most file types. Hope that helps and is not to late. |
| Joseph Noci 1 | 26/04/2021 09:26:30 |
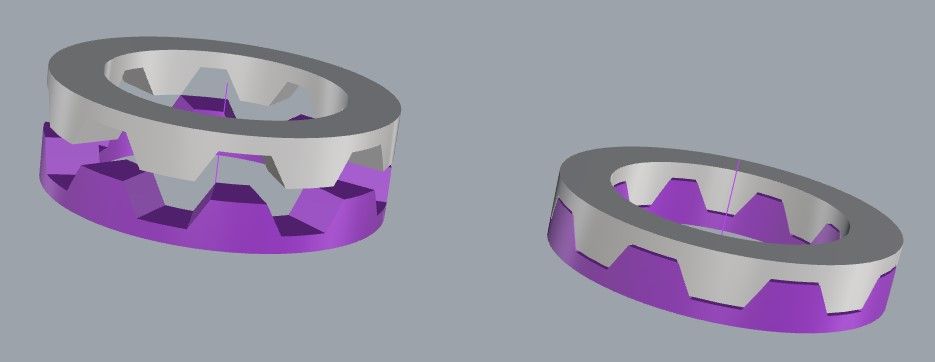
| 1323 forum posts 1431 photos | Thanks Ross. I had approached it from the periphery rather that the flat face - drew the side view of the disc peripheral 'teeth' and wrapped it around the disc, but extruding it was a mess! your way worked a treat. here is a quick hack - as you say, now to juggle with teeth height and angles, etc. The teeth in this hack are very tall - would require 8mm movement to clear, but proved the extrusion technique. The loads in my case are perhaps a little less since my stock size is limited to that of the 5C collet max opening. Since loss of air pressure stops the job regardless, would it not be easier to reverse the role of the cylinder? Let the air pressure close the Hirth, and a lower effort spring push the Hirth open when the air pressure is released? I am contemplating a double acting cylinder to do both functions but maybe that's a road to hell... Thanks again Ross - you have been most helpful!
Joe
Edit - added text Edited By Joseph Noci 1 on 26/04/2021 09:35:53 |
| Joseph Noci 1 | 26/04/2021 09:33:46 |
| 1323 forum posts 1431 photos | Posted by John Haine on 25/04/2021 13:49:15:
Hi Joe, I know that you've been focusing on the ATC but did you make any progress on the tool touch sensing? John, to be honest, no.. I did play around with a number of ideas, but there is still so much on the lathe's mechanical side to resolve ( and get on with!) that I was not fully applied in the experiments! One idea which showed good promise I do wish to pursue - I took apart an old hand held Piezo gas igniter stick thingy - it had an obelisk of piezo in it - about 4mm square by 25mm long with a silvered cap at each long end. A scope attached showed a 8 to 15 volt spike, with the slab on a wooden surface and very gently tapped in the center of the slab using a tooth pick. I think this fitted into a contact probe for side and end touch detection has good promise! Too many things on the go...Also busy upgrading the CNC mill, which I need to make the ATC tool plate, etc..! Joe |
| blowlamp | 26/04/2021 11:52:56 |
1885 forum posts 111 photos | Wouldn't a detent arrangement be easier to make? What would make me think twice about using a Hirth coupling is how many faces need to be in simultaneous contact when indexed and how feasible it would be to machine the coupling to the required accuracy. Because of its design it seems to me that the Hirth coupling is self-centring, so if used with a close fitting bearing there could also be issues with binding whereby the coupling can not fully seat because it's restrained radially by the bearing.
Martin. |
| Ross 77 | 26/04/2021 13:25:42 |
| 12 forum posts 5 photos | Joe I think 8mm of travel would cause you problems with the bellevilles by raising the opening force. we had 4mm tooth height and 1mm clearance so total travel of 5mm. that was generating a lot of force to reach the opening distance. Theres a good calculator on the mubea site that you can playaround with spring combinations to see the effects of different spring sizes and combinations. Disc Spring Calculator Tool | Mubea Disc Springs (mubea-discsprings.com) 2000N may seem a lot but one thing to bear in mind with the holding force calculation is that it is deflection and not component failure that you are checking for. We did a mock up and loaded the Hirth coupling to test defection before the full build took place. "Since loss of air pressure stops the job regardless, would it not be easier to reverse the role of the cylinder? Let the air pressure close the Hirth, and a lower effort spring push the Hirth open when the air pressure is released? I am contemplating a double acting cylinder to do both functions but maybe that's a road to hell..." Yes it would be much easier but I don't think that would work as well because air is still compressible so it wouldn't be as rigid as the bellevilles. It would also put a lot of wear and tear on the seals, holding pressure for long periods of time. From a safety point of view if it failed mid cycle it is likely to be a major failure as the spindle wouldn't stop fast enough.
Martin The coupling is quite easy to machine on a rotary table if you do full passes, then it is only 8 changes. T.B mentioned early that any error isnt really a problem as it is always repeatable. "Because of its design it seems to me that the Hirth coupling is self-centring, so if used with a close fitting bearing there could also be issues with binding whereby the coupling can not fully seat because it's restrained radially by the bearing." To some degree yes but it depends how you install the coupling. T.B can explain best but I'm sure it was all assembled and pinned prior to bolting it down to ensure everything was concentric. I do think this is one area that could be simplified and a normal ball bearing supports could be used, with a loose sliding fit on the shaft. As all the location is done by the Hirth coupling then all the bearing needs to do is support it when it moves forward and allow it to rotate. |
| Joseph Noci 1 | 26/04/2021 22:06:22 |
| 1323 forum posts 1431 photos | Posted by Ross 77 on 26/04/2021 13:25:42:
Joe I think 8mm of travel would cause you problems with the bellevilles by raising the opening force. we had 4mm tooth height and 1mm clearance so total travel of 5mm. that was generating a lot of force to reach the opening distance. Martin The coupling is quite easy to machine on a rotary table if you do full passes, then it is only 8 changes. T.B mentioned early that any error isnt really a problem as it is always repeatable.
Ross, The 8mm teeth were just a modelling test - far to tall. What is the actual contact height ( axial height) of the teeth in your design? Around 3mm? - 4mm tooth height with what seems to be about 1mm between tooth crest and opposite trough? What sort of milling cutter did you use? seems to be an angled cutter with a carbide insert? The rotary table seems to be horizontal, so cutter is angled. How did you do 'full pass' machining? Milling the flank of a tooth would require the cutter to be offset , say, to the left of the tooth flank, and then past the tooth, to the center of the disc, where the offset would need to be shifted to the right of the flank of the opposite tooth ( the tooth @ 180degrees). I glibly thought to use my shaper to do full pass cuts - Not Possible! Joe
Edit - text changes Edited By Joseph Noci 1 on 26/04/2021 22:08:30 |
| Ross 77 | 27/04/2021 00:53:11 |
| 12 forum posts 5 photos | Joe Ah sorry I must have miss read your comment, Id have to measure the contact height to know for sure but I though it was closer to 4mm but yes that sounds about right with 1mm clearance on the peaks and troughs. It was an angled cutter that was modified to have a flat bottom. a pointed cutter didn't work very well. the cutter was measured and then had the tip ground down and remeasured. the difference was used to work out the new cutter base width for the offsets. I got the machining process a bit wrong. it was the roughing pass that went full pass (parallel cutter) , then as you say the angled cutter was set up at an offset to mill the flanks. sorry, I didn't do the machining and it was a while ago. I just had to work out all the offsets to set the DRO on the mill I did wonder how you were going to use the shaper. Rotary table seems the easiest. |
| Joseph Noci 1 | 01/06/2021 15:22:26 |
| 1323 forum posts 1431 photos | A plea to any of the folk who have implemented an ATC on a lathe, using LinuxCNC - I would dearly like to discuss some of the ins and outs please!
Maybe T.B. , Ross, Simon?
Thanks You
Joe
|
| Ross 77 | 01/06/2021 21:12:46 |
| 12 forum posts 5 photos | Hi Joe I do use Linux CNC but I'm certainly not an expert user, more of a trial and error code basher and I haven't implemented an ATC yet. I'm going through the same issues with my Boxford and and trying to build a custom interface for the lathe that fits my touchscreen. I'm using a 7i96 and managed to get it working on the Ethernet and setup with the pc-config. The ATC will be soon but the Boxford one is the ratchet and pawl type so I think there are a few examples already in circulation on the Lcnc forum. I believe its just set up as a rotary axis and no feed back. What issues are you having? |
| Joseph Noci 1 | 02/06/2021 08:53:03 |
| 1323 forum posts 1431 photos | Hello there, Thanks for responding - The issues are yet to come I guess - I am progressing well with the manufacture of the ATC - what a lot of work and machining. While letting the lathe and mill cool down I am trying to get to grips with the ini, HAl and ATC component in Lcnc..I have just a few days ago got he lathe and its C axis working very nicely , thanks to Andy on the Lcnc forums, and so on to the ATC now. I have dug through all the examples I could find, inc the Carousel setup done by Andy ( lost me though..) and the I found a Hal/ini/comp set of files on Github - I think the original was done by 'arceyes' for a boxford 240 and I believe you modified for the Compact 5 - was under the Machinekit configs.? Not sure if I have this correct. I would like to try take that set of files and begin understanding how it all works and see if I can make it work with my design, which in essence is the same as the ATC you have made. However, as Andy found ( to his frustration), I don't get on very well ( at all!) with HAL and Component integration and rather than drive Andy mad again so soon, I thought , if you are doing this already, maybe I could ride on your back for this. I was going to fit a small proccessor board into the ATC to control it, ie, the stepper, tool position sensing, etc, but Andy said that was a waist as Lcnc would be able to do it all... Joe
|
| Ross 77 | 02/06/2021 23:20:25 |
| 12 forum posts 5 photos | Hi Joe I can definitely confirm that a decent home built ATC is a lot of work I will help were I can and i will be building a similar machine but Andy is the best one to guide you through all this. have you seen the "the feral engineer" on you tube? The feral engineer - YouTube he talks through Hal in quite some detail and is on the linuxcnc facebook page if you need one to one. don't bother with the external processor Lcnc can manage all of that. what Mesa are you using? if i have a the same card then it will be easier for me to test the HAL and share files. |
Please login to post a reply.
Want the latest issue of Model Engineer or Model Engineers' Workshop? Use our magazine locator links to find your nearest stockist!
Sign up to our newsletter and get a free digital issue.
You can unsubscribe at anytime. View our privacy policy at www.mortons.co.uk/privacy
- *Oct 2023: FORUM MIGRATION TIMELINE*
05/10/2023 07:57:11 - Making ER11 collet chuck
05/10/2023 07:56:24 - What did you do today? 2023
05/10/2023 07:25:01 - Orrery
05/10/2023 06:00:41 - Wera hand-tools
05/10/2023 05:47:07 - New member
05/10/2023 04:40:11 - Problems with external pot on at1 vfd
05/10/2023 00:06:32 - Drain plug
04/10/2023 23:36:17 - digi phase converter for 10 machines.....
04/10/2023 23:13:48 - Winter Storage Of Locomotives
04/10/2023 21:02:11 - More Latest Posts...
- View All Topics
- Reeves** - Rebuilt Royal Scot by Martin Evans
by John Broughton
£300.00 - BRITANNIA 5" GAUGE James Perrier
by Jon Seabright 1
£2,500.00 - Drill Grinder - for restoration
by Nigel Graham 2
£0.00 - WARCO WM18 MILLING MACHINE
by Alex Chudley
£1,200.00 - MYFORD SUPER 7 LATHE
by Alex Chudley
£2,000.00 - More "For Sale" Ads...
- D1-3 backplate
by Michael Horley
Price Not Specified - fixed steady for a Colchester bantam mark1 800
by George Jervis
Price Not Specified - lbsc pansy
by JACK SIDEBOTHAM
Price Not Specified - Pratt Burnerd multifit chuck key.
by Tim Riome
Price Not Specified - BANDSAW BLADE WELDER
by HUGH
Price Not Specified - More "Wanted" Ads...
Do you want to contact the Model Engineer and Model Engineers' Workshop team?
You can contact us by phone, mail or email about the magazines including becoming a contributor, submitting reader's letters or making queries about articles. You can also get in touch about this website, advertising or other general issues.
Click THIS LINK for full contact details.
For subscription issues please see THIS LINK.
Model Engineer Magazine
- Percival Marshall
- M.E. History
- LittleLEC
- M.E. Clock
ME Workshop
- An Adcock
- & Shipley
- Horizontal
- Mill
Subscribe Now
- Great savings
- Delivered to your door
Pre-order your copy!
- Delivered to your doorstep!
- Free UK delivery!





 Register
 Log-in


