Forum sponsored by:

Further Adventures with the Sieg KX3 & KX1
A thread for new owners of these machines to post in.
| JasonB | 04/07/2019 20:21:02 |
 25215 forum posts 3105 photos 1 articles | About 1hr 41mins machine time plus the changing of tools. Seems a long time but still a lot faster than doing it on the manual mill. removed 44% of the original block though there is still more to be turned to swarf when the other side is hollowed out. Alibre says the block started out at 307g and the finished part will eventually weight 63g. Just over 100,000 lines of G-code, thank God the CAM writes that for me. Edited By JasonB on 04/07/2019 20:22:22 |
| Neil Wyatt | 04/07/2019 20:56:54 |
 19226 forum posts 749 photos 86 articles | Excellent work Jason. Sadly can't see myself getting up and running before September now |
| Andrew Johnston | 04/07/2019 21:04:14 |
 7061 forum posts 719 photos | Looks good! As always I might have done a few things differently, but who's to say I'm right or wrong. I'm either going to have to upgrade my CAM program or start using Fusion360 so I can get going with adaptive toolpaths. Andrew |
| JasonB | 05/07/2019 06:56:54 |
25215 forum posts 3105 photos 1 articles | Thanks for the interest chaps, Andrew I'm always interested in how the more experienced user would have gone about things. There are a couple of things that I will do differently when I do the other half such as see if I can do a finer stepdown on the curved portion under the head flange and also make sure I put the correct stock size in as the last minute change to slightly thicker and +1 mm all round left a few bits that should have been removed, the simulator did show this but I did not spot it If anyone is going to the Guildford Gala Weekend then I will be there tomorrow only and you can see this part in the flesh plus a few of my recent engines. |
| Ron Laden | 05/07/2019 09:16:42 |
 2320 forum posts 452 photos | Jason, I see you used some cutting fluid for the drilling, fluid or coolant is obviously not required for the milling..? Its the 5000 rpm that always makes me wonder but I guess cutting aluminium with a 2 flute carbide Alu cutter there is no real benefit, it obviously works well enough dry. Ron |
| JasonB | 05/07/2019 09:51:42 |
25215 forum posts 3105 photos 1 articles | It's what you can't see that matters. I have not got anything set up yet to clear the chips and/or lubricate. I am giving the occasional blast with the air gun to clear swarf and brushing on a little paraffin every so often . What I also found works quite well is to hold the brush just in front of the air gun and that clears the swarf and sprays the lubricant at the same time with reasonable size droplets so you don't get a mist. It is just that I can't do both of those and hold the camera at the same time. Looking at the cutting data from another maker of similar high helix uncoated 2-flute cutters designed for aluminium and non ferrous they give a speed of 7000rpm for a 6mm in aluminium so my 5000rpm max is as near as I can get. The same chart also gives data for a similar type of cut as 1xD high and 0.25 x D deep which equates to 6mm x 1.5mm which is a similar amount of metal removal to my 8.5 x 1. However where I did go quite a bit easier was with the feed rates due to the fact I was using a long series cutter and only have manual swarf clearance and lube so rather than feeding at 900mm/min suggested I went with 300mm/min. |
| JasonB | 14/07/2019 13:33:46 |
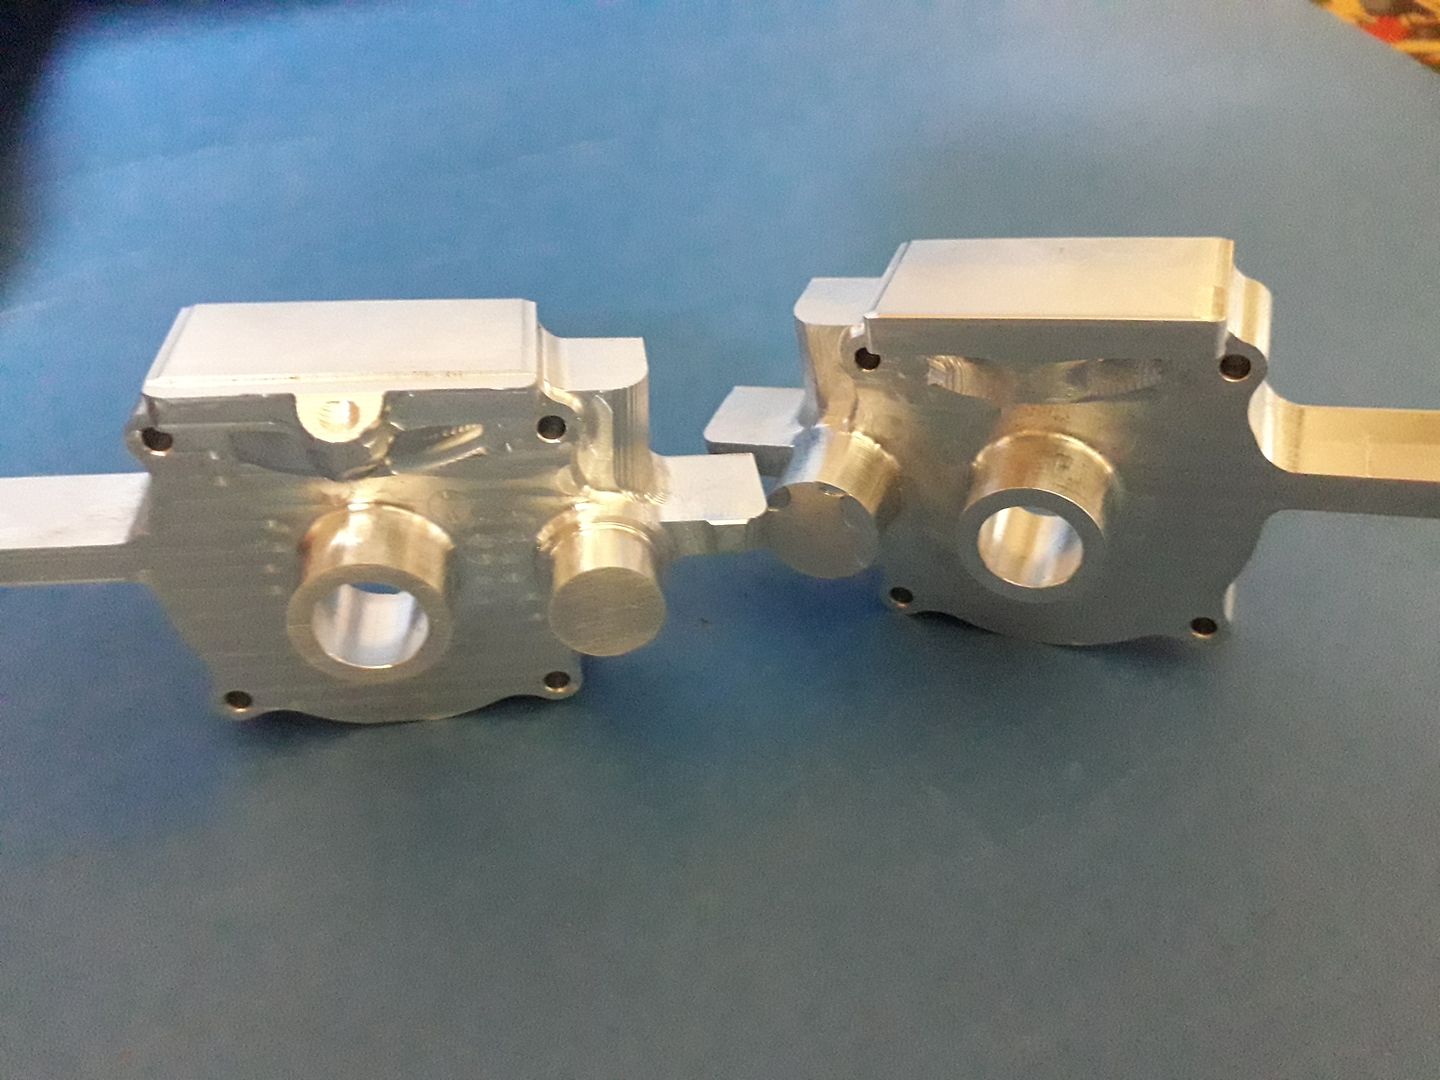
25215 forum posts 3105 photos 1 articles | And then there were two
Much the same setup as the other half with the addition of a contour cut to form the reduced diameter spigot on the cam shaft boss that will take the ignition contact so timing can be advanced/retarded. I also remembered that I bought a 4-flute radius corner cutter at the same time as the 2-flute and as it was not taking much off per pass there was no need to worry about swarf clearance so I used that and upped the feed to 500mm/min which cut the time a bit. |
| Ron Laden | 15/07/2019 07:04:02 |
2320 forum posts 452 photos | Looking good Jason, I bet that saved some time over doing them manual. |
| JasonB | 15/07/2019 07:39:17 |
25215 forum posts 3105 photos 1 articles | Yes, having done a couple the manual way it is certainly quicker, whether it is a satisfying is debatable and certainly not so high on the willy waving scale. |
| Old School | 15/07/2019 08:24:38 |
| 426 forum posts 40 photos | I am impressed with what you are managing to do with your machine. Must stop using the manual mill and get on with the using the KX1 got some Fusion 360 drawing done just need to get the g code done and cut metal. |
| Andrew Johnston | 16/07/2019 10:22:14 |
7061 forum posts 719 photos | Posted by JasonB on 15/07/2019 07:39:17:
Yes, having done a couple the manual way it is certainly quicker, whether it is a satisfying is debatable and certainly not so high on the willy waving scale. I'd argue that it's more satisfying and higher up on the willy waving scale. After all in order to produce the part one needs to create the design and be able to use 3D CAD. Then one needs to create the G-code and cutting schemes which requires a proper understanding of speeds and feeds versus depth and width of cut. Fixtures also need to be created that allow the part to be machined without getting in the way of the cutter or chuck. Andrew |
| JasonB | 16/07/2019 10:41:06 |
25215 forum posts 3105 photos 1 articles | I suppose it depends on how you look at it, For the manually machined engine crank cases I designed the parts and drew them up in 3D CAD so no difference there. Both design stages will take into account what you have available to make the part with and how you will use those items. Granted you don't need to produce the G-code but you still need to plan a scheme or machining sequence for the type and order of the manual cuts. Also agree that to get the best out of the CNC machine you need to get feeds, speeds and type of cutting right especially as it is harder to alter things once you pres GO! Fixtures were still needed to hold the parts as well as many setups on the lathe and mill so they could be manually machined. As for clashing I mentioned above that the tool needed to protrude a certain distance to prevent the collet hitting the work, this would be no different on the manual mill or making sure a boring bar is long enough on the lathe so you don't run the toolpost into the work though the manual methods may not result in such a big bang as it would if you got it wrong on the CNC As for the waving scale there are a lot who would say doing something manually is a lot higher up the shaft than with CNC but may well have never actually tried it. |
| Baz | 16/07/2019 10:54:28 |
| 1033 forum posts 2 photos | I have manual machines and also CNC mills and lathe, I don’t think it really matters how you make a part, the important thing is that you are making something. |
| John Haine | 16/07/2019 11:08:05 |
| 5563 forum posts 322 photos | There are things you can easily do with a CNC mill that are next to impossible manually. For example, for my current Synchronome-based clock project I have cut a pallet to a mathematically defined profile that gives a "raised cosine" impulse force waveform; and an equi-angular spiral cam. For both the coordinates were calculated and the g code generated in Excel. |
| JasonB | 17/07/2019 20:56:34 |
25215 forum posts 3105 photos 1 articles | Oh dear, the word is out that I have a new Machine. It was posted to me and after drawing up a suitable replacement that CAM was done to produce the code and a pair of brackets cut from a bit of 2" x 0.5" 6082. All milling done with one of Ketan's 6mm HSS aluminium specific cutters. After cutting apart on the bandsaw the counterbores were added on the lathe at the same time as the waste was turned away. Think it will do the job. Edited By JasonB on 17/07/2019 20:57:38 |
| Jeff Dayman | 17/07/2019 21:07:58 |
| 2356 forum posts 47 photos | Nice job for your niece Jason. Night and day improvement over the cheap plastic original bracket! |
| JasonB | 18/07/2019 06:53:48 |
25215 forum posts 3105 photos 1 articles | Thank's Jeff, I just hope she does not want all the other pivots remade to match! |
| Ian Johnson 1 | 18/07/2019 22:06:02 |
| 381 forum posts 102 photos | They turned out nice Jason. Are they single flute cutters? It seems to be cutting very well with swarf flying all over the place! I have bought some solid carbide single flute cutters 3, 4 and 6mm (not Arc) and have yet to try them out on my KX1. Ian |
| JasonB | 19/07/2019 07:15:45 |
25215 forum posts 3105 photos 1 articles | That is a HSS 2-flute cutter with the steeper angle specifically for aluminium and not coated to help stop swarf sticking. It is also a long series one so could probably be run a bit harder if standard length. ARC do the carbide version too and that does come in standard and long length and like the HSS work well on brass and bronze too. The only downside with the single flute cutters that I can think of is you have to feed at half the rate of a 2-flute if keeping the chip load and speed the same. This is another of teh HSS 2-flute sin action on th emanual mill |
| Ian Johnson 1 | 19/07/2019 23:14:59 |
| 381 forum posts 102 photos | Nice demo, I've bought HSS cutters from Arc they are top quality, they cut great and leave a super finish. My carbide single flutes will be mainly used to cut plastic. |

Please login to post a reply.
Magazine Locator
Want the latest issue of Model Engineer or Model Engineers' Workshop? Use our magazine locator links to find your nearest stockist!
Sign up to our Newsletter
Sign up to our newsletter and get a free digital issue.
You can unsubscribe at anytime. View our privacy policy at www.mortons.co.uk/privacy
Latest Forum Posts
- *Oct 2023: FORUM MIGRATION TIMELINE*
05/10/2023 07:57:11 - Making ER11 collet chuck
05/10/2023 07:56:24 - What did you do today? 2023
05/10/2023 07:25:01 - Orrery
05/10/2023 06:00:41 - Wera hand-tools
05/10/2023 05:47:07 - New member
05/10/2023 04:40:11 - Problems with external pot on at1 vfd
05/10/2023 00:06:32 - Drain plug
04/10/2023 23:36:17 - digi phase converter for 10 machines.....
04/10/2023 23:13:48 - Winter Storage Of Locomotives
04/10/2023 21:02:11 - More Latest Posts...
- View All Topics
Support Our Partners


Shopping Partners
Subscription Offer

Latest "For Sale" Ads
- Reeves** - Rebuilt Royal Scot by Martin Evans
by John Broughton
£300.00 - BRITANNIA 5" GAUGE James Perrier
by Jon Seabright 1
£2,500.00 - Drill Grinder - for restoration
by Nigel Graham 2
£0.00 - WARCO WM18 MILLING MACHINE
by Alex Chudley
£1,200.00 - MYFORD SUPER 7 LATHE
by Alex Chudley
£2,000.00 - More "For Sale" Ads...
Latest "Wanted" Ads
- D1-3 backplate
by Michael Horley
Price Not Specified - fixed steady for a Colchester bantam mark1 800
by George Jervis
Price Not Specified - lbsc pansy
by JACK SIDEBOTHAM
Price Not Specified - Pratt Burnerd multifit chuck key.
by Tim Riome
Price Not Specified - BANDSAW BLADE WELDER
by HUGH
Price Not Specified - More "Wanted" Ads...
Get In Touch!
Do you want to contact the Model Engineer and Model Engineers' Workshop team?
You can contact us by phone, mail or email about the magazines including becoming a contributor, submitting reader's letters or making queries about articles. You can also get in touch about this website, advertising or other general issues.
Click THIS LINK for full contact details.
For subscription issues please see THIS LINK.
Digital Back Issues


Donate

 Register
 Log-in
Model Engineer Magazine
- Percival Marshall
- M.E. History
- LittleLEC
- M.E. Clock

ME Workshop
- An Adcock
- & Shipley
- Horizontal
- Mill

Subscribe Now
- Great savings
- Delivered to your door

Pre-order your copy!
- Delivered to your doorstep!
- Free UK delivery!
All Forum Topics > CNC machines, Home builds, Conversions, ELS, automation, software, etc tools > Further Adventures with the Sieg KX3 & KX1