Forum sponsored by:

Novice beginner
advice
| Trevorh | 04/03/2010 12:56:30 |
 316 forum posts 89 photos | Hi all This weekend I will be mostly trying to master the art of Riveting - last attempted as an apprentice (hands up all who know what one of those were) Thinking back I am sure It took quite a lot of accuracy to form a good tight dome head and in the process many bruises to the hand.... I have read the article on riveting here on the site but I guess I just need to have a go cheers |
| Trevorh | 12/03/2010 14:15:25 |
316 forum posts 89 photos | OK I give up how do you work out the correct length the rivet needs to be to get a good shaped head on it, Is there an easy calculation? I think I need to come up with a different method of forming the head as it will be very close to the wheel casting At least I know why they sell the rivet in packs of a hundred - hammer rash not good |
| David Clark 1 | 12/03/2010 14:46:17 |
 3357 forum posts 112 photos 10 articles | Hi There
1.6 to 1.7 times the diameter of the rivet protruding.
That is from Model Engineering a Foundation course.
I always used to make up a spacer so I could file rivets to correct length.
regards David |
| JasonB | 12/03/2010 17:37:32 |
 25215 forum posts 3105 photos 1 articles | As David says its just over one and a half times the dia but varies a bit depending on your snap.
I annealed the end of one of my snaps and turned the end down to a smaller parallel end then hardened again, this should help stop it fouling the rim, will take a picture later so you can see what its like.
Jason |
| JasonB | 13/03/2010 10:18:57 |
25215 forum posts 3105 photos 1 articles | This pic shows how I turned down the end of the snaps to give a parallel end as the usual tapered end meant that the body of teh snap fouled the wheel rim. You can also see on them where I have ground a flat to give even more clearance for either the radius on the inside of the tee ring web to rim joint or to clear the tie plates on teh rear wheels.
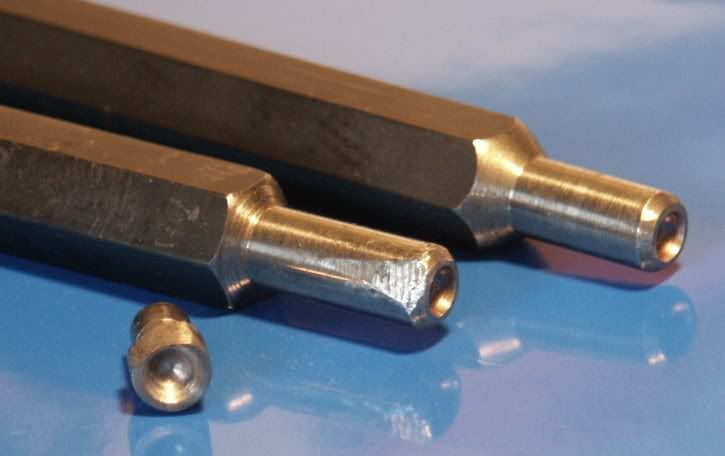
You can see the usual shape of the snaps here
Jason
Edited By JasonB on 13/03/2010 10:20:24 Edited By Katy Purvis on 01/06/2015 12:49:44 |
| Trevorh | 14/03/2010 13:40:14 |
316 forum posts 89 photos | Excellant, Thanks gents, That has helped a lot I will attempt to copy the snaps shown and try again to see if i can improve on the results cheers |
| Trevorh | 06/04/2010 11:43:21 |
316 forum posts 89 photos | Time for an Update Its official - I am no good at riverting, I have never known such an annoyoing process with such differing results, I need a time out I am going to start to machine the front axel, this at least should be quite straight forward, I have already looked up the relevant tolerance for the 1/2" bearing surfaces. I managed to scrounge some BMS 1" bar - its a little on the large side as the main body only needs to be 3/4" reduced to 1/2" at each end but its free so I can't complain too much Just going back to the riveting, I am going to try to use the hammer action on my drill to see if I can get a better consistancy/ repeatability Can some one tell me when the enjoyment factor kicks in....  Cheers |
| JasonB | 06/04/2010 12:24:57 |
25215 forum posts 3105 photos 1 articles | Thats sometimes the best way, if its not going right then leave it for a few weeks and hopefully they will come out better next time.
Jason |
| mgj | 06/04/2010 18:08:58 |
| 1017 forum posts 14 photos | Kerbtrawler - I love riveting. I started thinking it was going to be the easiest thing. Then I found you need 3 hands, and a spare for setting the rivet. The whole thing became an exercise in frustration. What a PITA. Now I have a different solution. I bought an air hammer - a scaled down version of the big air hammers the pros use!!!!. (£20 from Axminster) Them I turned the hammer tools that came with it rather like Jason did with his snaps. Extra - long ones in silver steel as well to get right into the bottom of the tender, but the easy ones to use are pretty short. The rivet head cavity is machined with a ball nosed slot drill to size. You put the "anvil" snap in a vice - making sure its supported at the bottom. You then have two hands to insert the rivet and support the job in the "anvil". Set the rivet with a small hammer and a bit of tube. Pick up air hammer with reduced air (40psi or so). Pull trigger. 2 seconds later you have a perfect double domed head rivet. Absolutely perfick. Easy quick and painless Oh and don't oversquinge the rivet or it will spread the base material. And you'll have irretrievably curved hornplates, and it becomes a sod to align the crank and 2nd motion shafts. So tight, but not too tight - even the dummies around the firebox. Edited By mgj on 06/04/2010 18:09:59 |
| Martin Johnson 1 | 24/05/2010 11:00:22 |
| 320 forum posts 1 photos | Probably a bit late for advice to Kerbtrawler, but a very important consideration not mentioned before is: HOW ARE YOU GOING TO TRANSPORT IT? In 6" scale you are looking at a big plant trailer and a four track or trannie van to pull it. In 4" scale a sturdy trailer (rated at least 750 kg) and a reasonable size car to pull it. You could legally just about use a trailer without brakes, but I wouldn't recommend it. Quite a few of my rally mates put the engine in a trannie van and then pull a caravan for accommodation. You are going to need the caravan if you want to get the max from steam rallies. There is also the question are you licensed to drive with a large trailer? - the law has been changed within the last few years. 3" scale becomes a lot more manageable and an unbraked trailer from the likes of Halfords will suffice. It would probably go in the back of the car with the chimney off. 2" scale is OK for going in the car, but will need ramps etc to get up into the car. A small trailer would probably be easier and keep the oil & soot out of the family motor. Best wishes, Martin |
| Martin Johnson 1 | 24/05/2010 11:04:26 |
| 320 forum posts 1 photos | Think I have ended up with a post on the wrong thread. Sorry Martin |
| Martin Johnson 1 | 24/05/2010 11:06:01 |
| 320 forum posts 1 photos | Probably a bit late for advice to Kerbtrawler, but a very important consideration not mentioned before is: HOW ARE YOU GOING TO TRANSPORT IT? In 6" scale you are looking at a big plant trailer and a four track or trannie van to pull it. In 4" scale a sturdy trailer (rated at least 750 kg) and a reasonable size car to pull it. You could legally just about use a trailer without brakes, but I wouldn't recommend it. Quite a few of my rally mates put the engine in a trannie van and then pull a caravan for accommodation. You are going to need the caravan if you want to get the max from steam rallies. There is also the question are you licensed to drive with a large trailer? - the law has been changed within the last few years. 3" scale becomes a lot more manageable and an unbraked trailer from the likes of Halfords will suffice. It would probably go in the back of the car with the chimney off. 2" scale is OK for going in the car, but will need ramps etc to get up into the car. A small trailer would probably be easier and keep the oil & soot out of the family motor. Best wishes, |
| Trevorh | 27/05/2010 12:18:04 |
316 forum posts 89 photos | Hi Martin, thanks for the comments about moving the beast. Luckily I am about 4 years away from having to look at that aspect. I am still building the front wheels, so a long way to go yet........ cheers |
| Stovepipe | 27/05/2010 18:40:53 |
| 196 forum posts | A "trannie" van sounds quite intriguing.!
 Dennis |
| Trevorh | 03/07/2010 21:19:25 |
316 forum posts 89 photos | Hi All, sorry for not posting recently - too much work and not on the traction engine unfortunately, but I'm back now and have just finished machining the front axal One good thing about traveling around the country working in different places , as soon as you mention the project you can alway get hold of large quantities of off cuts from the work shops, this is where the front axal has been obtained from - large lump of BMS 1" round bar, took quite a lot of machining down to the 3/4" body and 1/2" at the bearing ends but it was good lathe practice especially because it required the use a travelling steady, which until this point I had never used since purchasing my Warco, And yes you guessed it, it kept getting in the way, so I have modified the position of it ( moved it further forward of the Tool post ) this means that as the cutter comes into contact with the material, the steady is already in contact with the bar. Next needs to be the bearings, again free off cuts obtained. I'll let you know how I get on, No I haven't forgotten about the riveting but I need to progress these parts first. cheers |
| Trevorh | 23/07/2010 13:25:57 |
316 forum posts 89 photos | Ok The bronze bearings were quite straight forward to machine, played a little with the running fit/tolerance. Now machining the remainder of the parts that will hold/fix the position of the hubs Once I have all of these then I will have run out of excuses not to start the riveting  cheers |
| JasonB | 23/07/2010 15:55:02 |
25215 forum posts 3105 photos 1 articles | So you will have them all rivited up for next months meeting then!!
Good to hear you are making progress.
Jason Edited By JasonB on 23/07/2010 15:55:17 |
| Trevorh | 08/08/2010 19:56:38 |
316 forum posts 89 photos | NOT A HAPPY BUNNY I am sure some one said somewhere beware of the Plastow drawings...... Now I know why, just thought I would try and peice together the main parts of the front wheel hub assembly, oh dear...... the drawings are suppose to be 1:1 scale so where its a bad copy I measured the distances, no problem there but I rather stupidly assumed that who ever had originally drawn them could add up......errrm NO Got to remake the front axal and the bearings again because I am short by 1/8" at both ends and same on the bearings Just goes to show you check and check again Luckily I have spare material to remake the bearings, hope to visit a couple of companies next week where I can pick up a new peice for the axal Oh well back to the drawing board or Not I will of course keep you posted |
| JasonB | 08/08/2010 20:15:58 |
25215 forum posts 3105 photos 1 articles | There are a few other errors listed here |
| Trevorh | 09/08/2010 09:40:30 |
316 forum posts 89 photos | Thanks Jason, I guess I am going to be checking all of the dimensions from here on in, I will start a list of errors and probably post these at a later date See you all at the next meeting cheers |
Please login to post a reply.
Magazine Locator
Want the latest issue of Model Engineer or Model Engineers' Workshop? Use our magazine locator links to find your nearest stockist!
Sign up to our Newsletter
Sign up to our newsletter and get a free digital issue.
You can unsubscribe at anytime. View our privacy policy at www.mortons.co.uk/privacy
Latest Forum Posts
- hemingway ball turner
04/07/2025 14:40:26 - *Oct 2023: FORUM MIGRATION TIMELINE*
05/10/2023 07:57:11 - Making ER11 collet chuck
05/10/2023 07:56:24 - What did you do today? 2023
05/10/2023 07:25:01 - Orrery
05/10/2023 06:00:41 - Wera hand-tools
05/10/2023 05:47:07 - New member
05/10/2023 04:40:11 - Problems with external pot on at1 vfd
05/10/2023 00:06:32 - Drain plug
04/10/2023 23:36:17 - digi phase converter for 10 machines.....
04/10/2023 23:13:48 - More Latest Posts...
- View All Topics
Support Our Partners


Shopping Partners
Subscription Offer

Latest "For Sale" Ads
- Reeves** - Rebuilt Royal Scot by Martin Evans
by John Broughton
£300.00 - BRITANNIA 5" GAUGE James Perrier
by Jon Seabright 1
£2,500.00 - Drill Grinder - for restoration
by Nigel Graham 2
£0.00 - WARCO WM18 MILLING MACHINE
by Alex Chudley
£1,200.00 - MYFORD SUPER 7 LATHE
by Alex Chudley
£2,000.00 - More "For Sale" Ads...
Latest "Wanted" Ads
- D1-3 backplate
by Michael Horley
Price Not Specified - fixed steady for a Colchester bantam mark1 800
by George Jervis
Price Not Specified - lbsc pansy
by JACK SIDEBOTHAM
Price Not Specified - Pratt Burnerd multifit chuck key.
by Tim Riome
Price Not Specified - BANDSAW BLADE WELDER
by HUGH
Price Not Specified - More "Wanted" Ads...
Get In Touch!
Do you want to contact the Model Engineer and Model Engineers' Workshop team?
You can contact us by phone, mail or email about the magazines including becoming a contributor, submitting reader's letters or making queries about articles. You can also get in touch about this website, advertising or other general issues.
Click THIS LINK for full contact details.
For subscription issues please see THIS LINK.
Digital Back Issues


Donate

 Register
 Log-in
Model Engineer Magazine
- Percival Marshall
- M.E. History
- LittleLEC
- M.E. Clock

ME Workshop
- An Adcock
- & Shipley
- Horizontal
- Mill

Subscribe Now
- Great savings
- Delivered to your door

Pre-order your copy!
- Delivered to your doorstep!
- Free UK delivery!
All Forum Topics > Traction engines > Novice beginner