Forum sponsored by:

PG Optical dividing head
Are the optics saveable?
| Michael Gilligan | 21/07/2021 09:06:16 |
 23121 forum posts 1360 photos | Posted by Roger Hart on 21/07/2021 06:59:19:
[…] From what I remember from the ATM books, a small amount of warm balsam was applied, the lens put together with no bubbles etc and then put into a brass ring to keep them centred. A small weight applied and left to cool/set. Usually the lens are same size, just a bit of tube - not too tight - is needed. […] . Ah but … in the best work, the lens elements are centred and joined whilst slightly oversize, and then the edges ground. Modern tools have largely automated this process, but mid 20th Century it was very skilled hand-work. MichaelG.
|
| Michael Gilligan | 21/07/2021 10:25:42 |
23121 forum posts 1360 photos | I don’t think Baker had one of these : **LINK** https://youtu.be/cl6K-EXPILo or these: **LINK** https://trioptics.com/products/opticentric-lens-centration-and-alignment/ MichaelG. |
| William S | 28/07/2021 23:37:17 |
 80 forum posts 335 photos | Well:
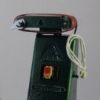
(quite a difficult thing to photograph) So in the end I went the LOCA route because I'm a cheapskate!, (it was extremely simple aswell) I also didn't want a huge great quantity left over.
I went with one of the many cheap kits available on eBay, The UV torch was immediately dismantled and jerry rigged to my bench to power supply, the 3 AAA I scrounged only managed to barely illuminate 3 LEDS anyway. This also enabled me to knock up a quick tripod to hold it about 20mm off the bench. So I experimented with some 1981NOS glass microscope slides(well that's what the boxed wrapped in cellophane said)
The result was a success and gave me confidence to risk the original! It went very well, As can be seen I just used the original brass cell as the line-up ring, the doublet was a relatively good fit anyway (they were the same dia, the lenses Michael) It also meant I didn't have to worry about peening it back it as the glue seems to be holding them in. I cleaned them, a couple of drops of LOCA, place together, wriggled them about to spread the adhesive and dropped it in the cell, lightly pressed it home with my thumb and placed under the UV light. left for about 5 mins, come back to one optically clear doublet. Reassembly went well, I screwed the brass cell Doublet fully home as it was that way upon the initial dismantle, the glass ring was installed and then the "first" lens was adjusted until the 0.2mm markings were in focus, then the black tube was rotated to get the markings in the right place on the minutes scale, the Baker object mounting thread is off centre to the black tube. The mirrors were not disturbed when I dismantled to preserve the original setting positions, I glad I did this as I would not know where to start to get these back in adjustment! I then following Clive's advice, "clocked" the glass ring by having it clamped very loosely just pushed it about until the markings all the way around were in the same place on the minutes scale. Well there we go, I am now going to try and look in to rectifying the minutes scale, Graticules optics is who I will try first, Now that I know it does actually work. And see about a permanent light unit.
|
| Michael Gilligan | 28/07/2021 23:51:55 |
23121 forum posts 1360 photos | Well done, Sir !! MichaelG. |
| William S | 28/07/2021 23:54:01 |
80 forum posts 335 photos |
This is a sales brochure for a 3 second version, but its exactly the same mechanically as my 6 second version, its quite interesting reading, it explains the operation better than I have in previous posts! the Internal diagram especially, this I acquired last week from eBay (again!) It has already provided the rather useful info about the lamp ,6v 18watt. The Projectorscope 10/250 is actually something my work has on the floor under a bench in the grinding department, it hasn't been used in the 3 years since I started my apprenticeship. Hmm do I have a use for it?! William |
| Robert Atkinson 2 | 29/07/2021 08:04:52 |
 1891 forum posts 37 photos | Very nice work. |


Please login to post a reply.
Magazine Locator
Want the latest issue of Model Engineer or Model Engineers' Workshop? Use our magazine locator links to find your nearest stockist!
Sign up to our Newsletter
Sign up to our newsletter and get a free digital issue.
You can unsubscribe at anytime. View our privacy policy at www.mortons.co.uk/privacy
Latest Forum Posts
- hemingway ball turner
04/07/2025 14:40:26 - *Oct 2023: FORUM MIGRATION TIMELINE*
05/10/2023 07:57:11 - Making ER11 collet chuck
05/10/2023 07:56:24 - What did you do today? 2023
05/10/2023 07:25:01 - Orrery
05/10/2023 06:00:41 - Wera hand-tools
05/10/2023 05:47:07 - New member
05/10/2023 04:40:11 - Problems with external pot on at1 vfd
05/10/2023 00:06:32 - Drain plug
04/10/2023 23:36:17 - digi phase converter for 10 machines.....
04/10/2023 23:13:48 - More Latest Posts...
- View All Topics
Support Our Partners


Shopping Partners
Subscription Offer

Latest "For Sale" Ads
- Reeves** - Rebuilt Royal Scot by Martin Evans
by John Broughton
£300.00 - BRITANNIA 5" GAUGE James Perrier
by Jon Seabright 1
£2,500.00 - Drill Grinder - for restoration
by Nigel Graham 2
£0.00 - WARCO WM18 MILLING MACHINE
by Alex Chudley
£1,200.00 - MYFORD SUPER 7 LATHE
by Alex Chudley
£2,000.00 - More "For Sale" Ads...
Latest "Wanted" Ads
- D1-3 backplate
by Michael Horley
Price Not Specified - fixed steady for a Colchester bantam mark1 800
by George Jervis
Price Not Specified - lbsc pansy
by JACK SIDEBOTHAM
Price Not Specified - Pratt Burnerd multifit chuck key.
by Tim Riome
Price Not Specified - BANDSAW BLADE WELDER
by HUGH
Price Not Specified - More "Wanted" Ads...
Get In Touch!
Do you want to contact the Model Engineer and Model Engineers' Workshop team?
You can contact us by phone, mail or email about the magazines including becoming a contributor, submitting reader's letters or making queries about articles. You can also get in touch about this website, advertising or other general issues.
Click THIS LINK for full contact details.
For subscription issues please see THIS LINK.
Digital Back Issues


Donate

 Register
 Log-in
Model Engineer Magazine
- Percival Marshall
- M.E. History
- LittleLEC
- M.E. Clock

ME Workshop
- An Adcock
- & Shipley
- Horizontal
- Mill

Subscribe Now
- Great savings
- Delivered to your door

Pre-order your copy!
- Delivered to your doorstep!
- Free UK delivery!
All Forum Topics > Manual machine tools > PG Optical dividing head