CNC Lathe Scratch Build
| Joseph Noci 1 | 18/03/2021 10:52:35 |
| 1323 forum posts 1431 photos | Thanks Andy - Still nuts though..
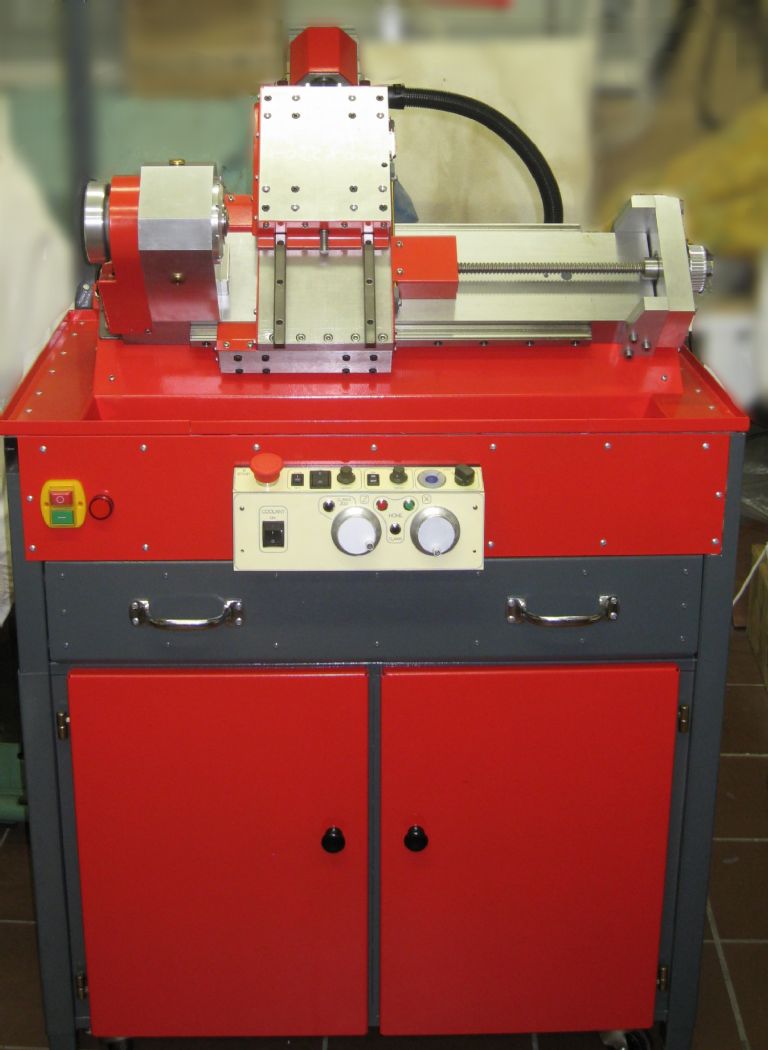
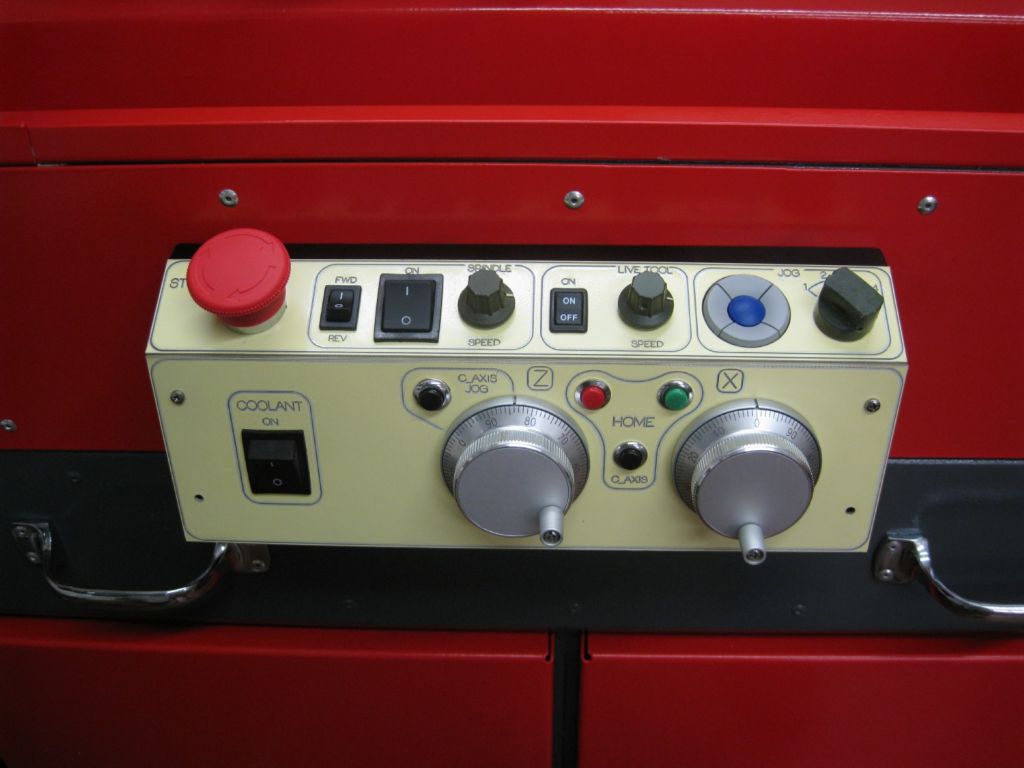
On the mechanical side the 2 items still to be done are the live milling spindle and the ATC carousel - the latter a huge challenge and a lot of work! All that on hold for a while now though. The current drive is to get LinuxCNC actually driving the lathe as a conventional 2 axis lathe to start with, and that is a massive task for me - LinuxCNC is cryptic and the setup of the HAL file ( Hardware Abstraction Layer) that defines functions ( JOG, stepper signal generations, spindle control, etc), connects those functions to hardware and software, and attaches hardware pins to controller I/O pins, is simply a nightmare for me. The language used and the syntax is like learning an extremely non-intuitive programming language, and simply understanding how all the functions and definition need to tie together is utterly daunting. The LinuxCNC documentation/help manuals are extensive, detailed and confusing in the hoards of info and detail, esp to a person who knows very little to nothing about that world of geeks.. So, if there are any LinuxCNC experts out there, able to help with creation of the HAL file in a fashion that can 'get' me going, please feel free to jump in! ( and if not for free, I am willing to talk on that as well!!) Photos below are now that the machine is in essence together - all mechanics bar the above mentioned are in place, display, computer, etc all done. All the wiring is done, all pins buzzed out, and all controls are seen by LinuxCNC ( HAL_Show) and toggle as required. So now just the HAL file to tie it all together! Display bezel still not fitted as I need some access still to plug in keyboard and mouse cables..
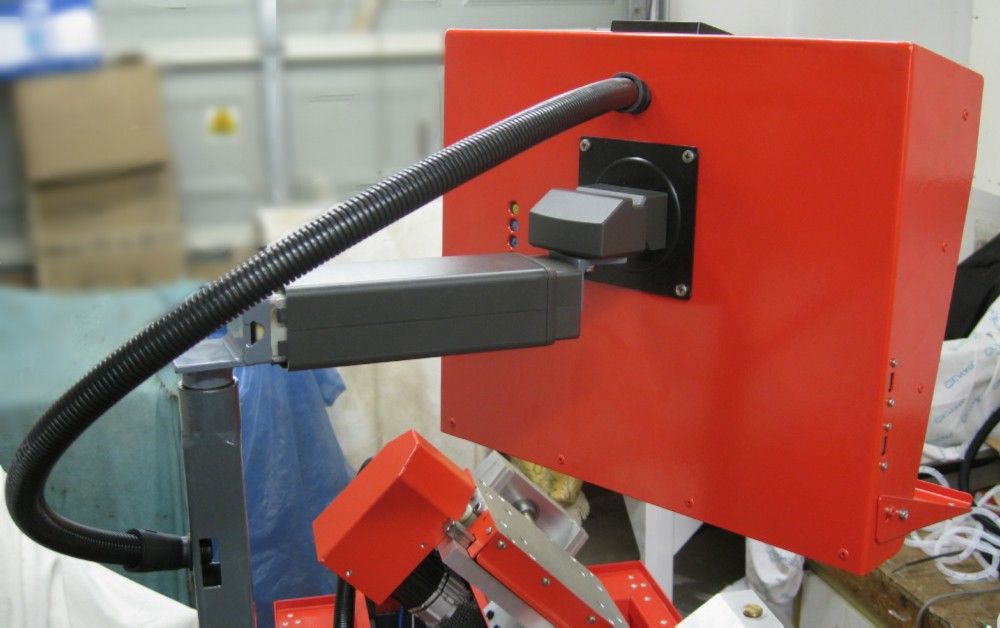
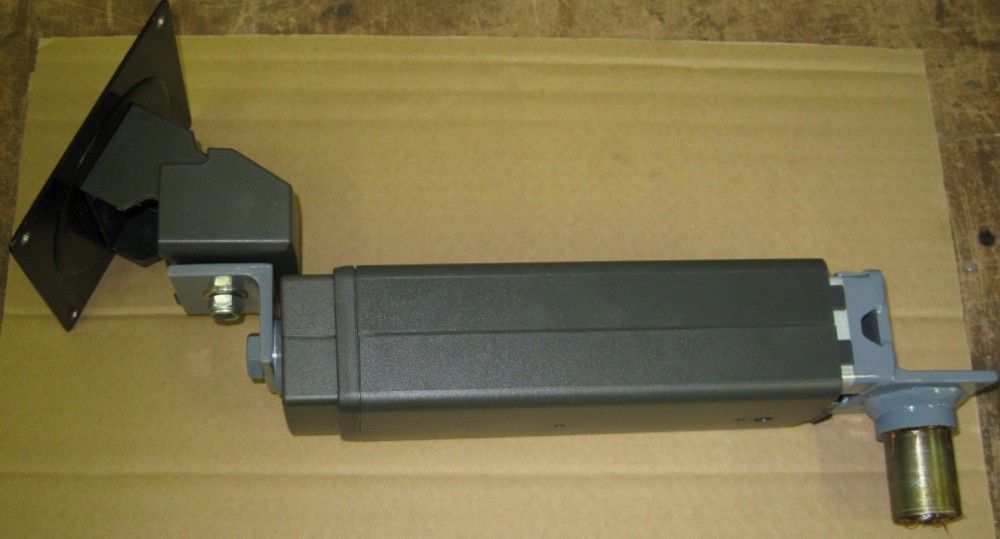
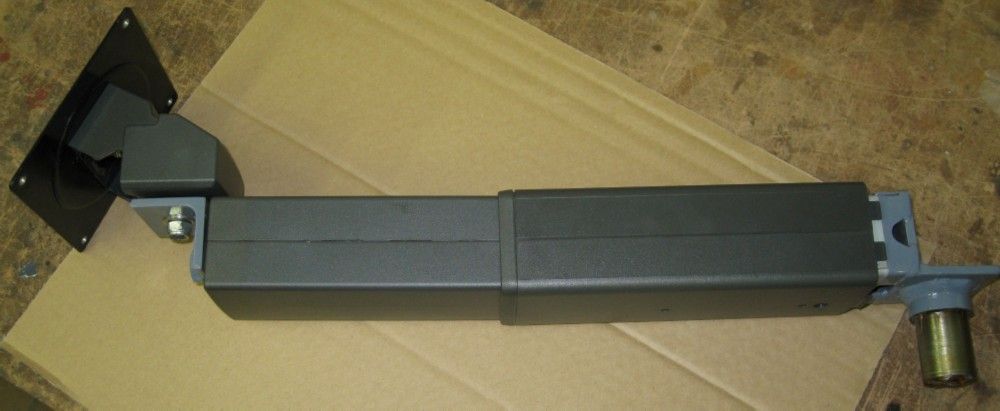
Rear of display - showing the re-purposed LCD desk stand as a support arm The stand 'bottom' end is now fitted with the rotary joint into the vertical pole, and the stand arm now lies horizontal, extending to the rotary joint now connected to the rear of the display panel. The stand could raise and lower to suit eye height at the desk, and so now extends horizontally instead of vertically, allowing the display to be pulled closer to the operator, or pushed away. The display can be maneuvered left right and all over the place..
The close swivel arm
And extended.. Now off into a huddle with HAL... Joe Edited By Joseph Noci 1 on 18/03/2021 10:54:27 - get rid of the darn faces.. Edited By Joseph Noci 1 on 18/03/2021 10:55:16 |
| Joseph Noci 1 | 18/04/2021 15:48:53 |
| 1323 forum posts 1431 photos | Have made slow progress.. A few other projects waylaying me as usual. Busy changing the steppers on my CNC mill to Clearpath servos and fitting a new controller - the UCCNC product, which so far looks very good, Will maybe create a thread on the build if there is interest. But by far the largest contribution to the slow progress has been LinuxCNC... LinuxCNC has driven me to virtual tears - to the extent that after many posts on the LinuxCNC forums I threw in the towel. LinuxCNC has some 'neat' tools - pncconf one of them, that allows one to run through a set of predefined setup pages, filling in parameters and info, and for a basic 3 axis mill, or 2 axis lathe, with no extras, no rotary axis, or C axis, or tool changers, etc, you most often are left with a LinuxCNC (lcnc from now on!) config which more or less works - that so since there are still issues to deal with such as the spindle VFD, its setup, how it is driven, and a few other things that will still bite you in the backside. And it does, with relish! In my setup, the lathe requirement is for a C_axis, the spindle motor is also a stepper type drive, ie, step/dir pulse control, not a DC voltage as for a VFD. In a normal lathe with VFD drive, when you take the DC drive voltage - that which controls the spindle motor speed, down to zero instantly, the motor coasts to a halt per the deceleration rate set up in the VFD. In a stepper type drive, lcnc has to decelerate the step pulses itself. And there is no way to set that up simply, ie, via dumb-user configuration tools - so you have to dig into HAL - the Hardware Abstraction Layer. And that is a nightmare. It is a language and a syntax unto itself - variables are named willy-nilly, as you wish, so examples mean little to a befuddled user. I spent weeks and weeks pouring over the documents and user manuals and it is basically useless. It remains Greek to me...If you are an Expert C language coder/programmer, HAL will still mean nothing to you! Helpful folk would write a paragraph of text with lcnc/HAL stuff in it, implying that is the answer to my woes - it was just so much more Greek - The more I pleaded for real basic assistance the more lost I became, and I gave up. Resigned myself to fitting mach3 onto the lathe a basic 2 axis lathe and basically dumping the whole project! Then one of the real experts on the forum - A fellow named Andy - felt sorry for me ( I guess..) and said to not give up, so I tried again, and Andy kindly climbed in and has been helping me along. So far I have a basic 2 axis lathe working nicely - Spindle stepper motor all nicely controlled, etc. No C Axis yet, But Andy is working on that and kindly explaining as we go along. LinuxCNC is not simple, is not for beginners and only works if you have a very wide geek streek down your back! I would gladly have walked away after what was a very stressful period with lcnc, but for Andy, and for the fact that there is NO other controller solution for a C_Axis CNC lathe with ATC... My LinxCNC rant for the day - I am sure I am not done boogying yet! I also make very poor video's - no matter how I try! - The lathes first cut- **LINK** Joe
|
| Joseph Noci 1 | 18/04/2021 16:23:15 |
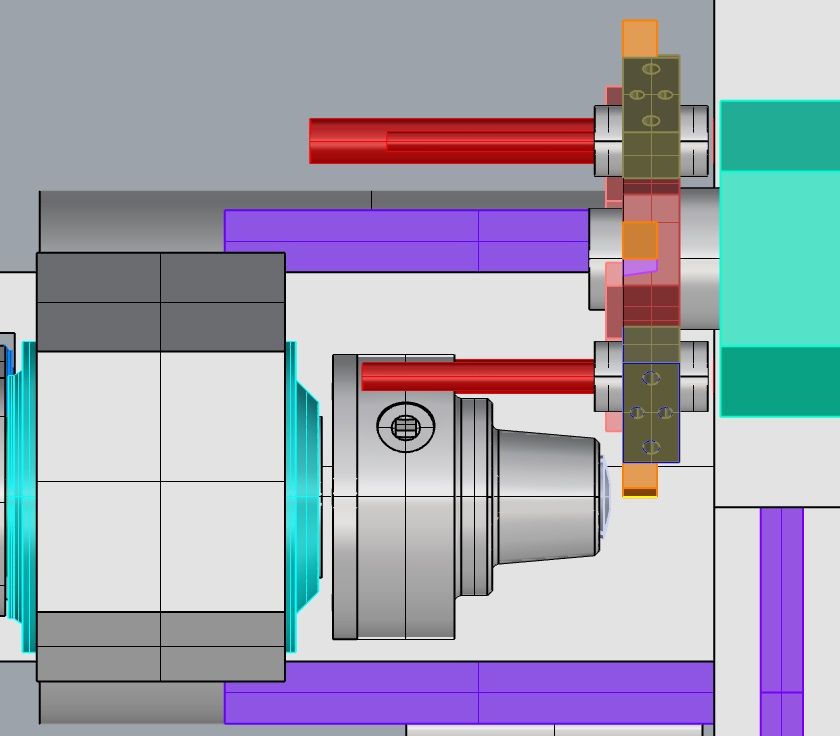
| 1323 forum posts 1431 photos | The ATC design is also a juggle of compromises. How many tools to accommodate, Tool clashes with headstock, chucks, etc, choice of inverted or conventional-up tip tooling, etc. Then of course how the changer will actually work - I have not got my head around that part yet! There are many articles on the internet of DIY ATC's for a lathe, but I fear most of them are, in my humble opinion, simply a hack. The way they are machined, the accuracy of positioning and placement of tooling can only mean misalignment with the spindle axis at the best. I am not sure at all of the route to follow - The positioning and locking mechanism has not a simple solution - it must locate accurately, must lock firmly, have no play which will promote tool chatter, etc. So I started with the simple part - the tool plate.. I decided on 8 tool stations, 4 of lathe cutters - normal facing/roughing/profiling tips, as well as threading, grooving and parting tips, and 4 stations to accommodate drill bits, centre drills, boring bars and internal threading tips. I looked at MANY ATC's out there... One of the big issues with tool placement and tool plate size, or rather , diameter, is the potential of a crash of axial tools ( boring bars, etc) with the headstock and chuck. Since my lathe has no chuck, that problem went away around the corner, and like LinuxCNC, came around the other way and bit me in the backside! The 5C collet spindle is almost flush with the headstock face, so there is no elongated space for the axial tools to flail about within..They will smack the headstock. The only way to prevent that is to have an axial tool placement radius of nearly 170mm, ie, a tool-plate diameter of more that 340mm - That's Big Haas lathe territory! Headstock with no room for axial tool bypass..
On top of it, the current spindle implementation leaks oil and all my modifications to the oil well, the labyrinth seals, oil level, etc, have been wasted - it still leaks unacceptably. So, a new spindle is in the works, with a trial taking place with greased bearings to see how they do for 20minutes at 4000 rpm, etc, etc....And the new spindle will be fitted with a 4inch OD, 5C collet chuck from Bison-Bial.. The design of the tool-plate is now a lot simpler, and has worked out nicely. I need to now work on the actual positioning and locking mechanism, but am a little lost - no neat solution apparent at the moment!
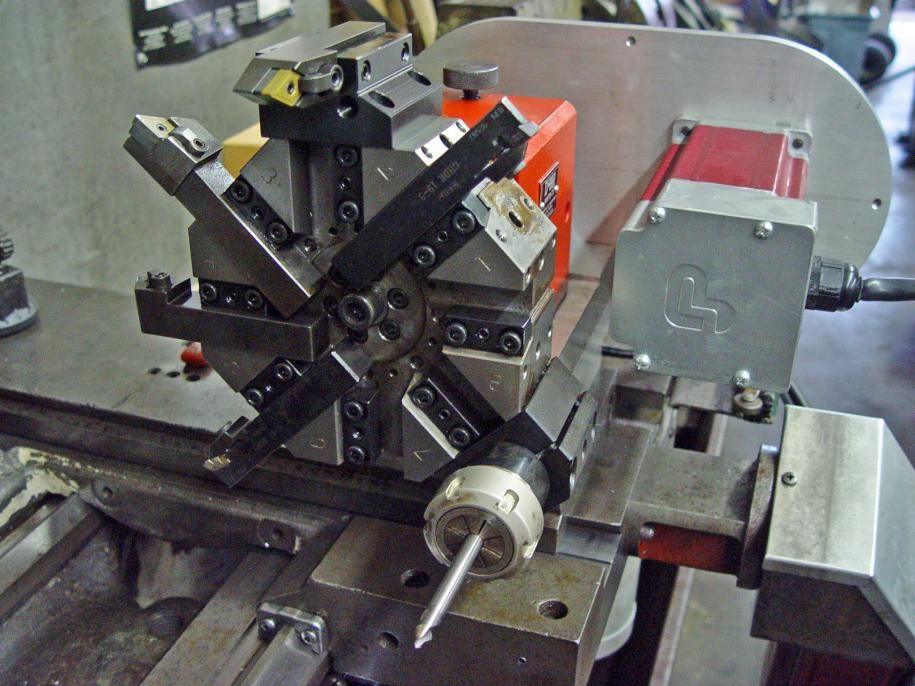
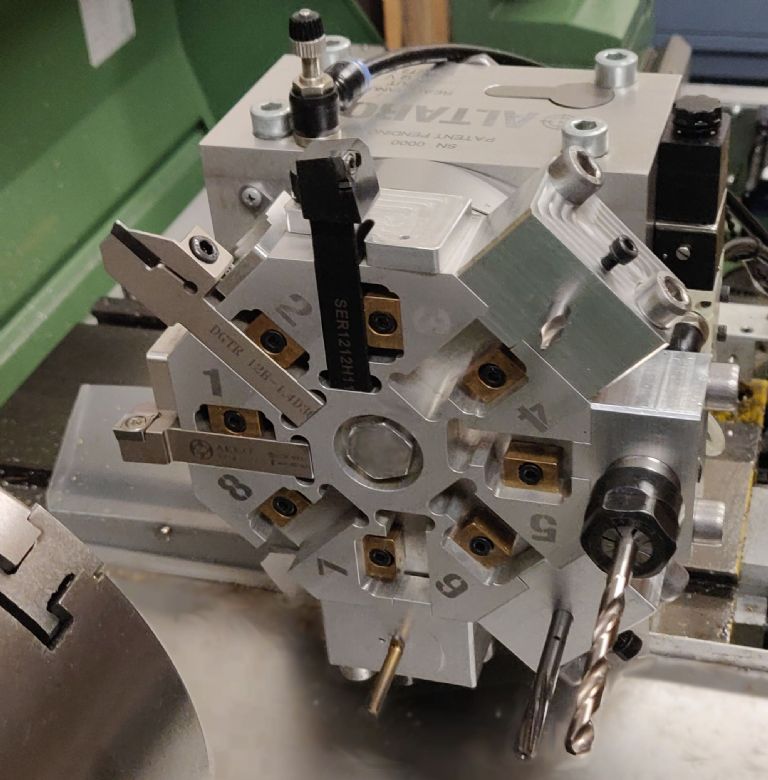
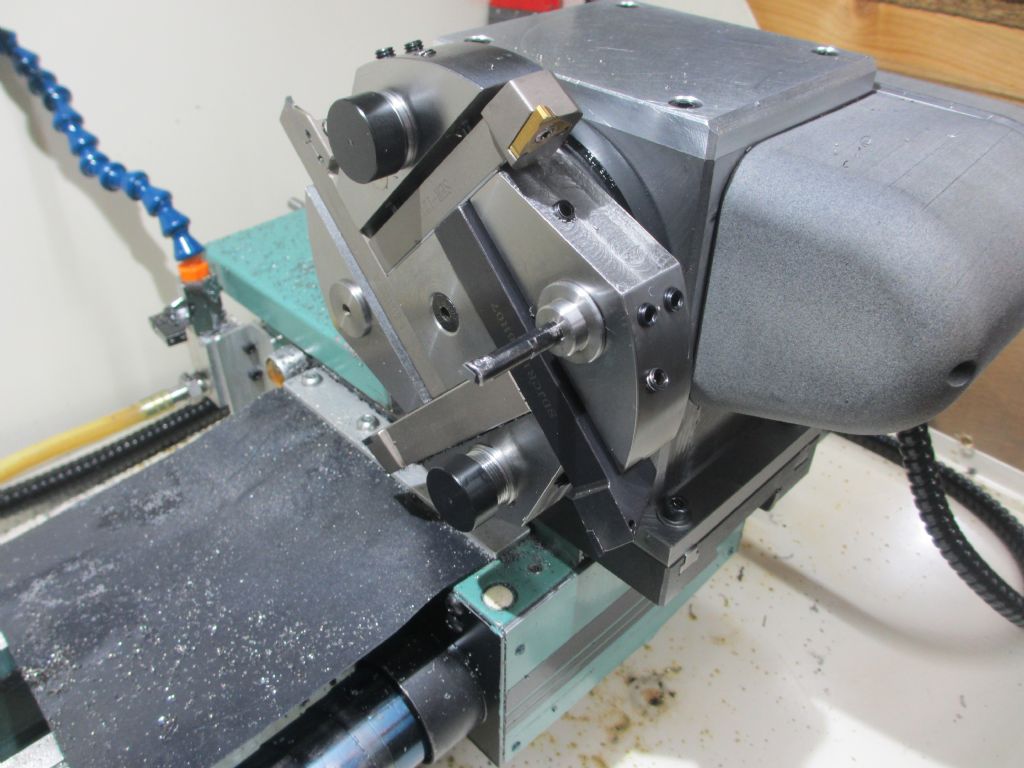
Here are some typical examples of tool-plate layouts - lots of similar to see, but few insights into the gubbins in the boxes..!
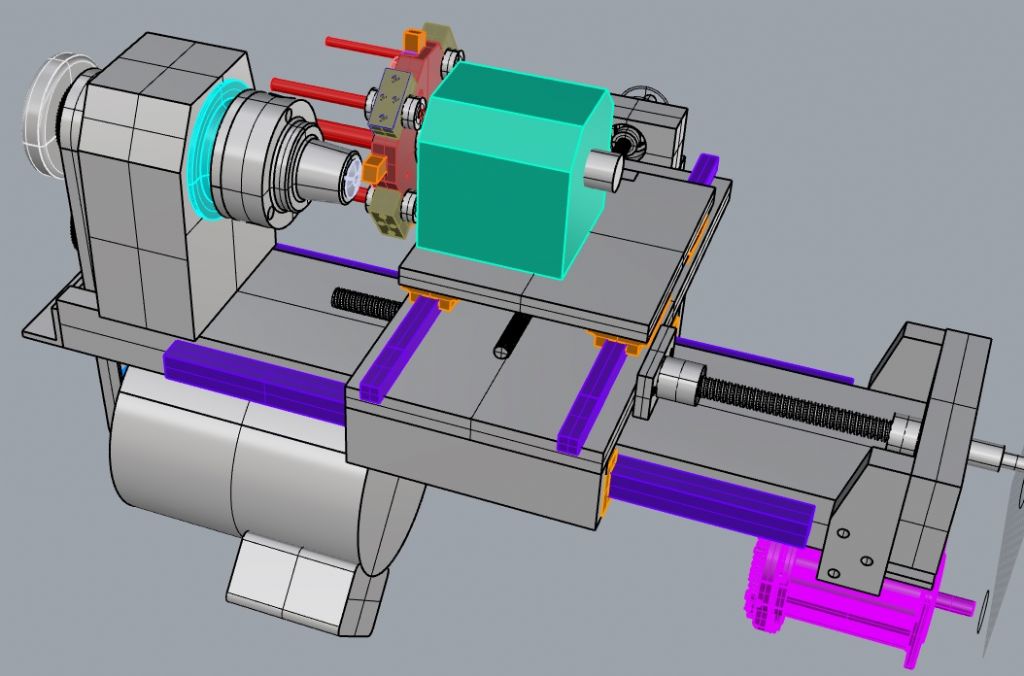
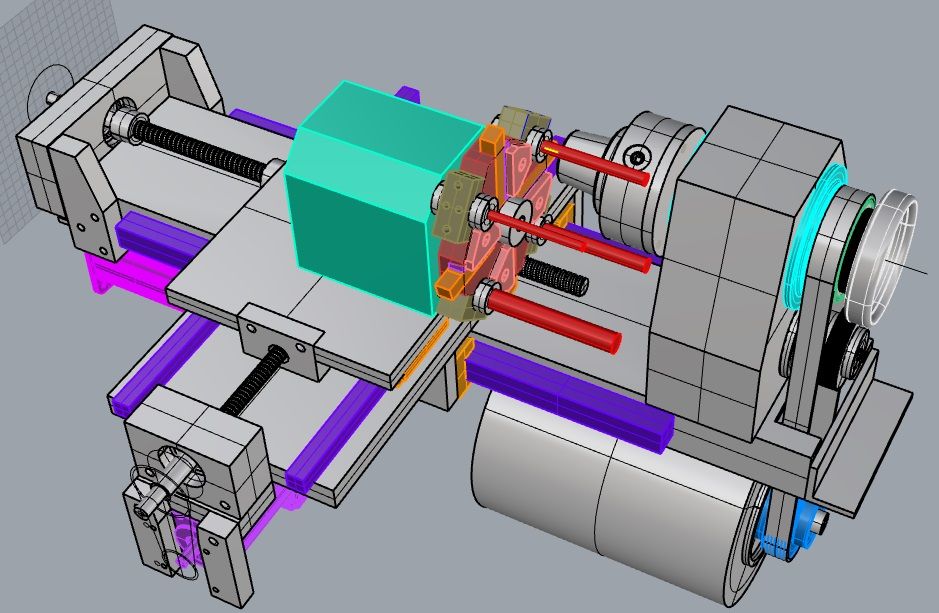
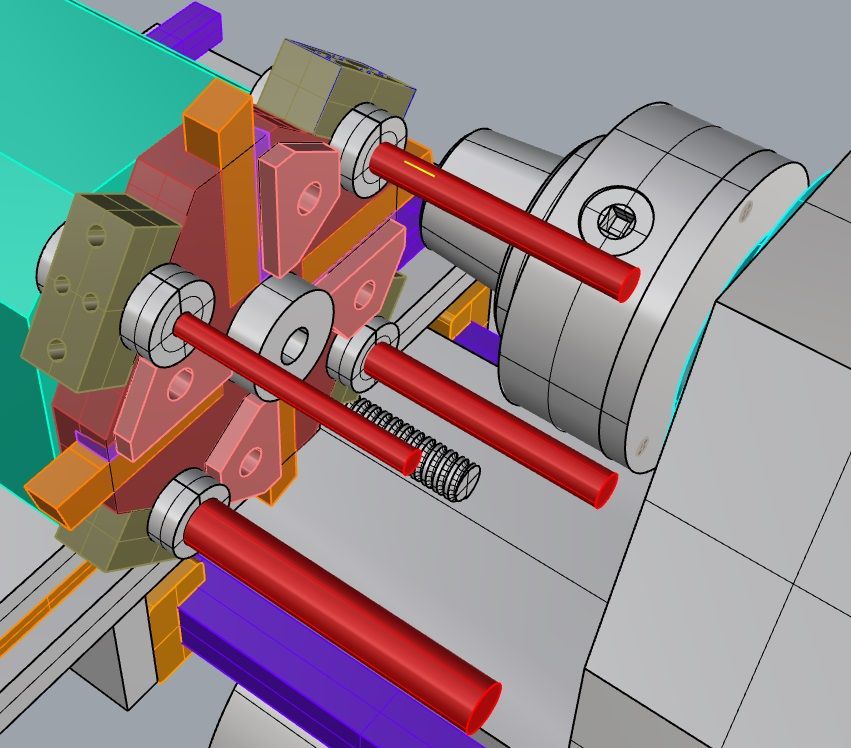
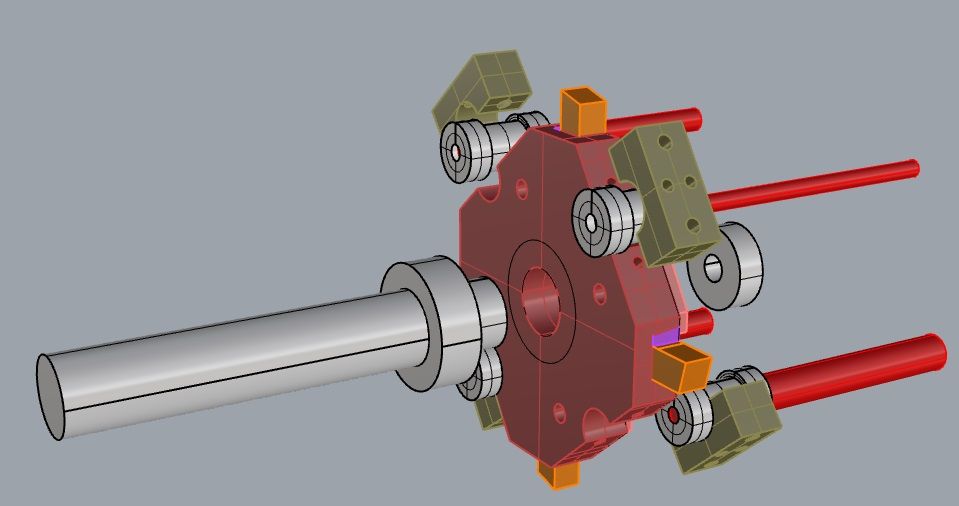
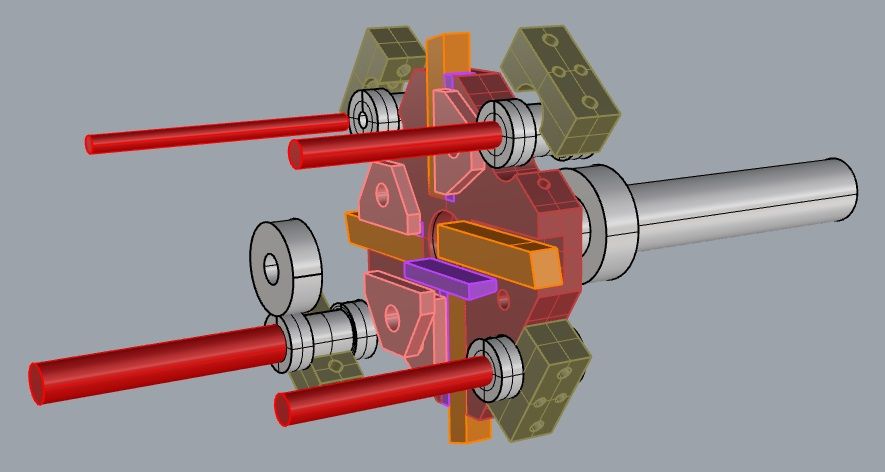
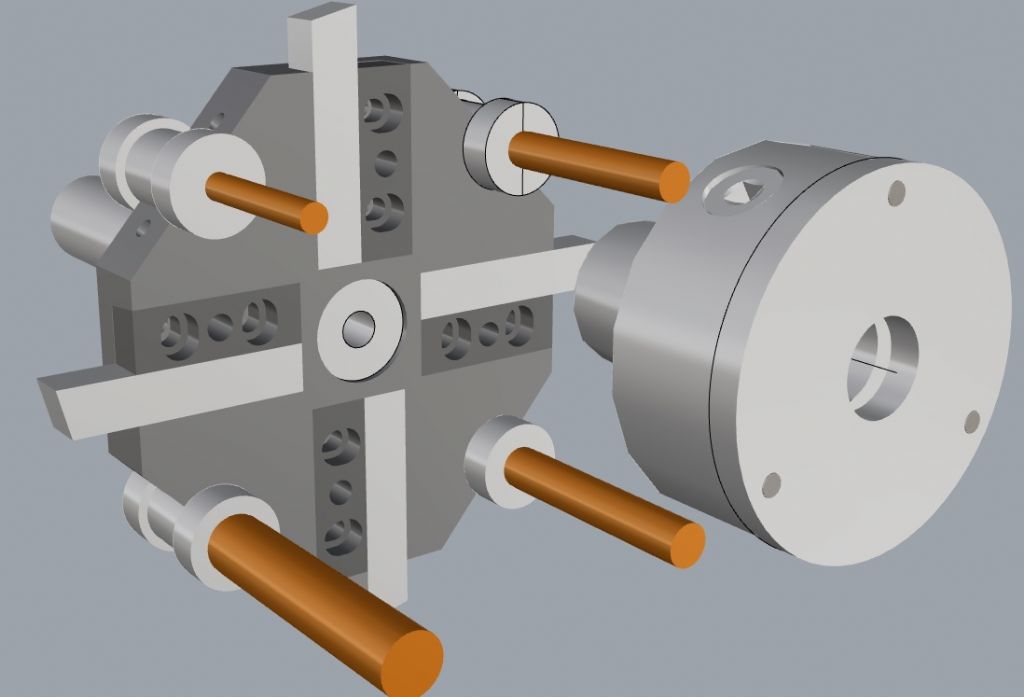
And my 3D models of the present design.( click to see a larger image) Tools are operated inverted - swarf goes down, not up!
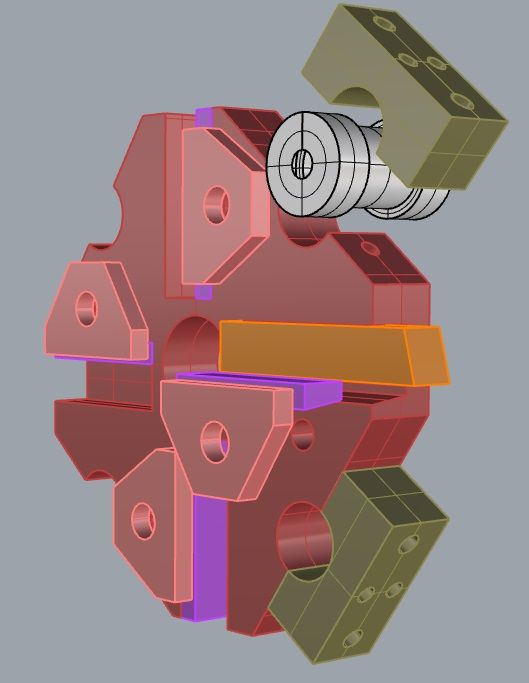
Rear of tool plate with spin-shaft. Lathe tip-tools are held in place with taper wedges ( lilac below) and clamped with the pink clamps.
Joe edit - typo's,typ'os, ty'pos.. Edited By Joseph Noci 1 on 18/04/2021 16:28:33 Edited By Joseph Noci 1 on 18/04/2021 16:30:18 |
| DiogenesII | 18/04/2021 18:11:29 |
| 859 forum posts 268 photos | Joe, if it is any help in any way (and you haven't been there already) there are some useful downloads on high speed spindle /contact-free seals here, including labyrinth sections, photos, detail of design aspects: GMN Contact - Free Seals - Downloads
|
| Joseph Noci 1 | 19/04/2021 07:36:54 |
| 1323 forum posts 1431 photos | Posted by DiogenesII on 18/04/2021 18:11:29:
Joe, if it is any help in any way (and you haven't been there already) there are some useful downloads on high speed spindle /contact-free seals here, including labyrinth sections, photos, detail of design aspects: GMN Contact - Free Seals - Downloads
Thank You for that info. I have searched 'somewhat' for commercial seals and did find quite a lot of info and a good number of sources. I don't have the capability to manufacture seals even similar to those types though! I would gladly purchase some seals but sit with my usual problems of sourcing from our backwater! Not to mention pricing! for a seal of 50mm ID x 90MM OD, prices vary ( for polymer seals..) from $140 US to $370 US - over here thats a lot of money! Better spent on tooling.. I had not seen the GMN source you provided - I will try contact them and see if they would quote. Thank You. Joe |
| mgnbuk | 19/04/2021 08:34:44 |
| 1394 forum posts 103 photos | I need to now work on the actual positioning and locking mechanism The usual method of positioning on industrial turrets is with a Hirth / Curvic coupling between the disc and the body. With that, there are two basic solutions - the disc + half of the coupling moves forwards to clear the body coupling teeth before indexing, or the body part of the Hirth coupling can move axially within the body (but constrained radially) to allow the disc to rotate without "lifting". Hydraulic operation of clamping is easier, but indexing is a bit more awkward - the Taiwanese all hydraulic turrets on various lathes at work use a complex Geneva indexing method using a hydraulic motor & rapidly "step" between positions. Control is quite simple, though, using a couple of proximety switches to count stations as they pass + a reference position switch & clamp / unclamp switches. A counter in the PLC gives a representation of the disc position, being incremented / decremented by the count switch depending on disc direction. The counter is a "ring counter" preset in the PLC with the number of disc stations that has no zero value. Usually the disc is indexed repeatedly to find the reference switch on the first tool call after powering up - at this point the "ring counter" is preset to the current station number (usually station 1), though some manufacturers make referencing the turret part of the initial machine reference procedure & some others use battery backed registers in the PLC memory to remember the disc position set at the point the machine was powered off, so no referencing required. One Cincinatti machine at work saved the cost of the reference switch by making the operator manually index the turret to station 1 & then confirm the position was set via the operator interface - many ways to achieve the same end ! All electric turrets use one motor to clamp/unclamp using a cam and a belleville washer stack arrangement, then index steplessly after unclamping. This type (variously made by Sauter, Duplomatic, Baruffaldi & Pragati) are mechanically complex and use a lot of precision ground hardened parts + a special absolute binary or BCD encoder for disc position + a solenoid operated plunger assembly for the locking arrangment. They also require quite a fast PLC to run them, as the timing of the locking plunger solenoid operation is critical. Locking is by reversing the motor after the locking plunger engages until a proximety switch actuates. There may also be an electromagnetic brake to lock the motor shaft after the "clamped" switch makes. It should be possible to do a hybrid - hydraulic clamping with electric indexing - without undue difficulty, I think. Live tooling drive to rotating tools in the turret is another can of worms to consider ! We have one machine at work with a Sauter all electric turret that has live tooling, but that uses the VDI tool mounting system not square shank tools. I have the manual for that turret that has sectional drawings that I could copy & post if that would help ? I would not like to try and make one, though ! On the turrets here that use a wedge to clamp square shank tooling, there are two counterbored holes & a tapped hole in the wedge rather than the plate you show - the counterbored holes line up with tapped holes in the disc & the tapped hole in the wedge is used to extract it. I think the face mounted wedge clamp shown would be restrictive & prone to collision with the workpiece / chuck. You need eyes everywhere when you have boring bars and turning tools mounted on a tool disc to be watchful of collison risks - you could do without introducing another one. HTH Nigel B. |
| Joseph Noci 1 | 20/04/2021 21:19:49 |
| 1323 forum posts 1431 photos | Nigel, Thank You for the post Nigel - A lot of very useful info there!
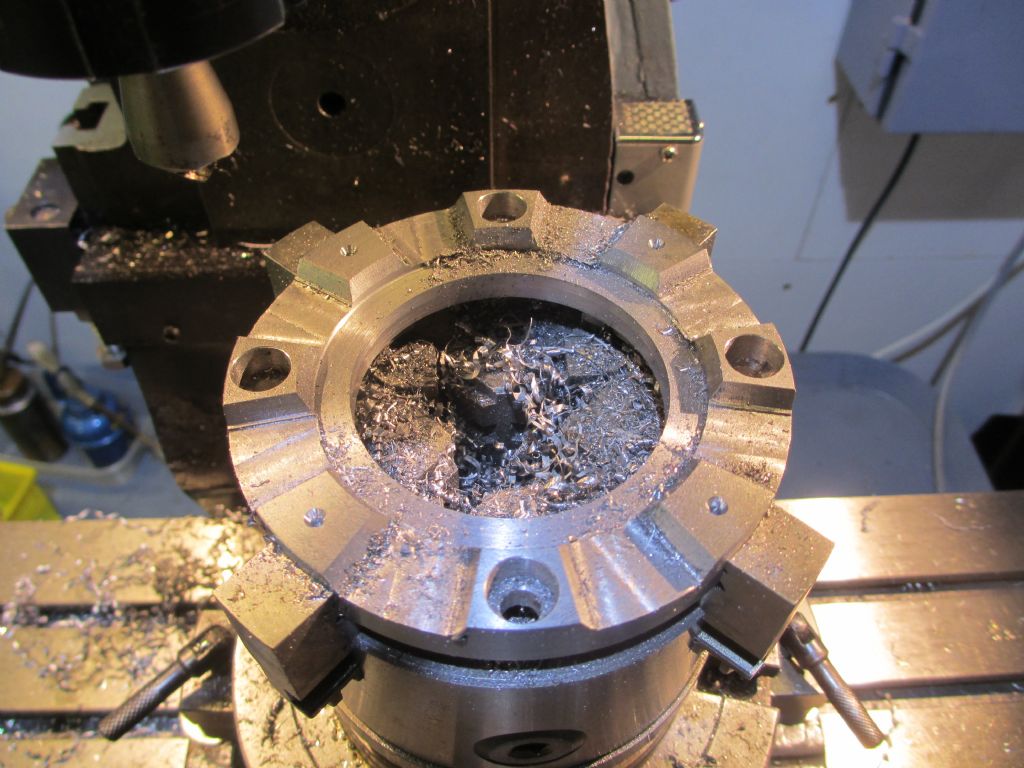
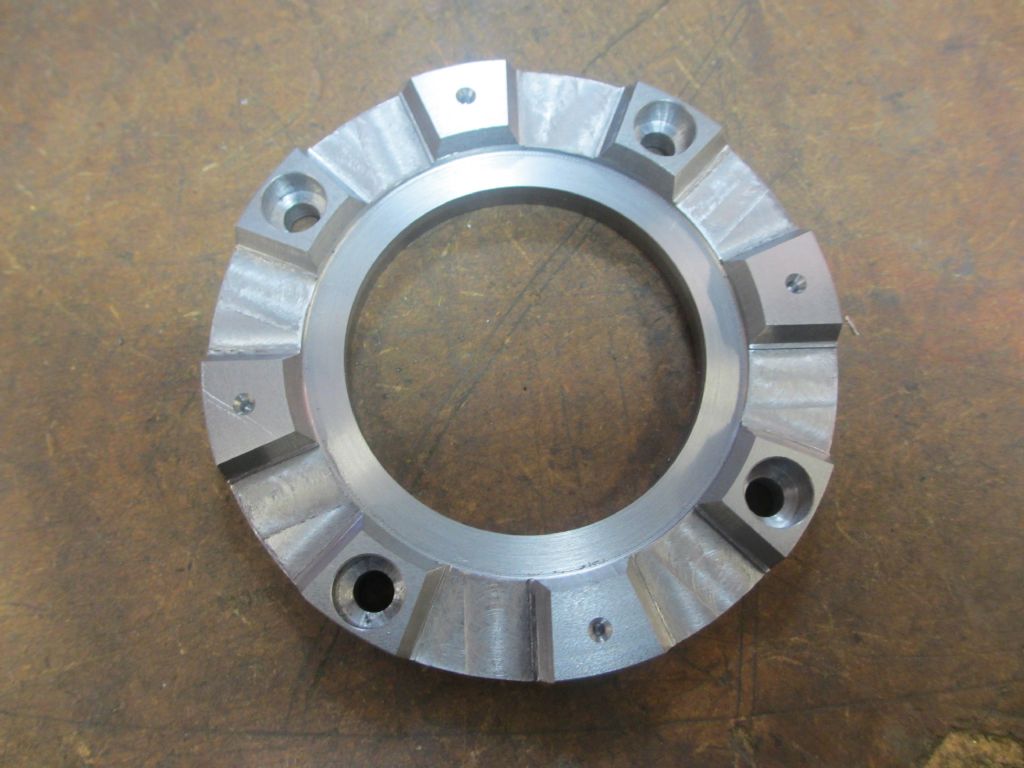
WRT your comments on the tooling clamping wedges - This was on of the areas that bugged me - Your proposed method is as on the two turrets I showed at the beginning of my ATC post - The reason I did not go that route ( but have decided to change now..) is simple - its a lot more steel to hog out of the tool plate on my small EMCO FB2 Mill! The wedges and such like are easy - all hogging will be done on the shaper, but the tool and wedge slots are all endmill stuff. But the result is not that elegant. The triangular wedge pressure plate is loose and will flop about when trying to tighten down the wedge, etc, so I decided to go the better route..
The indexing and clamping arrangement is still going to challenge me - There is a good series of article in MEW , by Simon Davies - No's 269-272 - He uses a taper cone interface between the tool plate and base and is rather attractive, but does require the base stock material for the tool plate to be very thick with lots of lathe work! I favour the Hirth coupling, but I am not sure I will be able to achieve appropriate fit and tolerances - My mill is just on the small side for that size work at those tolerances in steel , if not spending days standing at the mill! I suppose for this small size of lathe I could get away with an aluminium toolplate, but that just does not seem right.. Live tooling on this lathe is a bit of a misnomer! I intend to have only a single milling spindle, up to max 8mm endmill/drills with the spindle axis at the same height as the lathe spindle axis. The mill spindle will be able to swing so that its axis is either axial or radial to the lathe spindle, ie, you could mill a hexagon on the end of a shaft or a spiral groove into the side of the shaft in the lathe chuck, for example. The ATC really does not downsize well! It has to have all the features with reasonable rigidity as its bigger brother's do, but fit on a small lathe with much reduced axis motor torque, etc. On top of it, my lathe is a 'slant bed' so the weight of the ATC falls down, affecting the X axis +ve acceleration..At least in my case the workpiece diameter is limited to the 5C collet capabilities, so ATC performance constraints are reduced somewhat. Thanks again for taking the time to respond in detail Nigel. We will see where this one takes me! Regards Joe
|
| Simon0362 | 20/04/2021 22:26:30 |
| 279 forum posts 91 photos | Posted by Joseph Noci 1 on 20/04/2021 21:19:49:
... The indexing and clamping arrangement is still going to challenge me - There is a good series of article in MEW , by Simon Davies - No's 269-272 - He uses a taper cone interface between the tool plate and base and is rather attractive, but does require the base stock material for the tool plate to be very thick with lots of lathe work! Joe, I have been following your series with great interest and no little admiration of the work that you have done so far. As the author of the articles in MEW, maybe I can add to your comments above: Locking the taper in position with a fine screw and lots of stepper torque 'just' works- if I revisited it, I would look closely at small hydraulics - derived maybe from classic car brakes or modern bicycle brakes, married to a stepper driving the master cylinder and maybe mounted off the lathe. PM me if there is anything I can help with directly, very interested to see your project continue to go forward. Simon |
| T.B | 20/04/2021 23:32:12 |
| 54 forum posts 21 photos |
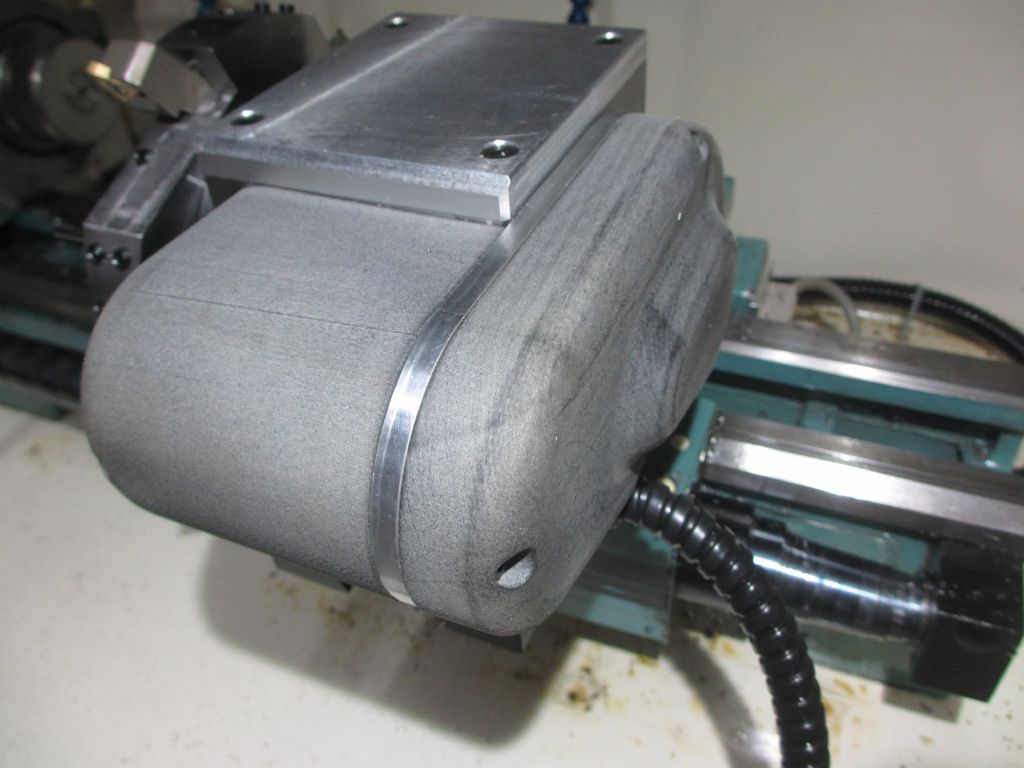
Hi Joe I built a small lathe ATC a while ago , after experimenting with a pawl and ratchet for a while I went with a hirth coupling design in the end. I wouldn't be too daunted about making the couplings , mine where made on a Centec mill so not vastly different in size to your mill, while I'm sure there are inaccuracies in my machining of the couplings , due to the self locating nature of a hirth coupling its seems that its still very repeatable to the point where I struggle to measure any deviation in a closed tool position. In retrospect I think the whole thing is massively over engineered but on the positive side its extremely rigid , I only wish I had made the toolplate to a better design ! I also often use a 4" bison 5C chuck for the reasons you state but still often wish the nose of the chuck was longer so I didn't have to cut down so many stub drills and boring bars etc. |
| Joseph Noci 1 | 21/04/2021 09:20:55 |
| 1323 forum posts 1431 photos | Simon, Thanks for the kind words! This project was a mental exercise started some 6 or 7 years ago and all the targets were formed in the mind way back with not much real thought applied to the work involved! And that is becoming a little overwhelming right now..But I am really keen to see the 'end' of it, or rather to see it working, so perseverance has it! From your MEW articles I found the reference to the Onshape info and did register there and take a look, thank you. I suppose I will go the Hirth coupler route - as usual decisions are also driven by what materials I can get. I can get almost any thickness 'steel' plate cut to 'size' - Living about 50km from a Marine repair and servicing Harbour there is a lot of ship hull steel plate! Cut to size is relative - within 5mm or so, cut with rough plasma, leaving lousy cutting tool tip unfriendly surfaces, etc..No idea what the grade of steel is - the shaper does not approve of it. A challenge in every way here! I want to try steer clear of hydraulics and pneumatics if possible - life is complicated enough with this thing, but who knows.
T.B. I am impressed by that ATC! Very nice and very well finished indeed. If I may be so bold - have you any detailed drawing or models of the internals that you would be willing to share ? The one thing I have not understood well enough yet is exactly how the tool plate and its shaft slides forward in the ATC block, to clear the Hirth teeth - In the many ATC DIY effort's I have seen on internet, that bit of detail is missing..I would assume the shaft rotates/slides in bushes rather than bearings? That implies that the shaft to bush fit must be very good to ensure rigidity, or does the Hirth coupling provide all the business end rigidity? How does the shaft slide in your design and what drives it? Your (3d printed?) covers hide many secrets! Your Hirth Coupler design as a bolt on has potential of being done on the shaper, so that will help! Regarding tool / chuck clearances - When modelling my ideas I placed a standard lathe tool in the tool plate, its tip at chuck center height and about 3mm past stock center line, ie, such as a parting tool might move to when cutting just past center, and then located the boring tools/drill on the circumference of a circle around the lathe spindle axis, so that a 16mm boring bar would clear the 4inch chuck with 4 mm gap. Where that circle intersects a circle centered on the ATC spindle axis, the tools are placed. That ensures those tools will always clear the chuck OUTER periphery, so no crunches, and no shortened tools - well, unless the tools are longer than the chuck and smack the headstock Very interested to see how you did your implementation of the ATC innards.. Thanks both.. Joe
T.B. - Sorry, an Edit - You kindly offered to assist via a PM, which I will take you up on - just a thought though - seems there are a few folk 'dabbling' in this, and maybe some technical discourse on design within the forum may be of interest to all - if it becomes to heavy for the forum pages we can PM further?
Edited By Joseph Noci 1 on 21/04/2021 09:40:41 |
| T.B | 21/04/2021 13:03:47 |
| 54 forum posts 21 photos |
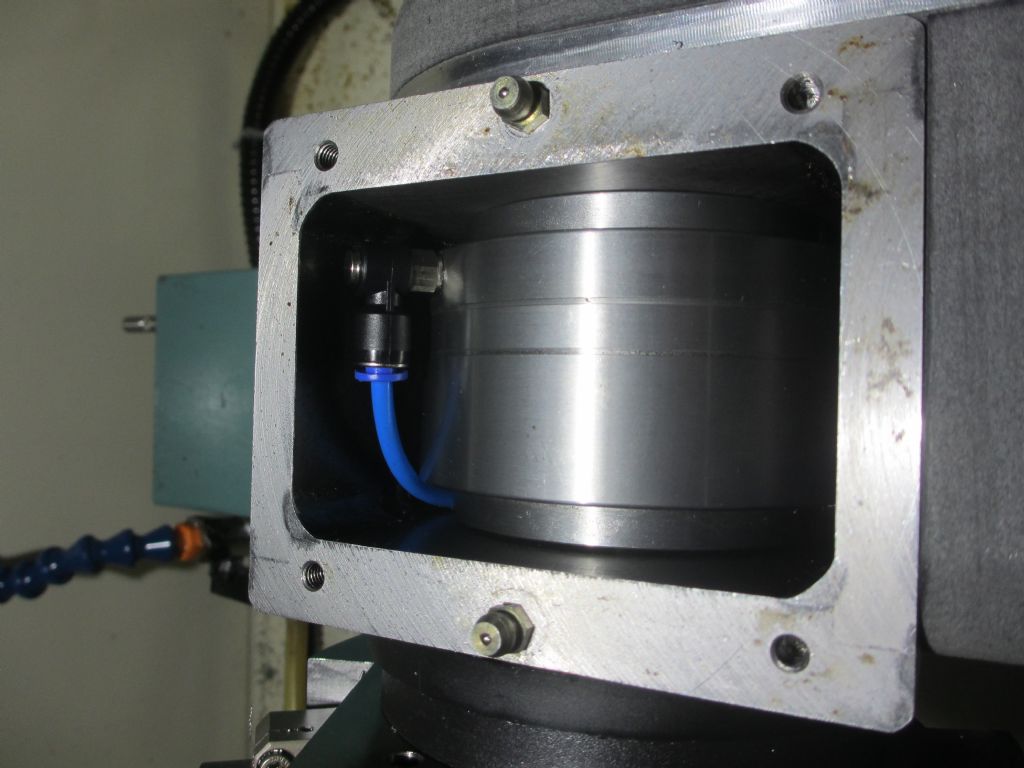
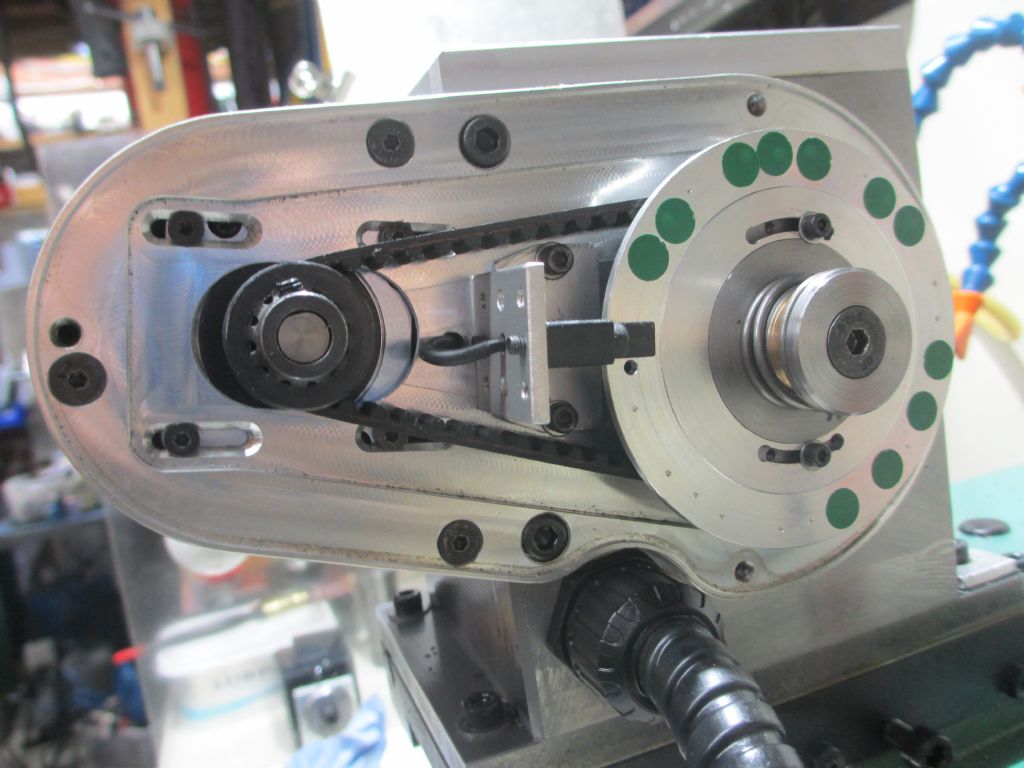
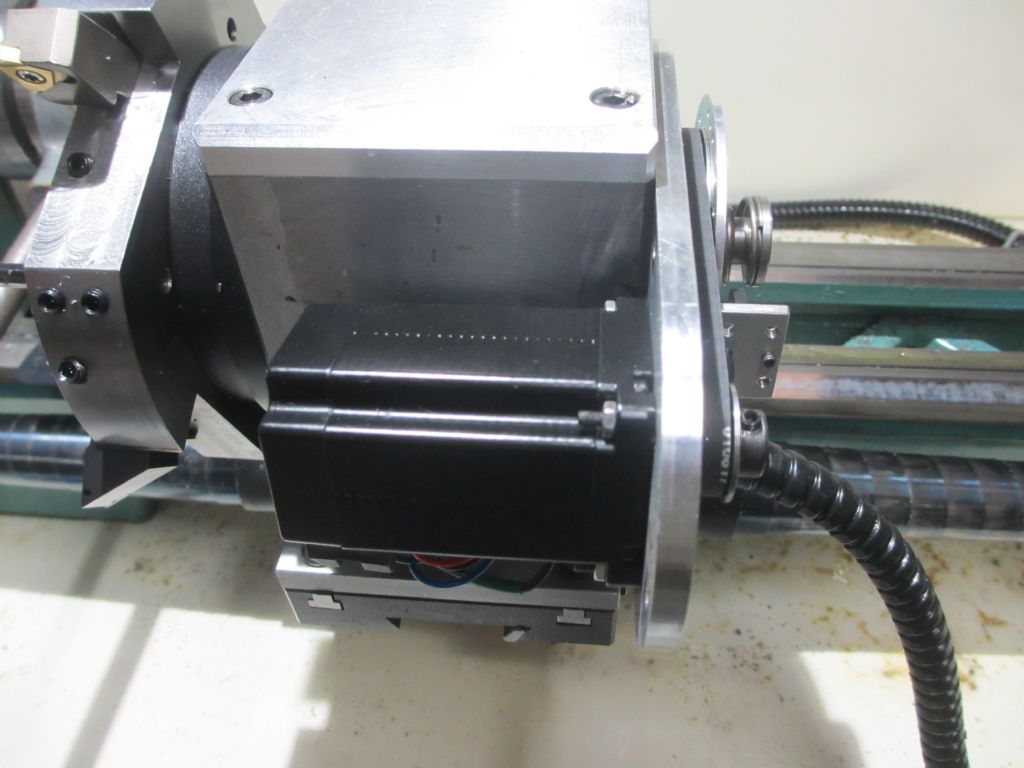
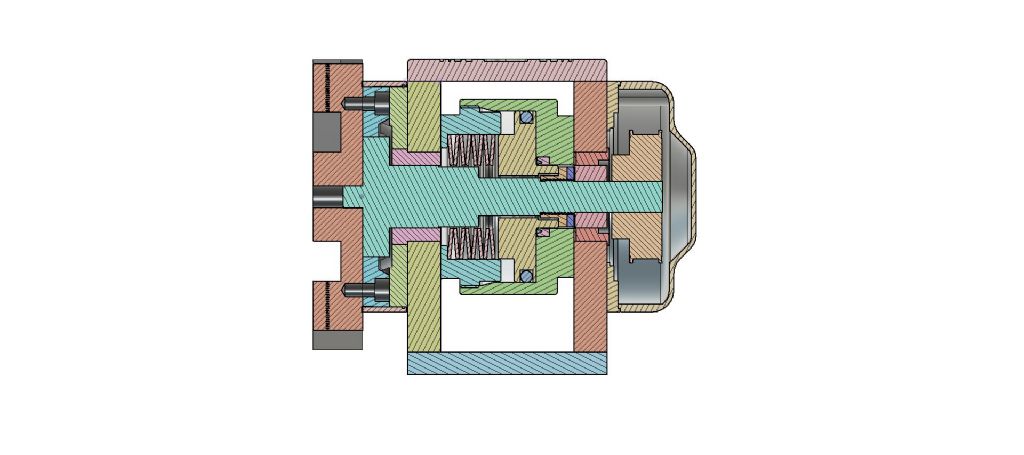
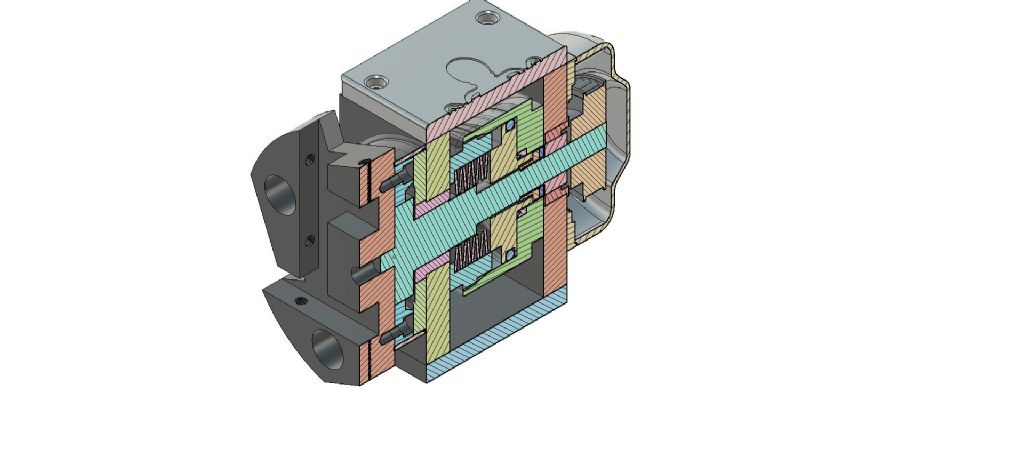
It was actually a joint project between me and a friend , he did most of the design stuff and I did the machining. I will ask him if he has any drawings I can send to you but in the mean time I will do my best to show / explain the workings. I did in fact show him this thread a while ago as he often talks about wanting to build a machine along similar lines to what you are doing. You are correct the spindle slides in bronze bushes , these where made to a close sliding fit but again in retrospect I think it would have been easier making them looser with the spindle less constrained as the hirth coupling when pulled into the locking position does all the location work. Inside the ATC body is a pneumatic cartridge that contains a stack of belleville washers and a piston. when at rest the belleville's are pulling the hirth coupling closed with some considerable force , the piston when actuated compresses the washers and pushes the spindle forwards , this leaves the hirth coupling disengaged and importantly the spindle is then totally free to rotate so that it can be driven round with a little nema 17 motor. Behind the rear cover you can see a disc that is keyed to the main spindle but free to slide axially , this plate has a small hole , which along with a sensor is used for homing / referencing tool position on start up. The little green stickers are covering up additional holes as to start with we where going to add more sensors and use a sort of Gray scale to give tool position feedback after a tool change. In the end we decided this was making things overly complicated as the rest of the lathe is on open loop steppers anyway ie: with no position feedback. I did however add a pressure sensor later on to the air line feeding the ATC as forgetting to turn my compressor on was proving to be the most likely fault scenario, if the pressure drops too low to open the hirth coupling the lathe pauses its cycle and throws out an error message. I should have more photos showing the workings of the pneumatic cartridge but I cant find them at the moment. hopefully this link will work , showing the ATC in the testing phase : **LINK**
|
| Joseph Noci 1 | 21/04/2021 14:18:26 |
| 1323 forum posts 1431 photos | Very nice indeed! The video is excellent. It would be great if you have details of the insides of that air cylinder. And how does the piston interface with the shaft - I presume it does not rotate with the shaft as that would make the piston/cylinder seals difficult. In fact, seals in general there must be a challenge as the shaft passes through the entire cylinder and piston.
I recall writing a few hundred words earlier I did not want to go the hydraulic of pneumatic route, but your setup is to neat to ignore! I guess this is now my challenge. very neat! Joe |
| T.B | 21/04/2021 14:57:34 |
| 54 forum posts 21 photos | No the piston does not rotate , although if it wasn't for the force of the belleville's pushing against it and the drag of the seals it could. the centre bore of the piston is sealed to the shaft with a lip or ring seal , I can't remember the proper name but it was only a couple of pounds from the local pneumatic suppliers. A lot of the hissing sound in the video is the cheap ebay solenoid leaking that was used for testing , I did pressure test the whole cartridge at one point and it held the belleville's in compression for about 20 minutes by which time I got bored ! I've got to go now as I'm due my 1st covid vaccination in an hour or so but i'll try and speak to my mate tonight re some air cylinder details |
| Joseph Noci 1 | 21/04/2021 16:07:42 |
| 1323 forum posts 1431 photos | Thank You. Looking forward to any info! Joe |
| T.B | 22/04/2021 01:23:08 |
| 54 forum posts 21 photos |
Ok , hopefully these will help make things clearer Some details to the rear , namely the homing disc etc changed and the drawings never got updated but the piston cartridge details and layout are correct and as we made them.
Why does this forum software seem to randomly place pictures all over the place seemingly no matter what I do !! Edited By T.B on 22/04/2021 01:25:46 |
| Simon0362 | 22/04/2021 12:25:32 |
| 279 forum posts 91 photos | @T.B., very nice indeed, pity I didn't talk to you guys before I built mine! |
| Joseph Noci 1 | 22/04/2021 14:01:51 |
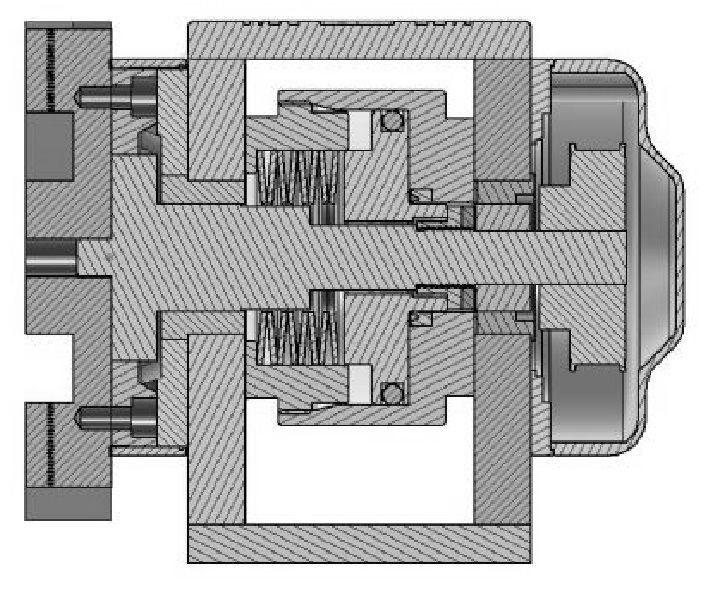
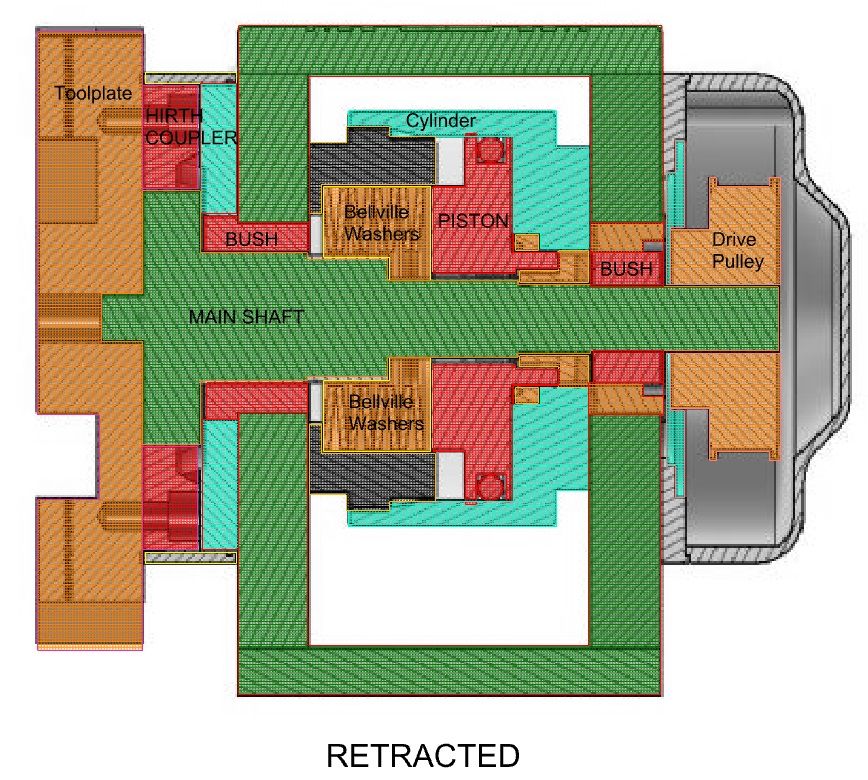
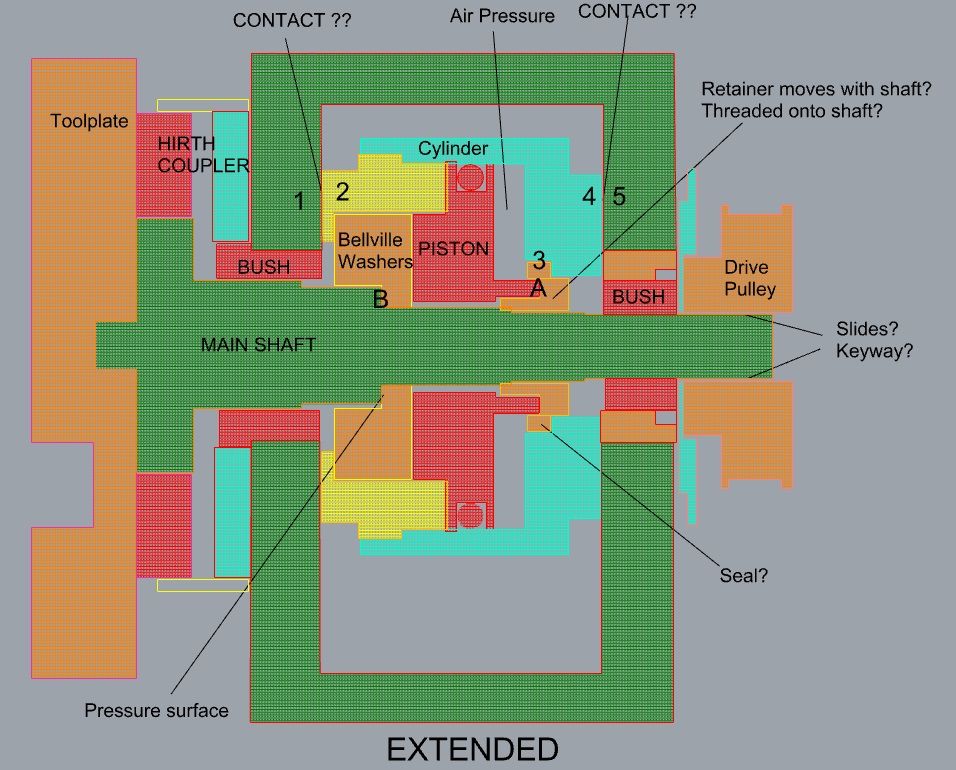
| 1323 forum posts 1431 photos | T.B - Thanks very much for those 3D sections. I have blown the one up, and filled in some detail as I understand it. If I may pick your brain a little now, to understand better the operation please...
This is just an enlarged greyscale version for view placement:
Then on top of the greyscale, some detail and colour hatching:
Then without the greyscale background, but in extended position, with some descriptors:
And then my questions! Is the pneumatic cylinder fixed to the housing or can it rotate somewhat? - Fixed somehow at interface surfaces 1/2 and 4/5 ? When the main shaft moves forward, does the Drive Pulley slide on the shaft? With a keyway? Is item 3 the air seal between the shaft/piston/retainer ( my naming) against air leaks? I presume the 'Retainer' moves with the shaft, ie, is fixed to the shaft ( Threaded?) - I also presume operation as follows- Piston moves forward with air pressure as labelled. Piston flatten bellville washers and pressure is applied to shaft surface at B - pushing shaft forward. Losing air pressure causes bellville washers to press piston away, placing pressure on retainer at surface A, pushing shaft backwards.
What is the thin 'blue' item between the drive pulley and the housing? What is the orange 'bush' surrounding the RED shaft bush at the pulley end of the shaft? - it also has a rebate between it and the RED bush, at the pulley side? Does that orange bush thread into the housing and is then used to press up against the cylinder ( blue) to take up any side to side play of the pneumatic cylinder assy?
Please forgive the many questions.. Looks like a very nice design indeed! Joe
|
| Ross 77 | 22/04/2021 19:27:09 |
| 12 forum posts 5 photos | Hi Joe What an amazing project this is turning into. the quality is something else. I have been watching this thread for a while as I want to build a multi axis machine as well at some point. I helped design the ATC with T.B so hopefully I offer some answers to your questions. Firstly I'm not a mechanical engineer so it is probably way over designed and there are better ways it could be done. this is also the first working prototype and we have planned to make improvements. The key part of the design is the integral air cylinder that compresses the bellville springs to open the Hirth coupling. When it is energised it dosn't put any axial load on the shaft, which means it is free to rotate and can be driven by a small nema 17 stepper. Most of the ones I have seen cause the shaft to be loaded and needs massive geared steppers to turn them. I'm happy to go through all design points but may take a while. To answer your questions: The cylinder was fixed to the main body but we found that it caused the piston to jam up, it is currently just a friction and allows for an minor misalignment. Yes the end pulley is stationary and the shaft has a key way to slide on. this detail is missing from the drawing as T.B solved this problem and I never got around to updating the model. There is a thrust bearing between the body and the pulley and spring loaded end stop to keep it aligned to the motor pulley. Yes item 3 is the air seal Yes the retainer is threaded to the shaft and applies the pre-load to the springs, there is then a lock nut behind that to lock it up. The operation is as you have identified, except there is a spacer that connects face B to the piston (this was part of the R&D to get the distance right) ideally face B is extended to meet the piston I think the thin blue line is the encoder disc. The orange bit is a steel bush. The main body was Lined bored to ensure it was accurate and concentric on both sides but this meant it had to be at the larger diameter of the from bush. the steel bush isnt really needed but reduced the size of the rear bronze bush. It serves no function other than a cheap spacer.
I think that covers most of the points. I'll get some better drawings of the various component groups if that would make it easier. Any more questions then fire away |
| Joseph Noci 1 | 22/04/2021 20:50:38 |
| 1323 forum posts 1431 photos | I am very grateful to both of you for being so forthcoming with drawings and design information. This is really a gem, an excellent design. When I initially looked at the 3D images I thought the design very complex and too much work to duplicate, but the mere outlining of all the parts in CAD showed just how simple and neat it is! I think I have enough data here to be able to model something to good detail. I will certainly post all of it here for your joint criticism! Thanks very much! Joe |
| Ross 77 | 23/04/2021 00:43:40 |
| 12 forum posts 5 photos | No problem and thanks for the positive feedback. Unfortunately I do tend to over complicate my designs. T.B always seems to pull them back to some sort of reality and make them buildable. It will be interesting to see what you come up with and I don't think I will be criticising your work any time soon. Im quite interested in your 5c spindle design for one of my projects. I wish I had your skills to make all those parts. I see you are having trouble with the seals. Is the whole bearing/shaft assembly full of oil? or is it a drip feed? |
Please login to post a reply.
Want the latest issue of Model Engineer or Model Engineers' Workshop? Use our magazine locator links to find your nearest stockist!
Sign up to our newsletter and get a free digital issue.
You can unsubscribe at anytime. View our privacy policy at www.mortons.co.uk/privacy
- *Oct 2023: FORUM MIGRATION TIMELINE*
05/10/2023 07:57:11 - Making ER11 collet chuck
05/10/2023 07:56:24 - What did you do today? 2023
05/10/2023 07:25:01 - Orrery
05/10/2023 06:00:41 - Wera hand-tools
05/10/2023 05:47:07 - New member
05/10/2023 04:40:11 - Problems with external pot on at1 vfd
05/10/2023 00:06:32 - Drain plug
04/10/2023 23:36:17 - digi phase converter for 10 machines.....
04/10/2023 23:13:48 - Winter Storage Of Locomotives
04/10/2023 21:02:11 - More Latest Posts...
- View All Topics
- Reeves** - Rebuilt Royal Scot by Martin Evans
by John Broughton
£300.00 - BRITANNIA 5" GAUGE James Perrier
by Jon Seabright 1
£2,500.00 - Drill Grinder - for restoration
by Nigel Graham 2
£0.00 - WARCO WM18 MILLING MACHINE
by Alex Chudley
£1,200.00 - MYFORD SUPER 7 LATHE
by Alex Chudley
£2,000.00 - More "For Sale" Ads...
- D1-3 backplate
by Michael Horley
Price Not Specified - fixed steady for a Colchester bantam mark1 800
by George Jervis
Price Not Specified - lbsc pansy
by JACK SIDEBOTHAM
Price Not Specified - Pratt Burnerd multifit chuck key.
by Tim Riome
Price Not Specified - BANDSAW BLADE WELDER
by HUGH
Price Not Specified - More "Wanted" Ads...
Do you want to contact the Model Engineer and Model Engineers' Workshop team?
You can contact us by phone, mail or email about the magazines including becoming a contributor, submitting reader's letters or making queries about articles. You can also get in touch about this website, advertising or other general issues.
Click THIS LINK for full contact details.
For subscription issues please see THIS LINK.
Model Engineer Magazine
- Percival Marshall
- M.E. History
- LittleLEC
- M.E. Clock
ME Workshop
- An Adcock
- & Shipley
- Horizontal
- Mill
Subscribe Now
- Great savings
- Delivered to your door
Pre-order your copy!
- Delivered to your doorstep!
- Free UK delivery!





 Register
 Log-in


