Tangential Tool Holder
| Jouke van der Veen | 09/06/2020 20:37:12 |
| 203 forum posts 19 photos | Posted by Niels Abildgaard on 09/06/2020 11:59:45:
There is an old thread that have pictures etc. I tried 6mm carbide and allwent well untill 2.5mm depth of cut.Then lathe was not really up for more.It was therefore reasonable that a 3mm tool should be able to do 2.5mm wide also from a lathe power viewpoint. That might have been the case put cutting was not possible.Noise was unpleasant,swarf curled wrong and it had to stop. Doing 1.5mm and down it was pure music
Niels, I have to read this thread all through. It contains a lot of information. Probably, you are right that the angle I had chosen (26 degrees) was to large. Making it smaller (more vertical) gives an ellips closer to a circle and the tip angle constant for a larger angle along the circumference of the tip. |
| JG | 10/06/2020 00:52:04 |
| 9 forum posts | Jouke's intention of making horological cutters is appealing.. might be the temptation I need to finally make one (once some other projects are finished). In terms of the maximum cutting loads / depth, I'll just see how the thread progresses (that's likely to be sooner than I can make one). |
| DiogenesII | 10/06/2020 07:08:35 |
| 859 forum posts 268 photos | Hi Jouke, and JG - thanks for your interest. I think in brief, that cutters will only have longevity in harder materials if the edge is kept within quite a narrow range of angles maybe only a couple of degrees either side of about 12 from vertical - less and the tool may start to rub, more and the edge becomes too thin and will lose strength. I'm unable to contribute much to the thread during this week in any case, so if anyone wishes to experiment and post their own findings, it will be both interesting and helpful in keeping the thread progressing.. regards D
|
| Niels Abildgaard | 10/06/2020 08:24:20 |
| 470 forum posts 177 photos | I hadn't thought of, er, the high-level advanced technique of using a strip of abrasive paper
Diogeness reminded me of something I had forgotten. In 2012 I fooled around with a square cutting material called Tantung(Stellite) and rounded the active edge to be, with abrassive paper with Corund/aluoxide. Worked very well but it was important that the rounded edge was polished afterwards along the edge for better resistance to chipping. I am all Tungstencarbide now and wonder where I can buy abrassive band with Carborundum/SiliziumCarbide that can repeat that stunt . Carborundum or silizium Carbide is much harder than aluminium oxide or corund that do not touch Tungsten Carbide . Ebay also mention bands with Zirkonia as abrassive. Is that hard enough to grind TungstenCarbide? Edited By Niels Abildgaard on 10/06/2020 08:29:26 Edited By Niels Abildgaard on 10/06/2020 08:32:33 |
| AdrianR | 10/06/2020 08:43:50 |
| 613 forum posts 39 photos | What about diamond paper? **LINK**
Adrian
|
| SillyOldDuffer | 10/06/2020 09:04:31 |
| 10668 forum posts 2415 photos |
+1 That's the stuff Zirconia won't do - it's only as hard as a steel file, and softer than Carborundum. Tungsten Carbide is a step harder above Carborundum. I think only Diamond and CBN (Cubic Boron Nitride) will touch TC. Dave |
| Niels Abildgaard | 10/06/2020 09:07:41 |
| 470 forum posts 177 photos |
Thank You. Never seen it before Will try |
| Jouke van der Veen | 10/06/2020 20:05:53 |
| 203 forum posts 19 photos | Round tangential tool limits
Niels, I have to read this thread all through. It contains a lot of information. Probably, you are right that the angle I had chosen (26 degrees) was to large. Making it smaller (more vertical) gives an ellips closer to a circle and the tip angle constant for a larger angle along the circumference of the tip. Niels, I went through the thread above and I think I understand now what you mean by a depth of cut not more than half the diameter of the toolbit. But I have a question which I hesitate to ask. When I look at your pictures It looks to me that you make, as an example, a depth of cut of 1.5mm, measuring in the axial direction of the lathe And you feed in the radial direction by movement of the cross slide. So, I would mention it a radial feed and not an axial feed. But I may be completely wrong. Please, could you clarify this? Jouke
|
| Niels Abildgaard | 10/06/2020 20:44:41 |
| 470 forum posts 177 photos | Posted by Jouke van der Veen on 10/06/2020 20:05:53:
Round tangential tool limits
Niels, I have to read this thread all through. It contains a lot of information. Probably, you are right that the angle I had chosen (26 degrees) was to large. Making it smaller (more vertical) gives an ellips closer to a circle and the tip angle constant for a larger angle along the circumference of the tip. Niels, When I look at your pictures It looks to me that you make, as an example, a depth of cut of 1.5mm, measuring in the axial direction of the lathe And you feed in the radial direction by movement of the cross slide. So, I would mention it a radial feed and not an axial feed. But I may be completely wrong. Please, could you clarify this?Jouke
What is Your difficulty with depth of cut being either radial or axial ? Some videos here show both axial and radial . My feeling is that a 2mm square can cut 1.9mm deep and a 3mm round only 1.5 or somewhat less. Enjoy some cutting phornography.
|
| Jouke van der Veen | 10/06/2020 21:26:04 |
| 203 forum posts 19 photos | Yes, thank you! In your video WP20150916004 you make a deep cut and feed in the radial direction. That is what I meant. Edited By Jouke van der Veen on 10/06/2020 21:37:10 |
| DiogenesII | 11/06/2020 07:50:50 |
| 859 forum posts 268 photos | Posted by Niels Abildgaard on 10/06/2020 08:24:20:
Carborundum or silizium Carbide is much harder than aluminium oxide or corund that do not touch Tungsten Carbide . Ebay also mention bands with Zirkonia as abrassive. Is that hard enough to grind TungstenCarbide? ..Just been out for a definitive answer - I ground flats on the end of an old insert on my linisher - Zirconia will only just cut it (more like polishing, rather than shaping) and slow going, with heavy pressure (= belt wear) - I changed the belt to Silicon Carbide and removed more than twice as much material in c.25% of the time, with only light pressure. So No, not a practical proposition.. Any one know a source for Silicon Carbide Tape? ..I'd never realised that my neighbours were interested in Engineering Experiments, but when I finished at 7am, they all were at their windows, cheering me on and punching the air in excitement. ..Gratifying.
|
| Jouke van der Veen | 11/06/2020 09:05:07 |
| 203 forum posts 19 photos | In the Netherlands we have the expression: “A good neighbour is better than a far friend”. |
| Howard Lewis | 11/06/2020 12:44:04 |
| 7227 forum posts 21 photos | IF it needs clarification, with a round toolbit, feeding radially should produce a groove width equal in diameter to that of the toolbit. There is little point in setting a depth of cut greater than half the diameter of the toolbit (which would be pretty deep, even with a 3 mm or 1/8 inch toolbit ) and then feeding axially, unless you wish to produce an annular groove, on a face. This would be a means of making a groove to take an 'O' ring to seal the face. Today, I hope to use a 1/8 inch diameter toolbit to cut a semi circular form thread, with a total infeed of 0.625 inches, but in a series of smaller cuts. The infeed will produce the thread form, and the axial feed, from the Leadscrew, will produce the helix which is the thread. HTH Howard |
| Jouke van der Veen | 11/06/2020 15:46:41 |
| 203 forum posts 19 photos | When I looked the video of Niels it got quite clear to me want he meant with depth of cut and axial and/or radial feed. For making a mill cutter for a clock wheel you also do not have to go deeper than half the diameter of the toolbit. An O-ring with a circular cross section used for vacuum applications is normally put in a rectangular or square groove. It is pressed into a more or less square cross section to close the connection. There are norms/specifications for combinations of groove dimension and O-ring cross section. Closing an O-ring in a round groove would give an undefined deformation of its cross section because where should the surplus of rubber flow when it is pressed together? |
| DiogenesII | 11/06/2020 17:18:07 |
| 859 forum posts 268 photos | Posted by Howard Lewis on 11/06/2020 12:44:04:
...Today I hope to cut a semi circular form thread, with a total infeed of 0.625 inchess... HTH Howard ..Heavens above - that's some screw.. ..are you making a cider press? |
| DiogenesII | 18/06/2020 21:29:31 |
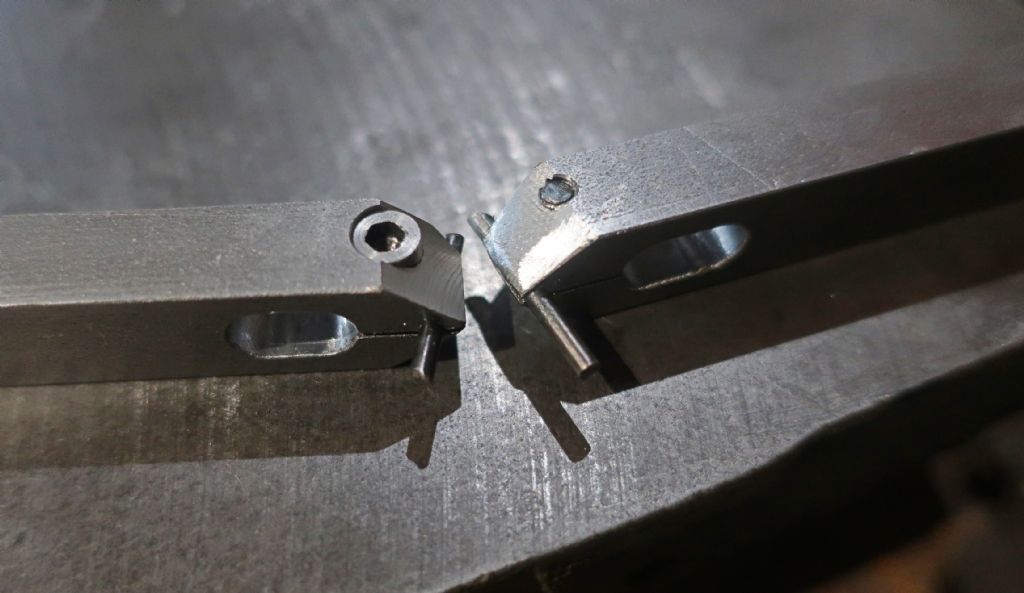
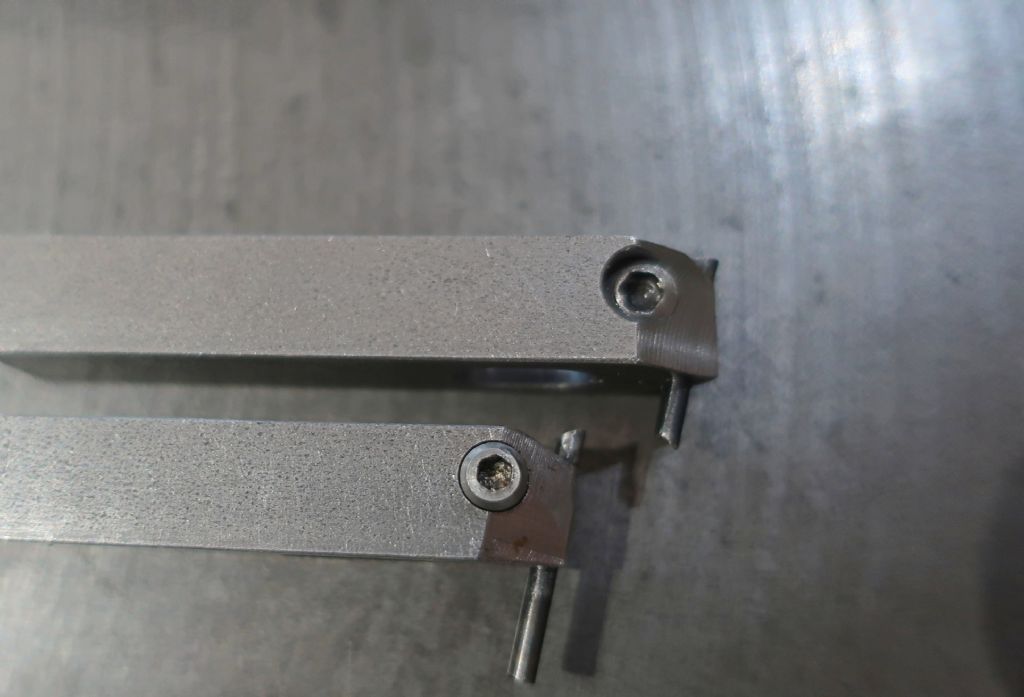
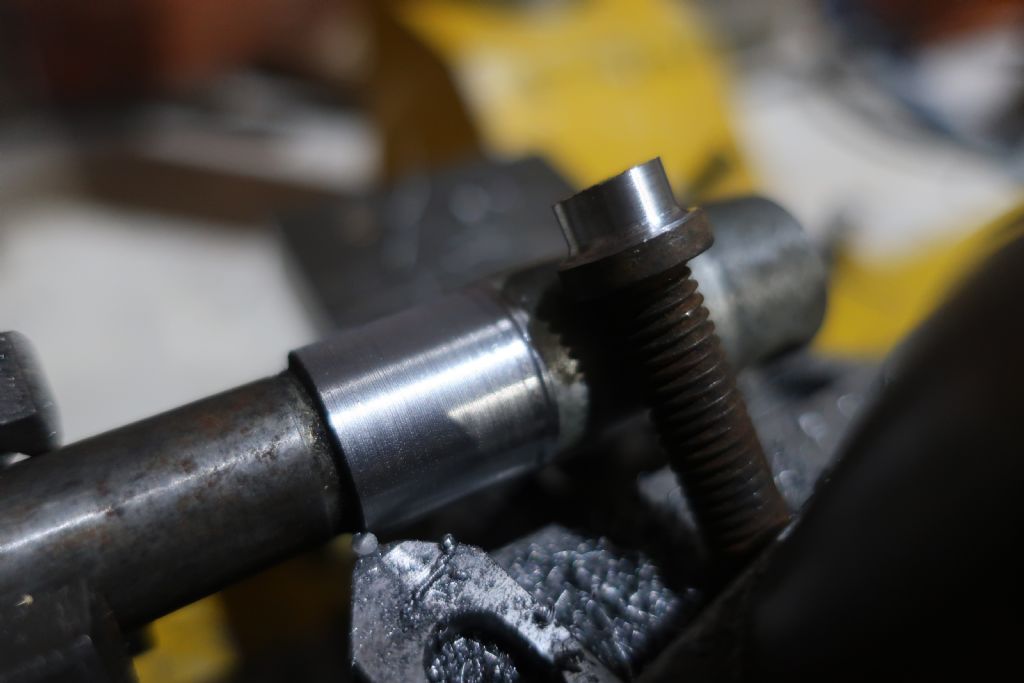
| 859 forum posts 268 photos | Following a week (and more) out of the workshop, I've finished a second toolholder. One of the first revisions was to amend the angle of the toolbit - in the original, I'd been fairly cavalier in the set-up and ended up with an angle of slightly less than the 12 degrees I'd shot for, so with this holder I was careful to err on the generous side to gain myself a little more side clearance. The upper surface of the tool is machined to centre-height - this makes setting tool height easy, as the holder only needs to be inverted on a flat surface and the tool tip set to touch, whilst the clamp is tightened. The nose of the new holder has an included angle of 80 degrees - reduced from the 85 used on the first tool, it makes acquiring the clearances for facing/turning less critical, and reduces the need to create extra easement by additional hand-filing of the nose. The "flanks" of the nose were machined with the holder clamped horizontally - on my prototype, I machined them in the same "inclined-at-12-degrees" set-up as drilling for the toolbit, which looked neat & purposeful, but resulted in rather thin jaws, and I think the extra metal in the later version is a positive improvement - It also simplifies the making, as it requires only a simple (rather than a compound) angle to be made. I used a home-made 40 degree angle gauge cut from a piece of 6mm flat bar to align the holder on it's side in the mill vise. The clamp screw size was upped to M4, the cap head being modified to provide clearance along the flank of the holder. The tool cuts as one would wish a neutral-rake carbide tool to cut - the photo's below show a tough cap-head screw of unknown (but tough) grade, and a m/c wheel spindle. The results were from the very first off-hand grinding and are certainly acceptable - the spindle had a huge overhang in spite of being shoved up the 'ole as far as I could get it (and was unsupported at the free end because of the shortcomings of the Hobbymat tailstock). I might make a simple jig to hold the tool for flatting with a lap, just because it's small and slips in the fingers. I still have a couple of ideas to try regarding the the fixing of the toolbit - although the clamp isn't that onerous to make, it still requires a number of set-ups and operations that it would be nice to reduce, and requires compromises to be made the balance of which are difficult to resolve without making and testing.. a number of options are possible, some tried by others, and some perhaps not.. I'll update once I get a chance to do more with it.. |
| Howard Lewis | 19/06/2020 14:09:10 |
| 7227 forum posts 21 photos | No, not a cider press! It is on what will be the column for a shop made Comparator. It is my poor imitation of the Industrial Sigma Comparator, which used a coarse pitch square thread. This one is 8mm pitch. It was an interesting exercise, since, normally I try to avoid screwcutting! The adjuster is just a ring drilled and tapped, so that a 1/8" ball bearing sits half in the Column and half in the Adjuster. The only forces involved are those needed to carry the Arm and the Indicator. "C'est brusque, mais ca marche" as Peugot said. The really interesting bit is going to be the "heat and freeze" to make the column an interference fit in the cast iron base.. Howard |
| DiogenesII | 19/06/2020 17:28:22 |
| 859 forum posts 268 photos | Posted by Howard Lewis on 19/06/2020 14:09:10:
..It is on what will be the column for a shop made Comparator... Howard Ah! - I really couldn't figure out what you were making, it would have made a great "what is it?" ..that will be a very satisfying one to bring to completion - at risk of being nosey, are you building in order to fulfil a particular need, or is this a project purely for personal interest?
|
| Niels Abildgaard | 20/06/2020 10:04:50 |
| 470 forum posts 177 photos | Hello Diogenes and congratulations on having made a well-working TanTool. Is there some thoughts on vertical level of clamping screw? I put them as close to base as possible to even clamping force over more of bit-bore.
Edited By Niels Abildgaard on 20/06/2020 10:05:13 |
| Howard Lewis | 20/06/2020 12:10:33 |
| 7227 forum posts 21 photos | Just spotted a MAJOR typo. Depth of thread is 0.0625"! The idea is that the Adjuster will have a 1/8" ball bearing, part in the thread and part in the Adjuster ring, to move the Comparator head up and down the column. There will be a separate clamp to prevent movement once set up. Work is still proceeding, the block to carry the Indicator is not yet finish machined. And then the base needs to be bored to be a slight interference fit on the Column. Then to become a sheet metal worker and make a box to contain and protect it. WHY? No immediate need, It seemed a good idea at the time, since it was a pity for a large diameter 0.0005" Indicator to sit in a box on the shelf. May well submit an article on its construction to Neil for possible inclusion in MEW. Howard |
Please login to post a reply.
Want the latest issue of Model Engineer or Model Engineers' Workshop? Use our magazine locator links to find your nearest stockist!
Sign up to our newsletter and get a free digital issue.
You can unsubscribe at anytime. View our privacy policy at www.mortons.co.uk/privacy
- *Oct 2023: FORUM MIGRATION TIMELINE*
05/10/2023 07:57:11 - Making ER11 collet chuck
05/10/2023 07:56:24 - What did you do today? 2023
05/10/2023 07:25:01 - Orrery
05/10/2023 06:00:41 - Wera hand-tools
05/10/2023 05:47:07 - New member
05/10/2023 04:40:11 - Problems with external pot on at1 vfd
05/10/2023 00:06:32 - Drain plug
04/10/2023 23:36:17 - digi phase converter for 10 machines.....
04/10/2023 23:13:48 - Winter Storage Of Locomotives
04/10/2023 21:02:11 - More Latest Posts...
- View All Topics
- Reeves** - Rebuilt Royal Scot by Martin Evans
by John Broughton
£300.00 - BRITANNIA 5" GAUGE James Perrier
by Jon Seabright 1
£2,500.00 - Drill Grinder - for restoration
by Nigel Graham 2
£0.00 - WARCO WM18 MILLING MACHINE
by Alex Chudley
£1,200.00 - MYFORD SUPER 7 LATHE
by Alex Chudley
£2,000.00 - More "For Sale" Ads...
- D1-3 backplate
by Michael Horley
Price Not Specified - fixed steady for a Colchester bantam mark1 800
by George Jervis
Price Not Specified - lbsc pansy
by JACK SIDEBOTHAM
Price Not Specified - Pratt Burnerd multifit chuck key.
by Tim Riome
Price Not Specified - BANDSAW BLADE WELDER
by HUGH
Price Not Specified - More "Wanted" Ads...
Do you want to contact the Model Engineer and Model Engineers' Workshop team?
You can contact us by phone, mail or email about the magazines including becoming a contributor, submitting reader's letters or making queries about articles. You can also get in touch about this website, advertising or other general issues.
Click THIS LINK for full contact details.
For subscription issues please see THIS LINK.
Model Engineer Magazine
- Percival Marshall
- M.E. History
- LittleLEC
- M.E. Clock
ME Workshop
- An Adcock
- & Shipley
- Horizontal
- Mill
Subscribe Now
- Great savings
- Delivered to your door
Pre-order your copy!
- Delivered to your doorstep!
- Free UK delivery!


 Register
 Log-in


