Learning CAD with Alibre Atom3D
Discussion of the series starting in MEW 274
Articles

Alibre Atom3D
Thanks to the generosity of Alibre, Model Engineers' Workshop Magazine is able to offer every reader of Model Engineers' Workshop a free six-month licence to Alibre Atom3D. Alongside this great opportunity, starting with issue 274 of Model Engineers' Workshop we are running a detailed tutorial series in the magazine. This page will be the 'hub' for links to example files, tutorials and more so make sure you drop in regularly to keep up to date!
| Nick James | 29/01/2019 14:47:02 |
| 11 forum posts | Hi Neil, Sometime ago I had reason to email a drawing to someone who did not have the software to open it (QCAD in this case). I was able to save the file as a PDF which almost any one can open. I tried using PDF publish on Alibre anf it worked ok with a 3D drawing but will not work with a 2D drawing. I have latest update of Foxit reader installed but have removed any Adobe software as it seems to cause trouble. I get the message "No PDF writer was detected. Please retry after installing one". If I look at Alibre System Options - Drawing - PDF. it shows Active PDF Writer as being "Foxit reader PDF Printer Driver" only. Any help would be appreciated. I'd like to add that that I am very impressed with Alibre atom3D so far. A bit of a steep learning curve to start with but perseverence is paying off. The software seems pretty bullet proof as I just click on things to see what happens and not once has it crashed just helpful messages.Many thanks to Robert for his excellent articles.and everyone else who has made Alibre available. Regards Nick |
| JasonB | 29/01/2019 14:53:24 |
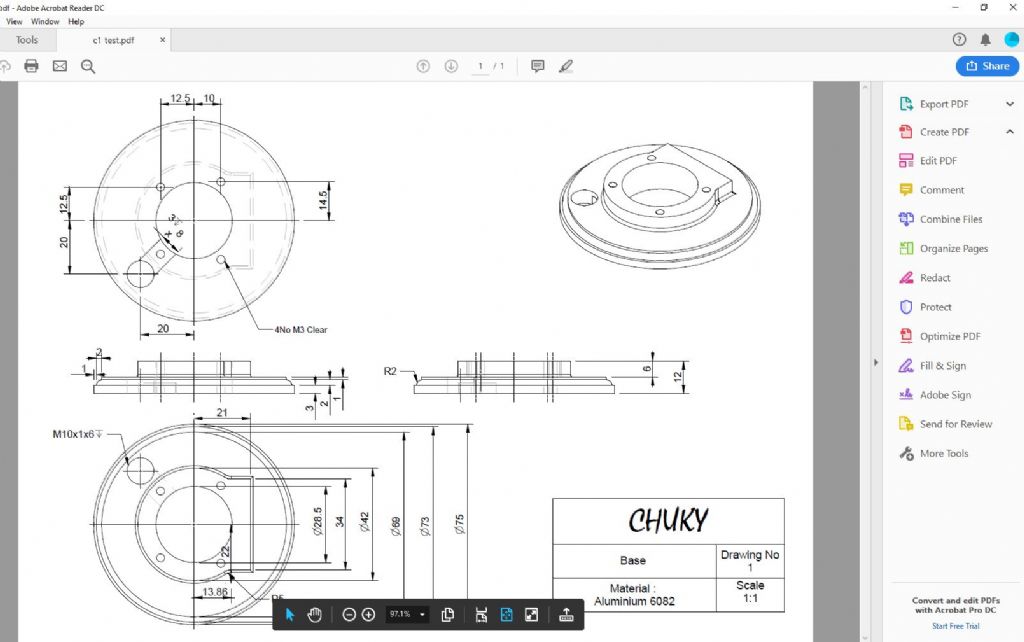
25215 forum posts 3105 photos 1 articles | I tend to just go to print and then instead of selecting my printer I use Cute PDF writer (free to download) which works fine for me, this is an example of one such 2D drawing in PDF format. I've just done it with the same drawing using Alibre's "publish to PDF from the 2D drawing and that works fine too. Mine shows "Microsoft Write to PDF" and "Cute" as the two available and it used Microsoft. Edited By JasonB on 29/01/2019 14:59:41 Edited By JasonB on 29/01/2019 15:05:42 |
| Andrew Johnston | 29/01/2019 14:59:11 |
7061 forum posts 719 photos | Posted by JasonB on 29/01/2019 14:53:24:
I tend to just go to print and then instead of selecting my printer I use Cute PDF writer Me too, although I rarely print PDF with 2D. For clients the 3D PDFs of parts or assemblies are most useful as they can be rotated, panned and zoomed. For 2D for workshop use I print straight from the drawing. Andrew |
| JasonB | 29/01/2019 15:02:02 |
25215 forum posts 3105 photos 1 articles | That's what I do too Andrew just print and use but the PDF is handy for sharing drawings with those that may not have Alibre or any CAD, the example above is one of the engines I have shared sets of drawings for. |
| David Jupp | 29/01/2019 15:03:39 |
| 978 forum posts 26 photos | Nick - the PDF option in Atom can be set to use any 'virtual PDF printer' that you have installed. These do vary in quality/compatibility. Like Jason I don't use the Publish option for 2D drawings, mainly because it introduces a slight scaling of the page to make room for header and footer at top and bottom of page - so your drawing won't truly be to scale. Edited By David Jupp on 29/01/2019 15:03:59 |
| Neil Wyatt | 29/01/2019 15:19:34 |
19226 forum posts 749 photos 86 articles | Windows 10 users will have Microsoft Print to PDF, which should be fine for most purposes. It just works like a printer, and when you click print it comes up with a 'save' as dialogue. Neil |
| Nick James | 29/01/2019 17:47:11 |
| 11 forum posts | Hi, I now have a PDF 2D file saved on my desktop, then sent and viewed on my phone. Brilliant In Alibre I selected Print then select Foxit Reader PDF Printer instead of my usual printer, and then choose where to save it. Thanks everybody for your help. Best regards Nick
|
| mick | 29/01/2019 18:02:49 |
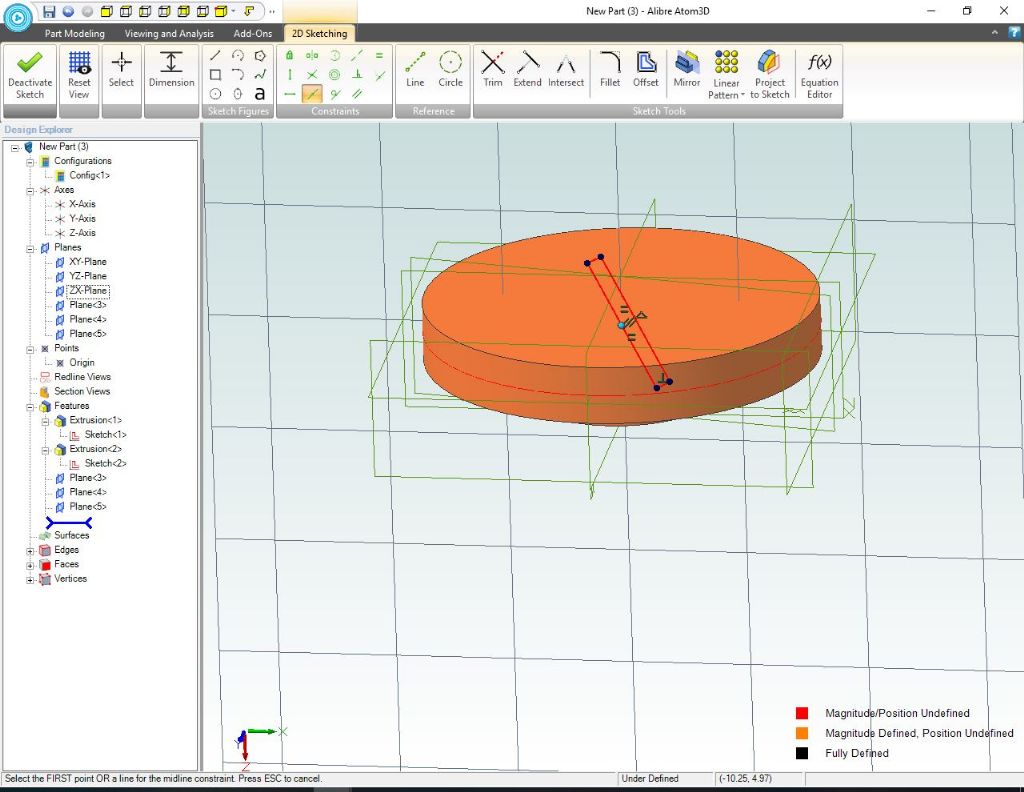
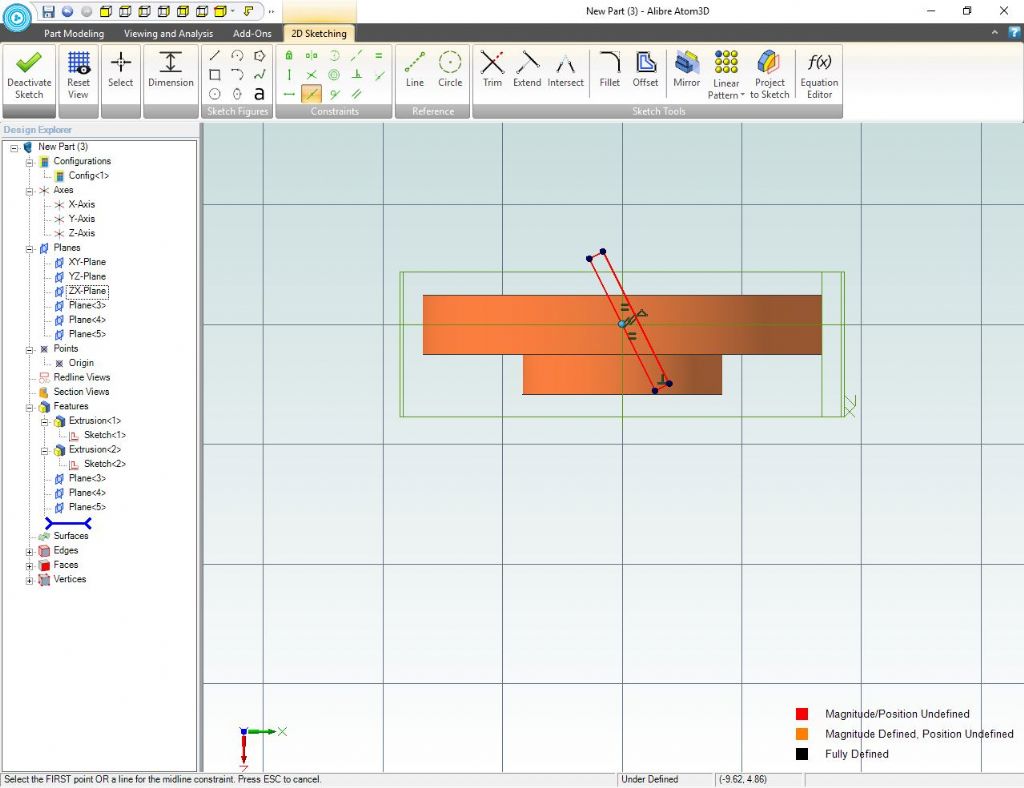
| 421 forum posts 49 photos | Sorry to bother you all again but I've spent quite a few hours trying to sort this out for myself. I've followed the tutorial to the letter but when I apply the midline constraint it locks the left hand line to the origin point but not to the sketch. I establish the plane by clicking on the z axis in the tree Which creates the blue box shown in fig 32. |
| JasonB | 29/01/2019 18:30:55 |
25215 forum posts 3105 photos 1 articles | Looks like you have drawn the sketch on the ZX plane and not the new plane that touches the edge of the disc. Easiest option is to deactivate the sketch you have there then click "activate 2D sketch and come down the tree on the left to what is probably your "plane 5" and then draw the angled rectangle again.
Edited By JasonB on 29/01/2019 18:38:28 |
| JasonB | 29/01/2019 19:13:04 |
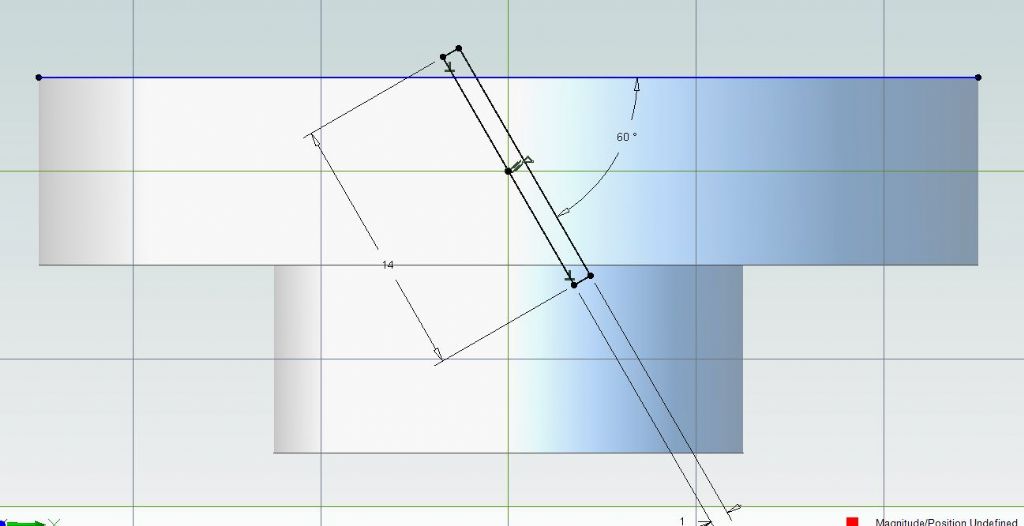
25215 forum posts 3105 photos 1 articles | I did also find an easier way to set the angle of the sketch. Select dimension and then just click the top edge of the knob and one long side of the sketch and enter the desired angle which seems far simpler than the method suggested. Could also have been done at the time of drawing the first line by just hitting tab and entering the angle. Edited By JasonB on 29/01/2019 19:14:05 |
| David Jupp | 31/01/2019 16:59:27 |
| 978 forum posts 26 photos | I just took a look at the Alibre web site - there are some new videos specifically covering Atom3D that have been added to the training area. Make sure to look on the Atom3D tab, at time of writing the videos on the Alibre Design tab are still rather dated.
|
| John Hinkley | 01/02/2019 14:28:03 |
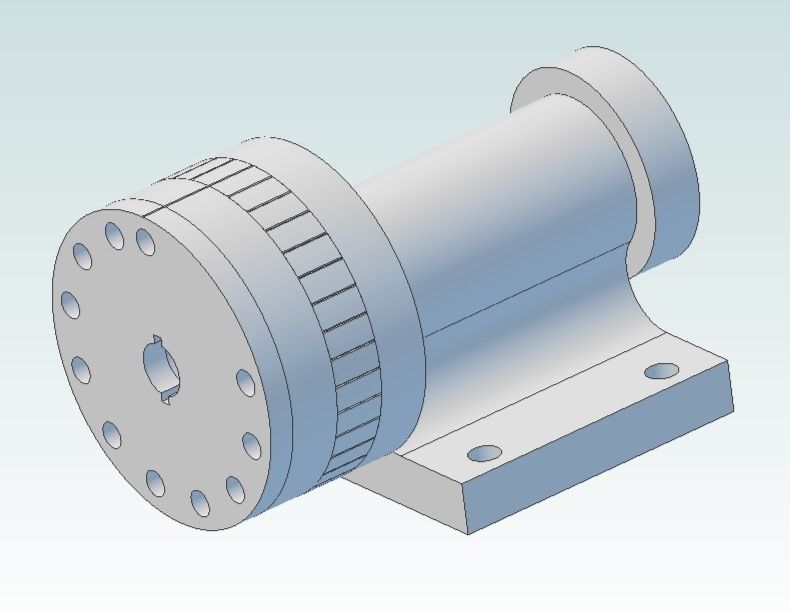
1545 forum posts 484 photos | Taking yet another break from my engine design, I've been pondering the question of a simple indexer. I have come up with a prototype as shown below, modelled in AA3D At the moment, there is no spindle shown as I haven't got around to drawing it, but the intention is to use a commercial ER25 chuck with 100mm straight shaft - because I happen to have one. It operates on the following principle: (Skip this bit if of no interest!) The outer,lefthand, disc is key to the shaft so that it rotes the workpiece as indexing progresses There are holes drilled in it at specific angles, such that by inserting a dowel in each hole in turn, it engages with a similar hole in the next plate with holes at the same angle plus one degree. The other side of the second plate has holes at 10° intervals and the engraved register allows one to set the second index position at a specific number of 10° intervals and the first plate adds the second and subsequent indices. It will only allow whole degrees to be indexed, but could be useful in instances where that is all that is required. I need to find a local foundry that will cast me a body from a pattern I'll have to make! More progress will appear in the album, not here. The design is in a state of flux and I will incorporate "improvements" as and when they occur to me! John
|
| Neil Wyatt | 01/02/2019 15:24:13 |
19226 forum posts 749 photos 86 articles | That makes me think it would be great to have a design for a multi-purpose casting that could be used for spindles, indexers, tailstocks. Something like an cylinder on an angle plate so it could be fixed on its side or on its end, with a couple of mounting points on the cylinder. There could be a challenge to come up with the most flexible casting, and then for different things to do with it. Might even be popular enough for someone to sell it for a reasonable cost. Neil |
| Kenneth Jones 1 | 01/02/2019 16:52:07 |
| 8 forum posts | Hi Neil & David, I am up to Fig 47 but try as I might the thread does not appear. I get the ghost thread as in B but when I click 'apply' it all disappears. I have checked on 'status' and it tells me;- 9002 open or overlapping figures are not supported. I can not see what I am doing wrong but you say make the height 6 but the part is only 5 thick, is this correct? I have selected 'Height and Pitch' I am quite proud of my progress so far! Thanks. Kenj |
| David Jupp | 01/02/2019 16:59:16 |
| 978 forum posts 26 photos | 6 is correct - in fig 46 the sketch profile for the groove of the thread is drawn just outside the thickness of the part, so the cut needs to extend a bit further than the thickness to make sure the thread goes all the way through. Open or overlapping figures suggests either a gap in your sketch profile (use the sketch analysis tool to check), or the profile is wide enough that adjacent 'turns' will overlap (that causes problems) - so axial width of the groove profile must be less than the pitch value. This might help. Edited By David Jupp on 01/02/2019 17:01:33 Edited By David Jupp on 01/02/2019 17:07:12 Edited By David Jupp on 01/02/2019 17:08:36 |
| Kenneth Jones 1 | 03/02/2019 17:49:15 |
| 8 forum posts | Thanks David, -- but still no thread! I can not locate 'sketch analysis tool' I did look at your suggested help tutorial and my problem does suggest a fault in the sketch as I have tried different shapes (rectangles and circles) and I can make a spiral cut using these shapes. I have also tried changing the pitch, that works on my simple shapes but not on the thread shape (triangle). Am I right in thinking that the groove profile is 2 x 0.375 =0.75, there for less than the 1.0 pitch suggested so that should be OK Am I the only one having this difficulty?
Thanks' kenj |
| David Jupp | 04/02/2019 07:19:33 |
| 978 forum posts 26 photos | Ken, In System Options -> Parts/Assemblies -> Sketching, make sure that the check box for 'automatically analyze sketch' is indeed checked. If still struggling, let me know. You may have one line on top of another in your sketch (hence 'overlapping' ).
Edited By JasonB on 04/02/2019 08:29:48 |
| Kenneth Jones 1 | 04/02/2019 11:14:09 |
| 8 forum posts | Hi Dave, I'm there! I switched on the sketch analysis button as suggested and tried yet again. The analysis did indeed suggest that I had an open sketch in spite of very careful location of my curser! BUT, I tried deleting the vertical line, ie; the back of the triangle, and low and behold the thread then appeared. I am at a loss to explain this but it has worked for me. Thanks again, I am looking forward to next months tutorial. Cheers, Kenj
|
| David Jupp | 04/02/2019 13:20:27 |
| 978 forum posts 26 photos | Ken - perhaps you missed out this step (my bold);- Change the right hand edge of the triangle A reference figure is like a 'construction line' - it is ignored for the actual extrusion (or other feature). |
| mick | 04/02/2019 17:39:48 |
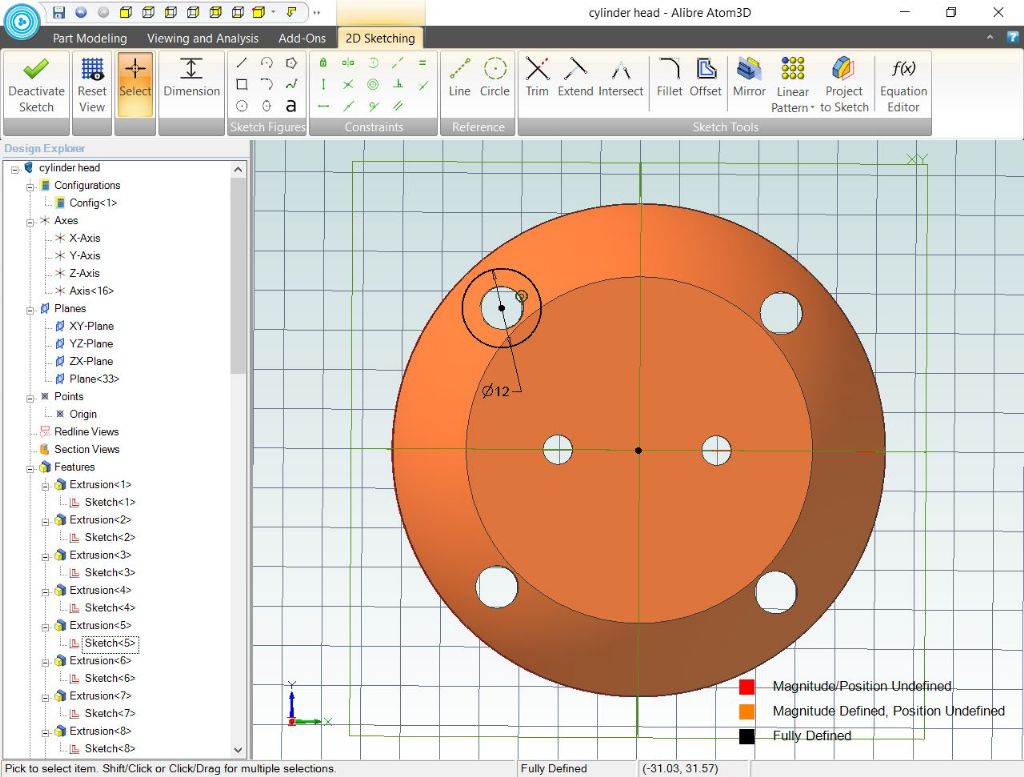
| 421 forum posts 49 photos | Back to playing with the cylinder head. How do I anchor the 12mm diameter sketch to the top face of the head in order to extrude it to form a counter bore. Thanks. |
Please login to post a reply.
Want the latest issue of Model Engineer or Model Engineers' Workshop? Use our magazine locator links to find your nearest stockist!
Sign up to our newsletter and get a free digital issue.
You can unsubscribe at anytime. View our privacy policy at www.mortons.co.uk/privacy
- hemingway ball turner
04/07/2025 14:40:26 - *Oct 2023: FORUM MIGRATION TIMELINE*
05/10/2023 07:57:11 - Making ER11 collet chuck
05/10/2023 07:56:24 - What did you do today? 2023
05/10/2023 07:25:01 - Orrery
05/10/2023 06:00:41 - Wera hand-tools
05/10/2023 05:47:07 - New member
05/10/2023 04:40:11 - Problems with external pot on at1 vfd
05/10/2023 00:06:32 - Drain plug
04/10/2023 23:36:17 - digi phase converter for 10 machines.....
04/10/2023 23:13:48 - More Latest Posts...
- View All Topics
- Reeves** - Rebuilt Royal Scot by Martin Evans
by John Broughton
£300.00 - BRITANNIA 5" GAUGE James Perrier
by Jon Seabright 1
£2,500.00 - Drill Grinder - for restoration
by Nigel Graham 2
£0.00 - WARCO WM18 MILLING MACHINE
by Alex Chudley
£1,200.00 - MYFORD SUPER 7 LATHE
by Alex Chudley
£2,000.00 - More "For Sale" Ads...
- D1-3 backplate
by Michael Horley
Price Not Specified - fixed steady for a Colchester bantam mark1 800
by George Jervis
Price Not Specified - lbsc pansy
by JACK SIDEBOTHAM
Price Not Specified - Pratt Burnerd multifit chuck key.
by Tim Riome
Price Not Specified - BANDSAW BLADE WELDER
by HUGH
Price Not Specified - More "Wanted" Ads...
Do you want to contact the Model Engineer and Model Engineers' Workshop team?
You can contact us by phone, mail or email about the magazines including becoming a contributor, submitting reader's letters or making queries about articles. You can also get in touch about this website, advertising or other general issues.
Click THIS LINK for full contact details.
For subscription issues please see THIS LINK.
Model Engineer Magazine
- Percival Marshall
- M.E. History
- LittleLEC
- M.E. Clock
ME Workshop
- An Adcock
- & Shipley
- Horizontal
- Mill
Subscribe Now
- Great savings
- Delivered to your door
Pre-order your copy!
- Delivered to your doorstep!
- Free UK delivery!



 Register
 Log-in


