Forum sponsored by:

Part built Allchin 1.5 inch
| derek blake | 14/11/2019 07:10:00 |
| 586 forum posts 151 photos | Hi John many thanks for the response, yes please could you measure the valves. kind regards Derek |
| JasonB | 14/11/2019 07:10:33 |
 25215 forum posts 3105 photos 1 articles | You will have a job getting ones small enough as most will have a larger than 3/8" dia body You will have a job getting ones with 7/32 x 40 threads You will have a real job finding ones with a female thread one side, male the other. |
| derek blake | 14/11/2019 07:32:12 |
| 586 forum posts 151 photos | Hi Jason i agree if I’m honest the threads are 1/4 x 40 on my manifold, so I may have a go making one by hand. or I shall farm the job out in the new year. regards Derek |
| derek blake | 15/11/2019 16:08:15 |
| 586 forum posts 151 photos | So I’ve done some plumbing the same as the previous picture and another builders idea so I’m guessing it should work. hopefully the water will run into the injector OK. Not sure how to turn the picture.
Edited By JasonB on 16/11/2019 06:52:48 |
| derek blake | 15/11/2019 21:53:20 |
| 586 forum posts 151 photos |
|
| derek blake | 16/11/2019 17:31:39 |
| 586 forum posts 151 photos | Pipework for the injector has been done with 5/32mm pipe, 1/8th for the water pump. hopefully this will be ok, I checked other models and they seemed to do the same. im going to fit just one globe valve for the steam feed to injector, as I don’t need the other globe valve as I’m not fitting the water lifter. |
| derek blake | 17/11/2019 22:01:09 |
| 586 forum posts 151 photos | Any ideas how to fill these holes, I had to enlarge the Hornplate fixing holes to be able to see the mis-alignment sidestay holes. because of this I’m having to use washers which look rubbish, is there any trick to filling the area around fixing to do away with the washers, I was thinking of making inserts but I’d have to make they all different and with off centre holes, thanks in advance.
|
| derek blake | 18/11/2019 21:20:20 |
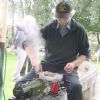
| 586 forum posts 151 photos | Small update today, I’ve been concerned that the exhaust plug in the base of the cylinder wasn’t steam/airtight as I had air god up the chimney on its test with the ports closed. i did think I could remove the cylinder but thankfully all went well and this plug is now secure. on the next air test, possible reasons for leak up the exhaust as suggested kindly by John is likely the valve or regulator. i had no control over speed on my last air test so I think I need to concentrate on lapping the regulator against its face and see if I can get a better seal. its possible that I have a leak from the valve chest to exhaust I’ve used gasket and liquid gasket so I’d be surprise, hopefully the work on the regulator will solve the leak. other than taking the engine apart no real step forward, however I do have more pipe coming to plumb in the globe valve to injector. that will be the plumbing sorted after that’s done, and next air test will be due. updates soon... |
| derek blake | 21/11/2019 20:57:16 |
| 586 forum posts 151 photos | So I was unsure if I had sealed the exhaust blanking plug well enough so to make sure I was OK, I removed the cylinder this week. i was scared to death it would cause issues but I was lucky and it removed well, while it was off I replaced the three bronze studs and changed them for stainless as per the other fixings. blanking plug was hard to remove so I think it was actually ok, but I added new steam seal loctite and covered the hole with Jb weld just to be 100% sure. cylinder refitted this evening, what I’m struggling with is the oil lubricator the pipe as per drawing is tiny so is this the correct pipe? I’m also struggling to make the fixings as well as actually getting the oil to enter the cylinder. i think it’s to do with the ball and spring which maybe too strong, so I’m going to have to start fresh and make a new parts and try again. has anyone any info on pipe size or how to make the fixings for these pipe ends as I’m assuming you can’t buy bits that small. i appreciate explaining in a message is difficult so no problem if no comeback on the questions, weekend work involves finishing pipe for the steam valve to injector which I’ve positioned next to the pump. i couldn’t find the correct size valve for pipe so this position should be fine for now, it’s not to drawing of course but I’m more for making a working engine over a 100% to real engine model. as I become more skilled I hope to make these valves in the future.... |
| derek blake | 22/11/2019 21:33:58 |
| 586 forum posts 151 photos | I’m not sure if I have readers of this thread but I will update anyway. so I fixed cylinder back on tonight with new sealant all went ok until one bolt stripped I didn’t seem to even get to tight and it stripped. not completely stripped as bolt still threaded in but wouldn’t tighten, this was in the middle of a row of 6 so I do think there is plenty of fixing force. so instead of panicking like I have before I decided there wasn’t much I could do so I added some 542 thread lock to the stud and once it set the nut tightened down a turn or two so hopefully this will work. unfortunately this boiler has been a pain from the beginning and the fixings along with it but we shall see how things are if I ever get a fire inside. after this fiasco I worked on the plumbing again and have pretty much finished the injector, so other than get the water pump setup on the eccentric and fully working I think it’s close to sealing every steam joint and trying again on air. i will add some pictures in due course for anyone who maybe interested. Derek
|
| Paul Kemp | 23/11/2019 00:46:04 |
| 798 forum posts 27 photos | Derek, Been watching but not logged in much to reply! On your horns I can't think of an easy way of correcting the stay holes, there are ways of doing it including welding them up and re-drilling but that is likely to introduce distortion. You could machine up stepped bushes and counterbore the plates to suit but again will be time consuming and won't be invisible to close examination so unless anyone else has any bright ideas for a simple fix I think you are stuck with what you have unless you want to make a new pair. Hindsight being a wonderful thing there was another way to mark those holes for drilling using a threaded point screwed into each hole in turn and a whack with a hammer to transfer the mark. Careful measurement for the first hole, secure with the first bolt and a dummy crank and axle to get the alignment with your screwed point in one stay, whack with hammer to transfer a mark, remove plate, centre punch mark proper and then drill, refit for the next ad finitum till you have them all! The way I did my half size was mount the boiler up on the horizontal borer, locate spindle over centre of stay, clamp the plate on lined up with the dummy crank and axle, drill the hole tapping size, remove plate and open hole to clearance, refit with the bolt having centred up to the next stay and repeat .......... Took me about 4hrs a plate but they were all in the right place bang on the centre of the stays. Injector plumbing looks fine. Small lubricators well made are usually capable of producing quite high pressures when dead headed so I doubt the spring is too strong. NRV's are a bugger to seal usually so I doubt that is your problem either they are more likely to leak back than block the flow altogether. Start at the lubricator making sure that delivers oil at its outlet (remember steam oil is thick, thin oil in the lubricator may not give the best performance!). If you have oil at the lubricator outlet, put the pipe on it without the valve and see you have oil through the pipe, then connect the valve and confirm it passes the valve. The most likely cause is the pipe blocked by silver solder when you have soldered the fittings, easy done with small bore pipe! Can you not tap that stripped thread out to 5ba and fit a stepped stud? Would be more secure, will hurt if it blows out! Sounds like you have eliminated any potential leaks under the block now so you will need to make sure the regulator seals next. Overall from the pictures it looks like you have made a cracking job of the engine generally, that boiler cladding is excellent. It will be quite a buzz when you get it lit up for the first time! All the best, Paul. |
| derek blake | 23/11/2019 09:49:23 |
| 586 forum posts 151 photos | Hi Paul thankyou for your reply, the stud that stripped is a 4BA and it did still thread in so I’m hoping with the thread lock it would stop put. the only other way to fix would be to step up size again and that would be 3ba so I’m not sure if that’s possible? For now I think it’s tight enough. i really hate this boiler with how many issues it’s given me with the strengthening plate being in the wrong position etc, anyway thank you I’m pleased with how the engine looks externally. the cladding definitely helps with the appearance, I’m going to finish the pipe work today and upload some picture tonight. as for the lubricator, I think the pipe for the oil is 1/16 which has a tiny tiny bore is this correct? It’s so small I didn’t think this was the correct size pipe. if the clack valve under the dummy lubricator wasn’t working would this allow steam out and maybe even blow the pipe off? Derek |
| derek blake | 23/11/2019 15:43:23 |
| 586 forum posts 151 photos | Small update, I’ve made a new dummy lubricator with 3/16 x 40 fixing for pipe. i made a 5BA to 3/16x 40 adapter the other end for the lubricator itself as seen in the attached picture, oil pumps into the valve chest so I’m pleased with the result. admittedly not 100% to drawing but it work oil wise, hopefully the ball will work and no steam come up the other direction. |
| Paul Kemp | 24/11/2019 21:21:52 |
| 798 forum posts 27 photos | Derek, Glad you got it sorted. Paul. |
| derek blake | 24/11/2019 21:31:30 |
| 586 forum posts 151 photos | Cheers Paul. |
| derek blake | 25/11/2019 22:32:31 |
| 586 forum posts 151 photos | Small bit of info required if possible please, within the recess for the regulator on the drawing is a slight relief at the front and rear of the surface, one end 1/4 and the other 1/8 mine doesn’t have this added, what is this relief for and will the fact mine is one long smooth surface cause me problems. thanks in advance. |
| derek blake | 22/12/2019 21:03:10 |
| 586 forum posts 151 photos | Hi All ive been doing some bits to the engine but no new pictures yet but there will be soon for anyone who maybe interested. one question I do have is sourcing the bevel gears for the Pickering governor, has anyone purchased these and know of a supplier, I’m going to keep an eye on eBay just in case as I need the pulley wheels as well but these I maybe able to make. Derek |
| derek blake | 23/12/2019 20:28:16 |
| 586 forum posts 151 photos |
still trying to source the correct size bevel gears but struggling.
|
| derek blake | 24/12/2019 15:05:32 |
| 586 forum posts 151 photos | New YouTube video added, under “Second Allchin air test” Merry Christmas |
| John Baguley | 24/12/2019 16:24:59 |
 517 forum posts 57 photos | Derek, RS sell some small steel bevel gears that you might be able to adapt: The drawings call for 0.5" DP and these are 12.8mm. You would have to sleeve the bore to fit the shafts and probably shorten the boss as well. Might be worth a try if you can't find any suitable ones elsewhere. I presume that Reeves used to sell them in the past? The governor that I built came with the gears so I don't know where they came from. John |


Please login to post a reply.
Magazine Locator
Want the latest issue of Model Engineer or Model Engineers' Workshop? Use our magazine locator links to find your nearest stockist!
Sign up to our Newsletter
Sign up to our newsletter and get a free digital issue.
You can unsubscribe at anytime. View our privacy policy at www.mortons.co.uk/privacy
Latest Forum Posts
- hemingway ball turner
04/07/2025 14:40:26 - *Oct 2023: FORUM MIGRATION TIMELINE*
05/10/2023 07:57:11 - Making ER11 collet chuck
05/10/2023 07:56:24 - What did you do today? 2023
05/10/2023 07:25:01 - Orrery
05/10/2023 06:00:41 - Wera hand-tools
05/10/2023 05:47:07 - New member
05/10/2023 04:40:11 - Problems with external pot on at1 vfd
05/10/2023 00:06:32 - Drain plug
04/10/2023 23:36:17 - digi phase converter for 10 machines.....
04/10/2023 23:13:48 - More Latest Posts...
- View All Topics
Support Our Partners


Shopping Partners
Subscription Offer

Latest "For Sale" Ads
- Reeves** - Rebuilt Royal Scot by Martin Evans
by John Broughton
£300.00 - BRITANNIA 5" GAUGE James Perrier
by Jon Seabright 1
£2,500.00 - Drill Grinder - for restoration
by Nigel Graham 2
£0.00 - WARCO WM18 MILLING MACHINE
by Alex Chudley
£1,200.00 - MYFORD SUPER 7 LATHE
by Alex Chudley
£2,000.00 - More "For Sale" Ads...
Latest "Wanted" Ads
- D1-3 backplate
by Michael Horley
Price Not Specified - fixed steady for a Colchester bantam mark1 800
by George Jervis
Price Not Specified - lbsc pansy
by JACK SIDEBOTHAM
Price Not Specified - Pratt Burnerd multifit chuck key.
by Tim Riome
Price Not Specified - BANDSAW BLADE WELDER
by HUGH
Price Not Specified - More "Wanted" Ads...
Get In Touch!
Do you want to contact the Model Engineer and Model Engineers' Workshop team?
You can contact us by phone, mail or email about the magazines including becoming a contributor, submitting reader's letters or making queries about articles. You can also get in touch about this website, advertising or other general issues.
Click THIS LINK for full contact details.
For subscription issues please see THIS LINK.
Digital Back Issues


Donate

 Register
 Log-in
Model Engineer Magazine
- Percival Marshall
- M.E. History
- LittleLEC
- M.E. Clock

ME Workshop
- An Adcock
- & Shipley
- Horizontal
- Mill

Subscribe Now
- Great savings
- Delivered to your door

Pre-order your copy!
- Delivered to your doorstep!
- Free UK delivery!
All Forum Topics > Traction engines > Part built Allchin 1.5 inch