Forum sponsored by:

Colchester Student Mk1 Won't Start
| Herman van der Merwe | 16/05/2020 21:05:16 |
 180 forum posts | Notice the wood bits left over on my last photo. I used three hard wood wedges. Came of easily. In your case, you need heat and patience. |
| Richard Kirkman 1 | 17/05/2020 13:39:46 |
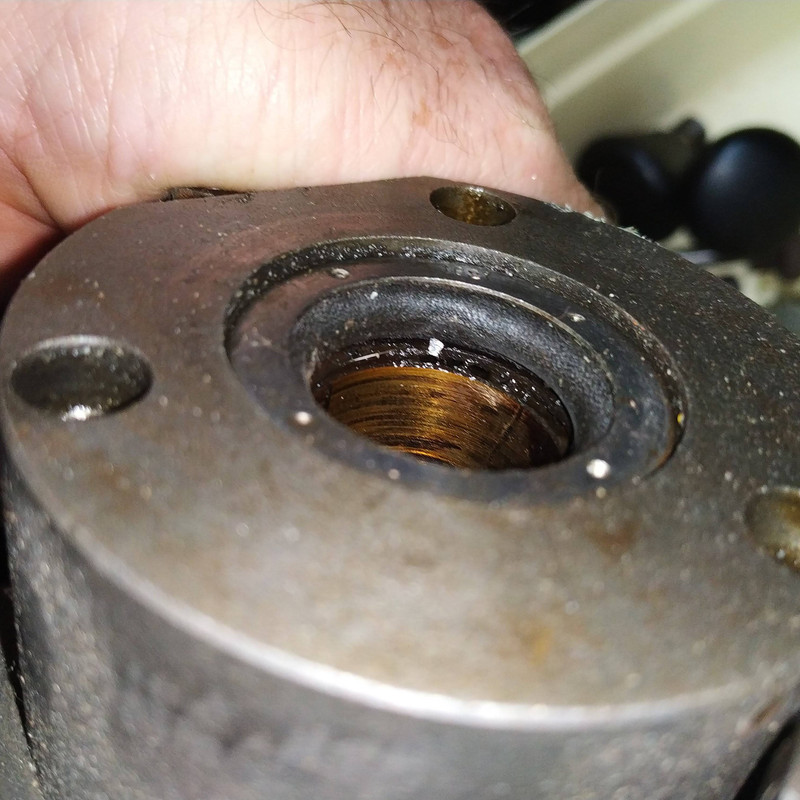
| 334 forum posts 799 photos | We have success! Heated with a heat gun till it was almost too hot to comfortably hold, then just gave it a little pull and it went pop! Very easy. Unfortunately, as I pulled a little further, the inevitable happened, oil gushed out of the hole. So I quickly plugged it back in and drained the headstock. Not something I wanted to do for this, but necessary. The smell is back, so that must be the smell of the gasket cement. Definitely recognizable for the future. I even found the original gasket in there too. It was stuck on very well so I had to use a box cutter blade to slowly get it off, but now I have a template for the next one. So, onto the main problem. The leaking seal. It has a set of numbers on it, but I can't seem to get it out easily.
The seal looks pretty shot. Looks like a leather one like the other one I replaced, but thicker.
I'll get the numbers from the seal |
| Richard Kirkman 1 | 17/05/2020 13:55:10 |
| 334 forum posts 799 photos | Will a replacement be something like this |
| Herman van der Merwe | 17/05/2020 14:27:52 |
180 forum posts | Posted by Richard Kirkman 1 on 17/05/2020 13:55:10:
Will a replacement be something like this Nothing like a bit of heat to make a plan work! Well done I would recommend you go that route. Take the ID of the hole it fits into (in other words the OD of the seal) then the OD of the shaft it fits over and then the depth of the recess it fits in (in other words the thickness of the seal) then use the Timken oil seal selector to find what you need. You might have to look at the various types of seals listed as the D-d difference is quite a small value. Edited By Herman van der Merwe on 17/05/2020 14:29:45 |
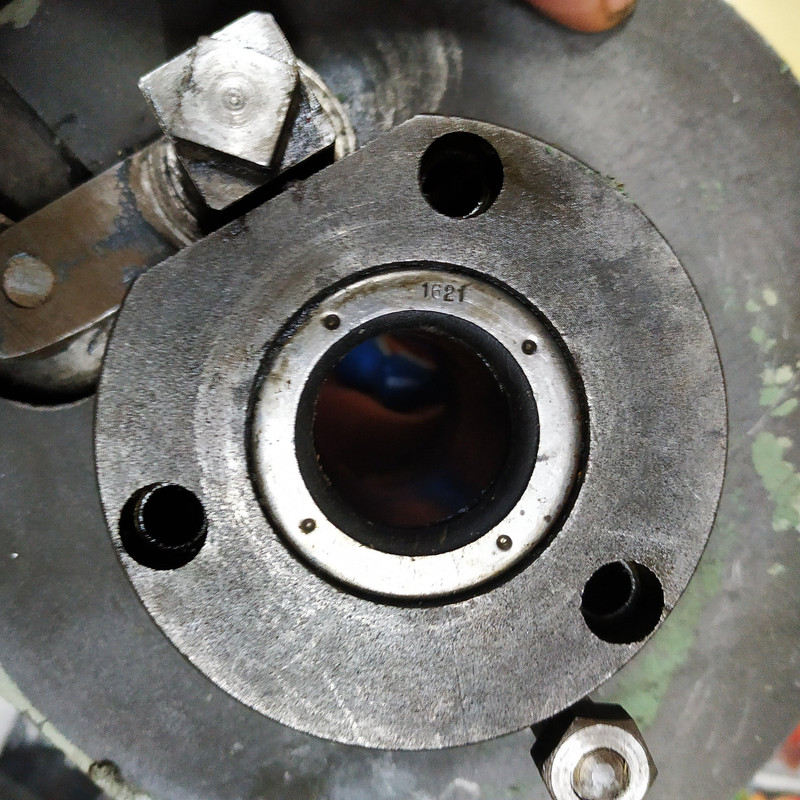
| Herman van der Merwe | 17/05/2020 15:23:50 |
180 forum posts | For reference and possible assistance here are two photos of the seal in my lathe. It has the number 1621 stamped on it.
|
| Richard Kirkman 1 | 17/05/2020 15:58:17 |
| 334 forum posts 799 photos | Thanks Herman, very useful, I'll go for a seal like that. I got the numbers from the old seal, 16210037. I'll just find a new one with the measurements I took
Anyway. I started by trying to use a socket to push it out from the inside. This didn't work well as it just pushed out the leather and messed it up. Not a good start.
Immediately that stumped me as I couldn't get any grip on it any way or tap it out from the inside as it wasnt working. Too tight in there. So I resorted to using my rotary tool to cut away one section of the seal to release the pressure and allow it to come out
This worked quite well but I went a little too deep and took a lttle out of the bore, but that shouldn't make a difference really.
Then I measured
So we have OD=1625 1 5/8ths ID=1000 1 inch T=a bit more than 350, probably 3/8ths So, I'll find a standard size closest to that 1 5/8x1 5/8x3/8 Question is, do I want double lip or single lip? And whats the difference |
| Richard Kirkman 1 | 17/05/2020 18:21:18 |
| 334 forum posts 799 photos | That seal I linked to has almost exactly the same number as the old seal, just one more zero. Maybe I misread it. I've remade the gasket and it fits perfectly. Undersized holes in the gasket to make it stick to the bolts and be easier to install
Then I was playing in the headstock just moving the gear selector back and forth. I noticed it wouldn't move all the way. Turns out one of the bolts had come very loose! Very bad news. I must have not done them up tight enough when I put them back in. I've tightened them all very tight now, but its worried me quite a bit.
My dad and I bought an old non working ransomes mower(Ransomes 24" Mk8A) to restore together, £60 and local so it was a steal. It's from the 1930s but I don't know anything really about lawnmowers. My Dad wants to get it working, but I'd like to completely dissect it and make sure it's working perfectly so I can learn too. I might have to start a new thread for that. Also, the paint on the traveling steady was just not going hard at all, even after putting it in the oven a little overnight with the heat leftover from cooking, It could still be taken off with a fingernail. So I've stripped it and reprimed it. This time I put a very very thin coat on, and it seems to have dried. It needs another coat of primer as i sanded it back, but then it will be ready to paint. I found a cheap paint sprayer, so I'm going to try to use that to paint the steady as a test and then hopefully the lawnmower too. I'm also going to get dove grey paint to match the lathe as I've changed my mind about painting it all red.
Edited By Richard Kirkman 1 on 17/05/2020 18:25:57 |
| Herman van der Merwe | 17/05/2020 21:52:43 |
180 forum posts | You will have to get some RTV silicone gasket maker and fill the new cut and then hammer the seal in while the silicon is still wet. Next time use a oil seal removing tool or an old tack nail remover. Go for the double lip seal. One lip keeps the oil in and the other keeps the external grime out and away from the internal seal. When you install the seal do not smear the silicone around the circumference of the seal. Get some glycerine and smear the oil seal and then use a socket that just fits into the "hole" where the seal must go. You want to hit the seal on the lip that forms the OD of the seal. Anything less in diameter and you are going to bent the flat surface of the seal, destroying it. If you do not have such a socket, you will need to take a wood dowel and carefully punch around and around and around the circumference of the seal until it is seated. Seated is when it is about a hair's breath lower than the housing's flat external face surface. In addition oil the shaft very well before sliding the seal on. Otherwise the edge of the oil lip will bent over and will not seal.
|
| Richard Kirkman 1 | 17/05/2020 22:40:45 |
| 334 forum posts 799 photos | I've ordered the Double lip I'll put a bit of epoxy in the cut, but I really don't think it'll make a difference. The cut isn't bad at all, so I think it'll be fine. I'll make sure to use a socket to seat it The seal should be here soon enough, probably before the lightbulb! Herman, sorry to hear about your drill bit shear pin. Not a great thing to find. Edited By Richard Kirkman 1 on 17/05/2020 22:51:57 |
| Herman van der Merwe | 18/05/2020 08:50:06 |
180 forum posts | Posted by Richard Kirkman 1 on 17/05/2020 22:40:45:
I'll put a bit of epoxy in the cut, but I really don't think it'll make a difference. The cut isn't bad at all, so I think it'll be fine. I'll make sure to use a socket to seat it You will be surprised what a bit of temp rise can do to air pressure inside the headstock. It will push out oil anywhere. I would not go the epoxy route as this means you need to let it dry and shape it before inserting the seal. If you insert the seal while the epoxy is wet, it will spread anywhere unseen and could change the stiffness of the lips ensuring a bad seal. I have used RTV silicon on many such damaged seats and it really works well. Yeah, shear pin should be aluminium on these lathes AFAIK. |
| Herman van der Merwe | 18/05/2020 08:55:13 |
180 forum posts | Posted by Richard Kirkman 1 on 17/05/2020 18:21:18: Turns out one of the bolts had come very loose! Very bad news. I must have not done them up tight enough when I put them back in. I've tightened them all very tight now, but its worried me quite a bit. I would recommend you undo these again and use Locktite on the threads. Just get the correct number Locktite that can work in oil submerged conditions. Torque it to wet conditons specifications for mild steel bolts of the cap screw diameter. Your weakest material here is the gear with material strength which should be in the range of mild steel. You are doing engineering studies so you should know about material strengths by now! Tip, after you have opened the Locktite bottle, stick a metal head sewing pin in the hole before you screw the cap shut. It seals the opening and your expensive Locktite stays good for a long time! Edited By Herman van der Merwe on 18/05/2020 08:55:46 |
| Herman van der Merwe | 19/05/2020 07:58:23 |
180 forum posts | Sorry @Richard but I aneed to hijack your thread a tiny bit! @Phil can you please tell me what paint you used to paint your lathe green? I was referred to this paint, but that is not available in South Africa, so I have asked my paint specialist to find something similar. He asked if it is possible to give me the paint code? If you do not have the code readily available can you install an app on your smart phone and just scan the colour and post the colour code? Secondly @Phil, please let me know what the colours are for the indented numbers on the index dials on the carriage? Some are red and some are black I know, but I have no record as to what each should look like. I hope you did restore this as well! Thanks @Richard, I think you will also need this info in the future. |
| Richard Kirkman 1 | 19/05/2020 11:57:29 |
| 334 forum posts 799 photos | Hijack away, All the info you need is helpful and interesting to me too! Although I've encountered more problems I'm planning to leave my index dials just as they are, no colour, as I can read them just fine. I'm not a fan of the Colchester green, So I'll be painting mine Colchester dove grey, but not from the paragon paints, that stuffs expensive. I found a code for dove grey BS381 694 which looks right but obviously it doesn't say Colchester. I'll probably use tractol stuff or tekaloid, I still need to decide, but I don't know the pros or cons of each. So we'll see. Need to find out soon as I need to paint my traveling steady and inevitably a lawn mower
Phil, how many liters of paint did you use for your full lathe? The second lightbulb arrived today, first one is definitely never showing up. So I went out and plugged it in and tried it. Nothing happened, no light, no flicker. How can I start to troubleshoot it? Wiring all seems right, but i'm getting nothing. It's a very cool little bulb with lots of LEDS Still waiting on the oil seal, and I've ordered some loctite for the gear. Also, I bought some steel from my local place yesterday. I'm looking forward to turning some bigger chunks. I found that only turning 1 inch or less steel, I didn't really have high enough speeds to get the correct sfpm for a great surface finish. Anyway, I made sure to get 10x50x300mm flat bar so I can make myself a ring spanner for the tailstock as I'm sick of having to keep putting a spanner on it. The lathe should have had a spanner to begin with, but mine didn't arrive with one. |
| Richard Kirkman 1 | 19/05/2020 11:59:10 |
| 334 forum posts 799 photos |
|
| Phil Whitley | 19/05/2020 12:29:14 |
 1533 forum posts 147 photos | Herman, I did use the Paragon paints colchester green, it is a bit pricy, but very good quality, it is thinned with naptha, not white spirit, and I believe this gives it better oil resistance. I used slightly less than one litre on my lathe, but I was spraying over a primed and denibbed surface, you use a lot less top coat that way, I also used the paragon thinners. Richard, start at the back of the lampholder, and see if you have a voltage there, then follow back to the led power supply. Put a 13a plug on the led supply and see if that works, I think by then you will have found the fault. also check the bulb with a power supply to check it is ok. if you have voltage at the lampholder, check that both pins are free on their springs and can be compressed and pop out again. Phil |
| Herman van der Merwe | 19/05/2020 12:48:10 |
180 forum posts |
Posted by Phil Whitley on 19/05/2020 12:29:14:
Herman, I did use the Paragon paints colchester green Would you mind scanning the paint and get the code to me? You can use PointPaint if you have an iPhone or Color Grab for Android. @Phil what primer did you use? White or grey colour? @Richard, as @Phil said start tracing at the output of the transformer up to the two pins in the holder. Also check that the switch is working! |
| Howard Lewis | 19/05/2020 13:36:36 |
| 7227 forum posts 21 photos | I'd be a bit wary of sealing the Loctite bottle! It is an anaerobic, so shutting off from oxygen is likely to cause it to cure. Probably better to leave the cap loose so that it doesn't seal. I have bottles which are never sealed tight, and are still useable, and effective, YEARS after their "expiry" date. Not the official recommendation, but I believe that a Loctite engineer once said that as long as it was liquid, it was useable. Howard |
| Herman van der Merwe | 19/05/2020 14:27:33 |
180 forum posts | Posted by Howard Lewis on 19/05/2020 13:36:36:
I'd be a bit wary of sealing the Loctite bottle! It is an anaerobic, so shutting off from oxygen is likely to cause it to cure. Probably better to leave the cap loose so that it doesn't seal. I have bottles which are never sealed tight, and are still useable, and effective, YEARS after their "expiry" date. Not the official recommendation, but I believe that a Loctite engineer once said that as long as it was liquid, it was useable. Howard You are correct Howard, but then your little bottle of Loctite has never fallen over and the liquid running into the thread of the cap. Once the thread is sealed, good luck with opening the cap. The pin creates a seal at the top, so that no liquid gets into the cap threads. There is more than enough oxygen in the bottle itself to keep it liquid. Just a tip from a Loctite engineer I have been using for more than 35 years ... It seems LOCTITE® 222 is what you are after. |
| Richard Kirkman 1 | 19/05/2020 14:31:06 |
| 334 forum posts 799 photos | Thanks Howard We finally have light!!!!!!!!!!! It's taken a couple of months but we're finally there So, I started by taking the light out and checking continuity for everything
Then I went in the cabinet and checked there. Everything had continuity and was working. Absolutely no idea what goes on or really how to check voltage. So, I put a plug onto the 240v to 12v transformer
Then I plugged it in and nothing. Absolutely nothing. So, I put the multimeter to volts or something and started prodding things. It should have only been 12v so i wasn't too worried, but I was still careful. Then I was just playing around. I looked up and it was on. No idea what I did, if anything at all. It was running from the plug, which was great. Then I took the plug off and put everything back together. Low and behold, it still worked. Not a clue what I did or what happened, but it's now working.
Light off
Light on
It just adds that bit extra lighting. Was it a lot of effort? Yes. Was it expensive for a light? Yes. But is it exactly what I wanted? Definitely as it fills the hole and remains contained in the lathe. The lamp seems to be very good and holds in place where I put it, unlike the lamp I have on my wood lathe. Phil, Thank you once again. Do you want the other two contactors that I have, the 240v one and the Normally Closed 415v one? When I post you the gasket stuff, I can send them too? I haven't been using the chuck guard at all, I find it just gets in the way. However, I think that could be a good mount for a DRO eventually
|
| Herman van der Merwe | 19/05/2020 15:33:18 |
180 forum posts | Good news. Most likely you screwed the screw of the termination block onto the sheathing of a wire and it did not touch the wire. When you did the plug thing and you screwed the wires back in, it then contacted the wire. Presto - current flows! |


Please login to post a reply.
Magazine Locator
Want the latest issue of Model Engineer or Model Engineers' Workshop? Use our magazine locator links to find your nearest stockist!
Sign up to our Newsletter
Sign up to our newsletter and get a free digital issue.
You can unsubscribe at anytime. View our privacy policy at www.mortons.co.uk/privacy
Latest Forum Posts
- hemingway ball turner
04/07/2025 14:40:26 - *Oct 2023: FORUM MIGRATION TIMELINE*
05/10/2023 07:57:11 - Making ER11 collet chuck
05/10/2023 07:56:24 - What did you do today? 2023
05/10/2023 07:25:01 - Orrery
05/10/2023 06:00:41 - Wera hand-tools
05/10/2023 05:47:07 - New member
05/10/2023 04:40:11 - Problems with external pot on at1 vfd
05/10/2023 00:06:32 - Drain plug
04/10/2023 23:36:17 - digi phase converter for 10 machines.....
04/10/2023 23:13:48 - More Latest Posts...
- View All Topics
Support Our Partners


Shopping Partners
Subscription Offer

Latest "For Sale" Ads
- Reeves** - Rebuilt Royal Scot by Martin Evans
by John Broughton
£300.00 - BRITANNIA 5" GAUGE James Perrier
by Jon Seabright 1
£2,500.00 - Drill Grinder - for restoration
by Nigel Graham 2
£0.00 - WARCO WM18 MILLING MACHINE
by Alex Chudley
£1,200.00 - MYFORD SUPER 7 LATHE
by Alex Chudley
£2,000.00 - More "For Sale" Ads...
Latest "Wanted" Ads
- D1-3 backplate
by Michael Horley
Price Not Specified - fixed steady for a Colchester bantam mark1 800
by George Jervis
Price Not Specified - lbsc pansy
by JACK SIDEBOTHAM
Price Not Specified - Pratt Burnerd multifit chuck key.
by Tim Riome
Price Not Specified - BANDSAW BLADE WELDER
by HUGH
Price Not Specified - More "Wanted" Ads...
Get In Touch!
Do you want to contact the Model Engineer and Model Engineers' Workshop team?
You can contact us by phone, mail or email about the magazines including becoming a contributor, submitting reader's letters or making queries about articles. You can also get in touch about this website, advertising or other general issues.
Click THIS LINK for full contact details.
For subscription issues please see THIS LINK.
Digital Back Issues


Donate

 Register
 Log-in
Model Engineer Magazine
- Percival Marshall
- M.E. History
- LittleLEC
- M.E. Clock

ME Workshop
- An Adcock
- & Shipley
- Horizontal
- Mill

Subscribe Now
- Great savings
- Delivered to your door

Pre-order your copy!
- Delivered to your doorstep!
- Free UK delivery!
All Forum Topics > Help and Assistance! (Offered or Wanted) > Colchester Student Mk1 Won't Start