Member postings for Andrew Johnston
Here is a list of all the postings Andrew Johnston has made in our forums. Click on a thread name to jump to the thread.
| Thread: Old School Drawing Exercises and 2D CAD |
| 01/07/2020 12:17:23 |
Good grief, SoD must be really bored! Andrew |
| Thread: Mill unexpectedly cutting crooked |
| 29/06/2020 22:56:03 |
Posted by blowlamp on 29/06/2020 22:14:32:
It sounds like the workpiece is lifting as it's being cut......... I wondered about that too, or if the work was being curved upwards due to pressure from the vice. But the OP states he had the same effect on a 40x6 part, so presumably not? Andrew |
| 29/06/2020 21:35:42 |
Well, that's an interesting conundrum. Never come across it on any of my milling machines. Tool deflection does happen, but it's small, especially with the light cuts being taken. And, as the OP says, tool deflection would cause the bottom of the work to stick out, not vice versa. Feeds and speeds don't seem unreasonable, although we don't know if the cutter is HSS or carbide. If the cut is unstable then it should generate noise/vibration - did it? Where's SoD with his vibration monitor when you need him? Andrew |
| Thread: Copper boiler plate flanging, or not? |
| 29/06/2020 14:28:03 |
Posted by SillyOldDuffer on 29/06/2020 12:52:30:
'Wire drawing' covers accidental throttling which can be considerable and is well worth reducing as much as possible.
Not necessarily. Wire drawing occurs when steam is throttled and the input and output velocities are similar. This means that the expansion is isenthalpic, ie, enathalpy stays constant although the pressure drops. Since the pressure has dropped but the enthalpy stays the same the output steam is drier, or even becomes superheated. That may be an advantage as condensation in the cylinder will be reduced and hence less energy lost due to condensation and re-evaporation. With Stephenson's valve gear, at short cut offs, the input ports are only partially open so wire drawing is almost certain to take place, which may, or may not, be an advantage. Losses due to poor passage design and sharp changes of direction are different. Andrew |
| Thread: fusion 360 cam |
| 29/06/2020 10:31:41 |
I use option 2. Andrew |
| 28/06/2020 22:25:46 |
Posted by Nick Hughes on 28/06/2020 19:57:20:
Using 2 Axis (2D) Facing in AlibreCAM............ That is interesting, you learn something every day; thanks very much. It works fine in my old version of VisualMill: I had in mind that using a facing operation with bosses would overcut the boss; but obviously that's not the case. I think it arose from my experiments with pockets that are open on one side. Pocketing doesn't properly finish the corners that meet the open edge. But facing overcuts the three sides that are not open. I'd better go back and do some tests. Andrew |
| 28/06/2020 11:07:33 |
Posted by JasonB on 28/06/2020 07:27:51:
Andrew, I wonder if it is because you are selecting two boundries and not a surface? F360 won't do it if I select the outer edge and edge of the circle. Definitely selecting a surface and the selection is called a FlatArea. But the system still highlights boundaries, so may not be really selecting a surface. Same result on a much newer demo version. Looks like it's a limitation of my CAM. Andrew |
| 27/06/2020 20:17:12 |
Pocketing doesn't work in my CAM software, which is why I didn't suggest it: It sort of does what is sensible, ie, keeps within the outer boundary and outside of the inner boundary, even if it isn't what is wanted. Presumably Fusion360 has extra knowledge of the part geometry and knows it can go outside the outer boundary? Andrew |
| 27/06/2020 13:13:17 |
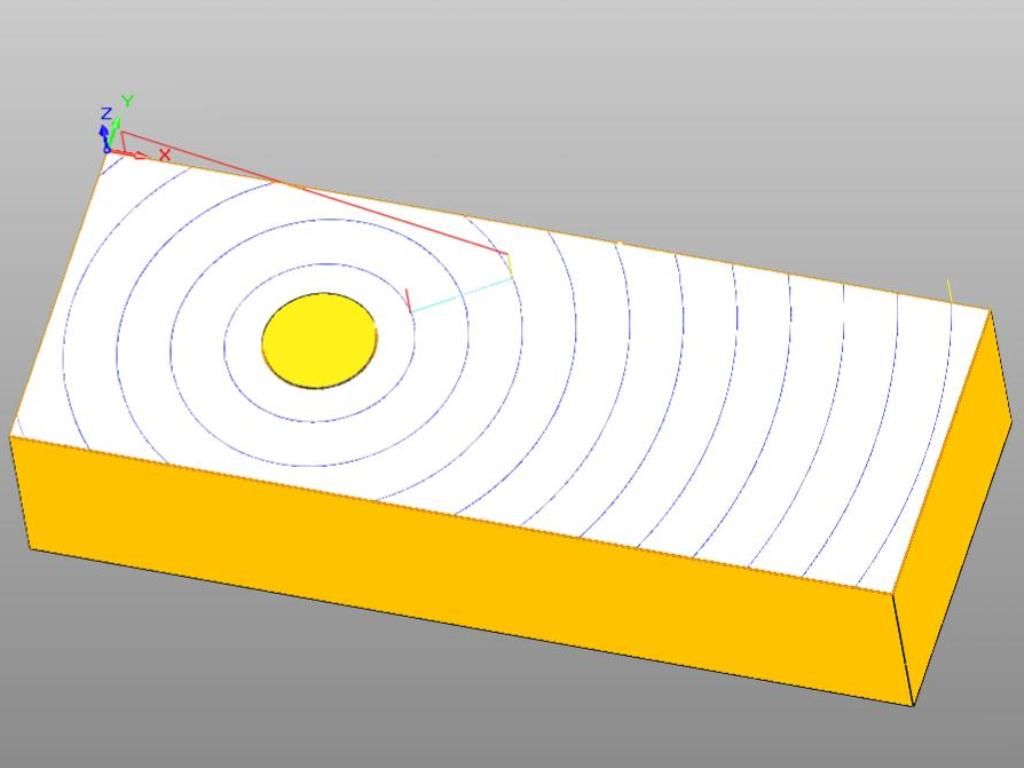
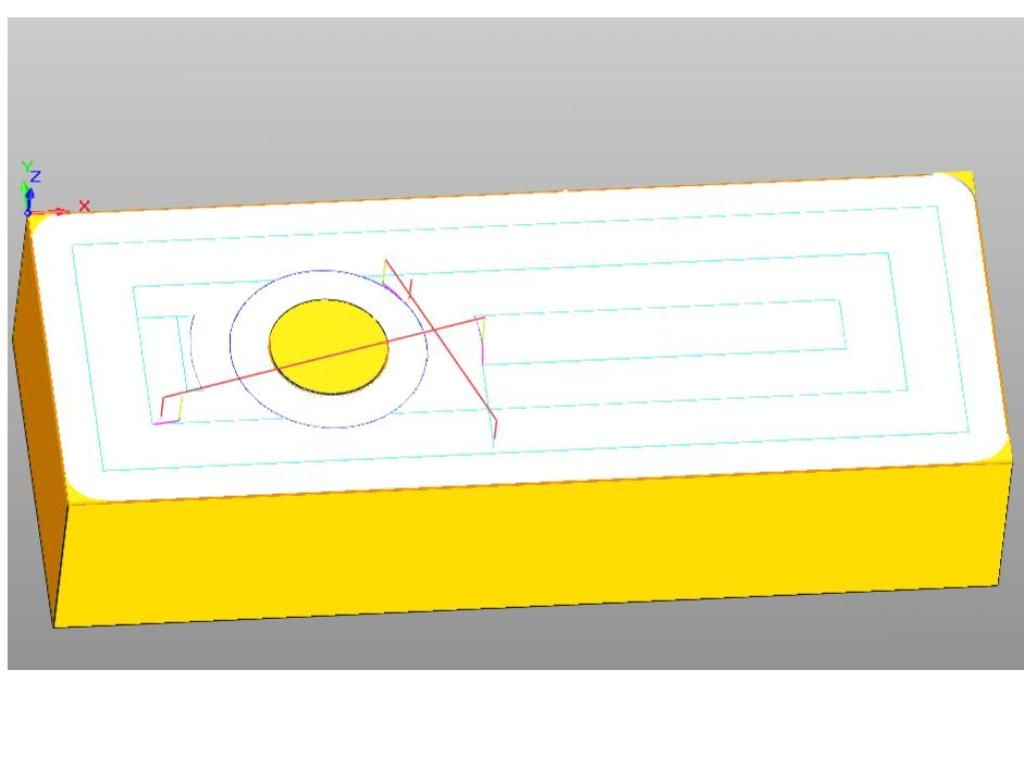
It's one of those seemingly simple jobs which are a PITA. If you trying facing the system will machine the outside perimeter with no problem but will overcut the boss. Conversely if you profile between the boss and outline it won't completely machine the corners of the outline. A simple but very inefficient solution is to profile the boss but have a number of 8mm stepovers such that the whole of the blue area is covered. Alternatively one could create a rectangular outline more than 10mm from the outside of the blue area and profile between the rectangular outline and the boss. Andrew |
| Thread: 2mm endmill help |
| 27/06/2020 08:21:29 |
There seem to be three fundamental issues. Roughly in order of importance: The new cutter shown seems to be poorly ground. The used cutter shown is badly worn with the cutting edges rounded. It would seem that these cutters are simply not up to machining steel. Runout on the collets - it's way bigger than the chip load. So one tooth may not be cutting while the next will be taking double or more the expected cut. So the loads on the cutter are much higher than expected from simply looking at the rpm and feedrate. Varying chip load is also a recipe for vibration and chatter. There is still quite a lot of cutter stick out. even with the shank cut down. One and three could be ameliorated by buying quality cutters intended for cutting steel. Two is more difficult, short of acquiring a different mill. A good clean and check for any small burrs may help. Reducing the stick out of the cutter would also help. Andrew |
| Thread: How does one scale a worm gear? |
| 25/06/2020 22:30:27 |
Posted by Michael Gilligan on 25/06/2020 21:26:20:
Here are some photos that confirm the table has a throated worm-wheel:
It's single enveloping, ie, the worm wheel wraps partly around the worm giving line contact. Double enveloping is where the worm also wraps around the worm wheel. Which means that the thread on the worm is cut on a circular path on a plane which also contains the axis of the worm. Andrew |
| Thread: 2mm endmill help |
| 25/06/2020 20:48:36 |
Posted by old mart on 25/06/2020 14:47:38:
.........I blame the heat, 33.8C at the moment. Man, that's hot. Higher than Heathrow reported today I think. One normally expects airports to be slightly hotter than the surrounding areas due to all the engines pumping out hot gases. But not at the moment. I went down to Stansted yesterday to renew my Civil Aviation Authority medical. Never seen it so quiet. Very few cars and no buses around the terminal building and the long term car park was empty. Andrew |
| Thread: How does one scale a worm gear? |
| 25/06/2020 20:40:41 |
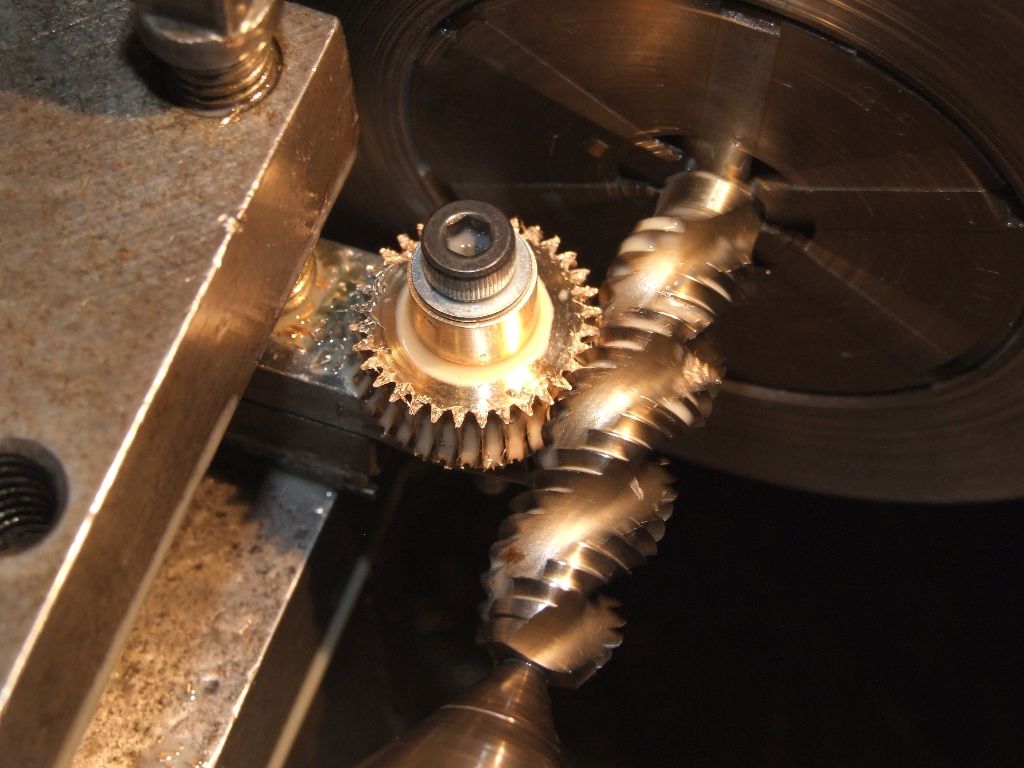
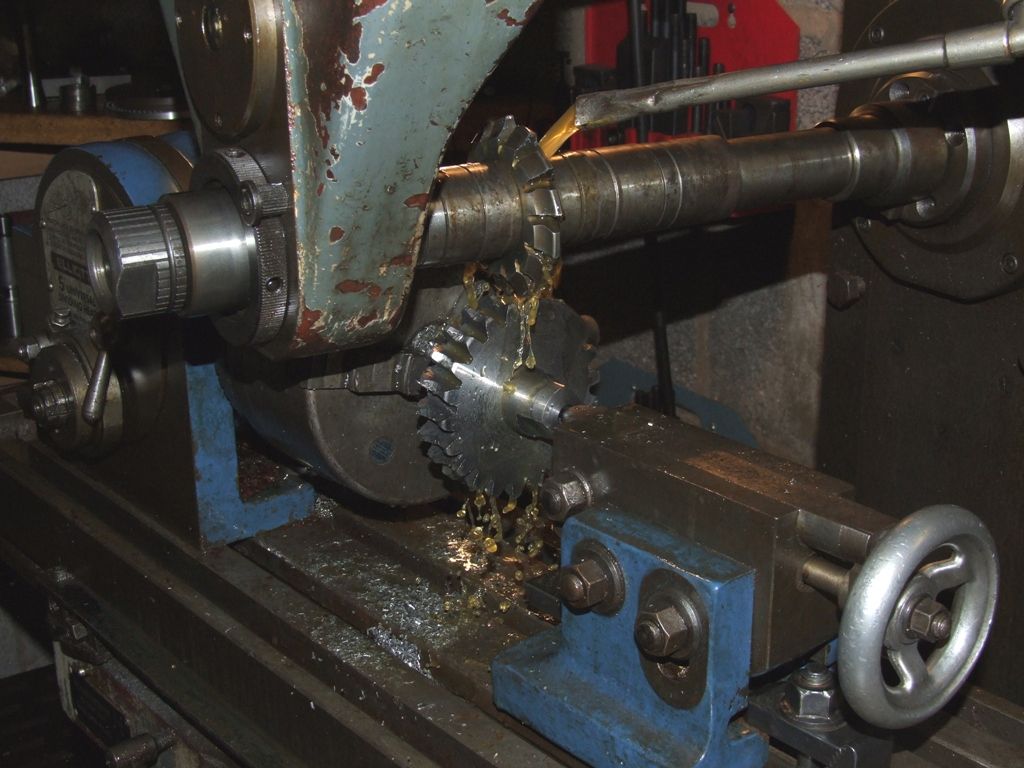
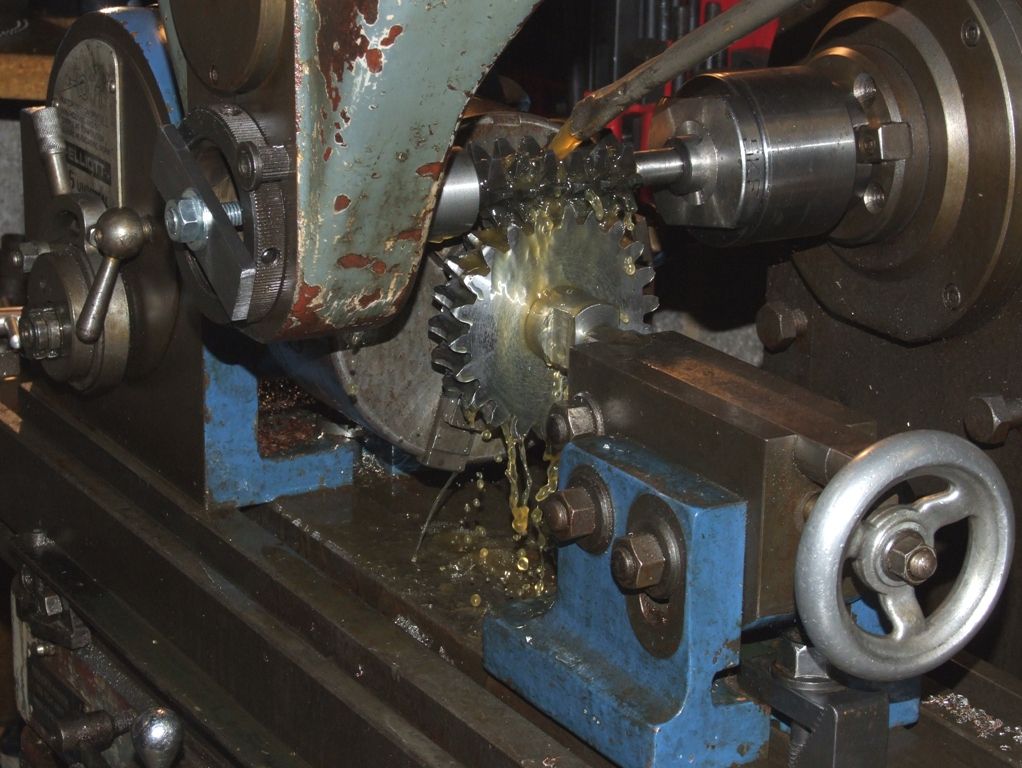
Posted by William S on 25/06/2020 19:01:41: A quick question about hobbing is it always necessary to gash a gear prior to hobbing Assuming free hobbing (hob and blank are not geared together externally) then it depends upon if you need a set number of teeth. One can free hob using a tap and a blank with no gashing: But it's a crap shoot as to how many teeth you end up with; in the case above it didn't matter. If a set number of teeth is important then you need to gash the blank at the helix angle of the worm - - to give the hob something to engage with and drive the embryo worm wheel: The DP of the worm wheel shown was approximately 6.281, although I used a commercial 6DP involute cutter for the gashing. The hob is home made. Andrew |
| Thread: 2mm endmill help |
| 25/06/2020 14:11:09 |
Posted by old mart on 25/06/2020 13:32:14:
A J, your picture shows a 2mm slot drill, but the shank is al least 4mm. A quick visual comparison with the rule in the picture will show that the shank is 3mm. My apologies for not reading the thread sufficiently well to realise that an expert had already expounded. At least crawling back into my cave will be some relief from the heat. Andrew |
| Thread: How does one scale a worm gear? |
| 25/06/2020 10:07:10 |
Posted by William S on 25/06/2020 00:09:16: ......(is DP for worm gears? cant seem to find a definitive answer)...... The basic rule for worms and worm wheels is that anything goes. But it is common to specify the worm wheel in terms of a standard DP or Mod number. The downside is that the tpi/pitch of the worm is then an irrational number. On my lathe one can modify the change gears so that the gearbox will screwcut worms to approximately the correct tpi or pitch for standard DP and Mod values. Andrew |
| Thread: 2mm endmill help |
| 25/06/2020 09:54:08 |
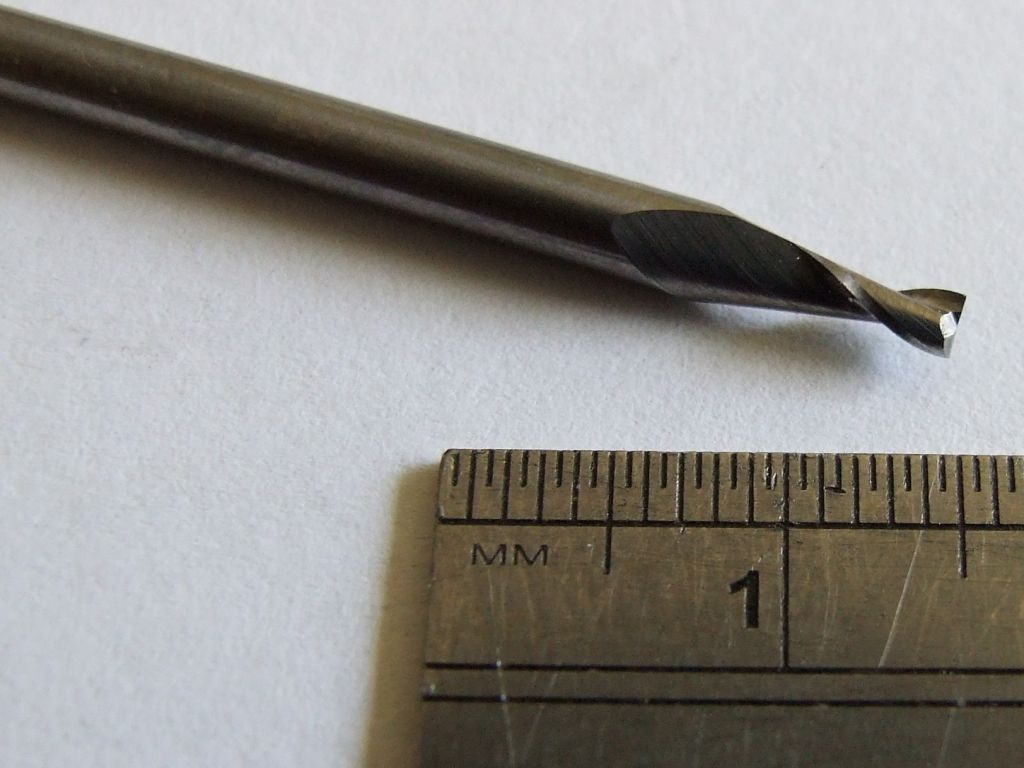
Here's a picture of a 2mm diameter 2-flute uncoated slotdrill: Note that the working length of the cutter is quite short. I'd be running this with the collet closing at the top of the flutes, so less than 10mm stick out. I used this style of cutter to form a series of fins on a liquid cooled heatsink for an experimental high power inverter. The gap between each fin was 2mm and they were 4mm deep. I ran at 4000rpm, full width, 1mm stepdown and 150mm/min feed in 6082 aluminium. Each heatsink had 18 gaps and I machined 8 heatsinks, all with the same cutter. Andrew Andrew |
| 25/06/2020 09:16:43 |
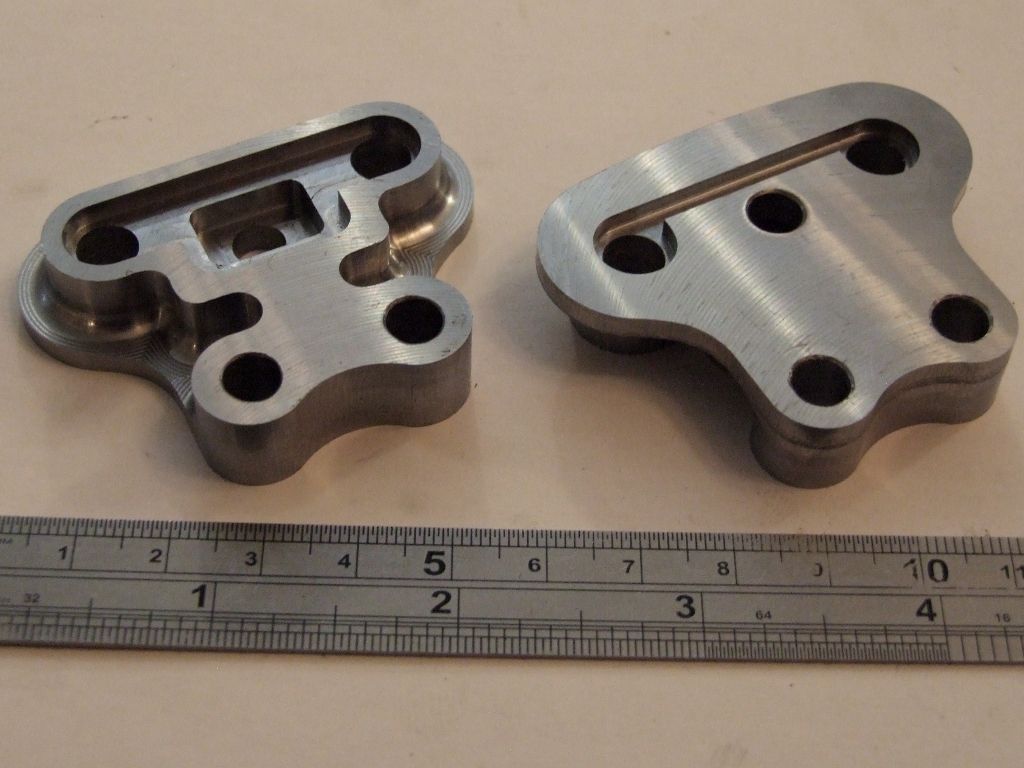
There's no polite way of saying this, but the finish shown is awful. The pocketing on both sides of this steel part was done with a 3mm cutter - no deburring needed: However, the reason that the cutters are snapping is waaaaaaaaay too much stick out of the cutter. Looking at the finish on the flat parts there appears to be chatter, caused by the excessive stick out. In due course I'll take a picture of one of my 2mm cutters for comparison. Andrew |
| 24/06/2020 22:43:51 |
I looked up a previous CAM file using a 2-flute carbide endmill cutting 316 stainless steel on my CNC mill. I was running at 3500rpm, 70mm/min feed and DOC of 0.425mm. Nothing special about the DOC, it just gave an integer number of steps down for the thickness of material. This was done 10 years ago, now I'd be at 5000+rpm and a commensurate increase in feed. With a 3-flute cutter, full width and DOC of 0.4mm in low carbon steel I'd be running at 7800rpm and 100mm/min. All the above is with quality cutters, Guhring and YG. It's a funny thing, but I find that industrial feeds and speeds (from YG) work very well in my home workshop on my hobby CNC mill. Although of course the cutters don't know what machine or environment they're running in. But with the caveat that it only applies to small cutters. I don't have rigidity or horsepower to drive large (>20mm) cutters at their recommended feeds and speeds. Andrew |
| Thread: What Did You Do Today 2020 |
| 22/06/2020 22:08:14 |
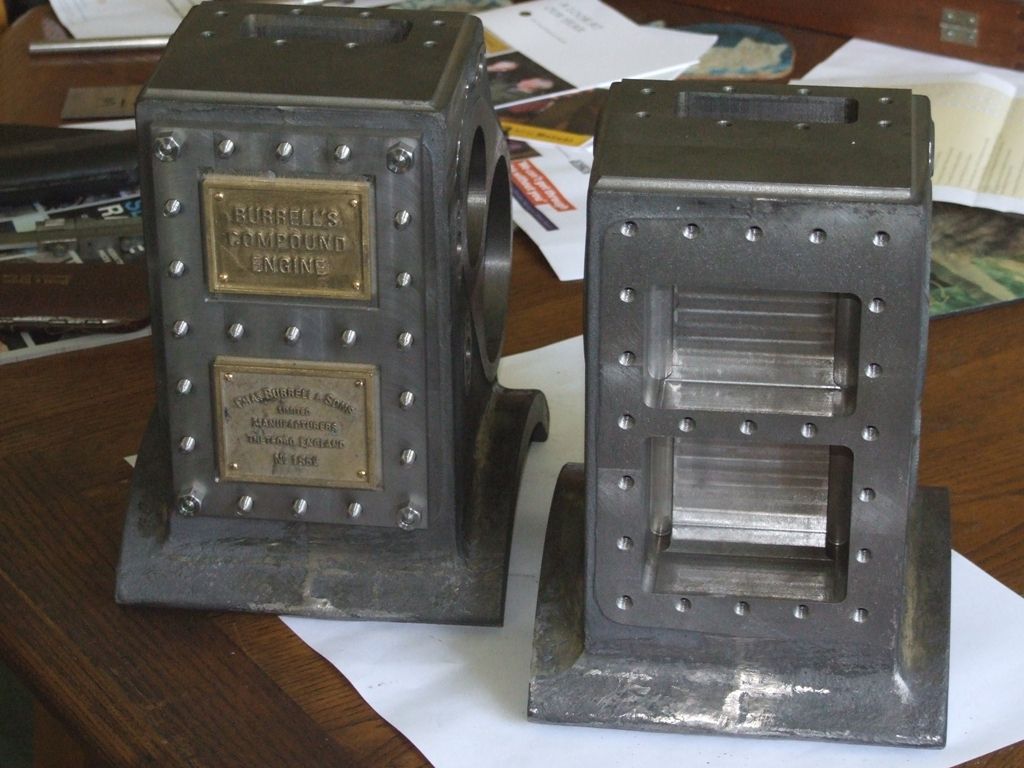
Finished the valve chest cavities: The LP cavity is nearly 2" deep so a fair stick out on the 10mm endmill! All machining was done by numbers, X and Y from the DRO and Z using the handwheel dial. It's pleasing that finished dimensions are within a couple of thou. The holes for the valve chest cover studs were drilled and tapped using the DRO on the vertical mill while the holes in the cover were done on the CNC mill. Fortunately the cover fits, studs are 1/4" BSF, clearance holes were drilled 6.4mm. Next task is to finish bore the cylinders on the horizontal mill. Andrew |
| Thread: Boxford 280 spindle nose runout |
| 22/06/2020 14:07:22 |
Boxford didn't make a 280 lathe, but Myford did. The fitting is Camlock, so the spindle doesn't have a radial register or threads. The Camlock system primarily mates on the outer taper. Measurements on my lathe spindle Camlock give a runout on the back face of 0.01mm and a runout on the outside taper estimated to be 0.002mm. The inside of the taper plays no part in mounting the chuck so it's runout, or otherwise, doesn't tell one anything. The runout on the back face seems a lot to me, but it would be a bad idea to try and machine it. I think Camlock parts are hardened which makes life more difficult. I'd agree wth JasonB, the best bet is to machine the chuck backplate in situ. But make sure you mark it so that it can be replaced in the same orientation each time, otherwise it won't run true. Andrew |
Want the latest issue of Model Engineer or Model Engineers' Workshop? Use our magazine locator links to find your nearest stockist!
Sign up to our newsletter and get a free digital issue.
You can unsubscribe at anytime. View our privacy policy at www.mortons.co.uk/privacy
- *Oct 2023: FORUM MIGRATION TIMELINE*
05/10/2023 07:57:11 - Making ER11 collet chuck
05/10/2023 07:56:24 - What did you do today? 2023
05/10/2023 07:25:01 - Orrery
05/10/2023 06:00:41 - Wera hand-tools
05/10/2023 05:47:07 - New member
05/10/2023 04:40:11 - Problems with external pot on at1 vfd
05/10/2023 00:06:32 - Drain plug
04/10/2023 23:36:17 - digi phase converter for 10 machines.....
04/10/2023 23:13:48 - Winter Storage Of Locomotives
04/10/2023 21:02:11 - More Latest Posts...
- View All Topics
- Reeves** - Rebuilt Royal Scot by Martin Evans
by John Broughton
£300.00 - BRITANNIA 5" GAUGE James Perrier
by Jon Seabright 1
£2,500.00 - Drill Grinder - for restoration
by Nigel Graham 2
£0.00 - WARCO WM18 MILLING MACHINE
by Alex Chudley
£1,200.00 - MYFORD SUPER 7 LATHE
by Alex Chudley
£2,000.00 - More "For Sale" Ads...
- D1-3 backplate
by Michael Horley
Price Not Specified - fixed steady for a Colchester bantam mark1 800
by George Jervis
Price Not Specified - lbsc pansy
by JACK SIDEBOTHAM
Price Not Specified - Pratt Burnerd multifit chuck key.
by Tim Riome
Price Not Specified - BANDSAW BLADE WELDER
by HUGH
Price Not Specified - More "Wanted" Ads...
Do you want to contact the Model Engineer and Model Engineers' Workshop team?
You can contact us by phone, mail or email about the magazines including becoming a contributor, submitting reader's letters or making queries about articles. You can also get in touch about this website, advertising or other general issues.
Click THIS LINK for full contact details.
For subscription issues please see THIS LINK.
Model Engineer Magazine
- Percival Marshall
- M.E. History
- LittleLEC
- M.E. Clock
ME Workshop
- An Adcock
- & Shipley
- Horizontal
- Mill
Subscribe Now
- Great savings
- Delivered to your door
Pre-order your copy!
- Delivered to your doorstep!
- Free UK delivery!


 Register
 Log-in


